Linux+Nginx+MariaDB+php实现LEMP环境
目录
1、系统环境
2、CA证书服务器配置
3、nginx环境部署
4、MariaDB部署
5、php部署及与nginx整合
6、phpmyadmin部署
7、discuz论坛部署测试
8、验证nginx的status功能
9、总结
1、系统环境
1.1、基本环境:
[root@LEMP ~]# ifconfig | grep Bcast
          inet addr:192.168.0.200  Bcast:192.168.0.255  Mask:255.255.255.0
[root@LEMP ~]# cat /etc/issue
CentOS release 6.4 (Final)
Kernel \r on an \m
[root@LEMP ~]# uname -r
2.6.32-358.el6.x86_64
[root@LEMP ~]# vim /etc/sysconfig/selinux
SELINUX=disabled #关闭
[root@LEMP ~]# setenforce 0
1.2、系统防火墙设置:
[root@LEMP scripts]# pwd
/root/scripts
[root@LEMP scripts]# vim iptables.sh
#!/bin/bash
/sbin/iptables -F
/sbin/iptables -X
/sbin/iptables -Z
/sbin/iptables -P INPUT DROP
/sbin/iptables -P OUTPUT ACCEPT
###
/sbin/iptables -A INPUT -p tcp --dport 2222 -j ACCEPT
/sbin/iptables -A INPUT -i lo -j ACCEPT
/sbin/iptables -A OUTPUT -o lo -j ACCEPT
/sbin/iptables -A INPUT -m state --state ESTABLISHED,RELATED -j ACCEPT
/sbin/iptables -A INPUT -i eth+ -p icmp --icmp-type 8 -j ACCEPT
#deny DDOS
/sbin/iptables -A INPUT -p icmp -m icmp --icmp-type 8 -m limit --limit 6/min --limit-burst 2 -j ACCEPT
/sbin/iptables -A INPUT -p icmp -m icmp --icmp-type 8 -j REJECT --reject-with icmp-port-unreachable
###
/sbin/iptables -A INPUT -p TCP -i eth0 --dport 80 -j ACCEPT
/sbin/iptables -A INPUT -p TCP -i eth0 --dport 443 -j ACCEPT

[root@LEMP scripts]# chmod +x iptables.sh
[root@LEMP scripts]# ./iptables.sh
[root@LEMP scripts]# vim /etc/rc.local
/root/scripts/iptables.sh #新增加此行
1.3、windows测试客户端hosts配置
确保本地hosts文件中有以下信息,
192.168.0.200 phpmyadmin.com
192.168.0.200 status.zhaochj.com
192.168.0.200 bbs.zhaochj.com
2、CA证书服务器配置
2.1、以CA服务器角色生成私钥文件:
[root@LEMP CA]# pwd
/etc/pki/CA
[root@LEMP CA]# (umask 077;openssl genrsa -out private/cakey.pem 2048)
Generating RSA private key, 2048 bit long modulus
...........................................................................................+++
.............+++
e is 65537 (0x10001)
2.2、利用私钥文件自签后生成证书文件:
[root@LEMP CA]# openssl req -new -x509 -key private/cakey.pem -out cacert.pem -days 365
You are about to be asked to enter information that will be incorporated
into your certificate request.
What you are about to enter is what is called a Distinguished Name or a DN.
There are quite a few fields but you can leave some blank
For some fields there will be a default value,
If you enter '.', the field will be left blank.
-----
Country Name (2 letter code) [XX]:CN
State or Province Name (full name) []:ChongQing
Locality Name (eg, city) [Default City]:YuBei
Organization Name (eg, company) [Default Company Ltd]:Learing
Organizational Unit Name (eg, section) []:Tech
Common Name (eg, your name or your server's hostname) []:ca.zhaochj.com
Email Address []:[email protected]
[root@LEMP CA]# touch index.txt serial
[root@LEMP CA]# echo 01 > serial
3、nginx环境部署
3.1、处理依赖关系及建立运行nginx的用户
[root@LEMP ~]# yum -y install pcre-devel #如果系统没有此开发包则要先安装
[root@LEMP ~]# useradd -r -s /sbin/nologin -M nginx
3.2、nginx源码编译安装
[root@LEMP software]# pwd
/root/software
[root@LEMP software]# ls
nginx-1.6.2.tar.gz
[root@LEMP software]# tar xf nginx-1.6.2.tar.gz
[root@LEMP software]# cd nginx-1.6.2
[root@LEMP software]# ./configure \
--prefix=/opt/lemp/nginx16 \
--sbin-path=/opt/lemp/nginx16/sbin/nginx \
--conf-path=/etc/nginx16/nginx.conf \
--error-log-path=/var/log/nginx16/error.log  \
--http-log-path=/var/log/nginx16/access.log \
--pid-path=/var/run/nginx16.pid \
--lock-path=/var/lock/subsys/nginx16 \
--user=nginx \
--group=nginx \
--with-file-aio \
--with-http_ssl_module \
--with-http_flv_module \
--with-http_mp4_module \
--with-http_gzip_static_module \
--with-http_stub_status_module \
--http-client-body-temp-path=/var/tmp/nginx16/client \
--http-proxy-temp-path=/var/tmp/nginx16/proxy \
--http-fastcgi-temp-path=/var/tmp/nginx16/fastcgi \
--http-uwsgi-temp-path=/var/tmp/nginx16/uwsgi \
--http-scgi-temp-path=/var/tmp/nginx16/scgi \
--with-pcre
[root@LEMP nginx-1.6.2]# make && make install
3.3、nginx启动脚本
[root@LEMP nginx-1.6.2]# vim /etc/rc.d/init.d/nginx16
#!/bin/bash
##
#nginx - this script starts and stops the nginx daemon
#
# chkconfig:   - 85 15
# description:  Nginx is an HTTP(S) server, HTTP(S) reverse \
#               proxy and IMAP/POP3 proxy server
# processname: nginx
# config:      /etc/nginx16/nginx.conf
# pidfile:     /var/run/nginx16.pid

# Source function library.
. /etc/rc.d/init.d/functions

# Source networking configuration.
. /etc/sysconfig/network

# Check that networking is up.
[ "$NETWORKING" = "no" ] && exit 0

nginx="/opt/lemp/nginx16/sbin/nginx"
prog=$(basename $nginx)
nginx_config_file="/etc/nginx16/nginx.conf"
lockfile=/var/lock/subsys/nginx16

make_dirs() {
   # make required directories
   user=`$nginx -V 2>&1 | grep "configure arguments:" | sed 's/[^*]*--user=\([^ ]*\).*/\1/g' -`
   options=`$nginx -V 2>&1 | grep 'configure arguments:'`
   for opt in $options; do
       if [ `echo $opt | grep '.*-temp-path'` ]; then
           value=`echo $opt | cut -d "=" -f 2`
           if [ ! -d "$value" ]; then
               # echo "creating" $value
               mkdir -p $value && chown -R $user $value
           fi
       fi
   done
}

start() {
    [ -x $nginx ] || exit 5
    [ -f $nginx_config_file ] || exit 6
    make_dirs
    echo -n $"Starting $prog: "
    daemon $nginx -c $nginx_config_file
    retval=$?
    echo
    [ $retval -eq 0 ] && touch $lockfile
    return $retval
}

stop() {
    echo -n $"Stopping $prog: "
    killproc $prog -QUIT
    retval=$?
    echo
    [ $retval -eq 0 ] && rm -f $lockfile
    return $retval
}

restart() {
    configtest || return $?
    stop
    sleep 1
    start
}

reload() {
    configtest || return $?
    echo -n $"Reloading $prog: "
    killproc $nginx -HUP
    RETVAL=$?
    echo
}

force_reload() {
    restart
}

configtest() {
  $nginx -t -c $nginx_config_file
}

rh_status() {
    status $prog
}

rh_status_q() {
    rh_status >/dev/null 2>&1
}
case "$1" in
    start)
        rh_status_q && exit 0
        $1
        ;;
    stop)
        rh_status_q || exit 0
        $1
        ;;
    restart|configtest)
        $1
        ;;
    reload)
        rh_status_q || exit 7
        $1
        ;;
    force-reload)
        force_reload
        ;;
    status)
        rh_status
        ;;
    condrestart|try-restart)
        rh_status_q || exit 0
            ;;
    *)
        echo $"Usage: $0 {start|stop|status|restart|condrestart|try-restart|reload|force-reload|configtest}"
        exit 2
esac
[root@LEMP nginx-1.6.2]# chmod +x /etc/rc.d/init.d/nginx16
[root@LEMP nginx-1.6.2]# service nginx16 start
Starting nginx:                                            [  OK  ]
[root@LEMP nginx-1.6.2]# chkconfig --add nginx16
[root@LEMP nginx-1.6.2]# chkconfig nginx16 on
[root@LEMP nginx-1.6.2]# ps aux | grep nginx
3.4、nginx二进制文件导出:
[root@LEMP nginx-1.6.2]# vim /etc/profile.d/nginx16.sh
export PATH=$PATH:/opt/lemp/nginx16/sbin
[root@LEMP nginx-1.6.2]# source /etc/profile.d/nginx16.sh
[root@LEMP nginx-1.6.2]# echo $PATH
/usr/local/sbin:/usr/local/bin:/sbin:/bin:/usr/sbin:/usr/bin:/root/bin:/opt/lemp/nginx16/sbin
3.5、准备各站点目录及配置虚拟主机
3.5.1、准备站点数据目录:
[root@LEMP ssl]# mkdir /web/bbs -pv
[root@LEMP ssl]# mkdir /web/phpmyadmin
[root@LEMP ssl]# ls /web/
bbs  phpmyadmin
3.5.2、为nginx状态输出站点及phpmyadmin站点生成证书
[root@LEMP nginx16]# pwd
/etc/nginx16
[root@LEMP nginx16]# mkdir ssl  #建立这个目录来存放私钥及签署后的证书文件
[root@LEMP nginx16]# cd ssl
3.5.2.1、nginx状态信息输出站点证书生成
[root@LEMP ssl]# (umask 077;openssl genrsa -out status.pem 1024) #生成私钥文件
Generating RSA private key, 1024 bit long modulus
.......++++++
.++++++
e is 65537 (0x10001)

[root@LEMP ssl]# openssl req -new -key status.pem -out status.csr #生成证书签署请求
You are about to be asked to enter information that will be incorporated
into your certificate request.
What you are about to enter is what is called a Distinguished Name or a DN.
There are quite a few fields but you can leave some blank
For some fields there will be a default value,
If you enter '.', the field will be left blank.
-----
Country Name (2 letter code) [XX]:CN
State or Province Name (full name) []:ChongQing
Locality Name (eg, city) [Default City]:YuBei
Organization Name (eg, company) [Default Company Ltd]:Learing
Organizational Unit Name (eg, section) []:Tech
Common Name (eg, your name or your server's hostname) []:status.zhaochj.com
Email Address []:[email protected]
Please enter the following 'extra' attributes
to be sent with your certificate request
A challenge password []:
An optional company name []:

[root@LEMP ssl]# openssl ca -in status.csr -out status.crt -days 365  #自己就是CA服务器,自己签署证书请求生成status站点的证书文件
Using configuration from /etc/pki/tls/openssl.cnf
Check that the request matches the signature
Signature ok
Certificate Details:
        Serial Number: 1 (0x1)
        Validity
            Not Before: Feb 24 09:36:01 2015 GMT
            Not After : Feb 24 09:36:01 2016 GMT
        Subject:
            countryName               = CN
            stateOrProvinceName       = ChongQing
            organizationName          = Learing
            organizationalUnitName    = Tech
            commonName                = status.zhaochj.com
            emailAddress              = [email protected]
        X509v3 extensions:
            X509v3 Basic Constraints:
                CA:FALSE
            Netscape Comment:
                OpenSSL Generated Certificate
            X509v3 Subject Key Identifier:
                7F:DA:32:BC:76:8E:08:36:B2:E5:B6:2B:76:2E:B5:39:DE:A1:DB:E7
            X509v3 Authority Key Identifier:
                keyid:21:79:B1:87:F4:DF:F4:A2:3B:7B:1D:E2:30:D6:F7:E1:AE:4E:E1:AD
Certificate is to be certified until Feb 24 09:36:01 2016 GMT (365 days)
Sign the certificate? [y/n]:y
1 out of 1 certificate requests certified, commit? [y/n]y
Write out database with 1 new entries
Data Base Updated
3.5.2.2、phpmyadmin站点证书生成
[root@LEMP ssl]# (umask 077;openssl genrsa -out phpmyadmin.pem 1024) #生成私钥文件
Generating RSA private key, 1024 bit long modulus
.....................................................++++++
..........++++++
e is 65537 (0x10001)
[root@LEMP ssl]# openssl req -new -key phpmyadmin.pem -out phpmyadmin.csr #生成证书签署请求
You are about to be asked to enter information that will be incorporated
into your certificate request.
What you are about to enter is what is called a Distinguished Name or a DN.
There are quite a few fields but you can leave some blank
For some fields there will be a default value,
If you enter '.', the field will be left blank.
-----
Country Name (2 letter code) [XX]:CN
State or Province Name (full name) []:ChongQing
Locality Name (eg, city) [Default City]:YuBei
Organization Name (eg, company) [Default Company Ltd]:Learing
Organizational Unit Name (eg, section) []:Tech
Common Name (eg, your name or your server's hostname) []:phpmyadmin.com
Email Address []:[email protected]
Please enter the following 'extra' attributes
to be sent with your certificate request
A challenge password []:
An optional company name []:
[root@LEMP ssl]# openssl ca -in phpmyadmin.csr -out phpmyadmin.crt -days 365  #自己就是CA服务器,自己签署证书请求生成status站点的证书文件
Using configuration from /etc/pki/tls/openssl.cnf
Check that the request matches the signature
Signature ok
Certificate Details:
        Serial Number: 2 (0x2)
        Validity
            Not Before: Feb 24 12:18:33 2015 GMT
            Not After : Feb 24 12:18:33 2016 GMT
        Subject:
            countryName               = CN
            stateOrProvinceName       = ChongQing
            organizationName          = Learing
            organizationalUnitName    = Tech
            commonName                = phpmyadmin.com
            emailAddress              = [email protected]
        X509v3 extensions:
            X509v3 Basic Constraints:
                CA:FALSE
            Netscape Comment:
                OpenSSL Generated Certificate
            X509v3 Subject Key Identifier:
                DE:BF:6F:4B:CB:2D:AD:FC:6E:A4:82:34:86:CA:9F:4D:A5:D3:15:6C
            X509v3 Authority Key Identifier:
                keyid:21:79:B1:87:F4:DF:F4:A2:3B:7B:1D:E2:30:D6:F7:E1:AE:4E:E1:AD
Certificate is to be certified until Feb 24 12:18:33 2016 GMT (365 days)
Sign the certificate? [y/n]:y
1 out of 1 certificate requests certified, commit? [y/n]y
Write out database with 1 new entries
Data Base Updated

[root@LEMP ssl]# ls
phpmyadmin.crt  phpmyadmin.csr  phpmyadmin.pem  status.crt  status.csr  status.pem
3.6、一些其他工作
[root@LEMP bbs]# pwd
/web/bbs
[root@LEMP bbs]# mkdir ErrorPage
[root@LEMP bbs]# echo "No such file." > ErrorPage/404.html #创建当出现404错误时返回的自定义信息

[root@LEMP nginx16]# yum -y install httpd-tools   #利用htpasswd功能
[root@LEMP bbs]# htpasswd -c -m /etc/nginx16/htpasswd tom #增加访问status状态的用户
[root@LEMP bbs]# mkdir /var/log/nginx16/zhaochj.com #创建"bbs.zhaochj.com"虚拟主机日志存放目录
[root@LEMP bbs]# mkdir /var/log/nginx16/phpmyadmin.com #创建"phpmyadmin.com"虚拟主机日志存放目录
3.7、nginx.conf文件配置
文件内容较多,此处不给出,在后边与php整合后一并给出。但对这个配置文件的结构作一个简单的说明,配置文件的结构大致如下:
main  #全局段,定义工作进程数量,cpu亲缘性,PID路径,日志文件路径等特性
……
events {      #直属main段,此上下文是配置影响连接处理指令的
worker_connections  1024;
}

http {    #http段,直属main段,是设定http服务器工作特性的,所有的server段都包含在http中
    server {       #http中可有多个server段,一个server段对应一个虚拟主机
        location / {     #一个server段中可有多个location
        }
    }

    server {
        location / {
        }
    }
}
4、MariaDB部署
[root@LEMP software]# mkdir /mydata/dbdata -pv #准备数据库数据存放目录,建议把此目录放LVM卷上
[root@LEMP software]# chown -R mysql.mysql /mydata/dbdata
[root@LEMP software]# useradd -r -s /sbin/nologin -M mysql
[root@LEMP mysql]# yum -y install libaio #安装依赖包,否则初始化不成功

[root@LEMP software]# tar xf mariadb-5.5.42-linux-x86_64.tar.gz -C /opt/lemp/
[root@LEMP software]# cd /opt/lemp/
[root@LEMP lemp]# ln -sv mariadb-5.5.42-linux-x86_64 mysql
`mysql' -> `mariadb-5.5.42-linux-x86_64'
[root@LEMP mysql]# cd mysql/
[root@LEMP mysql]# chown -R mysql.mysql .
[root@LEMP mysql]# cp support-files/my-huge.cnf /etc/my.cnf
[root@LEMP mysql]# vim /
etc/my.cnf #在[mysqld]段时新增以下三行,其他参数要根据自己系统硬件、软件环境的具体来配置
datadir = /mydata/dbdata
innodb_file_per_table = 1
innodb_thread_concurrency = 0  #不限制并发数

[root@LEMP mysql]# scripts/mysql_install_db --user=mysql --datadir=/mydata/dbdata #输出内容中会有两个OK
[root@LEMP mysql]# cp support-files/mysql.server /etc/rc.d/init.d/mysqld
[root@LEMP mysql]# chown -R root .
[root@LEMP mysql]# chmod +x /etc/rc.d/init.d/mysqld
[root@LEMP mysql]# vim /etc/rc.d/init.d/mysqld #把下边的两个变量的路径加入
basedir=/opt/lemp/mysql
datadir=/mydata/dbdata
[root@LEMP mysql]#  service mysqld start
Starting MySQL. SUCCESS!
[root@LEMP mysql]# chkconfig --add mysqld
[root@LEMP mysql]# chkconfig mysqld on
[root@LEMP mysql]# vim /etc/profile.d/mysql.sh #导出二进制文件
export PATH=$PATH:/opt/lemp/mysql/bin
[root@LEMP mysql]# source /etc/profile.d/mysql.sh
[root@LEMP mysql]# ln -sv /opt/lemp/mysql/include /usr/include/mysql #导出头文件
[root@LEMP mysql]# echo "/opt/lemp/mysql/lib" > /etc/ld.so.conf.d/mariadb.conf #导出库文件
[root@LEMP mysql]# ldconfig -v | grep mysql
[root@LEMP mysql]# vim /etc/man.config #输出帮助手册,新增下一行
MANPATH /opt/lemp/mysql/man

[root@LEMP mysql]# mysqladmin -u root password #为root用户设置密码
New password:
Confirm new password:

[root@LEMP mysql]# mysql -u root -p  #连接测试
Enter password:
Welcome to the MariaDB monitor.  Commands end with ; or \g.
Your MariaDB connection id is 9
Server version: 5.5.42-MariaDB-log MariaDB Server
Copyright (c) 2000, 2015, Oracle, MariaDB Corporation Ab and others. #版权不再是问题,mariadb是开源软件
Type 'help;' or '\h' for help. Type '\c' to clear the current input statement.
MariaDB [(none)]>
5、php部署
5.1、php编译安装
5.1.1、处理依赖关系
[root@LEMP software]# yum -y install epel-release #增加epel源,因有些依赖包在默认的Yum源没有
[root@LEMP software]# vim /etc/yum.repos.d/epel.repo
[epel]
name=Extra Packages for Enterprise Linux 6 - $basearch
#baseurl=http://download.fedoraproject.org/pub/epel/6/$basearch
mirrorlist=http://mirrors.fedoraproject.org/metalink?repo=epel-6&arch=$basearch  #默认是https,改成http方式,不然epel源无法访问
failovermethod=priority
enabled=1
gpgcheck=1
gpgkey=file:///etc/pki/rpm-gpg/RPM-GPG-KEY-EPEL-6
……
[root@LEMP software]# yum -y install libxml2-devel bzip2-devel libmcrypt-devel mhash-devel libcurl-devel #安装依赖包
5.1.2、编译安装php
[root@LEMP software]# tar xf php-5.6.6.tar.xz
[root@LEMP software]# cd php-5.6.6
[root@LEMP php-5.6.6]# ./configure \
--prefix=/opt/lemp/php5.6 \
--enable-fpm \
--enable-mbstring \
--enable-xml \
--enable-sockets \
--enable-sysvshm \
--with-mysql=/opt/lemp/mysql \
--with-mysqli=/opt/lemp/mysql/bin/mysql_config \
--with-openssl \
--with-freetype-dir \
--with-jpeg-dir \
--with-png-dir \
--with-zlib-dir \
--with-libxml-dir=/usr \
--with-mcrypt \
--with-mhash \
--with-bz2 \
--with-curl \
--with-config-file-path=/etc \
--with-config-file-scan-dir=/etc/php.d
[root@LEMP php-5.6.6]# make && make install
[root@LEMP php-5.6.6]# ls /opt/lemp/php5.6/
bin  etc  include  lib  php  sbin  var
[root@LEMP php-5.6.6]# cp php.ini-production /etc/php.ini #拷贝php的配置文件
[root@LEMP php-5.6.6]# cp /opt/lemp/php5.6/etc/php-fpm.conf.default /opt/lemp/php5.6/etc/php-fpm.conf #拷贝php-fpm的配置文件
[root@LEMP php-5.6.6]# vim /opt/lemp/php5.6/etc/php-fpm.conf #根据需求及服务器性能调整参数,并增加pid参数,如下
[global]
pid = /opt/lemp/php5.6/var/run/php-fpm.pid  #启用pid
error_log = /opt/lemp/php5.6/var/log/php-fpm.log #启用日志
……
[www]
pm.max_children = 50  #默认是5,我这里是实验环境,修改成了50
pm.start_servers = 2
pm.min_spare_servers = 1
pm.max_spare_servers = 3
……

[root@LEMP php-5.6.6]# cp sapi/fpm/init.d.php-fpm /etc/rc.d/init.d/php-fpm #拷贝启用脚本文件
[root@LEMP php-5.6.6]# chmod +x /etc/rc.d/init.d/php-fpm
[root@LEMP php-5.6.6]# chkconfig --add php-fpm
[root@LEMP php-5.6.6]# service php-fpm start
[root@LEMP php-5.6.6]# ps aux | grep php  #可以看到有一个master进程和两个子进程
5.1.3、收尾工作
[root@LEMP php-5.6.6]# echo 'export PATH=$PATH:/opt/lemp/php5.6/bin' > /etc/profile.d/php5.6.sh #导出二进制文件
[root@LEMP php-5.6.6]# source /etc/profile.d/php5.6.sh
[root@LEMP php-5.6.6]# php -v
PHP 5.6.6 (cli) (built: Feb 25 2015 11:39:32)
Copyright (c) 1997-2015 The PHP Group
Zend Engine v2.6.0, Copyright (c) 1998-2015 Zend Technologies

[root@LEMP php-5.6.6]# ln -sv /opt/lemp/php5.6/include /usr/include/php5.6 #导出头文件
[root@LEMP php-5.6.6]# echo "/opt/lemp/php5.6/lib" > /etc/ld.so.conf.d/php5.6.conf #导出库文件
[root@LEMP php-5.6.6]# ldconfig -v | grep php
5.2、启用opcache功能
[root@LEMP php-5.6.6]# vim /etc/php.ini #在[opcache]中启用该功能
[opcache]
zend_extension = /opt/lemp/php5.6/lib/php/extensions/no-debug-non-zts-20131226/opcache.so
opcache.enable=1
opcache.enable_cli=1
opcache.memory_consumption=64
opcache.interned_strings_buffer=4
opcache.max_accelerated_files=2000
opcache.revalidate_freq=2
opcache.fast_shutdown=1

[root@LEMP php-5.6.6]# php -m #查看opcache模块是否已加载,不需要重新启动php-fpm服务
5.3、php与nginx整合
因bbs.zhaochj.com及phpmyadmin.com两个站点都是php语言编写的站点,所以两个站点都要启用php的支持
[root@LEMP ~]# vim /etc/nginx16/nginx.conf #在"bbs.zhaochj.com"与"phpmyadmin.com"两个虚拟主机中分别启用下边的选项
location ~ \.php$ {
            root           /web/bbs;   #phpmyadmin.com主机的root修改成/web/phpmyadmin
            fastcgi_pass   127.0.0.1:9000;
            fastcgi_index  index.php;
            fastcgi_param  SCRIPT_FILENAME  /scripts$fastcgi_script_name;
            fastcgi_param HTTPS on; #在phpmyadmin.com虚拟主机中在新增这一行,在bbs.zhaochj.com虚拟主机中不用此选项
            include        fastcgi_params;
        }
说明:“ fastcgi_param HTTPS on;”这一行是新增加的,如果不加,在访问https://phpmyadmin.com时会报“The plain HTTP request was sent to HTTPS port”
[root@LEMP ~]# vim /etc/nginx16/fastcgi_params #先清空,再加入以下选项
fastcgi_param  GATEWAY_INTERFACE  CGI/1.1;
fastcgi_param  SERVER_SOFTWARE    nginx;
fastcgi_param  QUERY_STRING       $query_string;
fastcgi_param  REQUEST_METHOD     $request_method;
fastcgi_param  CONTENT_TYPE       $content_type;
fastcgi_param  CONTENT_LENGTH     $content_length;
fastcgi_param  SCRIPT_FILENAME    $document_root$fastcgi_script_name;
fastcgi_param  SCRIPT_NAME        $fastcgi_script_name;
fastcgi_param  REQUEST_URI        $request_uri;
fastcgi_param  DOCUMENT_URI       $document_uri;
fastcgi_param  DOCUMENT_ROOT      $document_root;
fastcgi_param  SERVER_PROTOCOL    $server_protocol;
fastcgi_param  REMOTE_ADDR        $remote_addr;
fastcgi_param  REMOTE_PORT        $remote_port;
fastcgi_param  SERVER_ADDR        $server_addr;
fastcgi_param  SERVER_PORT        $server_port;
fastcgi_param  SERVER_NAME        $server_name;

[root@LEMP ~]# vim /web/bbs/index.php #建立bbs.zhaochj.com的php测试文件
<h1>bbs.zhaochj.com</h1>
<?php
    phpinfo();
?>
[root@LEMP ~]# vim /web/phpmyadmin/index.php  #建立phpmyadmin.com的php测试文件
<h1>phpmyadmin.com</h1>
<?php
    phpinfo();
?>
[root@LEMP ~]# nginx -t #测试nginx配置文件
[root@LEMP ~]# service nginx16 reload #重读配置文件
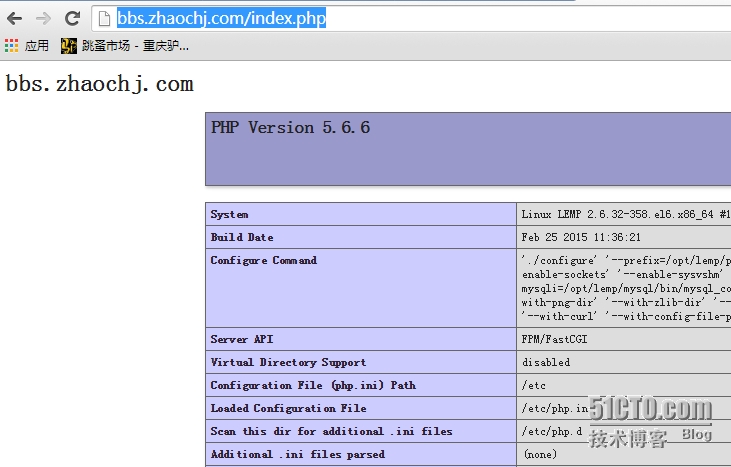
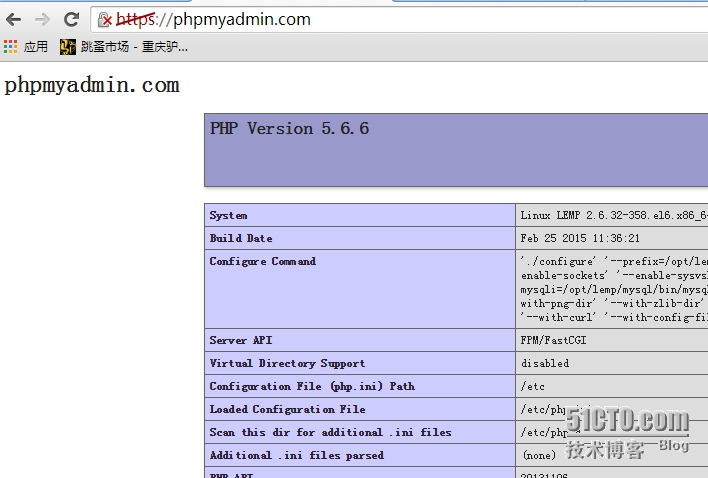
测试两个站点能否正确解析php,如以下图片
5.4、完整的nginx.conf配置文件
请见附件
6、phpmyadmin部署
[root@LEMP software]# pwd
/root/software
[root@LEMP software]# ls | grep phpM
phpMyAdmin-4.3.10-all-languages.7z  #7zip压缩的,系统默认没有安装7zip的压缩工具,安装之

[root@LEMP software]# yum -y install p7zip #安装解压工具
[root@LEMP software]# 7za x phpMyAdmin-4.3.10-all-languages.7z
[root@LEMP software]# rm -rf /web/phpmyadmin/index.php #删除测试文件
[root@LEMP software]# mv phpMyAdmin-4.3.10-all-languages/* /web/bbs/
[root@LEMP software]# cd /web/phpmyadmin/
[root@LEMP phpmyadmin]# cp config.sample.inc.php config.inc.php
[root@LEMP phpmyadmin]# openssl rand -hex 8 #准备一个随机数
cad0b7878a2f0779
[root@LEMP phpmyadmin]# vim config.inc.php #填入上边产生的随机数,自己随意填写一些字符也可以
$cfg['blowfish_secret'] = 'cad0b7878a2f0779'; /* YOU MUST FILL IN THIS FOR COOKIE AUTH! */

[root@LEMP phpmyadmin]# service nginx16 reload#重新读取配置
测试:
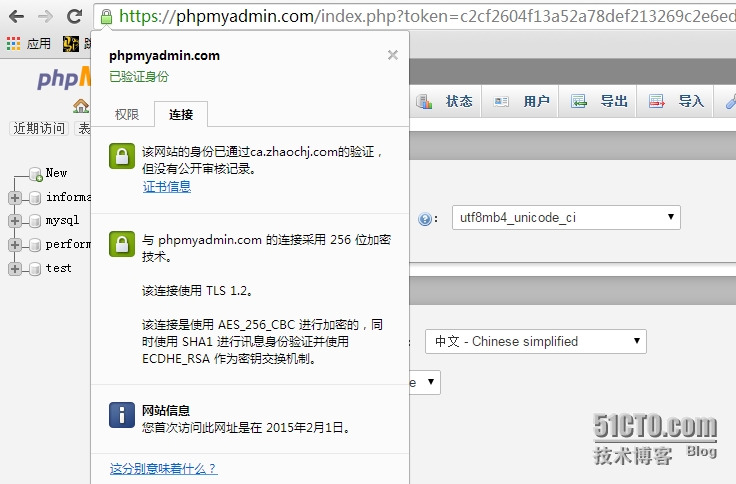
因phpmyadmin.com是以ssl方式安全访问,所以先导入CA的证书文件,证书在访问端的安装省略,可参照http://zhaochj.blog.51cto.com/368705/1609777文章的相关部份。
导出证书后访问phpmyadmin.com站点,如下图片:
7、discuz论坛部署测试
[root@LEMP discuz]# pwd
/root/software/discuz
[root@LEMP discuz]# ls
Discuz_X3.2_SC_UTF8.zip
[root@LEMP discuz]# unzip Discuz_X3.2_SC_UTF8.zip
[root@LEMP discuz]# ls
Discuz_X3.2_SC_UTF8.zip  readme  upload  utility
[root@LEMP discuz]# mv upload/* /web/bbs/
[root@LEMP discuz]# chmod -R 777 /web/bbs/config
[root@LEMP discuz]# chmod -R 777 /web/bbs/data
[root@LEMP discuz]# chmod -R 777 /web/bbs/uc_client
[root@LEMP discuz]# chmod -R 777 /web/bbs/uc_server
[root@LEMP discuz]# service nginx16 reload
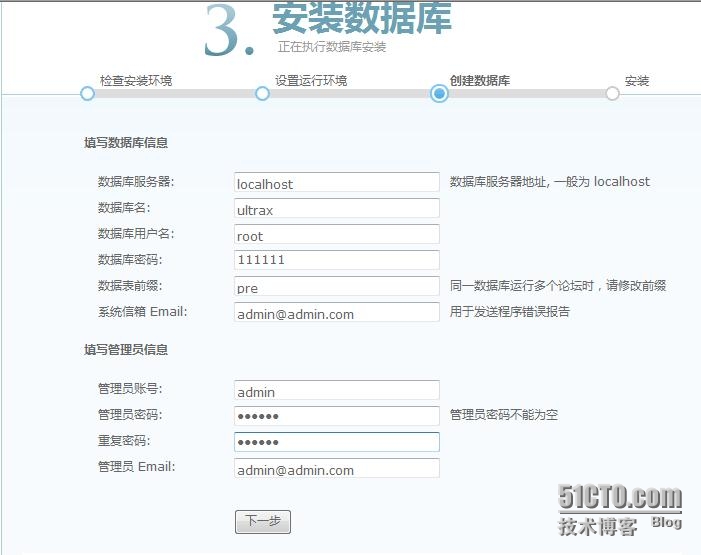
使用ie浏览器来安装discuz
在浏览器地址栏输入“http://bbs.zhaochj.com”,点击回车键后,如下图,点击“我同意”




安装Discuz时的插曲:
在安装Discuz时发生了一些比较奇怪的事情,最初使用的数据库是“mariadb-10.0.16-linux-x86_64.tar.gz”这个版本的,数据库部署好后在进行Discuz安装时看到能正常的创建数据库及表,但是在数据库中只是创建好一个数据库,而数据库中的表并没有创建成功,在访问Discuz时也报错,报错信息如下图所示:
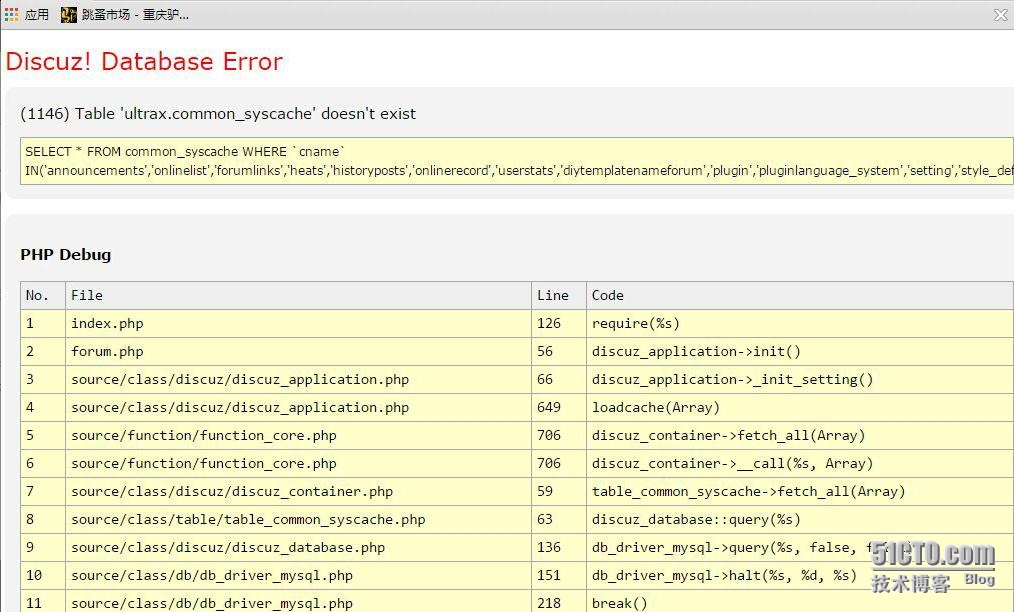
这个问题折磨我很久,安装Discuz时没有出现任何错误提示,但数据库中的表就是没有创建成功。换了一个wordpress测试是可以正常工作的,没道理呀。作罢,准备把数据库更换来试试,本想更换成mysql 5.6的版本,但需要glibc 2.5的,而系统不是此版本的,也作罢,最后把数据库更换成了“mysql-5.5.33-linux2.6-x86_64.tar.gz”,这样安装Discuz时就正常了,跟着这个思路,我又把数据库更换成了“mariadb-5.5.42-linux-x86_64.tar.gz”,这个也是没问题的。所以怀疑是版本的问题导致这次离奇的故障。
目前最新版本的“mariadb-10.0.16-linux-x86_64.tar.gz”这个版本类似Mysql 5.6版本,版本很新,应该对系统环境有更高的要求,所以在生产环境下还是推荐5.5版本的数据库。
8、验证nginx的status功能
确保配置文件中启用如下的虚拟主机,配置如下:
[root@LEMP ~]# vim /etc/nginx16/nginx.conf
server {
        listen        443 ssl;
        server_name   status.zhaochj.com;
        ssl_certificate    /etc/nginx16/ssl/status.crt;
        ssl_certificate_key    /etc/nginx16/ssl/status.pem;
        ssl_session_cache    shared:SSL:1m;
        ssl_session_timeout  5m;

        ssl_ciphers  HIGH:!aNULL:!MD5;
        ssl_prefer_server_ciphers  on;

        access_log off; #对于status的访问不需要写入日志
        location / {
            stub_status on;
            auth_basic   "Restricted Area."; #认证模块的使用
            auth_basic_user_file /etc/nginx16/htpasswd;
        }
    }
配置好后在浏览器中打开“https://status.zhaochj.com” 输入用户名及密码就可以输出状态信息。

9、总结
通过整理此博文,有以下几个感受:
第一:对nginx有了新的认识,此软件是由核心模块及一大堆其他模块组成,各模块所支持的指令在官方wiki中查看(http://wiki.nginx.org/Modules)
第二:熟悉了nginx.conf这个配置文件的组成结构,常见的就是由三段组成,main、http、server三段组成
第三:在软件的使用上不要选择最新版本来进行安装,在安装Discuz时因选择MariaDB的最新版本导致出现了比较怪异的现象。