LAMP之环境搭建(一)
一、LAMP搭建前的准备
LAMP是四套软件的缩写,分别指的是L-Linux,A-Apache,M-Mysql,P-php,利用这四套软件搭建的web的运行环境。
搭建前需要需要下载好软件
apache http://syslab.comsenz.com/downloads/linux/httpd-2.2.16.tar.gz
mysql 32位 :http://syslab.comsenz.com/downloads/linux/mysql-5.1.40-linux-i686-icc-glibc23.tar.gz
64位 :http://syslab.comsenz.com/downloads/linux/mysql-5.1.40-linux-x86_64-icc-glibc23.tar.gz
php http://cn2.php.net/distributions/php-5.3.28.tar.gz
软件镜像下载地址http://mirrors.sohu.com/
安装扩展库地址
yum install -y epel-release
安装库文件
yum -y install ntp make openssl openssl-devel pcre pcre-devel libpng libpng-devel libtiff-devel libjpeg-6b libjpeg-devel-6b freetype freetype-devel gd gd-devel fontconfig-devel zlib zlib-devel libevent-devel gcc gcc-c++ flex bison bzip2-devel libXpm libXpm-devel ncurses ncurses-devel libmcrypt libmcrypt-devel libxml2 libxml2-devel imake autoconf automake screen sysstat compat-libstdc++-33 curl curl-devel
关闭selinux
二、Apache
1 )编译
# 解压软件包
[root@mylinux src]# tar -zxvf httpd-2.2.16
# 进入软件目录
[root@mylinux src]# cd httpd-2.2.16
# 执行编译参数
[root@mylinux httpd-2.2.16]# ./configure --prefix=/usr/local/apache2 --enable-so \
> --enable-mods-shared=most
# 开始编译
[root@mylinux httpd-2.2.16]# make
# 安装软件
[root@mylinux httpd-2.2.16]# make install
2 )修改配置
[root@mylinux ~]# vim /usr/local/apache2/conf/httpd.conf
..................上面省略.....................
# at a local disk.  If you wish to share the same ServerRoot for multiple
# httpd daemons, you will need to change at least LockFile and PidFile.
#
ServerRoot "/usr/local/apache2"       # apache 程序目录
...................中间省略....................
#
#Listen 12.34.56.78:80
Listen 80           # 监听端口

#
# Dynamic Shared Object (DSO) Support
...................中间省略....................
# as error documents.  e.g. [email protected]
#
ServerAdmin [email protected]           # 管理员邮箱地址

...................中间省略....................
# If your host doesn't have a registered DNS name, enter its IP address here.
#
ServerName localhost:80         # 默认ServerName www.example.com:80
                                # 这里需要修改,默认是用注释符“#”注释掉的
#
...................中间省略....................
# symbolic links and aliases may be used to point to other locations.
#
DocumentRoot "/usr/local/apache2/htdocs/"        # 网站文件存储的位置,文件监听目录

#
# Each directory to which Apache has access can be configured with respect
...................中间省略....................
# features.
#
<Directory />
    Options FollowSymLinks
    AllowOverride None
    Order deny,allow
    Allow from all     # 默认为Deny from all,拒绝访问,修改为Allow from all,允许访问
</Directory>

#
# Note that from this point forward you must specifically allow
3 )启动apache
# 修改配置 ,检测是否OK
[root@mylinux ~]# /usr/local/apache2/bin/apachectl -t
Syntax OK
[root@mylinux ~]# /usr/local/apache2/bin/apachectl start
4 )检测httpd服务是否有启动,网络端口是否开启,关闭防火墙,或者对80端口放行,外网就可以访问了
 # 进程检测
[root@mylinux ~]# ps aux|grep httpd
root     25675  0.0  0.2   5280  2148 ?        Ss   12:30   0:00 /usr/local/apache2/bin/httpd -k start
daemon   25676  0.0  0.1   5280  1548 ?        S    12:30   0:00 /usr/local/apache2/bin/httpd -k start
daemon   25677  0.0  0.1   5280  1548 ?        S    12:30   0:00 /usr/local/apache2/bin/httpd -k start
daemon   25678  0.0  0.1   5280  1548 ?        S    12:30   0:00 /usr/local/apache2/bin/httpd -k start
daemon   25679  0.0  0.1   5280  1548 ?        S    12:30   0:00 /usr/local/apache2/bin/httpd -k start
daemon   25680  0.0  0.1   5280  1548 ?        S    12:30   0:00 /usr/local/apache2/bin/httpd -k start
root     25686  0.0  0.0   4356   740 pts/4    S+   12:34   0:00 grep httpd
[root@mylinux ~]#

# 端口检测
[root@mylinux ~]# netstat -nlp |grep httpd
tcp        0      0 :::80                       :::*                        LISTEN      25675/httpd

# 网站状态访问检测
[root@mylinux ~]# curl -I localhost
HTTP/1.1 200 OK
Date: Tue, 28 Apr 2015 04:45:54 GMT
Server: Apache/2.2.16 (Unix) DAV/2
Last-Modified: Sat, 20 Nov 2004 20:16:24 GMT
ETag: "12a8-2c-3e9564c23b600"
Accept-Ranges: bytes
Content-Length: 44
Content-Type: text/html
在浏览器中输入IP地址,如果显示
It works!
代表成功启动了!
三、mysql
# 解压mysql
[root@mylinux src]# tar -zxvf mysql-5.1.40-linux-i686-icc-glibc23.tar.gz

# 文件程序移动到指定的安装路径
[root@mylinux src]# mv mysql-5.1.40-linux-i686-icc-glibc23 /usr/local/mysql

# 创建mysql用户,shell状态为/sbin/nologin
[root@mylinux mysql]# useradd -s /sbin/nologin mysql

# 创建数据库存储目录,更改目录权限
[root@mylinux mysql]# mkdir -p /data/mysql
[root@mylinux mysql]# chown -R mysql.mysql /data/mysql/


# 进入/usr/local/mysql,初始化mysql库,当有2个OK,代表初始化成功
# 这里要注意,需要修改/etc/hosts,将主机名字,添加到文件了
[root@mylinux mysql]# ./scripts/mysql_install_db --user=mysql --datadir=/data/mysql
Installing MySQL system tables...
OK
Filling help tables...
OK
..................下面省略....................

# 拷贝启动脚本,更改权限
[root@mylinux mysql]# cp support-files/mysql.server /etc/init.d/mysqld
[root@mylinux mysql]# chmod 755 /etc/init.d/mysqld

# 修改启动脚本
[root@mylinux mysql]# vim /etc/init.d/mysqld
........................上面省略...................
basedir=        <== mysql程序路径
datadir=        <== mysql数据路径
.........................下面省略...................

# 拷贝mysql配置文件,这里需要注意一下,自己的物理内存有多大
[root@mylinux mysql]# cp support-files/my-
my-huge.cnf             my-large.cnf            my-small.cnf
my-innodb-heavy-4G.cnf  my-medium.cnf
[root@mylinux mysql]# cp support-files/my-large.cnf /etc/my.cnf
cp: overwrite `/etc/my.cnf'? y

# 将mysqld加到服务列表里,并启动
[root@mylinux mysql]# chkconfig --add mysqld
[root@mylinux mysql]# chkconfig mysqld on
[root@mylinux mysql]# service mysqld start
Starting MySQL... SUCCESS!
然后进行进程检测,端口检测
四、php
# 解包软件
[root@mylinux php-5.3.28]# tar -zxvf php-5.3.28.tar.gz
# 进入php文件目录,编辑参数
[root@mylinux php-5.3.28]# ./configure --prefix=/usr/local/php --with-apxs2=/usr/local/apache2/bin/apxs --with-config-file-path=/usr/local/php/etc --with-mysql=/usr/local/mysql --with-libxml-dir --with-gd --with-jpeg-dir --with-png-dir --with-freetype-dir --with-iconv-dir --with-zlib-dir --with-bz2 --with-openssl --with-mcrypt --enable-soap --enable-gd-native-ttf --enable-mbstring --enable-sockets --enable-exif --disable-ipv6
# 执行编译
[root@mylinux php-5.3.28]# make
# 安装文件
[root@mylinux php-5.3.28]# make install
五、php与apache的组合
修改apache的配置文件
[root@mylinux ~]# vim /usr/local/apache2/conf/httpd.conf
.........................上面省略...........................
# is requested.
#
<IfModule dir_module>
    DirectoryIndex index.html index.htm index.php  <== 默认没有index.htm和index.php,需要加上
</IfModule>

#
# The following lines prevent .htaccess and .htpasswd files from being
.........................中间省略..............................
    # If the AddEncoding directives above are commented-out, then you
    # probably should define those extensions to indicate media types:
    #
    AddType application/x-compress .Z
    AddType application/x-gzip .gz .tgz
    AddType application/x-httpd-php .php <== 需要在这里加上这一行,增加对php的解析
    #
    # AddHandler allows you to map certain file extensions to "handlers":
    # actions unrelated to filetype. These can be either built into the server
.........................下面省略................................
还要检查是否加载了php模块
LoadModule php5_module modules/libphp5.so
修改完配置需要重启apache服务(重启前需要进行检测)
# 编写php解析测试文件
[root@mylinux ~]# vim /usr/local/apache2/htdocs/test.php
<?php
phpinfo();
?>
[root@mylinux ~]# curl -I localhost/test.php
HTTP/1.1 200 OK
Date: Tue, 28 Apr 2015 23:03:35 GMT
Server: Apache/2.2.16 (Unix) DAV/2 PHP/5.3.28
X-Powered-By: PHP/5.3.28
Content-Type: text/html
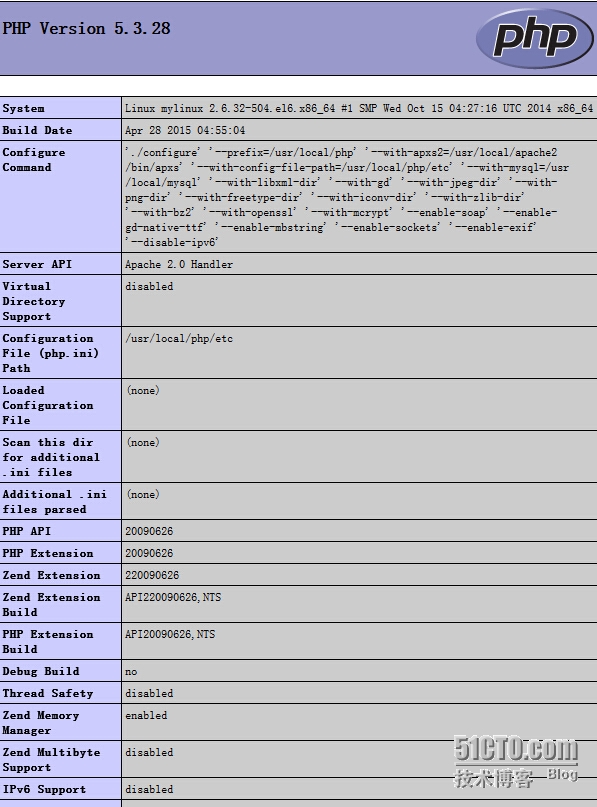
在浏览器里输入IP地址,显示如下界面,代表解析php成功

到此,LAMP的环境搭建完毕