老牌绘图工具pic的基本使用
作者小白对WYTIWYG(What You Think Is What You Get)“所思即所得”的绘图方式情有独钟。之前就听说过metapost及asymptote两种绘图工具,很多网友都说,两种绘图工具,会其一,就可满足一生所需。
作者也是无意当中发现了Raymond大叔(没错,就是那个《大教堂和集市》的作者)写的一篇文章《Making Pictures With GNU PIC》,介绍PIC的基本使用。其中,文章中说,
“The pic language is a troff extension that makes it easy to create and alter box-and-arrow diagrams of the kind frequently used in technical papers and textbooks. ”
PIC的作者大家应该都很熟悉的吧?在小白没说出来之前,估计很少有人猜得到,没错,他就是贝尔实验室的Brain Kernihan,《C Programming Language》的作者之一,也是AWK的作者之一。
好了,其他就不扯那么多了,直接来几个例子把。所有的PIC代码需要放到.PS与.PE之间,与metapost的beginfig与endfig类似。
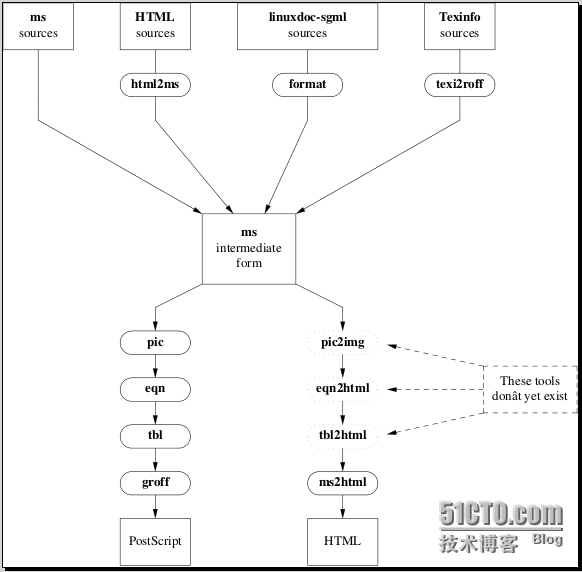
下面的两幅图是来至帮助文档里的例子,具有很好的学习指导作用。
实例1:
$ cat pic08.pic
.PS
define filter {box ht 0.25 rad 0.125}
lineht = 0.25;
Top: [
     right;
     box "\fBms\fR" "sources";
     move;
     box "\fBHTML\fR" "sources";
     move;
     box "\fBlinuxdoc-sgml\fP" "sources" wid 1.5;
     move;
     box "\fBTexinfo\fP" "sources";
     line down from 1st box .s lineht;
     A: line down;
     line down from 2nd box .s; filter "\fBhtml2ms\fP";
     B: line down;
     line down from 3rd box .s; filter "\fBformat\fP";
     C: line down;
     line down from 4th box .s; filter "\fBtexi2roff\fP";
     D: line down;
]

move down 1 from last [] .s;
Anchor: box wid 1 ht 0.75 "\fBms\fR" "intermediate" "form";
arrow from Top.A.end to Anchor.nw;
arrow from Top.B.end to 1/3 of the way between Anchor.nw and Anchor.ne;
arrow from Top.C.end to 2/3 of the way between Anchor.nw and Anchor.ne;
arrow from Top.D.end to Anchor.ne

{
     # PostScript column
     move to Anchor .sw;
     line down left then down ->;
     filter "\fBpic\fP";
     arrow;
     filter "\fBeqn\fP";
     arrow;
     filter "\fBtbl\fP";
     arrow;
     filter "\fBgroff\fP";
     arrow;
     box "PostScript";
     # HTML column
     move to Anchor .se;
     line down right then down ->;
     A: filter dotted "\fBpic2img\fP";
     arrow;
     B: filter dotted "\fBeqn2html\fP";
     arrow;
     C: filter dotted "\fBtbl2html\fP";
     arrow;
     filter "\fBms2html\fP";
     arrow;
     box "HTML";
     # Nonexistence caption
     box dashed wid 1 at B + (2,0) "These tools" "don’t yet exist";
     line chop 0 chop 0.1 dashed from last box .nw to A.e ->;
     line chop 0 chop 0.1 dashed from last box .w to B.e ->;
     line chop 0 chop 0.1 dashed from last box .sw to C.e ->;
}
.PE
上面的代码如何编译呢?
$ pic pic08.pic |groff |ps2eps > pic08.eps
$ epstopdf pic08.eps
$ evince pic08.pdf
注意:小白的电脑里已经安装了TeXLive套件,所以上述程序都已经具备。所以,如果你的PC上没有相应的工具,请自行安装之。
效果图为:

实例2:
$ cat box01.pic
.PS
define ndblock {
       box wid boxwid/2 ht boxht/2
       down; box same with .t at bottom of last box; box same
}

boxht = .2; boxwid = .3; circlerad = .3; dx = 0.05
down; box; box; box; box ht 3*boxht "." "." "."
L: box; box; box invis wid 2*boxwid "hashtab:" with .e at 1st box .w
right
Start: box wid .5 with .sw at 1st box.ne + (.4,.2) "..."
N1: box wid .2 "n1"; D1: box wid .3 "d1"
N3: box wid .4 "n3"; D3: box wid .3 "d3"
box wid .4 "..."
N2: box wid .5 "n2"; D2: box wid .2 "d2"
arrow right from 2nd box
ndblock
spline -> right .2 from 3rd last box then to N1.sw + (dx,0)
spline -> right .3 from 2nd last box then to D1.sw + (dx,0)
arrow right from last box
ndblock
spline -> right .2 from 3rd last box to N2.sw-(dx,.2) to N2.sw+(dx,0)
spline -> right .3 from 2nd last box to D2.sw-(dx,.2) to D2.sw+(dx,0)
arrow right 2*linewid from L
ndblock
spline -> right .2 from 3rd last box to N3.sw + (dx,0)
spline -> right .3 from 2nd last box to D3.sw + (dx,0)
circlerad = .3
circle invis "ndblock" at last box.e + (1.2,.2)
arrow dashed from last circle.w to last box chop 0 chop .3
box invis wid 2*boxwid "ndtable:" with .e at Start.w
.PE
效果图为:

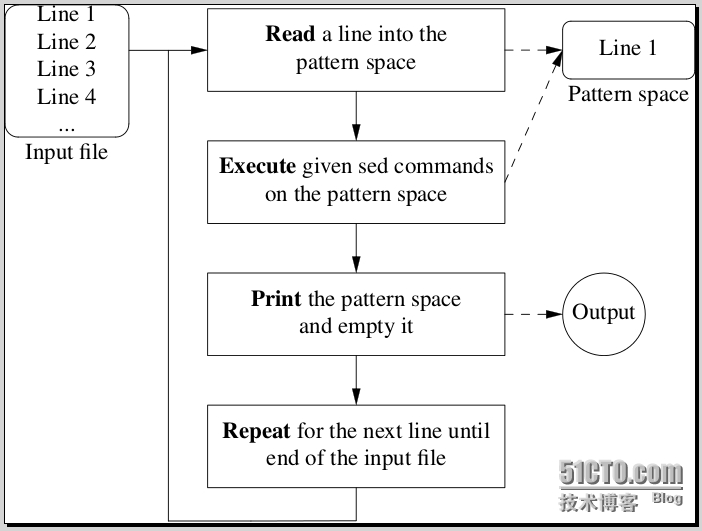
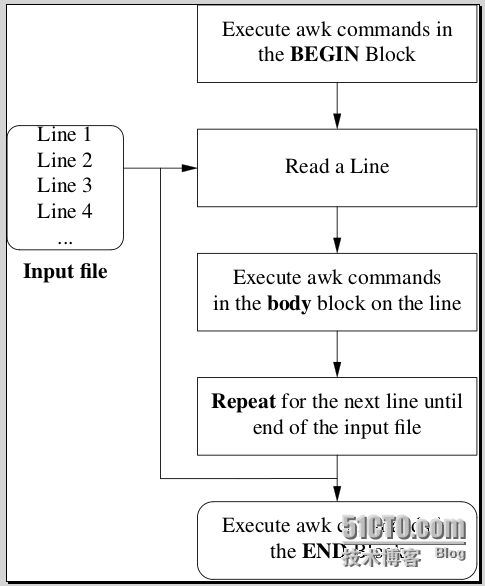
小白利用两个午休的时间,大致看完了PIC的帮助文档,不是很难,多练习几个小例子,基本可以掌握其用法。自己也绘制了以下几幅图形,仅供有需要的网友参考,一副是awk的工作流程图,一副是sed的工作流程图,由于PIC暂不支持中文,所以,这里使用的E文。
实例1:
$ cat SedWorkflow.pic
.PS
A: box ht 0.8 rad 0.08 "Line 1" "Line 2" "Line 3" "Line 4" "..."
B: box width 1.8 "\fBRead\fP a line into the" "pattern space" with .nw at A.ne + (0.5,0)
C: box width 1.8 "\fBExecute\fP given sed commands" "on the pattern space" at B - (0,0.8)
D: box width 1.8 "\fBPrint\fP the pattern space" "and empty it" at C - (0,0.8)
E: box width 1.8 "\fBRepeat\fP for the next line until" "end of the input file" at D - (0,0.8)
F: box width 0.5 ht 0.35 rad 0.05 "Line 1" with .w at B.e + (0.35,0)
G: circle "Output" with .w at D.e + (0.35,0)

L1: line chop 0.01 chop 0.9 from 1st box at 1/3 <A.e,A.ne> to B ->

L2: line down from B to C -> chop
L3: arrow down from C to D chop
L4: arrow down from D to E chop

L5: line dashed from B.e to F.w ->
L6: line dashed from C.e to F.w ->
L7: line dashed from D.e to G.w ->

L8: line down 2.85 from L1 .center
L9: line right from L8.end to E.s - (0,0.2)
L10: line from E.s to L9.end
.PE
图形效果为:

实例2:
$ cat awk_workflow.pic
.PS
A: box ht 0.8 rad 0.08 "Line 1" "Line 2" "Line 3" "Line 4" "..."
INFILE: "\fBInput file\fP" with .n at A.s - (0,0.15)
B: box width 1.8 "Read a Line" with .nw at A.ne + (0.5,0)
C: box width 1.8 "Execute awk commands" "in the \fBbody\fP block on the line" at B - (0,0.8)
D: box width 1.8 "\fBRepeat\fP for the next line until" "end of the input file" at C - (0,0.8)
E: box width 1.8 rad 0.1 "Execute awk commands in" "the \fBEND\fP Block" at D - (0,0.8)
F: box width 1.8 "Execute awk commands in" "the \fBBEGIN\fP Block" at B + (0,0.8)

L1: line chop 0.01 chop 0.9 from 1st box at 1/3 <A.e,A.ne> to B ->

L2: line down from B to C -> chop
L3: arrow down from C to D chop
L4: arrow down from D to E chop

L5: line down 2 from L1 .center
L6: line right from L5.end to L4.center
L7: arrow  from F.s to B.n
.PE
图形效果为:

好了,以上是小白的练习。更多的源文件小白也共享出来吧,感兴趣的网友可以看一看。