Linux运维 第三阶段 (十三)nss&pam
Linux运维第三阶段(十三)nss&pam
一、nss(network service switch网络服务转换)
authentication(认证,决定用户的用户名和密码是否能通过检验)
authorization(授权,决定用户是否能访问某服务)
audition(审计)
username-->UID
groupname-->GID
http-->80port
FQDN-->IP(hosts文件,DNS,mysql,NIS(networkinformation service),LDAP)
命令route,iptables,netstat,这些命令如果不加-n选项,则会解析主机名及端口
应用程序app内置login程序,如果将认证的所有机制都内置到app里,那么只认证这一个功能将会使得app程序变得非常臃肿,维护不便,为简化引入中间层(独立出来作为框架),如:app-->nsswitch-->resolv_lib
#vim /etc/nsswitch.conf(可以为众多的名称解析机制提供名称解析库,到不同的仓库中查找,就需要不同的库文件支持)
passwd: files
shadow: files
hosts: files dns
netgroup: nisplus
#services: nisplus [NOTFOUND=return] files(NOTFOUND若换为UNAVAIL,则是服务不可用,才到files中查找,nis服务在就是nis说了算;其中,SUCCESS(表示serviceok,found name),NOTFOUND(表示service ok,name not found),UNAVAIL(表示service notavailable),TRYAGAIN(表示temporary service failure))
#ls /usr/lib | grep libnss(这些库文件才真正实现解析过程)
libnss_db.so
libnss_dns.so
libnss_files.so
libnss_ldap.so
libnss_nisplus.so
注:linux系统中mingetty仅提供虚拟终端,login程序提供输入账号密码的界面
#vim /etc/nssswitch.conf(在小系统中添加下列三行,再复制相应库文件/usr/lib/libnss.files.so即可完成名称解析)
passwd: files
shadow: files
group: files
#man getent(get entries from administrative database)
#getent passwd
#getent shadow
#getent hosts
#getent passwd root(仅获取某一特定条目)
二、pam(pluggable authentication module可插入认证模块)
名称解析和认证(两套各自独立运行的机制,在某些应用中有关系,如linux登录认证借助于名称解析服务,很多的程序在认证时并不借助于名称解析服务)
名称解析(只告知到哪找)
认证(将输入的密码转为md5特征码,和文件中事先保存的比较,查验是否一致,这个过程是认证)
root-->nsswitch.conf-->passwd: files
‘123456’-->nssswitch.conf-->shadow: files
auth:123456-->md5(salt)-->compare(认证本身也可不借助名称解析服务,仅linux(login)登录认证借助;authentication认证有多种机制,某次认证仅使用一种(md5,mysql,ldap,nis,kerberos))
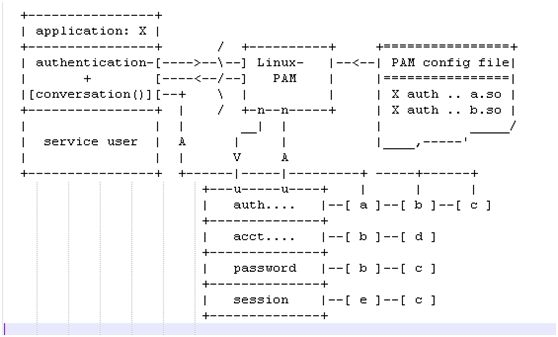
app-->PAM-->authentication(PAM认证框架,引入中间层思想)
#ls /lib/security/*
pam_unix.so(比对文件,files)
pam_ldap.so
pam_krb5.so
pam_winbind.so(在win的AD域中找,activedirectory)
pam_mysql.so(得手动安装)
#ls /etc/pam.d/*(定义支持几种认证机制,前一种机制通过后是否再继续第二种机制)
login
passwd
system-auth-ac
功能(以下四种并非每项都要有,在多数服务为保险起见,至少提供前两种auth和account):
auth(用户输入的账号密码是否匹配,认证过程只看auth开头的行)
account(审核用户账号是否仍然有效,是否过期或被锁定#passwd -l USERNAME)
password(当用户修改密码时,查验用户改密码的动作是否被允许,并与规则比较是否符合密码复杂性要求)
session(定义真正工作过程的相关属性,如仅允许使用20分钟)
#vim /etc/pam.conf(此文件redhat中没有,这是总配置文件,可将/etc/pam.d/*目录下的所有文件内容整理到此文件中,格式如下)
service type control module-path module-arguments
#vim /etc/pam.d/login(/etc/pam.d/SERVICE,文件名通常与服务名相同,且必须要小写,格式如下)
type control module-path module-arguments
crontrol(控制同一类型有多个时,每行之间如何建立关系,有如下几种):
required(必要条件,无论它通过还是不通过,若后面同组中还有其它条目继续检查,它通过了起不到决定作用)
requisite(必要条件,有一票否决权,若不通过则不过,若通过后面同组中有则继续检查)
sufficient(充分条件,它只参与投赞成票,通过则直接返回应用程序,不过继续检查)
optional(可选的,有无均可,ignore)
include(将权力给其它文件,由其它文件决定,例如/etc/pam.d/login文件中有一行auth include system-auth表示将system-auth文件中auth开头的行包含进来)
module-path(默认到/lib[64]/下找,也可写绝对路径)
module-arguments(定义模块工作的不同方式,如nullok,shadow,md5)
#vim /etc/pam.d/system-auth-ac(此文件的软链接为/etc/pam.d/system-auth)
auth required pam_env.so
auth sufficient pam_unix.so nulloktry_first_pass
auth requisite pam_succeed_if.souid >= 500 quiet
auth required pam_deny.so
注:1、2若过,则直接通过;1、3、4若过,则最终通过
#vim /etc/pam.d/other(此文件定义默认规则,先使用与服务名相同的文件中定义的规则,若最后没有匹配的,将使用此文件)
模块/lib/security:
1、pam_unix.so(traditionalpassword authentication,pam出现之前,login的认证是通过glibc的标准库实现的,pam_unix.so只是将此功能抽离出来放在pam中实现了而已)
nullok(如果空也ok)
shadow(读写都以shadow方式)
md5(默认加密方式)
try_first_pass(之前输过密码,现在又要认证,则尝试使用之前输过的密码)
use_first_pass(之前输过密码,现在又要谁,直接使用之前输的密码)
2、pam_permit.so(允许访问)
3、pam_deny.so(拒绝访问,通常用于/etc/pam.d/other中)
4、pam_cracklib.so(互联网以破坏为目的攻击别人称骇客crack;通过字典和规则(大小写字母,数字,其它字符)检查密码)
minlen=N(最短长度)
difok=N(密码与此前是否相同)
dcredit=N(至少要包含几个数字digit)
ucredit=N(包含几个大写字母upper case)
lcredit=N(包含几个不写字母lower case)
ocredit=N(包含几个其它字符othercharacters)
retry=N(最多尝试多少次)
例:
password requisite pam_cracklib.so try_first_pass retry=3
password sufficient pam_unix.so md5shadow nullok try_first_pass use_authtok(use_authok表示使用上一行检查并通过的密码,若未通过这行就不设置)
5、pam_shells.so(限制用户登录时使用/etc/shells中的安全shell,其它shell不允许)
6、pam_securetty.so(限制管理员登录到特殊的设备;/etc/securetty此文件中有root用户登录时能使用的tty,除此之外其它任何终端都登录不了,若将此文件中的tty2删除,则通过tty2就登录不上系统)
例:auth [user_unknown=ignore success=ok ignore=ignore default=bad]pam_securetty.so
auth include system-auth
7、pam_listfile.so(到某个文件中验证用户账号是否合法,可独立定义一个文件限制哪一类用户能登录,哪一类用户不能登录,此模块应用于vsftpd服务中ftpusers文件中的用户)
item=[tty|user|rhost|ruser|group|shell](根据什么检查)
sense=[allow|deny](出现在文件中的用户是允许还是拒绝)
file=/path/filename
onerr=[succeed|fail](一旦出现故障,如文件不存在或逻辑错误,是succeed还是fail)
例:auth required pam_listfile.soitem=user sense=deny file=/etc/vsftpd/ftpusers onerr=succeed
举例:仅在规定组中的用户才能登陆系统
#cp /etc/pam.d/system-auth-ac /etc/pam.d/system-auth-ac.bak
#vim /etc/pam.d/system-auth-ac(在auth中插入一行,如下)
auth required pam_env.so(设置用户环境变量)
auth required pam_listfile.so item=group sense=allow file=/etc/pam_allowgroups
#vim /etc/pam_allowgroups
root
allowgrp
#groupadd allowgrp
#usermod -a -G allowgrp fedora(将允许的登录系统的用户加入到这个组中)
在不同终端测试
注:fedora和ubuntu系统是不能使用root直接登录系统的,要想使用root直接登录,只需找到对应的pam文件将auth一行注释即可
8、pam_rootok.so(管理员切到其它用户直接通过)
例:#vim /etc/pam.d/su
auth sufficient pam_rootok.so
auth include system-auth
9、pam_limits.so(在一次用户会话里,能被使用的资源限定,root也受此限定)
#vim /etc/security/limits.conf(此模块的配置文件,格式如下)
<domain> <type> <item> <value>
domain(表示对谁生效,USER,@GROUP_NAME,*)
type(soft limits or hardlimits)
item(对哪一种资源限制,nofile(maxnumber of open files)所能打开的最多文件个数,nproc(max number of processes)用户所能运行的最多进程个数,rss所能使用的最大实际内存集,as线性地址空间限制,cpu最大CPU时间单位MIN)
value(值的上限)
例如:
* soft core 0
@student - maxlogins 4
注:普通用户只能调自己的软限制,命令#ulimit
#ulimit -n [LIMIT](对nofile限制,Themaximum number of open file descriptors (most systems do notallow this value to be set))
#ulimit -u [LIMIT](对nproc限制,Themaximum number of processes available to a single user)
#ulimit -a(All current limits are reported)
core file size (blocks, -c) 0
scheduling priority (-e) 0
pending signals (-i) 4096
max locked memory (kbytes, -l) 64
open files (-n) 1024
pipe size (512 bytes, -p) 8
POSIX message queues (bytes, -q) 819200
real-time priority (-r) 0
stack size (kbytes, -s) 8192
max user processes (-u) 4096
10、pam_env.so(set/unsetenvironment variables,根据/etc/security/pam_env.conf为用户设置环境变量)
11、pam_wheel.so(only permitroot access to members of group wheel,限定哪些用户可以su到root,为加强系统安全可以启用此项)
#cat /etc/group | grep wheel(FreeBSD系统一般都定义了仅允许wheel组中的用户可以su到root)
12、pam_succeed_if.so(test accountcharacteristics,可限制>500的账号登录,而<500且>0的账号不能登录)
13、pam_time.so(timecontroled access)
举例:在fedora系统中设置允许root登录
$su - root
#vim /etc/pam.d/gdm(注释一行,如下)
#auth required pam_succeed_if.so user!=root quiet
#vim /etc/pam.d/gdm-password(注释一行,如下)
#auth required pam_succeed_if.so user!=root quiet
附图:

相关文档参考:PAM-SAG,PAM-ADG,PAM-MWG(system administrator guide,application developers guide,modulewriters guide)
以上是学习《马哥运维视频》做的笔记。
本文出自 “Linux运维重难点学习笔记” 博客,谢绝转载!