haproxy+keepalived搭建WEB群集
haproxy+keepalived搭建WEB群集
前面已经学习了两款web群集软件Nginx和lvs,他们都有各自的特点,本章将介绍另外一款群集软件haproxy,我们将对其的调度算法、群集环境、以及群集的配置展开讲解。
haporxy是目前比较流行的调度工具,之前学习的lvs配置相对来说比较复杂,nginx不能实现健康检查性能也没有haproxy好。官方站点位于htp://haproxy.1wt.eu/.
今天我们将介绍使用haproxy搭建一套web群集
一、案例概述
1、案例前知识点
1)http请求
通过URL访问网站使用的是http协议,此类请求一般被称为http请求,http请求的方式分式,分别GET和POST方式。会根据请求返回状态码,正常请求成功的时候一般会返回2xx,3xx错误饭后的时候4xx,5xx
2)负载均衡的调度算法
lvs、nginx最常用的算法就是一下三种分别是:
RR(round robin)。RR算法是最简单的一种算法,即轮询调度,根据顺序分配请求
LC(Lease Connections)。lc即最少连接数,调度器会根据当前服务器节点的负载动态分配,那个节点负载小,则调度器就会分配请求给该节点。
SH(Source Hsahing)。SH即基于原地址调度算法,此算法常用于需要身份验证的网站,第一个用户的第一个请求给了第一个节点服务器,第二个用户的第一个请求给了第二个节点服务器,当第一个用户的第二个请求发来的时候还是第一个节点进行处理。这种调度算法应用的场景如需要用户名密码登录的网站,如果客户一次是第一个节点服务器响应,第二个请求有分配给了第二个节点服务器,那么客户必须在输入一次验证信息才可以到达访问的目的,这种方式是不可取的。除了SH之外我们还可以使用一种缓存机制去实现memchack。
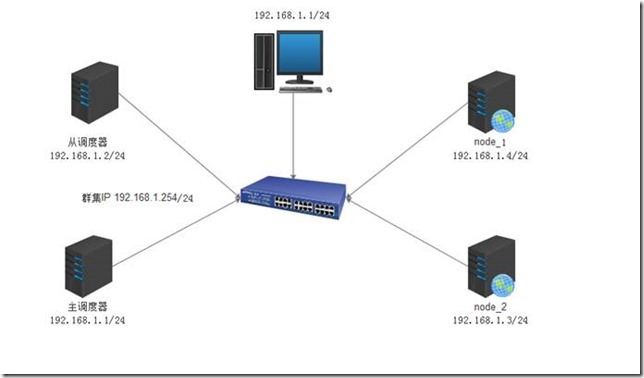
3、案例环境
今天我们需要四台主机来

图1
二、案例实施
1、编译安装Haproxy
第一台haproxy为192.168.1.1 centos1.lzg.com
部署Haproxy需要pcre-devel bzip2-devel的软件包支持,所以先进性安装相关包
[root@centos1 ~]# yum -y install pcre-devel bzip2-devel
[root@centos1 ~]# tar zxf haproxy-1.4.24.tar.gz
[root@centos1 ~]# cd haproxy-1.4.24
[root@centos1 haproxy-1.4.24]# make TARGET=linux26 //64位系统
[root@centos1 haproxy-1.4.24]# make install
2、添加服务脚本
[root@centos1 haproxy-1.4.24]# cp examples/haproxy.init /etc/init.d/haproxy
[root@centos1 haproxy-1.4.24]# chkconfig --add haproxy
[root@centos1 haproxy-1.4.24]# chkconfig haproxy on
[root@centos1 haproxy-1.4.24]# ln -s /usr/local/sbin/* /usr/sbin/
[root@centos1 haproxy-1.4.24]# chmod +x /etc/init.d/haproxy
3、Haproxy配置
1)建立haproxy配置文件
[root@centos1 haproxy-1.4.24]# mkdir /etc/haproxy
[root@centos1 haproxy-1.4.24]# cp examples/haproxy.cfg /etc/haproxy/
2)Haproxy配置文件介绍
Haproxy配置文件分为三个部分。即global、default、listen。global为全局配置,defaults为默认配置、listen为应用组件配置
global配置通常由一下配置参数
global
log /dev/log local0 info
log /dev/log local0 notice //日志存储的设备及记录级别
maxconn 4096 //最大连接数
uid 99 //程序用户的UID
gid 99 //程序用户组的GID
daemon //后台运行
retriee 3 //重试次数
option http-server-close //主动关闭http请求选项
timeout http-keep-alive //最长连接超时时间
timeout http-requota //http请求超时时间
timeout client //客户端超时时间
pidfile /var/run/haproxy.pid //pid文件的路径以及文件名
#debug
#quiet
#chroot /usr/share/haproxy
以上配置红色部分为添加、绿色部分为修改、蓝色部分为注释部分,黑色部分为默认部分。
defaults配置项,一般会被应用组件所继承,如果在应用组件中没有特殊的声明,则默认使用配置参数。
defaults
log global //应用全局配置的日志格式
mode http //模式为http
option httplog //采用http的日志格式
retries 3 //检查节点次数
maxconn 2000 //最大连接数
contimeout 5000 //连接超时时间(秒)
clitimeout 50000 //客户端超时时间
srvtimeout 50000 //服务器超时时间
option httpclose //关闭客户端请求
除了新添加一行之外其余的全部都是默认的配置就可以了,可以根据实际情况进行修改
listen配置项目一般为配置应用模块参数
listen webcluster 0.0.0.0:80 //监听地址及端口
option httpchk GET /index.html //健康检查的网页文件
balance roundrobin //轮询算法
server web1 192.168.1.3:80 check inter 2000 fall 3
server web2 192.168.1.4:80 check inter 2000 fall 3
以上两条定义服务器池 以及健康检查3次
以下是配置好的完成配置
global
log /dev/log local0 info
log /dev/log local0 notice
maxconn 4096
uid 99
gid 99
daemon
nbproc 2
pidfile /var/run/haproxy.pid
option http-server-close
#debug
#quiet
# chroot /usr/share/haproxy
defaults
log global
mode http
option httplog
option dontlognull
retries 3
redispatch
maxconn 2000
contimeout 5000
clitimeout 50000
srvtimeout 50000
option httpclose
listen webcluster 0.0.0.0:80
option httpchk GET /index.html
balance roundrobin
server web1 192.168.1.3:80 check inter 2000 fall 3
server web 2 192.168.1.4:80 check inter 2000 fall 3
4、修改rsyslog配置
[root@centos1 haproxy-1.4.24]# vim /etc/rsyslog.d/haproxyconf
if ($programname == 'haproxy' and $syslogseverity-text ==
'info') then -/var/log/haproxy/haproxy.info
& ~
if ($programname == 'haproxy' and $syslogseverity-text ==
'notice' ) then -/var/log/haproxy/haproxy.notice
& ~
5、启动服务
[root@centos1 haproxy-1.4.24]# service haproxy start
[root@centos1 haproxy-1.4.24]# service rsyslog restart
rsyslog启动之后会在/var/log/haproxy下建立相关文件
启动haproxy时会出现一些提示信息,这是因为没有检测到存活的节点,所以我们接下来部署节点
6、建立防火墙规则,允许80端口入站
[root@centos1 haproxy-1.4.24]# iptables -I INPUT -p tcp --dport 80 -j ACCEPT
7、nginx安装 192.168.1.3
[root@centos3 ~]# yum -y install pcre-devel zlib-devel
[root@centos3 ~]# tar zxf nginx-1.6.2.tar.gz
[root@centos3 ~]# cd nginx-1.6.2
[root@centos3 nginx-1.6.2]# ./configure --prefix=/usr/local/nginx --user=nginx --group=nginx && make && make install
[root@centos3 nginx-1.6.2]# useradd -M -s /sbin/nologin nginx
[root@centos3 nginx-1.6.2]# ln -s /usr/local/nginx/sbin/* /usr/local/sbin/
[root@centos3 nginx-1.6.2]# echo "node_1" > /usr/local/nginx/html/index.html
启动ngnx服务
[root@centos3 nginx-1.6.2]# nginx
建立防火墙规则
[root@centos3 nginx-1.6.2]# iptables -I INPUT -p tcp --dport 80 -j ACCEPT
剩下的节点配置一样,为了测试时看出效果,建议将测试页的内容不要保持一致
重新启动haproxy的服务
8、配置keepalived
[root@centos1 ~]# yum -y install openssl-devel kernel-devel popt-devel
[root@centos1 ~]# tar zxf keepalived-1.2.13.tar.gz
[root@centos1 ~]# cd keepalived-1.2.13
[root@centos1 keepalived-1.2.13]# ./configure --prefix=/ --with-kernel-dir=/usr/src/kernels/2.6.32-431.el6.x86_64/ && make && make install
[root@centos1 keepalived-1.2.13]#
[root@centos1 keepalived-1.2.13]# chmod +x /etc/init.d/keepalived
[root@centos1 keepalived-1.2.13]# chkconfig --add keepalived
[root@centos1 keepalived-1.2.13]# chkconfig keepalived on
[root@centos1 keepalived-1.2.13]# vim/etc/keepalived/keepalived.conf
lobal_defs {
notification_email {
}
notification_email_from [email protected]
smtp_server 127.0.0.1
smtp_connect_timeout 30
router_id R1
}
vrrp_instance VI_1 {
state MASTER
interface eth0
virtual_router_id 1
priority 100
advert_int 1
authentication {
auth_type PASS
auth_pass 123.ABC
}
virtual_ipaddress {
192.168.1.254
[root@centos1 keepalived-1.2.13]# service keepalived start
[root@centos1 keepalived-1.2.13]#
vim /etc/sysconfig/network-scripts/ifcfg-eth0
NM_CONTROLLED=no
[root@centos1 keepalived-1.2.13]# service network restart
[root@centos1 keepalived-1.2.13]# iptables -I INPUT -p ip -d 224.0.0.18 -j ACCEPT
[root@centos1 keepalived-1.2.13]# service iptables save
以上就是 192.168.1.1 keepalived的配置
从调度器其他的部分都一样,主配置文件内有三个地方不能一样
router_id R2
state BACKUP
priority 99
注意:启动服务,防火墙规则、网卡的配置
验证:


OK了,今天的目标就完成了。