SVN服务器集群(基于LDAP)
SVN服务器操作手册
1. svn服务器整体架构
1.1 svn服务器分类和作用
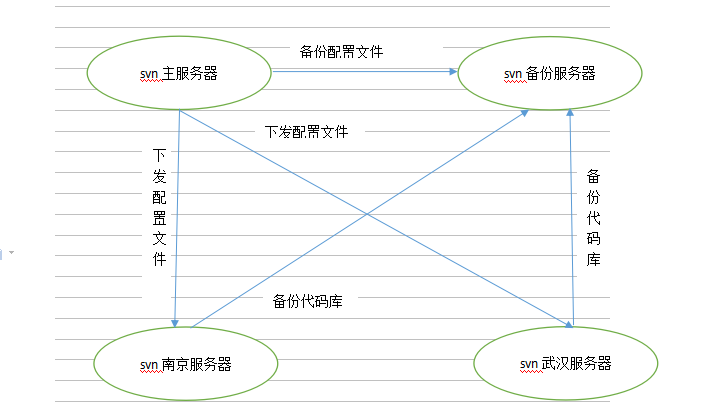
svn主服务器:下发svn区域服务器的权限文件和配置文件。
svn备份服务器:提供数据备份,如果出现源主机宕机,更改备机IP为源主机IP后,还可备份svn区域服务器上的库。
南京svn服务器:提供区域svn服务。
武汉的svn服务器:提供区域svn服务。
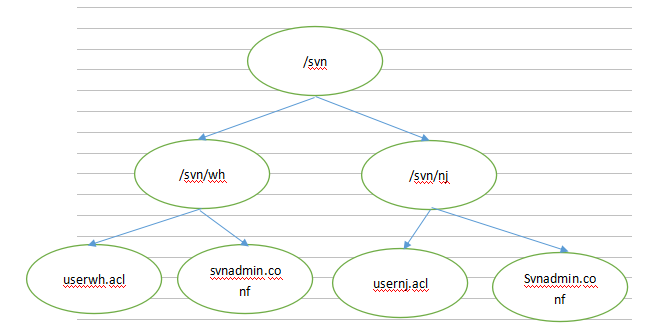
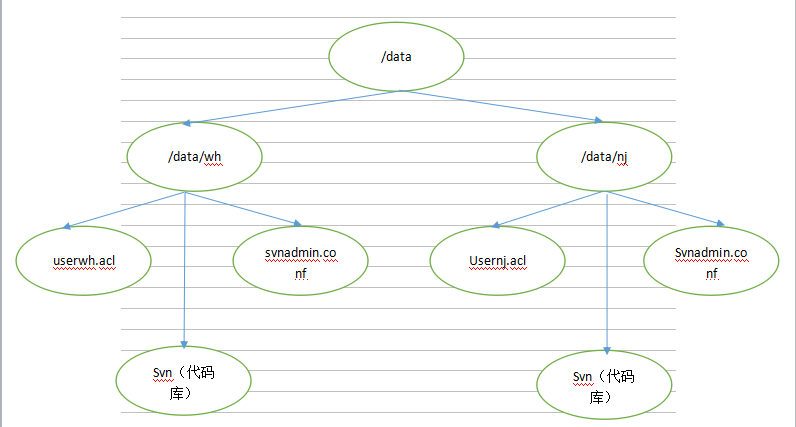
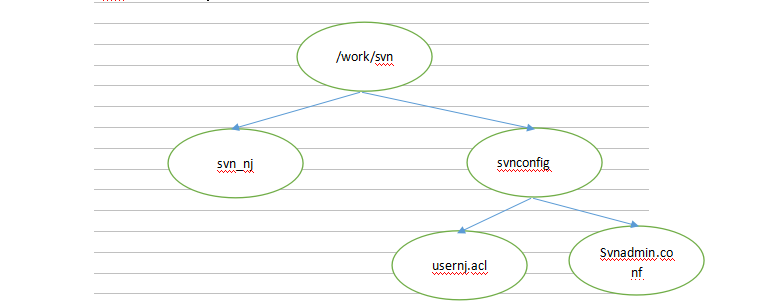
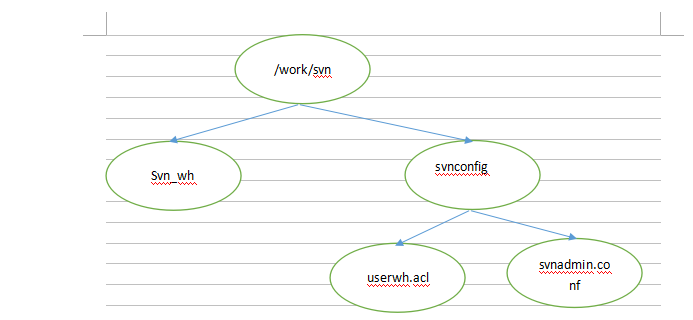
1.2 svn服务器的目录结构
svn主服务器:
svn备份服务器:
svn南京服务器:
svn武汉服务器:
1.3 svn服务器联系图
2. svn服务下载和创建库
下载svn服务
yum �Cy install mod_dav_svn
创建svn版本库
svnadmin create /home/svn/repos1
svnadmin create /home/svn/repos2
3. svn服务的ldap认证配置
步骤一:
vi /etc/httpd/conf.d/subversion.conf
修改svn的ldap认证配置,如下所示:
<Location /svn/>

   DAV svn
   SVNListParentPath on
   AuthType Basic
   AuthName "svn"
   AuthBasicProvider ldap
   AuthzLDAPAuthoritative off
   #AuthUserFile /home/svn/conf/pwd.conf
   #AuthzSVNAccessFile /data/user.acl
  include /work/svn/svnconfig/svnadmin.conf
   #AuthLDAPBindDN "domainldap"
   AuthLDAPBindDN "CN=domainldap,OU=IT,OU=archermind,DC=archermind,DC=com"
   AuthLDAPBindPassword "archerminD_2006"
   AuthLDAPURL "ldap://192.168.100.101:389/OU=archermind,DC=archermind,DC=com?sAMAccountName?sub?(objectClass=person)"

   Require valid-user
   #Require ldap-group CN=domainldap,OU=it,OU=archermind,DC=archermind,DC=com
   #Require ldap-group DC=archermind,DC=com

</Location>
4. 管理员可见的svn配置文件和权限文件
增加权限文件user.acl
vi /data/wh /userwh.acl
样例如下:
[groups]
admin=n006253
user=002731,n000714
test=user3
[/]
@admin=rw
@user=r
n000714=r
[repos1:/]
@admin=rw
@user=r
解释:[groups]为组定义,可以在该组下加很多用户,以分割,但是该用户数据必须是ldap服务器中的用户。
[/]表示根目录以下的权限定义
[repos1:/]表示仓库下的权限定义
如果要分项目,则以此规则类推:
如:[repos1:/aaa]则表示仓库下的aaa项目的权限定义。
@admin 表示admin这个组下的用户权限。
n000714=r 表示n000714这个用户的权限。
权限类型:r,w,rw 分别表示只读,只写,读写。如果是user1= 这种空情况则表示没有。
增加管理员配置文件
 # SVN ROOT
  DAV svn
  SVNParentPath "/work/svn/svn_wh"

  # Access Control Policy
  AuthzSVNAccessFile /work/svn/svnconfig/userwh.acl
  # IP Access
  #Order Deny,Allow
  #       Deny from all
  #       Allow from all
  #       #Allow from 172.16.2
  #       #Allow from 127.0.0.1

  Order Allow,Deny
  Allow from all
5. svn服务启动
svnserve -d -r /home/svn/
service httpd restart
ps aux | grep svn
##出现以下内容说明svn服务已经成功启动
root 8610 0.0 0.0 152864 740 ? Ss 11:25 0:00 svnserve -d -r /home/svn/repos1/
root 13128 0.0 0.0 103252 876 pts/0 S+ 14:00 0:00 grep svn
登录网页:http://10.20.70.175/svn/
输入账号密码以后如下图所示:
6. svn实现https服务
步骤一:生成密钥
下载ssl认证服务
yum install mod_ssl
开始进行证书的申请
cd /etc/pki/tls/private
openssl genrsa -out ca.key 1024
openssl req -new -key ca.key -out ca.csr
cd /etc/pki/tls/certs
根据提示填写公司名等内容,可以回车跳过
openssl x509 -req -days 365 -in /etc/pki/tls/private/ca.csr -signkey /etc/pki/tls/private/ca.key -out ca.crt
最后会生成ca.crt证书。
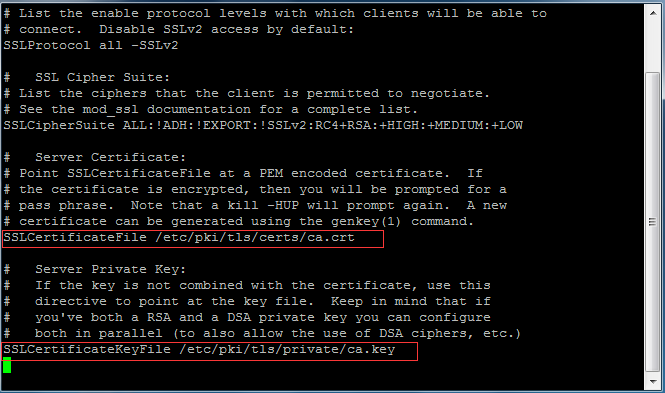
步骤二:ssl配置
vi /etc/httpd/conf.d/ssl.conf
修改ssl配置里的两处密钥(在上面配置过)
SSLCertificateFile /etc/pki/tls/certs/ca.crt
SSLCertificateKeyFile /etc/pki/tls/private/ca.key
重启apache服务
即可以https的方式登录
7. svn命令
svn导出代码
svn co http://10.20.70.163/svn/repos1
svn添加文件
svn add 3.txt
svn将改动文件提交到版本库
svn commit -m "this is a test" 3.txt --username=n006253 --password=jac891010@163.com
svn删除代码库文件
svn delete http://10.20.70.163/svn/repos1/3.txt -m "error"
svn查看文件日志
svn log 1.txt
或者svn info 1.txt
svn比较差异
svn diff -r 2:3 3.txt(版本2和版本3)
svn解决冲突
svn resolved
svn更换代码库的URL
svn switch [PATH]
8. svn的同步脚本和同步配置
8.1 svn主服务器
rsyncd.conf同步配置:
uid = root
gid = named
user chroot =no
max connections = 20000
timeout =600
pid file= /var/run/rsyncd.pid
lock file = /var/run/rsyncd.lock
log file = /var/log/rsyncd.log
[svnnj]
path=/svn/nj
ignore errors
read only = false
list = no
hosts allow = 10.0.0.0/8 172.16.0.0/16 192.168.0.0/16
[svnwh]
path=/svn/wh
ignore errors
read only = yes
list = no
hosts allow = 10.0.0.0/8 172.16.0.0/16 192.168.0.0/16
8.2 svn备用服务器
svn备用服务器:
备用服务器的同步脚本,/etc/cron.daily/svnrsync.sh
#!/bin/bash

rsync -avz --delete 10.20.70.163::svnnj /data/nj/svn  --log-file /var/log/svnnjlog.log
rsync -avz --delete 10.20.70.175::svnwh /data/wh/svn  --log-file /var/log/svnnjlog.log
rsync -avz --delete  10.20.70.192::svnnj /data/nj --exclude=/svn  --ignore-errors --log-file /var/log/svnconf_njlog.log
rsync -avz --delete  10.20.70.192::svnwh /data/wh  --exclude=/svn --ignore-errors --log-file /var/log/svnconf_whlog.log
8.3 svn南京服务器
svn南京服务器:
南京的同步脚本,/etc/cron.daily/svnrsync.sh
#!/bin/bash
rsync -avz --delete 10.20.70.192::svnnj /work/svn/svnconfig --ignore-errors --log-file /var/log/svnlog.log
南京的rsyncd.conf里的配置
uid = root
gid = named
user chroot =no
max connections = 20000
timeout =600
pid file= /var/run/rsyncd.pid
lock file = /var/run/rsyncd.lock
log file = /var/log/rsyncd.log
[svnnj]
path=/work/svn/svn_nj
ignore errors
read only = false
list = no
hosts allow = 10.0.0.0/8 172.16.0.0/16 192.168.0.0/16
8.4 svn武汉服务器
svn武汉服务器:
武汉的同步脚本,/etc/cron.daily/svnrsync.sh
#!/bin/bash
rsync -avz --delete 10.20.70.192::svnwh /work/svn/svnconfig --ignore-errors --log-file /var/log/svnlog.log
武汉的rsyncd.conf里的配置
uid = root
gid = named
user chroot =no
max connections = 20000
timeout =600
pid file= /var/run/rsyncd.pid
lock file = /var/run/rsyncd.lock
log file = /var/log/rsyncd.log
[svnwh]
path=/work/svn/svn_wh
ignore errors
read only = false
list = no
hosts allow = 10.0.0.0/8 172.16.0.0/16 192.168.0.0/16