【Nagios】nagios服务器添加监控远程Linux主机
一、远程主机添加nagios用户
[root@yo ~]# useradd -s /sbin/nologin nagios
二、安装nagios-plugins插件
[root@yo nagios-plugins-2.1.1]# ./configure --prefix=/usr/local/nagios --with-nagios-user=nagios --with-nagios-group=nagios
[root@yo nagios-plugins-2.1.1]# make && make install
三、查看生成的目录文件
[root@yo nagios-plugins-2.1.1]# ls /usr/local/nagios/
include  libexec  share
四、安装nrpe
[root@yo nrpe-2.15]# ./configure
[root@yo nrpe-2.15]# make all
[root@yo nrpe-2.15]# make install-daemon
[root@yo nrpe-2.15]# make install-daemon-config
[root@yo nrpe-2.15]# make install-plugin
五、安装nrpe守护进程的服务xinetd
[root@yo nrpe-2.15]# make install-xinetd
/usr/bin/install -c -m 644 sample-config/nrpe.xinetd /etc/xinetd.d/nrpe
六、打开/etc/xinetd.d/nrpe文件,修改添加服务端IP
only_from = 127.0.0.1 localhost 192.168.1.21
七、添加nrpe守护进程端口号
[root@yo nrpe-2.15]# vim /etc/services
nrpe            5666/tcp                #nrpe
八、安装xinetd软件包,并重启xinetd服务
[root@yo nrpe-2.15]# yum -y install xinetd
[root@yo nrpe-2.15]# /etc/init.d/xinetd restart
Stopping xinetd:                                           [FAILED]
Starting xinetd:                                           [  OK  ]
九、查看监听端口和nrpe进程有没有起来
[root@yo nrpe-2.15]# netstat -ntlp |grep 5666
tcp        0      0 :::5666                     :::*                        LISTEN      73351/xinetd
[root@yo nrpe-2.15]# netstat -at | grep nrpe
tcp        0      0 *:nrpe                      *:*                         LISTEN
十、在远程主机运行check_nrpe测试有没有安装或配置成功
[root@yo nrpe-2.15]# /usr/local/nagios/libexec/check_nrpe -H 127.0.0.1
NRPE v2.15
[root@yo nrpe-2.15]# /usr/local/nagios/libexec/check_nrpe -H 127.0.0.1 -c check_users
USERS OK - 5 users currently logged in |users=5;5;10;0
[root@yo nrpe-2.15]# /usr/local/nagios/libexec/check_nrpe -H 127.0.0.1 -c check_load
OK - load average: 0.00, 0.00, 0.00|load1=0.000;15.000;30.000;0; load5=0.000;10.000;25.000;0; load15=0.000;5.000;20.000;0;
[root@yo nrpe-2.15]# /usr/local/nagios/libexec/check_nrpe -H localhost
NRPE v2.15
[root@yo nrpe-2.15]# /usr/local/nagios/libexec/check_nrpe -H localhost -c check_users
USERS OK - 5 users currently logged in |users=5;5;10;0
十一、以下是在服务端测试
[root@www ~]# /usr/local/nagios/libexec/check_nrpe -H 192.168.1.250
NRPE v2.15
[root@www ~]# /usr/local/nagios/libexec/check_nrpe -H 192.168.1.250 -c check_users
USERS OK - 5 users currently logged in |users=5;5;10;0
十二、服务端添加hosts.cfg和services.cfg两个文件,作为远程主机的监控配置文件
[root@www ~]# vim /etc/nagios/nagios.cfg
cfg_file=/etc/nagios/objects/hosts.cfg
cfg_file=/etc/nagios/objects/services.cfg
[root@www ~]# touch /etc/nagios/objects/hosts.cfg
[root@www ~]# touch /etc/nagios/objects/services.cfg
十三、配置services.cfg文件
define service{
        use                     generic-service
        host_name               tecmint
        service_description     CPU Load
        check_command           check_nrpe!check_load
        }
define service{
        use                     generic-service
        host_name               tecmint
        service_description     Total Processes
        check_command           check_nrpe!check_total_procs
        }
define service{
        use                     generic-service
        host_name               tecmint
        service_description     Current Users
        check_command           check_nrpe!check_users
        }
define service{
        use                     generic-service
        host_name               tecmint
        service_description     SSH Monitoring
        check_command           check_nrpe!check_ssh
        }
define service{
        use                     generic-service
        host_name               tecmint
        service_description     FTP Monitoring
        check_command           check_nrpe!check_ftp
        }
十四、配置hosts.cfg文件
## Default Linux Host Template ##
define host{
name                            linux-box               ; Name of this template
use                             generic-host            ; Inherit default values
check_period                    24x7
check_interval                  5
retry_interval                  1
max_check_attempts              10
check_command                   check-host-alive
notification_period             24x7
notification_interval           30
notification_options            d,r
contact_groups                  admins
register                        0                       ; DONT REGISTER THIS - ITS A TEMPLATE
}
## Default
define host{
use                             linux-box               ; Inherit default values from a template
host_name                       tecmint                 ; The name we're giving to this server
alias                           CentOS 6.5                ; A longer name for the server
address                         192.168.1.250            ; IP address of Remote Linux host
十五、检查配置并重启nagios
[root@www ~]# /usr/local/nagios/bin/nagios -v /etc/nagios/nagios.cfg
Total Warnings: 0
Total Errors:   0
[root@www ~]# service nagios restart
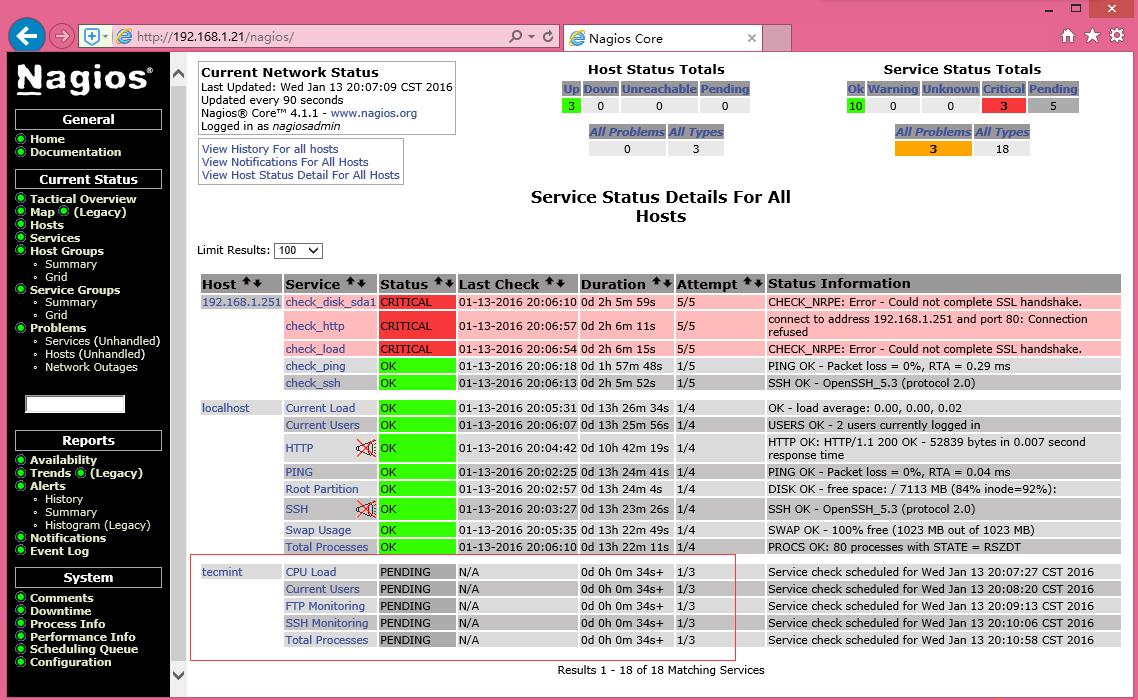
十六、在web页面上查看结果
