OSPF 5种网络类型实验
实验拓扑:

一.Broadcast
R1.R3.R4地址为192.168.0.1/24 192.168.0.3/24 192.168.0.4/24
通过inver-arp学习到的frame map 默认是支持广播.这里能产生广播包在链路上.封装成帧中继.OSPF默认会认为是non-broadcast类型.这种类型下.广播包不会存在链路上.接口无法产生广播包
下面更改接口类型.其实是cisco的一个特性.
R1(config)#router osp 1
R1(config-router)#inter s0/0
R1(config-if)#ip ospf 1 ar 0
R1(config-if)#ip ospf net broad
R1(config-if)#inter lo 0
R1(config-if)#ip ospf 1 ar 0
R3(config)#router osp 3
R3(config-router)#inter s0/0
R3(config-if)#ip ospf 3 ar 0
R3(config-if)#ip ospf net broad
R3(config-if)#inter lo 0
R3(config-if)#ip ospf 3 ar 0
R4(config)#router osp 4
R4(config-router)#inter s0/0
R4(config-if)#ip ospf 4 ar 0
R4(config-if)#ip ospf net broad
R4(config-if)#inter lo 0
R4(config-if)#ip ospf 4 ar 0
R1#show ip osp nei
Neighbor ID Pri State Dead Time Address Interface
3.3.3.3 1 FULL/BDR 00:00:38 192.168.0.3 Serial0/0
4.4.4.4 1 FULL/DR 00:00:38 192.168.0.4 Serial0/0
R1#
R3#show ip ospf nei
Neighbor ID Pri State Dead Time Address Interface
1.1.1.1 1 FULL/DROTHER 00:00:32 192.168.0.1 Serial0/0
4.4.4.4 1 FULL/DR 00:00:35 192.168.0.4 Serial0/0
R3#
R4#show ip osp nei
Neighbor ID Pri State Dead Time Address Interface
1.1.1.1 1 FULL/DROTHER 00:00:38 192.168.0.1 Serial0/0
3.3.3.3 1 FULL/BDR 00:00:39 192.168.0.3 Serial0/0
R4#
R1#show ip osp inter s0/0
......
Timer intervals configured, Hello 10, Dead 40, Wait 40, Retransmit 5
自动建立邻居关系.需要选举DR. HELLO时间为10秒
路由表正常
二.NBMA
把之前配置的IP OSPF NETWORK BROADCAST 改为non-broadcast
到dead time后.邻接关系断开.
NBMA网络下不能发送组播包.OSPF无法发现邻居.需要手动定义邻居
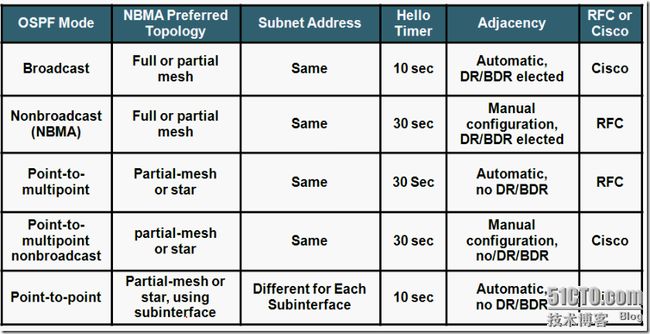
在NBMA网络下.RFC定义了2种方法.CISCO也有3种解决方法
RFC:
1.NBMA. 手动定义邻居
2.point-multipoint 使接口配置成point-multipoint,这样能自动发现邻居.不需要选举DR/BDR.
CISCO:
1.point-multipoint nonbroadcast .非广播下需要手动定义邻居,不需要选举DR/BDR
2.Broadcast .把接口更改为广播类型.如上面实验一,就是应用了这个特性.
3.point-point. 使用点到点子接口,能自动发现邻居,不需要选举DR/BDR
下面实验,是RFC的NBMA方案,手动定义邻居,其他4种将独立实验.
在拓扑中,如果R3,R4不能直接通信(非全互联网络),必须干预DR选择.因为R3.R4连接到R1.如果选举过程.把R3或者R4选举为DR.网络就出现问题.因为R3.R4不能直接通信.
在拓扑中帧中继交换机里面删除DLCI304和DLCI403
把R3.R4的接口优先级配置成0.
R3(config-router)#inter s0/0
R3(config-if)#ip osp
R3(config-if)#ip ospf priority 0
R4(config-router)#inter s0/0
R4(config-if)#ip osp
R4(config-if)#ip ospf priority 0
手动定义邻居
R1(config-router)#nei 192.168.0.3 pri 0
R1(config-router)#nei 192.168.0.4 pri 0
R1(config-router)#
正常建立邻接关系,并且只有R1被选举为DR
R1#show ip osp nei
Neighbor ID Pri State Dead Time Address Interface
3.3.3.3 0 FULL/DROTHER 00:01:58 192.168.0.3 Serial0/0
4.4.4.4 0 FULL/DROTHER 00:01:58 192.168.0.4 Serial0/0
R4#show ip osp nei
Neighbor ID Pri State Dead Time Address Interface
1.1.1.1 1 FULL/DR 00:01:52 192.168.0.1 Serial0/0
查看R4路由表:
R4#show ip rou
......
1.0.0.0/32 is subnetted, 1 subnets
O 1.1.1.1 [110/65] via 192.168.0.1, 00:00:21, Serial0/0
3.0.0.0/32 is subnetted, 1 subnets
O 3.3.3.3 [110/65] via 192.168.0.3, 00:00:21, Serial0/0
4.0.0.0/32 is subnetted, 1 subnets
C 4.4.4.4 is directly connected, Loopback0
C 192.168.0.0/24 is directly connected, Serial0/0
R4#
学习到所有路由.但是.ping3.3.3.3 是无法ping通.原因是3.3.3.3 下一跳为192.168.0.3 .而R4上面frame-relay map 里面没有192.168.0.3.无法封装发出.
解决办法:
R4(config-if)#frame-relay map ip 192.168.0.3 401 broadcast
把192.168.0.3 加入到401里面.发到R1
R3同样
R3(config-if)#frame-relay map ip 192.168.0.4 301 br
R4(config-if)#do ping 3.3.3.3
Type escape sequence to abort.
Sending 5, 100-byte ICMP Echos to 3.3.3.3, timeout is 2 seconds:
!!!!!
Success rate is 100 percent (5/5), round-trip min/avg/max = 16/39/68 ms
R4(config-if)#
三.Point to Multipoint

这种星型的拓扑.是最常见的,实验2解决这种拓扑的方法是手动定义邻居.现在使用point-multipoint来使OSPF运行正常
R1(config)#inter s0/0
R1(config-if)#ip ospf network point-to-multipoint
R1(config-if)#router osp 1
R1(config-router)#inter s0/0
R1(config-if)#ip ospf 1 ar 0
R1(config-if)#inter lo 0
R1(config-if)#ip osp 1 ar 0
R3(config-if)#ip osp net point-to-multipoint
R3(config-if)#ip osp 3 ar 0
R3(config-if)#router osp 3
R3(config-router)#inter lo 0
R3(config-if)#ip osp 3 ar 0
R4(config-if)#ip osp network point-to-mu
R4(config-if)#ip osp 4 ar 0
R4(config)#router osp 4
R4(config-router)#inter lo 0
R4(config-if)#ip osp 4 ar 0
R4(config-if)#
R1#show ip
*Mar 1 00:06:42.551: %SYS-5-CONFIG_I: Configured from console by console
R1#show ip osp nei
Neighbor ID Pri State Dead Time Address Interface
4.4.4.4 0 FULL/ - 00:01:58 192.168.0.4 Serial0/0
3.3.3.3 0 FULL/ - 00:01:56 192.168.0.3 Serial0/0
邻接关系建立起来.不需要选举DR.
再看下R4路由表
R4#show ip rou
........
1.0.0.0/32 is subnetted, 1 subnets
O 1.1.1.1 [110/65] via 192.168.0.1, 00:00:15, Serial0/0
3.0.0.0/32 is subnetted, 1 subnets
O 3.3.3.3 [110/129] via 192.168.0.1, 00:00:15, Serial0/0
4.0.0.0/32 is subnetted, 1 subnets
C 4.4.4.4 is directly connected, Loopback0
192.168.0.0/24 is variably subnetted, 3 subnets, 2 masks
C 192.168.0.0/24 is directly connected, Serial0/0
O 192.168.0.1/32 [110/64] via 192.168.0.1, 00:00:15, Serial0/0
O 192.168.0.3/32 [110/128] via 192.168.0.1, 00:00:15, Serial0/0
学习路由正常.R3通过R1访问,不需要像NBMA里面要定义map
R4#ping 3.3.3.3
Type escape sequence to abort.
Sending 5, 100-byte ICMP Echos to 3.3.3.3, timeout is 2 seconds:
!!!!!
Success rate is 100 percent (5/5), round-trip min/avg/max = 68/103/132 ms
R4#
四.Point to Multipoint nonbroadcast
CISCO定义的特性.由于不支持广播,需要手动定义邻居.点到多点网络下不需要选择DR/BDR
使用命令
R1(config-if)#ip osp network point-to-multipoint non-broadcast
R3….
R4….
更改接口类型
改变接口类型后.无法建立邻居.在R1上手动定义邻居
R1(config-router)#neighbor 192.168.0.3
R1(config-router)#neighbor 192.168.0.4
R1(config-router)#
邻接关系建立.不需要选举DR
R1#show ip ospf nei
Neighbor ID Pri State Dead Time Address Interface
4.4.4.4 0 FULL/ - 00:01:58 192.168.0.4 Serial0/0
192.168.0.3 0 FULL/ - 00:01:58 192.168.0.3 Serial0/0
R1#
查看R4路由表:
R4#show ip rou
....
1.0.0.0/32 is subnetted, 1 subnets
O 1.1.1.1 [110/65] via 192.168.0.1, 00:00:02, Serial0/0
3.0.0.0/32 is subnetted, 1 subnets
O 3.3.3.3 [110/129] via 192.168.0.1, 00:00:02, Serial0/0
4.0.0.0/32 is subnetted, 1 subnets
C 4.4.4.4 is directly connected, Loopback0
192.168.0.0/24 is variably subnetted, 3 subnets, 2 masks
C 192.168.0.0/24 is directly connected, Serial0/0
O 192.168.0.1/32 [110/64] via 192.168.0.1, 00:00:02, Serial0/0
O 192.168.0.3/32 [110/128] via 192.168.0.1, 00:00:02, Serial0/0
R4#
路由正常.不需要干预.
五.Point-Point
点到点接口需要在子接口做.
R1上.定义S0/0.13 是连接到R3 S0/0.14 连接到R4
S0/0.13 IP ADD 192.168.13.1/24
S0/0.14 IP ADD 192.168.14.1/24
R3 IP ADD 192.168.13.3/24
R4 IP ADD 192.168.14.4/24
R1:
!
interface Serial0/0.13 point-to-point 开启子接口,类型是point-point
ip address 192.168.13.1 255.255.255.0
frame-relay interface-dlci 103 定义这个子接口使用哪条DLCI
!
interface Serial0/0.14 point-to-point
frame-relay interface-dlci 104
!
R1#show frame-relay map
Serial0/0.14 (up): point-to-point dlci, dlci 104(0x68,0x1880), broadcast
status defined, active
Serial0/0.13 (up): point-to-point dlci, dlci 103(0x67,0x1870), broadcast
status defined, active
R3.R4上更改接口类型
R3(config)#inter s0/0
R3(config-if)#ip osp network point-to-p
R4(config)#inter s0/0
R4(config-if)#ip osp network point-to-p
启动OSPF.(R1上如果使用IP OSPF 1 AR 0 启用OSPF.需在每个子接口上做.在S0/0上做无效)
R1#show ip os nei
Neighbor ID Pri State Dead Time Address Interface
4.4.4.4 0 FULL/ - 00:00:36 192.168.14.4 Serial0/0.14
3.3.3.3 0 FULL/ - 00:00:35 192.168.13.3 Serial0/0.13
R1#
正常建立邻居.不需要选举DR
R4#show ip rou
......
1.0.0.0/32 is subnetted, 1 subnets
O 1.1.1.1 [110/65] via 192.168.14.1, 00:02:01, Serial0/0
O 192.168.13.0/24 [110/128] via 192.168.14.1, 00:02:01, Serial0/0
C 192.168.14.0/24 is directly connected, Serial0/0
3.0.0.0/32 is subnetted, 1 subnets
O 3.3.3.3 [110/129] via 192.168.14.1, 00:02:01, Serial0/0
4.0.0.0/24 is subnetted, 1 subnets
C 4.4.4.0 is directly connected, Loopback0
R4#
路由表正常.不需要干预
总结:
1.在帧中继网络.有2个关于广播的参数.一个是,DLCI映射支持广播.这个支持广播是指广播包能在网络中传输.另外一个是接口上的类型,这个类型是广播.表示这个接口能产生广播包.
2.OSPF网络类型有2种.MA和NBMA. MA下支持广播.一切正常.但是在NBMA下由于不支持广播.需要用其他手段来使OSPF正常.
RFC:
1.NBMA. 手动定义邻居
2.point-multipoint 使接口配置成point-multipoint,这样能自动发现邻居.不需要选举DR/BDR.
CISCO:
1.point-multipoint nonbroadcast .非广播下需要手动定义邻居,不需要选举DR/BDR
2.Broadcast .把接口更改为广播类型.如上面实验一,就是应用了这个特性.
3.point-point. 使用点到点子接口,能自动发现邻居,不需要选举DR/BDR
3.在NBMA下.如果采用手动定义邻居的方法.需要注意网络拓扑,因为NBMA手动定义邻居需要选举DR.如果网络拓扑只是部分互联,需要干预DR的选择.不然会出错
4.在Point-Multipoint 里面,各个邻居的接口都是要定义这个类型,如果R1上是Point-Multipoint ,R3上是Point-Point.默认情况下不能建立,因为点到点,点到多点2仲类型的HELLO时间不同,但是手动修改Point-Point的hello时间后,也能正常工作.
5.在Point-Point里面,要注意为子接口配上所对应的DLCI
6.支持广播包的类型.邻居是能自动建立起来,反之,需要手动定义邻居
BMA和NBMA需要选举DR/BDR.涉及Point-X的不需要选举
只有BMA,Point-Point的HELLO时间是10S.其他都是30S
本文出自 “虾饺” 博客,转载请与作者联系!
