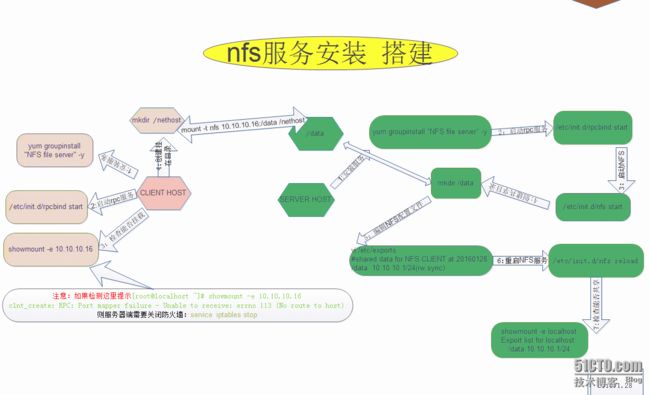
nfs 初步使用 创建SERVER AND CLIENT ,share files
首先安装NFS服务
yum groupinstall "NFS file server"
默认就给安装rpcbind(c6system)了
查询NFS服务向RPC服务注册的端口信息
[root@linux-chen ~]# rpcinfo -p localhost
   program vers proto   port  service
    100000    4   tcp    111  portmapper
    100000    3   tcp    111  portmapper
    100000    2   tcp    111  portmapper
    100000    4   udp    111  portmapper
    100000    3   udp    111  portmapper
    100000    2   udp    111  portmapper
    100024    1   udp  55908  status
    100024    1   tcp  53125  status
因为NFS还没起动,所以,现在没太多注册的端口映射信息。请留意和后面NFS启动后这里的对比
查询下现在NFS服务运行状态
[root@linux-chen ~]# /etc/init.d/nfs status
rpc.svcgssd 已停
rpc.mountd 已停
nfsd 已停
rpc.rquotad 已停
上边显示没有启动,我们现在启动
[root@linux-chen ~]# /etc/init.d/nfs start
启动 NFS 服务:                                            [确定]
关掉 NFS 配额:                                            [确定]
启动 NFS mountd:                                          [确定]
启动 NFS 守护进程:                                        [确定]
正在启动 RPC idmapd:                                      [确定]
如第一段所说我们在查询下NFS在RPC注册的端口数
[root@linux-chen ~]# rpcinfo -p localhost
   program vers proto   port  service
    100000    4   tcp    111  portmapper
    100000    3   tcp    111  portmapper
    100000    2   tcp    111  portmapper
    100000    4   udp    111  portmapper
    100000    3   udp    111  portmapper
    100000    2   udp    111  portmapper
    100024    1   udp  55908  status
    100024    1   tcp  53125  status
    100011    1   udp    875  rquotad
    100011    2   udp    875  rquotad
    100011    1   tcp    875  rquotad
    100011    2   tcp    875  rquotad
    100005    1   udp  51537  mountd
    100005    1   tcp  49708  mountd
    100005    2   udp  46369  mountd
    100005    2   tcp  49553  mountd
    100005    3   udp  56355  mountd
    100005    3   tcp  39360  mountd
    100003    2   tcp   2049  nfs
    100003    3   tcp   2049  nfs
    100003    4   tcp   2049  nfs
    100227    2   tcp   2049  nfs_acl
    100227    3   tcp   2049  nfs_acl
    100003    2   udp   2049  nfs
    100003    3   udp   2049  nfs
    100003    4   udp   2049  nfs
    100227    2   udp   2049  nfs_acl
    100227    3   udp   2049  nfs_acl
    100021    1   udp  60653  nlockmgr
    100021    3   udp  60653  nlockmgr
    100021    4   udp  60653  nlockmgr
    100021    1   tcp  56339  nlockmgr
    100021    3   tcp  56339  nlockmgr
    100021    4   tcp  56339  nlockmgr
果然多了很多
查询下NFS运行状态
[root@linux-chen ~]# /etc/init.d/nfs status
rpc.svcgssd 已停
rpc.mountd (pid 1572) 正在运行...
nfsd (pid 1588 1587 1586 1585 1584 1583 1582 1581) 正在运行...
rpc.rquotad (pid 1567) 正在运行...
设置成开机自动启动
[root@linux-chen ~]# chkconfig nfs on
[root@linux-chen ~]# chkconfig rpcbind on
[root@linux-chen ~]# chkconfig --list nfs
nfs            0:off1:off2:on3:on4:on5:on6:off
[root@linux-chen ~]# chkconfig --list rpcbind
rpcbind        0:off1:off2:on3:on4:on5:on6:off
分别more下 rpcbind and nfs server 看看哪个先启动 哪个后启动
[root@linux-chen ~]# more /etc/init.d/rpcbind
#! /bin/sh
#
# rpcbind Start/Stop RPCbind
#
# chkconfig: 2345 13 87
# description: The rpcbind utility is a server that converts RPC program \
# numbers into universal addresses. It must be running on the \
# host to be able to make RPC calls on a server on that machine.
#
# processname: rpcbind
# probe: true
# config: /etc/sysconfig/rpcbind
#!/bin/sh
#
# nfs           This shell script takes care of starting and stopping
#               the NFS services.
#
# chkconfig: - 30 60
# description: NFS is a popular protocol for file sharing across networks.
#              This service provides NFS server functionality, which is \
#              configured via the /etc/exports file.
# probe: true
# config: /etc/sysconfig/nfs
### BEGIN INIT INFO
# Provides: nfs
# Required-Start: $local_fs $network $syslog $rpcbind
# Required-Stop: $local_fs $network $syslog $rpcbind
# Default-Stop: 0 1 6
# Short-Description: Start up the NFS server sevice
# Description: NFS is a popular protocol for file sharing across networks \
#              This service provides NFS server functionality, \
#              which is configured via the /etc/exports file.
### END INIT INFO
很明显:rpc先启动nfs后启动,nfs先关闭。rpc后关闭
#####################################################################################
客户端配置
不用多说,看完上边的肯定看的懂下边的。只启动rpc即可。毕竟咱们是一般的client
[root@localhost ~]# service rpcbind start
[root@localhost ~]# /etc/init.d/rpcbind status
rpcbind (pid  2009) is running...
[root@localhost ~]# chkconfig rpcbind on
[root@localhost ~]# chkconfig --list rpcbind
rpcbind        0:off1:off2:on3:on4:on5:on6:off
##############################################################################
server端配置服务
配置文件位置
[root@linux-chen ~]# ll /etc/exports
-rw-r--r--. 1 root root 0 Jan 12 2010 /etc/exports
开始共享目录data
mkdir /data
复制一些内容到新建目录
cp -r /tmp/temp /data
[root@linux-chen temp]# ls
a.du b.du b.sh leran.log miao.xx test1.xx
vi /etc/exports
#shared data for NFS CLIENT at 20160128
/data  10.10.10.1/24(rw,sync)
"rw" 读写权限 “ro”只读权限 “sync”允许写入磁盘权限
重启服务
/etc/init.d/nfs reload
(reload=平滑重启即等连接的服务完成以后再退出)
检查下能否共享:
[root@linux-chen ~]# showmount -e localhost
Export list for localhost:
/data 10.10.10.1/24
##########################################################
CLIENT host
检查下能否共享
[root@localhost ~]# showmount -e 10.10.10.16
clnt_create: RPC: Port mapper failure - Unable to receive: errno 113 (No route to host)
这个错误是因为server host的防火墙没有关闭
所以要在SERVER-HOST操做
[root@linux-chen ~]# service iptables stop
iptables:将链设置为政策 ACCEPT:filter                    [确定]
iptables:清除防火墙规则:                                 [确定]
iptables:正在卸载模块:
CLIENT host 重新检查
回到client
[root@localhost ~]# showmount -e 10.10.10.16
Export list for 10.10.10.16:
/data 10.10.10.1/24
即可~!
好!我们现在挂载server的 /data
[root@localhost temp]# mount -t nfs 10.10.10.16:/data /nethost
[root@localhost ~]# cd /nethost/temp
[root@localhost temp]# ls
a.du  b.du  b.sh  leran.log  miao.xx  test1.xx
注意:SERVERhost /data 的目录其他人没有写入权限,所以 客户不能写入。修改后即可
chmod -t nfs 777 /data
附录:图片示意
