注:所有java框架配置都是基于maven创建的
先介绍下maven如何创建eclipse项目,eclipse安装maven插件看 链接
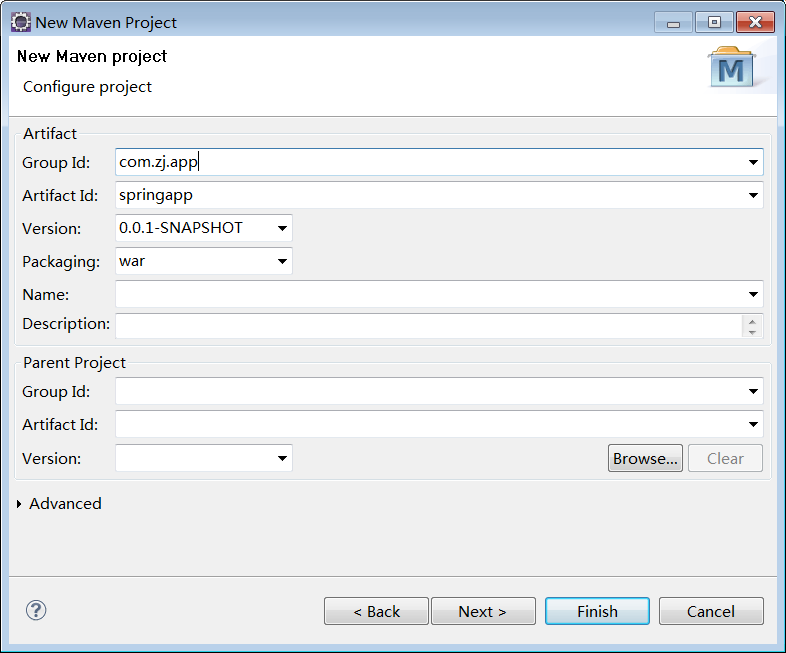
1 eclipse 中new-maven project
点击 create simple project ,填写属性

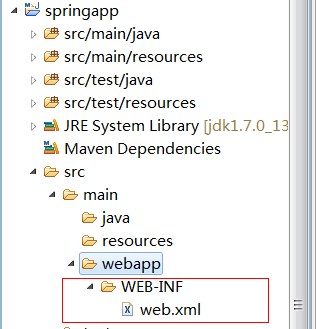
直接点finish,然后webapp里面添加WEB-INF文件夹和文件夹下的web.xml

web.xml内容暂时可以写为:
<?xml version="1.0" encoding="UTF-8"?>
<web-app version="2.5" xmlns="http://java.sun.com/xml/ns/javaee"
	xmlns:xsi="http://www.w3.org/2001/XMLSchema-instance"
	xsi:schemaLocation="http://java.sun.com/xml/ns/javaee
http://java.sun.com/xml/ns/javaee/web-app_2_5.xsd">
	<display-name>springapp</display-name>

</web-app>
web.xml的格式<?xml开头,注意web-app的几个属性,这里经常会导致其他问题很难找,可以让页面获取不到值。
以前是基本的maven 创建项目步骤,下面用maven配置框架,看spring的配置
<project xmlns="http://maven.apache.org/POM/4.0.0" xmlns:xsi="http://www.w3.org/2001/XMLSchema-instance" xsi:schemaLocation="http://maven.apache.org/POM/4.0.0 http://maven.apache.org/xsd/maven-4.0.0.xsd">
  <modelVersion>4.0.0</modelVersion>
  <groupId>com.zj.app</groupId>
  <artifactId>springapp</artifactId>
  <version>0.0.1-SNAPSHOT</version>
  <packaging>war</packaging>
  <name>test04 Maven Webapp</name>
  <url>http://maven.apache.org</url>
   <!-- 属性配置 -->
  <properties>
      <project.build.sourceEncoding>UTF-8</project.build.sourceEncoding>
  </properties>
  <dependencies>
    <dependency>
      <groupId>junit</groupId>
      <artifactId>junit</artifactId>
      <version>4.10</version>
      <scope>test</scope>
    </dependency>
    <!-- 添加Spring依赖 -->
    <dependency>
        <groupId>org.springframework</groupId>
        <artifactId>spring-core</artifactId>
        <version>3.1.1.RELEASE</version>
    </dependency>
    <dependency>
        <groupId>org.springframework</groupId>
        <artifactId>spring-beans</artifactId>
        <version>3.1.1.RELEASE</version>
    </dependency>
    <dependency>
        <groupId>org.springframework</groupId>
        <artifactId>spring-context</artifactId>
        <version>3.1.1.RELEASE</version>
    </dependency>
    <dependency>
        <groupId>org.springframework</groupId>
        <artifactId>spring-jdbc</artifactId>
        <version>3.1.1.RELEASE</version>
    </dependency>

  </dependencies>
  <!-- maven打包的名称 -->
  <build>
    <finalName>springapp</finalName>
  </build>
</project>
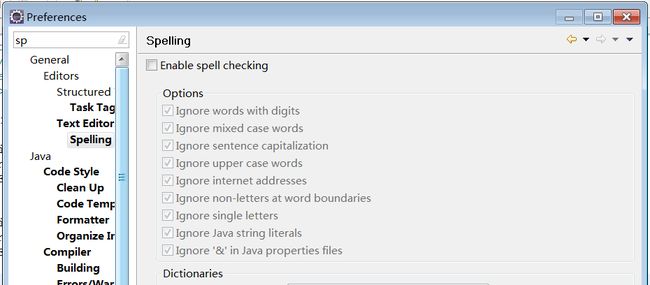
这个时候发现springapp 几个字在eclipse是红色的小警告,不要紧,是The word 'springapp' is not correctly spelled,并不是错误,在eclipse 去掉它

然后再resources目录创建application.xml文件
<?xml version="1.0" encoding="UTF-8"?>
<beans xmlns="http://www.springframework.org/schema/beans"
    xmlns:xsi="http://www.w3.org/2001/XMLSchema-instance" xmlns:aop="http://www.springframework.org/schema/aop"
    xmlns:tx="http://www.springframework.org/schema/tx" xmlns:context="http://www.springframework.org/schema/context"
    xsi:schemaLocation="
     http://www.springframework.org/schema/beans
     http://www.springframework.org/schema/beans/spring-beans-3.0.xsd
     http://www.springframework.org/schema/tx
     http://www.springframework.org/schema/tx/spring-tx-3.0.xsd
     http://www.springframework.org/schema/aop
     http://www.springframework.org/schema/aop/spring-aop-3.0.xsd
     http://www.springframework.org/schema/context
     http://www.springframework.org/schema/context/spring-context-3.0.xsd">

</beans>
暂时一个空的spring项目出来的
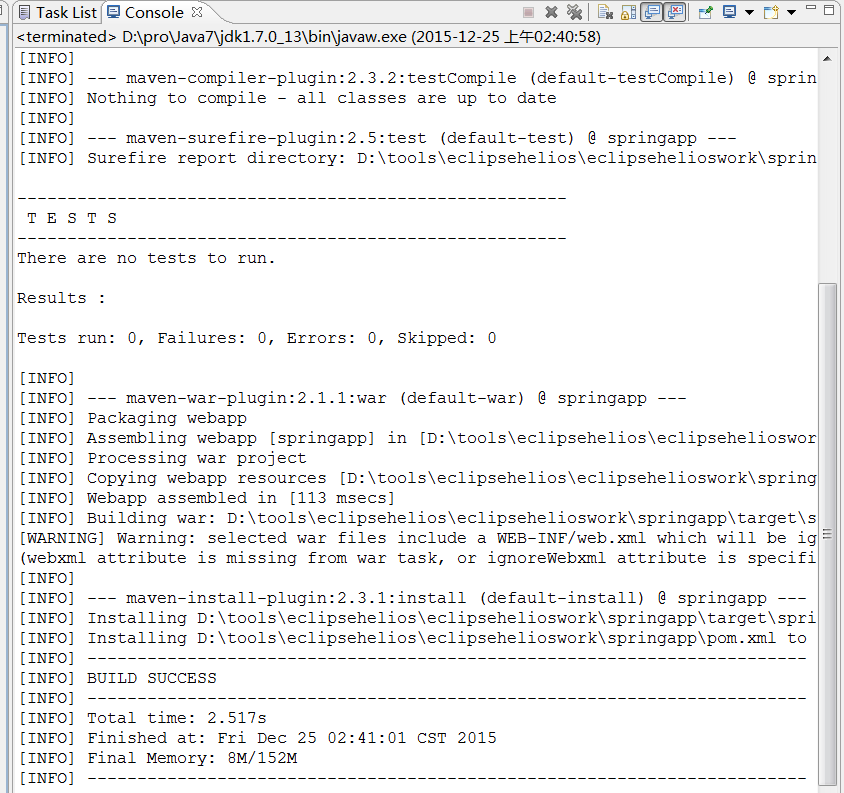
点击项目右键 run as -maven install
如果出现下面的内容一个空的spring项目就OK了

这些基本的步骤,后面不会再说,只会提到POM文件配置,先用最原始的方式学习
先用spring做一个基本的增删改查吧。对象以书Book为例
1 创建对象Book.java
package com.zj.app.book.entity;

import java.io.Serializable;
import java.math.BigDecimal;
public class Book implements Serializable {
	private static final long serialVersionUID = 1L;
	public Book() {

	}
	private Long id;
	// 标题
	private String title;
	// 描述
	private String describe;
	// 价格
	private BigDecimal price;
	// 类型
	private int type;
	// 剩余数量
	private int surplusAmount;
	public Long getId() {
		return id;
	}
	public void setId(Long id) {
		this.id = id;
	}
	public String getTitle() {
		return title;
	}
	public void setTitle(String title) {
		this.title = title;
	}
	public String getDescribe() {
		return describe;
	}
	public void setDescribe(String describe) {
		this.describe = describe;
	}
	public BigDecimal getPrice() {
		return price;
	}
	public void setPrice(BigDecimal price) {
		this.price = price;
	}
	public int getType() {
		return type;
	}
	public void setType(int type) {
		this.type = type;
	}
	public int getSurplusAmount() {
		return surplusAmount;
	}
	public void setSurplusAmount(int surplusAmount) {
		this.surplusAmount = surplusAmount;
	}
}
2 dao接口
package com.zj.app.book.dao;

public interface IBookDao {
	public void saveBook();
}
dao实现
package com.zj.app.book.dao.impl;
import com.zj.app.book.dao.IBookDao;
public class BookDaoImpl implements IBookDao {
	public void saveBook() {
		System.out.println("---dao save start-----");
		System.out.println("保存对象");
		System.out.println("---dao save start-----");
	}
}
service接口
package com.zj.app.book.service;
public interface IBookService {
    public void saveBook();
}
service实现
package com.zj.app.book.service.impl;
import com.zj.app.book.dao.IBookDao;
import com.zj.app.book.service.IBookService;
public class BookServiceImpl implements IBookService {
    private IBookDao iBookDao;
    public void setBookDao(IBookDao bookDao) {
        this.iBookDao = bookDao;
    }
    public void saveBook() {
        System.out.println("---service save start-----");
        iBookDao.saveBook();
        System.out.println("---service save end-----");
    }
}
然后Junit 测试下
package com.zj.app.book;

import org.junit.Before;
import org.junit.Test;
import org.springframework.beans.factory.BeanFactory;
import org.springframework.context.support.ClassPathXmlApplicationContext;
import com.zj.app.book.service.IBookService;
public class BookTest {
	private BeanFactory factory = null;
	@Before
	public void before() {
		factory = new ClassPathXmlApplicationContext("applicationContext.xml");
	}
	@Test
	public void testSpring() {
		IBookService bookService = (IBookService) factory
				.getBean("bookService");
		bookService.saveBook();
	}
}
运行结果为

简答的测试结束了 spring运行是正常的
下面配置一下 springmvc之后再配置mybatis
POM配置不够灵活,先改下POM
这种方式修改版本比上面更方便
<project xmlns="http://maven.apache.org/POM/4.0.0" xmlns:xsi="http://www.w3.org/2001/XMLSchema-instance" xsi:schemaLocation="http://maven.apache.org/POM/4.0.0 http://maven.apache.org/xsd/maven-4.0.0.xsd">
  <modelVersion>4.0.0</modelVersion>
  <groupId>com.zj.app</groupId>
  <artifactId>springapp</artifactId>
  <version>0.0.1-SNAPSHOT</version>
  <packaging>war</packaging>
  <name>Maven Webapp</name>
  <url>http://maven.apache.org</url>
  <!-- 属性配置 -->
  <properties>
  	<spring.version>3.1.1.RELEASE</spring.version>
  	<junit.version>4.11</junit.version>
	<jdk.version>1.7</jdk.version>
     <project.build.sourceEncoding>UTF-8</project.build.sourceEncoding>
  </properties>
  <dependencies>
		<dependency>
			<groupId>org.springframework</groupId>
			<artifactId>spring-core</artifactId>
			<version>${spring.version}</version>
		</dependency>
		<dependency>
	        <groupId>org.springframework</groupId>
	        <artifactId>spring-beans</artifactId>
	        <version>${spring.version}</version>
	    </dependency>
	    <dependency>
	        <groupId>org.springframework</groupId>
	        <artifactId>spring-context</artifactId>
	        <version>${spring.version}</version>
	    </dependency>
	    <dependency>
	        <groupId>org.springframework</groupId>
	        <artifactId>spring-jdbc</artifactId>
	        <version>${spring.version}</version>
	    </dependency>
	    <dependency>
			<groupId>org.springframework</groupId>
			<artifactId>spring-web</artifactId>
			<version>${spring.version}</version>
		</dependency>
		<dependency>
			<groupId>org.springframework</groupId>
			<artifactId>spring-webmvc</artifactId>
			<version>${spring.version}</version>
		</dependency>

		<dependency>
			<groupId>junit</groupId>
			<artifactId>junit</artifactId>
			<version>${junit.version}</version>
			<scope>test</scope>
		</dependency>

  </dependencies>
  <!-- maven打包的名称 -->
  <!-- ========================= -->
  <build>
		<finalName>springapp</finalName>
		<plugins>
			<plugin>
				<groupId>org.apache.maven.plugins</groupId>
				<artifactId>maven-compiler-plugin</artifactId>
				<version>3.0</version>
				<configuration>
					<source>${jdk.version}</source>
					<target>${jdk.version}</target>
				</configuration>
			</plugin>
		</plugins>
	</build>
	<!-- ========================= -->
</project>
这样就方便了好多,下面开始spring mvc
下面配置一下springmvc
把 application.xml删掉,web-inf文件夹下建 文件 mvc-dispatcher-servlet.xml
<?xml version="1.0" encoding="UTF-8"?>
<beans xmlns="http://www.springframework.org/schema/beans"
    xmlns:xsi="http://www.w3.org/2001/XMLSchema-instance" xmlns:aop="http://www.springframework.org/schema/aop"
    xmlns:tx="http://www.springframework.org/schema/tx" xmlns:context="http://www.springframework.org/schema/context"
    xsi:schemaLocation="
     http://www.springframework.org/schema/beans
     http://www.springframework.org/schema/beans/spring-beans-3.0.xsd
     http://www.springframework.org/schema/tx
     http://www.springframework.org/schema/tx/spring-tx-3.0.xsd
     http://www.springframework.org/schema/aop
     http://www.springframework.org/schema/aop/spring-aop-3.0.xsd
     http://www.springframework.org/schema/context
     http://www.springframework.org/schema/context/spring-context-3.0.xsd">
     <context:component-scan base-package="com.zj.app.book.controller" />
	<bean
		class="org.springframework.web.servlet.view.InternalResourceViewResolver">
		<property name="prefix">
			<value>/WEB-INF/pages/</value>
		</property>
		<property name="suffix">
			<value>.jsp</value>
		</property>
	</bean>
     <bean id="bookDao" class="com.zj.app.book.dao.impl.BookDaoImpl"></bean>
     <bean id="bookService" class="com.zj.app.book.service.impl.BookServiceImpl">
		<property name="bookDao" ref="bookDao"></property>
     </bean>
</beans>
之前application.xml的配置都放这里了
web.xml修改下:
<?xml version="1.0" encoding="UTF-8"?>
<web-app version="2.5" xmlns="http://java.sun.com/xml/ns/javaee"
	xmlns:xsi="http://www.w3.org/2001/XMLSchema-instance"
	xsi:schemaLocation="http://java.sun.com/xml/ns/javaee
http://java.sun.com/xml/ns/javaee/web-app_2_5.xsd">
	<display-name>springapp</display-name>
	<servlet>
		<servlet-name>mvc-dispatcher</servlet-name>
		<servlet-class>org.springframework.web.servlet.DispatcherServlet</servlet-class>
		<load-on-startup>1</load-on-startup>
	</servlet>

	<servlet-mapping>
		<servlet-name>mvc-dispatcher</servlet-name>
		<url-pattern>/</url-pattern>
	</servlet-mapping>

	<context-param>
		<param-name>contextConfigLocation</param-name>
		<param-value>/WEB-INF/mvc-dispatcher-servlet.xml</param-value>
	</context-param>

	<listener>
		<listener-class>org.springframework.web.context.ContextLoaderListener</listener-class>
	</listener>
</web-app>
然后 新增java文件
package com.zj.app.book.controller;

import org.springframework.beans.factory.annotation.Autowired;
import org.springframework.stereotype.Controller;
import org.springframework.ui.ModelMap;
import org.springframework.web.bind.annotation.PathVariable;
import org.springframework.web.bind.annotation.RequestMapping;
import org.springframework.web.bind.annotation.RequestMethod;

import com.zj.app.book.service.IBookService;
@Controller
@RequestMapping("/")
public class BookController {
    @Autowired
    IBookService iBookService;              ;
	@RequestMapping(value = "/welcome", method = RequestMethod.GET)
	public String welcome(ModelMap model) {
		model.addAttribute("message","hellojava");
		return "index";
	}
	@RequestMapping(value = "/welcome/{name}", method = RequestMethod.GET)
	public String welcomeName(@PathVariable String name,ModelMap model) {
		iBookService.saveBook();
		model.addAttribute("message", " /welcome hellojava"
				+ name);
		return "index";
	}
}
web-inf文件夹下 建立 pages文件夹 然后再pages文件夹下创建index.jsp
<%@ page language="java" contentType="text/html; charset=UTF-8" pageEncoding="UTF-8"%>
<!DOCTYPE html PUBLIC "-//W3C//DTD HTML 4.01 Transitional//EN" "http://www.w3.org/TR/html4/loose.dtd">
<html>
<head>
<meta http-equiv="Content-Type" content="text/html; charset=UTF-8">
<title>你好</title>
</head>
<body>
	<h1>你好${message}</h1>
</body>
</html>
jetty运行项目,输入 http://localhost:8080/springapp/welcome/dsf
同时看下控制台,service和dao的输出。
现在又向前走了一步了。
下一步需要进一步做数据库的操作,框架用mybatis,此文有点过长了,写在下一篇吧
maven代码也放上来 仅仅8kb maven真爽


