在Openresty环境下搭建视频服务器
环境说明:
1. 操作系统----CentOS7
安装过程(以下安装过程以root执行,目录假定在/opt):
1. 安装必要的依赖库
2. 安装drizzle7-2011.07.21
3. 安装nginx_mod_h264_streaming-2.2.7
此处注意:如果是64位系统,需要修改文件:nginx_mod_h264_streaming-2.2.7/src/ngx_http_streaming_module.c,将158-161行代码注释(
)
4. 安装openresty
5. 安装yamdi【其作用是为flv文件添加关键帧,才能实现拖动播放】
6. 上传你的视频flv或mp4文件到服务器到/opt/openresty/nginx/html/flv目录下
7. 配置openresty
内容如下,重点在server部分:
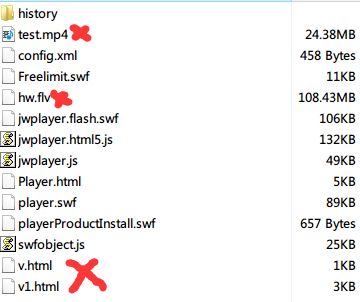
8. 下载JWPlayer,并上传到/opt/openresty/nginx/html/flv目录,见图:

注:带X的文件非必要文件,mp4或flv为测试用。
9. 启动Openresty中的nginx
如果启动成功,访问 http://你的服务器IP/player.swf?type=http&file=test.mp4

其中:player.swf是JW Player播放器
http表示基于http分发方式
test1.mp4为待播放的视频文件
参考: http://www.itf5.com/nginx/236.html#597806-qzone-1-76085-0d330c1129111f0caa3695e5a48539b8
1. 操作系统----CentOS7
安装过程(以下安装过程以root执行,目录假定在/opt):
# cd /opt
1. 安装必要的依赖库
        # yum install -y zlib
        # yum install -y pcre
        # yum install -y gcc gcc-c++ readline-devel pcre-devel openssl-devel tcl perl
2. 安装drizzle7-2011.07.21
        # wget http://openresty.org/download/drizzle7-2011.07.21.tar.gz  -- 此处如果下载不了,可以搜索到文件下载到本地,进行本地安装。
        # tar xzvf drizzle7-2011.07.21.tar.gz
        # cd drizzle7-2011.07.21/
        # ./configure --without-server
        # make libdrizzle-1.0
        # make install-libdrizzle-1.0
        <<< 安装完成,修改环境变量或加入到~/.bash_profile中:>>>
        # export LD_LIBRARY_PATH=/usr/local/lib:$LD_LIBRARY_PATH
3. 安装nginx_mod_h264_streaming-2.2.7
        # wget http://h264.code-shop.com/download/nginx_mod_h264_streaming-2.2.7.tar.gz
        # tar xzvf nginx_mod_h264_streaming-2.2.7.tar.gz
此处注意:如果是64位系统,需要修改文件:nginx_mod_h264_streaming-2.2.7/src/ngx_http_streaming_module.c,将158-161行代码注释(
       /* TODO: Win32 */
       if (r->zero_in_uri)
       {
            return NGX_DECLINED;
       }
)
4. 安装openresty
        # wget https://openresty.org/download/ngx_openresty-1.9.3.2.tar.gz
        # tar xzvf ngx_openresty-1.9.3.2.tar.gz
        # cd ngx_openresty-1.9.3.2
        # ./configure --prefix=/opt/openresty --with-luajit --with-http_drizzle_module --with-http_iconv_module --add-module=/opt/nginx_mod_h264_streaming-2.2.7 --with-http_flv_module --with-http_stub_status_module
        # gmake
        # gmake install
5. 安装yamdi【其作用是为flv文件添加关键帧,才能实现拖动播放】
        # wget http://jaist.dl.sourceforge.net/project/yamdi/yamdi/1.4/yamdi-1.4.tar.gz
        # tar xzvf yamdi-1.4.tar.gz
        # cd yamdi-1.4/
        # make && make install
6. 上传你的视频flv或mp4文件到服务器到/opt/openresty/nginx/html/flv目录下
        # cd /opt/openresty/nginx/html/flv
        # yamdi -i 你的视频.mp4 -o test.mp4
7. 配置openresty
        # cd /opt/openresty/nginx/conf
        # vim nginx.conf
内容如下,重点在server部分:
#user  nobody;
worker_processes  2;

#error_log  logs/error.log;
#error_log  logs/error.log  notice;
#error_log  logs/error.log  info;

#pid        logs/nginx.pid;

events {
    use epoll;
    worker_connections  1024;
}

http {
    include       mime.types;
    default_type  application/octet-stream;

    #log_format  main  '$remote_addr - $remote_user [$time_local] "$request" '
    #                  '$status $body_bytes_sent "$http_referer" '
    #                  '"$http_user_agent" "$http_x_forwarded_for"';

    #access_log  logs/access.log  main;

    sendfile        on;
    #tcp_nopush     on;

    keepalive_timeout  65;
    server_names_hash_bucket_size 128;
    client_header_buffer_size 32k;
    large_client_header_buffers 4 32k;
    access_log off;
    gzip on;
    gzip_min_length 1100;
    gzip_buffers 4 8k;
    gzip_types text/plain;
    output_buffers 1 32k;
    postpone_output 1460;
    client_header_timeout 3m;
    client_body_timeout 3m;
    send_timeout 3m;
    tcp_nopush on;
    tcp_nodelay on;

    #gzip  on;

    server {
        listen       80;
        server_name  localhost;
        ####  关键部分  ####
        root html/flv;
        limit_rate_after 5m; ####在flv视频文件下载了5M以后开始限速
        limit_rate 512k; ####速度限制为512K
        index index.html;
        charset utf-8;

        location ~ /.flv {
           flv;
        }

        location ~ /.mp4 {
           mp4;
        }
        #### 结束 ####
        #error_page  404              /404.html;
        error_page   500 502 503 504  /50x.html;
        location = /50x.html {
            root   html;
        }
    }
}
8. 下载JWPlayer,并上传到/opt/openresty/nginx/html/flv目录,见图:

注:带X的文件非必要文件,mp4或flv为测试用。
9. 启动Openresty中的nginx
# /opt/openresty/nginx/sbin/nginx
如果启动成功,访问 http://你的服务器IP/player.swf?type=http&file=test.mp4

其中:player.swf是JW Player播放器
http表示基于http分发方式
test1.mp4为待播放的视频文件
参考: http://www.itf5.com/nginx/236.html#597806-qzone-1-76085-0d330c1129111f0caa3695e5a48539b8