回顾
在上一篇文章,利用Spring Security 3.2的remember-me搭建SSO,我做了一个简单的单点登录。但其毕竟不够健壮,比如无法点单登出,也无法与非Spring Security的应用集成。今天,我将使用CAS重新搭建SSO。
本实验架构图
以下是本实验要搭建的服务的架构图,两个web应用网站和一个认证中心。三个网站均隐藏在Apache reverse proxy身后。
本实验使用的软件:
-
Spring Security 3.2
-
CAS 3.5.2
-
Apache Httpd 2.2
-
Tomcat 8
-
OpenLdap 2.4
-
OpenSSL
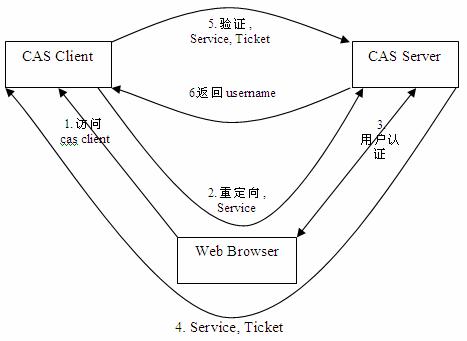
CAS原理
这不是本文的重点。但如果不提一下,后面的实验则可能会比较困难。我在网上找了张别人画的图,清晰的解释了CAS是如何工作的。
简单的讲,CAS client将用户转向CAS server,用户在CAS server上登陆,产生了ticket。CAS server将用户转回CAS client页面,带着ticket参数。 CAS client悄悄的使用httpClient向CAS server索取用户全部信息,凭证就是ticket。CAS server将用户信息返回给CAS client,client对用户进行检验并重定向到原始请求的页面。
安装配置CAS Server
CAS Server只是一个部署在服务器上的java web应用,并且其使用的是Spring工具包,所以在配置CAS和LDAP上,跟Spring的ldap配置几乎相同。我还是使用之前配好的OpenLDAP,见OpenLDAP搭建。
CAS server的源码和安装文件都在一起,可以从http://www.jasig.org/cas/download下载。下载完以后,将里面的maven项目全部导入到eclipse中。建议使用Spring tool suite。Eclipse在导入这些maven项目时,会有一些错误。怕麻烦的话,就用STS吧。
在项目cas-server-webapp下,编辑pom.xml,增加ldap的依赖:
|
1
2
3
4
5
|
<
dependency
>
<
groupId
>org.jasig.cas</
groupId
>
<
artifactId
>cas-server-support-ldap</
artifactId
>
<
version
>${project.version}</
version
>
</
dependency
>
|
然后打开WEB-INF下的deployerConfigContext.xml,在最后面添加:
|
1
2
3
4
5
6
7
8
9
10
11
12
13
14
|
<
bean
id
=
"contextSource"
class
=
"org.springframework.ldap.core.support.LdapContextSource"
>
<
property
name
=
"pooled"
value
=
"false"
/>
<
property
name
=
"url"
value
=
"ldap://127.0.0.1:389/dc=mycompany,dc=com"
/>
<
property
name
=
"userDn"
value
=
"cn=admin,dc=mycompany,dc=com"
/>
<
property
name
=
"password"
value
=
"admin"
/>
<
property
name
=
"baseEnvironmentProperties"
>
<
map
>
<
entry
key
=
"com.sun.jndi.ldap.connect.timeout"
value
=
"3000"
/>
<
entry
key
=
"com.sun.jndi.ldap.read.timeout"
value
=
"3000"
/>
<
entry
key
=
"java.naming.security.authentication"
value
=
"simple"
/>
</
map
>
</
property
>
</
bean
>
|
注释掉SimpleTestUsernamePasswordAuthenticationHandler并加入新的代码:
|
1
2
3
4
5
6
|
<!-- <bean class="org.jasig.cas.authentication.handler.support.SimpleTestUsernamePasswordAuthenticationHandler" />
-->
<
bean
class
=
"org.jasig.cas.adaptors.ldap.BindLdapAuthenticationHandler"
p:filter
=
"uid=%u"
p:searchBase
=
"ou=people"
p:contextSource-ref
=
"contextSource"
/>
|
另外需要注册cas client,否则cas server则不信任client发送的任何请求。在deployerConfigContext.xml找到serviceRegistryDao。本文使用最简单的方式:
|
1
2
3
4
5
6
7
|
<
bean
class
=
"org.jasig.cas.services.RegexRegisteredService"
>
<
property
name
=
"id"
value
=
"0"
/>
<
property
name
=
"name"
value
=
"HTTPS and IMAPS"
/>
<
property
name
=
"description"
value
=
"Allows HTTPS and IMAPS protocols"
/>
<
property
name
=
"serviceId"
value
=
"^(https?|imaps?)://.*"
/>
<
property
name
=
"evaluationOrder"
value
=
"10000001"
/>
</
bean
>
|
maven install将cas-server-webapp构建成cas.war,然后部署在tomcat4上。启动tomcat4,可以访问http://localhost:8003/cas/login并尝试用ldap用户登录。
CAS Server开启Https
尽管我的CAS server是隐藏在Apache代理的后面,CAS Server还是要求使用Https进行登录验证。在文章Apache httpd开启SSL中, 我曾经使用openSSL开启了apache的HTTPS。由于CAS server隐藏在Apache之后,所以我对CAS server的SSL证书并不在乎其权威性,只需要使用本地keytool产生一个证书即可。步骤如下:
-
生成服务器证书 keytool -genkey -alias casServer -keyalg RSA -keystore d:/servers/keys/casServerStore, 密码为:wwwtestcom。
特别注意:名字与姓氏一定要使用网站的域名,例如cas.test.com。Cas Client使用httpclient访问cas server的时候,会严格的检查证书。
-
导出证书:keytool -export -file d:/servers/keys/casServer.crt -alias casServer -keystore d:/servers/keys/casServerStore, 导出的证书需要导入cas client jvm中。但本例我们将cas server隐藏在了apache proxy的后面了,所以并不需要导入此证书。而我们需要向cas client中导入的是apache proxy的SSL证书。
-
修改TOMCAT配置文件:tomcat/conf/server.xml
首先关闭APR模式。 在APR模式下,SSL的配置参数跟非APR模式完全不一样,详细请参考tomcat手册。
123<!--APR library loader. Documentation at /docs/apr.html<Listener className="org.apache.catalina.core.AprLifecycleListener" SSLEngine="on" />-->然后开启tomcat的https connector.
1234<Connectorport="8443"protocol="HTTP/1.1"SSLEnabled="true"maxThreads="150"scheme="https"secure="true"clientAuth="false"sslProtocol="TLS"keystoreFile="d:/servers/keys/casServerStore"keystorePass="wwwtestcom"/>
重启tomcat4,你可以访问https://cas.test.com:8443/cas/login 了。
Apache代理CAS Server
为了节省IP,继续使用之前firstWeb与secondWeb共用的apache。共用Apache的方法有一个缺陷,我后面会提到。
首先为我们新的auth.test.com产生新的SSL证书,请根据之前文章中列出的步骤做:OpenSSL生成证书步骤。记住Common Name必须为auth.test.com. 我们将得到authServer.crt与authServer.key.
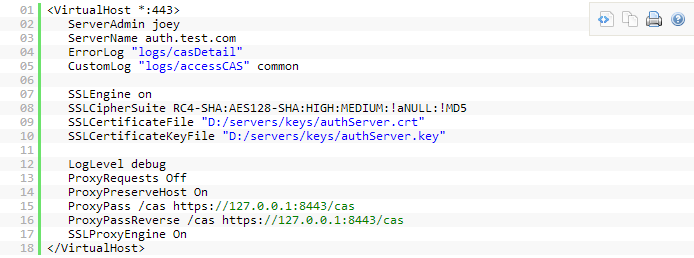
然后在httpd-ssl.conf中添加新的逆向代理,为了节省文字,不突破上限1万字,我用图片代替代码:
重启apache,现在可以使用https://www.test.com/cas/login来访问cas服务器了。
为CAS客户端导入SSL证书
CAS client是跑在tomcat上的一个servletFilter。CAS client使用HttpClient与CAS server打交道,因为中间存在着apache代理,所以HttpClient实际是与apache打交道。如果httpClient的环境不信任 apache的SSL证书,就会产生SSLHandshakeException和SunCertPathBuilderException:
所以需要把apache的证书导入到tomcat的jvm中。由于openssl产生的authServer.crt并不是x509证书,无法被导入到java cacerts中。需要将authServer.crt转为x509格式.
|
1
|
>openssl x509 -in authServer.crt -inform PEM -out authServer.der -outform DER
|
然后将authServer.der导入java的cacerts中:
|
1
|
keytool -
import
-keystore %JAVA_HOME%/jre/lib/security/cacerts -file pathto/authServer.der -alias auth.test.com
|
注意,这里有个bug。我导入了证书以后,CASClient还是报SunCertPathBuilderException,我向JVM加启动参数
-Djavax.net.debug=all
来 调试SSL握手过程。发现接受的证书并不是auth.test.com的,而是来自于httpd-ssl.conf中<VirtualHost _default_:443>定义中的证书。我猜想httpclient在进行SSL握手的时候,使用的是IP地址,所以转向了_default_ 虚拟网站,并获取了它的证书。为了解决此问题,我不得不把<VirtualHost _default_:443>中的证书指定与auth.test.com相同的证书。
开发CAS客户端
FirstWeb与SecondWeb若想通过CAS服务器来做登录验证,需要与CAS的客户端集成。CAS客户端在java web上则是一个servlet filter。接下来配置firstWeb与secondWeb的CAS客户端。
以下代码修改都是基于前一篇文章开启Remember Me SSO之前的Firstweb与SecondWeb.这两个的初始源码可以从下面地址下载:
修改前的FirstWeb的源码在此:http://pan.baidu.com/s/1nthpuDN
修改前的secondWeb的源码可以从这里下载http://pan.baidu.com/s/1o64TQ9k
我只展示如何修改secondWeb。步骤如下:
-
在pom.xml中声明对CAS client的依赖:
123456<dependency><groupId>org.springframework.security</groupId><artifactId>spring-security-cas</artifactId><version>3.2.0.RELEASE</version><scope>compile</scope></dependency> -
因为登陆页面已经交给了CAS,所以删除自己的login.jsp。但创建一个403.jsp,用于展示access dennied。
-
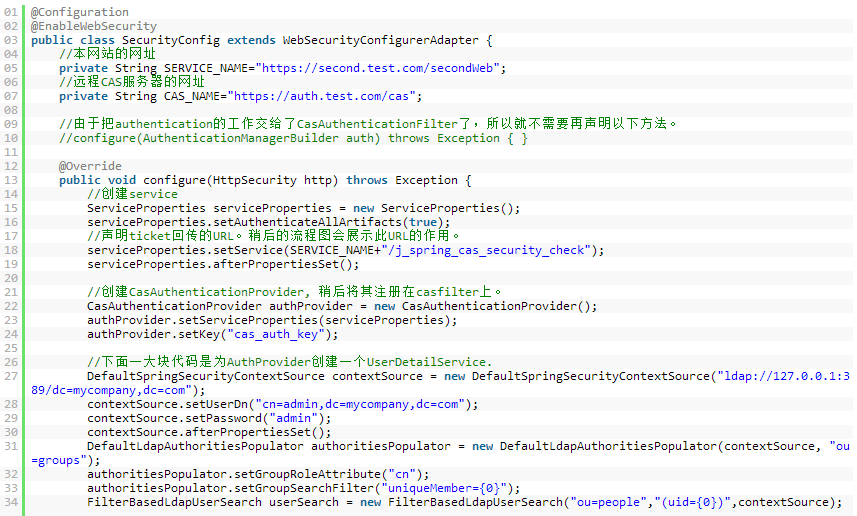
对Spring Security进行配置。由于之前我一直用的javaconfig。随着复杂度的增加,javaconfig越来越麻烦,网上也没教程。XML配置的教 程到很多。但实在是不想修改了,于是继续坚持使用javaconfig。以下是Spring的javaconfig:
为了控制字数,我用截图来展示代码和注释。 源码可下载。
之前的formLogin()和rememberMe()全部删除了,因为这两块全部交给了CAS Server来做。
-
修改index.jsp中的logout URL
1<ahref="${pageContext.request.contextPath }/j_spring_cas_security_logout">logout</a> -
为了能够单点登出,除了在第3步中注册的SingleSignOutFilter,(注意SingleSignOutFilter需要注册在CsrfFilter之前,否则会被Csrf阻挡)。还需要在web.xml中添加下面一段代码。此外,还需要把https://second.test.com的SSL证书导入到CAS服务器的JVM中。原理在下面讲。
12345<listener><listener-class>org.jasig.cas.client.session.SingleSignOutHttpSessionListener</listener-class></listener> -
修改完毕,打包部署。
CAS单点登录的时序图
为了更好的理解上面的代码,我将用时序图来解释,当未认证的用户访问受保护页面的时候,代码都做了哪些工作。
CAS单点登出原理
CAS的单点登出是自动实现了。FirstWeb与SecondWeb使用同一个CAS登录。用户在同一个浏览器中做了以下几个操作:
-
登录FirstWeb, 转向cas server登录页面。登录以后,浏览器中存放有cas server的cookie.
-
登录SecondWeb,直接使用浏览器中的cas server cookie,自动登录了。
用户在完成上面的操作时,cas server端自动的将来自firstWeb和secondWeb网站的service URL和它们共用的cas server cookie存储起来了。
FirstWeb的service url是https://first.test.com/firestWeb/html/j_spring_cas_security_check
SecondWeb的service url是https://second.test.com/secondWeb/j_spring_cas_security_check
当用户注销firstWeb的时候,会转向cas的登出页面,cas服务器会根据firstWeb提交的cookie,而列出所有跟此cookie 绑定在一起的service url. 然后cas服务器会通过httpclient向所有的service url发送下面的请求:
|
1
|
post SERVICE_URL?LogoutRequest=<
samlp:LogoutRequest
xmlns:samlp
=
"urn:oasis:names:tc:SAML:2.0:protocol"
ID
=
"LR-29-s7cF2OLhk7I3fN03ifDMTMbQ4tPedaR0jTJ"
Version
=
"2.0"
IssueInstant
=
"2014-03-04T01:38:14Z"
><
saml:NameID
xmlns:saml
=
"urn:oasis:names:tc:SAML:2.0:assertion"
>@NOT_USED@</
saml:NameID
><
samlp:SessionIndex
>ST-28-ZvyU0hUzbMkzLiQqnkdY-cas.test.com</
samlp:SessionIndex
></
samlp:LogoutRequest
>
|
上面的请求会被SingleSignOutFilter所截获。然后销毁其session。
注意:既然是使用了httpclient发送请求,如果service url使用的是https, 那需要把不信任的证书先导入到服务器运行环境中。
最后的源代码以及WAR下载
http://pan.baidu.com/s/1Byc9o 其中cas.war是CAS server。其它的都可以根据名字猜出是什么。
有疑问可以跟我联系,[email protected], QQ14687489
改造架构
为了统一域名,减少SSL证书,让所有的网站看起来像一个网站,请把上面的架构改造成如下:
-
使用同一个域名www.test.com.
-
对外使用https,对内全部使用ajp协议。
-
Apache与cas server之间使用ajp联系。
以上是我在本地做的最后改动,步骤和代码就不上传了,留给大家自己去尝试吧。有问题可联系。


