Struts2应用笔记
一、Struts基础
1.当你想访问其他包里面的action怎么办?
将result类型改为redirectAction
<param name="actionName"></param>
<param name="namespace">指定该包的nameSpace</param>
2.当我想访问同一个包里面的其他action怎么办?
<result type="redirect">action名</result>
3.如何为action中的属性注入值?
在action中
<param name="属性名">属性值</param>
4.如何把.action改成其他的后缀?
在<struts>
<constant name="struts.action.extension" value="do"/>
</struts>这样的方式做就把action后缀改成了do
<struts>
<constant name="struts.action.extension" value="action"/>
</struts>这样的方式是默认
<struts>
<constant name="struts.action.extension" value="action,do"/>
</struts>同时指定多个后缀
5.Struts加载常量的搜索顺序?
struts-default.xml
struts-plugin.xml
struts.xml 最好使用这个定义常量
struts.propreties
web.xml
6.一些常量的设置方法以及各自的作用
1.指定默认编码集
<constant name="struts.i18n.encoding" value="UTF-8"/>
2.设置浏览器是否缓存静态内容(默认是true)
<constant name="struts.serve.static.browserCache" value="false"/>
3.当struts的配置文件修改后,系统是否自动加载该文件,默认为false
<constant name="struts.configuration.xmlreload" value="true"/>
4. 开发模式下使用,可以打印更详细的错误信息
<constant name="struts.devMode" value="true"/>
5.默认的视图主题
<constant name="struts.ui.theme" value="simple"/>
6.与spring集成时,指定由spring负责action对象的创建
<constant name="struts.objectFactory" value="spring"/>
7.struts2是否支持动态方法调用,默认为True
<constant name="struts.enable.DynamicMethodInvocation" value="true"/>
8.上传文件大小的限制
<constant name="struts.multipart.maxSize" value="10701096"/> 超过即不接受
7.struts2的处理流程
二、Struts进阶2
1.为应用配置多个xml文件
首先要配置一个公共的XML文件,就相当于Struts最重要的xml
然后各个模块一般都会有一个xml文件
紧接着在主要的xml文件下
<include file="模块.xml"/>
<include file="模块.xml"/>
<include file="模块.xml"/>
.
.
.
2.动态方法调用
1 .动态调用我们自己写的类中的其他方法
- 直接在Struts文件的 <action name="hello" class="com.peng.web.HelloAction">//方法名,类文件
中加一个method=“”双引号中是你的类中自定义的方法
- 在页面调用的时候填写
在页面的方法中填写Action名!方法名例如 <s:form action="action!aa"/><form action="action!aa.action"/>
2.通配符Action调用动态方法(牛逼)
在XML文件中 <action name="*_*" class="com.peng.{1}action" method={2}>//method={2}z这个是作为案例的,可以不写<result >{2}.jsp</result></action>则在连接中,<a href="text_save.action">
3.参数传递
在action使用复合类型(实体类 例如persion)
private Persion persion;
在传递参数的时候用persion.id,persion.name 等等进行传递和接收
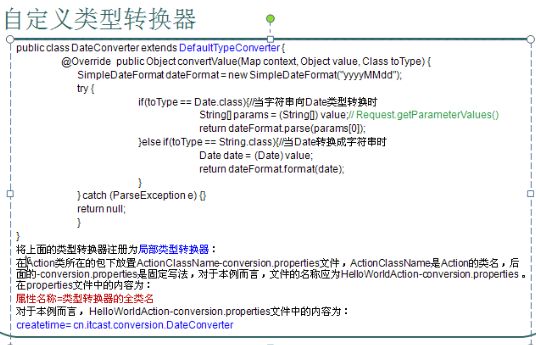
4.自定义类型转换器
一、局部类型转换器
假设我们Action中有一个属性的类型是Date类型的,但是用户输入的不是相应的类型,例如是20110202,那应该怎么做才能避免这个问题?
新建一个类继承com.opensymphony.xwork2.conversion.impl.DefaultTypeConverter;
然后重写public Object convertValue(Map<String, Object> context, Object value, Class toType)该方法即可
转换器代码:
import java.sql.Date;
import java.text.SimpleDateFormat;
import java.util.Map;
import com.opensymphony.xwork2.conversion.impl.DefaultTypeConverter;
public class TypeConverter extends DefaultTypeConverter {
@Override
public Object convertValue(Map<String, Object> context, Object value, Class toType) {
SimpleDateFormat dateFormat = new SimpleDateFormat("yyyyMMdd");
try {
if(toType == Date.class){
String[] params = (String[])value;
return dateFormat.parse(params[0]);
}else if(toType == String.class){
Date date = (Date) value;
return dateFormat.format(date);
}
} catch (Exception e) {
e.printStackTrace();
}
return null;
}
}
当然写一个转换器也是需要注册的,那怎么注册呢?
在需要转换类型的那个Action下建一个propreties文件进行注册
命名规范Action名-conversion. propreties
例如 HelloAction-conversion. propreties
放在与HelloAction同一个文件夹下
在该文件中填入birthday=com.peng.TypeConverter
属性名 = 包名.类名
二、全局类型转换器
那如果我想要把所有的birthday的类型都引用该类怎么办?
我们就此引进了全局类型转换器
步骤还是一样,不一样的是我们的propreties
文件
我们在Struts.xml文件夹下先建一个xwork-conversion. propreties
在里面填入你需要转换的类型以及对应的类
如:java.util.Date = com.peng.TypeConverter
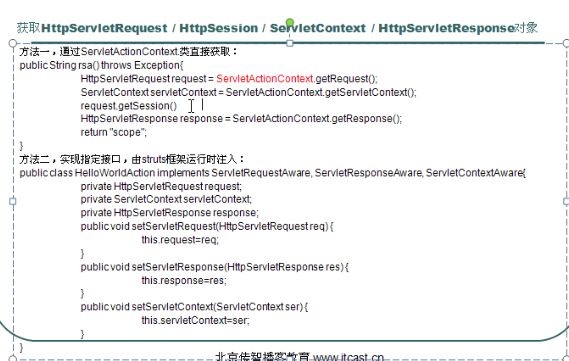
5.访问或者在Request/Session/Application中添加数据怎么办
获得Request: ActionContext.getContext()
获得Session: ActionContext.getContext().getSession()
获得Application: ActionContext.getContext().getApplication()
想要再里面放值,直接.put("name",value);
||
什么时候需要用下面的方法呢?当你想要获得绝对路径的时候就需要用到
6.单文件上传功能的实现
讲解:
首先切记在网页form表单的enctype的类型改掉
<form enctype="multipart/form-data"></form>
input 里面的类型改为 file
第二,对于action内部属性的命名
private File 表单的属性名;
private String 表单的属性名+FileName;
get/set
第三,引用FileUtils
代码如下:
private File image;private String imageFileName;public File getImage() {
return image;
}public void setImage(File image) {
this.image = image;
}public String getImageFileName() {
return imageFileName;
}public void setImageFileName(String imageFileName) {
this.imageFileName = imageFileName;
}public String execute() throws Exception{
String path = ServletActionContext.getServletContext().getRealPath("/images");
if(image!=null){
File savefile = new File(new File(path),imageFileName);
if(!savefile.getParentFile().exists()){
savefile.getParentFile().mkdirs();
}
FileUtils.copyFile(image, savefile);
}
return "success";
}
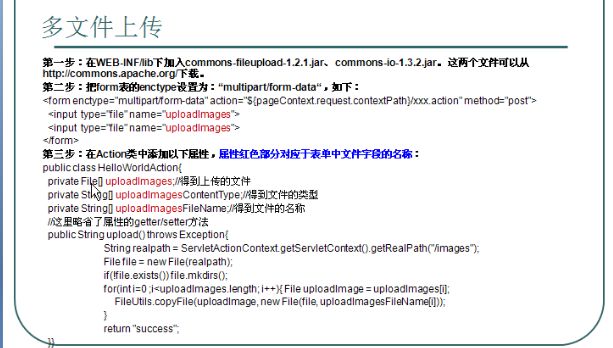
7.多文件上传功能的实现
讲解:
首先切记在网页form表单的enctype的类型改掉
<form enctype="multipart/form-data"></form>
input 里面的类型改为 file,多个文件的名字要一样,方便使用
第二,对于action内部属性的命名
private File[] 表单的属性名;
private String[] 表单的属性名+FileName;
get/set
Code:
private File[] image;
private String[] imageFileName;
public File[] getImage() {
return image;
}
public void setImage(File[] image) {
this.image = image;
}
public String[] getImageFileName() {
return imageFileName;
}
public void setImageFileName(String[] imageFileName) {
this.imageFileName = imageFileName;
}
public String execute() throws Exception{
String path = ServletActionContext.getServletContext().getRealPath("/images");
if(image!=null){
File savedir = new File(path);
if(!savedir.getParentFile().exists()){
savedir.getParentFile().mkdirs();
}
for (int i=0; i<image.length;i++) {
File savefile = new File(savedir,imageFileName[i]);
FileUtils.copyFile(image[i], savefile);
}
}
return "success";
}
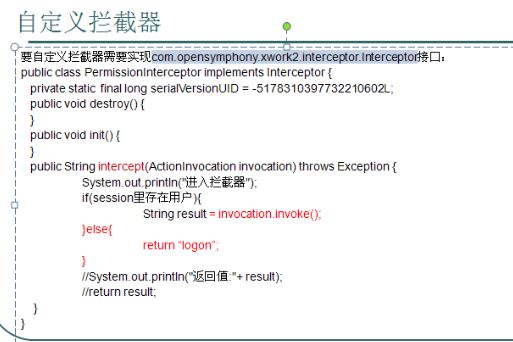
8.自定义拦截器
代码如下
import com.opensymphony.xwork2.ActionContext;
import com.opensymphony.xwork2.ActionInvocation;
import com.opensymphony.xwork2.interceptor.Interceptor;
@SuppressWarnings("serial")
public class PersionInterceptor implements Interceptor{
public void destroy() {
}
public void init() {
}
public String intercept(ActionInvocation invocation) throws Exception {
Object user = ActionContext.getContext().getSession().get("user");
if(user != null){
return invocation.invoke();
}
return "success";
}
}
xml文件的注册方法:
在包下
<interceptors>
<interceptor name="Persion" class="com.peng.view.PersionInterceptor"></interceptor>
<interceptor-stack name="PersionStack">
<interceptor-ref name="defaultStack"></interceptor-ref>//必须有这个默认栈,否则Struts提供的过滤器失效
<interceptor-ref name="Persion"></interceptor-ref>//自己的过滤器
</interceptor-stack>
</interceptors>
之后在action中引用:<interceptor-ref name="Persion"></interceptor-ref>//自己的过滤器
如果你想把自己写的默认拦截器想设置为默认,
即可注册完成
9.对Action中的所有方法进行输入校验
在action中添加validate方法(在extends ActionSupport之后)
在Action中进行判断,之后使用this.addFieldError(fieldName, errorMessage);
将相关的错误信息放入errorMessage中,这个产生的错误信息会传进input的视图,也就
意味着你在xml文件中ation配置中需要添加一个<result name="input">视图
在页面的接收方法为<s:fielderror fieldName=""/>即可
Pattern.compile("^1[358]\\d{9}$").matcher(this.mobile).matches()手机的格式
10.对Action中的某一个方法进行校验
方法与
对Action中的所有方法进行输入校验类似,但是需要对validate方法进行改名
比如说我们在Action中有save,update,delete方法,那么方法名就为
validateSave()....等等,其余步骤一样
如果校验没有问题,但是一直过不去,那么是你中间的类型转换器的问题
11.编写XML文件的形式进行方法校验全局变量
在Action下新建一个xml文件
命名如下,ActionName-validation.xml
代码
<?xml version="1.0" encoding="UTF-8"?>
<!DOCTYPE validators PUBLIC
"-//OpenSymphony Group//XWork Validator 1.0.3//EN"
"http://www.opensymphony.com/xwork/xwork-validator-1.0.3.dtd">
<validators>
<field name="name">
<field-validator type="requiredstring"> <!-- 该字段要求是String型 -->
<param name="trim">true</param>
<message>用户名不能 为空</message>
</field-validator>
</field>
<field name="mobile">
<field-validator type="requiredstring">
<param name="trim">true</param>
<message>手机号不能为空</message>
</field-validator>
<field-validator type="regex">
<param name="expression"><![CDATA[^1[358]\d{9}$]]></param>
<message>手机号码格式不正确</message>
</field-validator>
</field>
</validators>
12.编写XML文件的形式进
某一个方法进行
命名方法为 ActionName-ation-validation.xml
其中ation这部分相当于我们访问的路径,假设我们有一个通配符user_* 和相关方法add
则为 ActionName-user_add-validation.xml


