学习笔记-AngularJs(九)
到目前为止,我们所做的学习案例都是没有加任何动画效果的,对于以往来说,我们经常会去使用一些动画插件或是css框架(如:animate.css)来点缀我们的网页,这样显得生动,高大上,那么接下来我们可以学习一下,怎么在AngularJs下来实现叼酷炫的动画操作,主要使用的命令是ngAnimate。
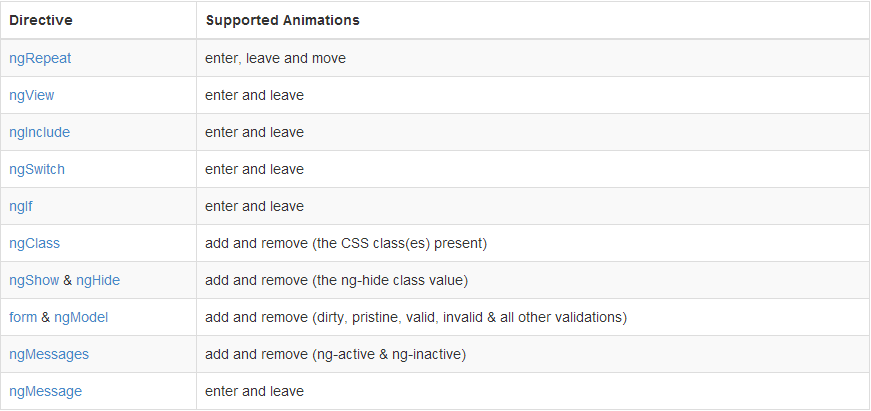
与之前的ngResource,ngRoute一样,需要注入ngAnimate和引入ng-animate.js才可以使用此服务,想在你的angular应用程序使用ngAnimate来实现动画功能,前提条件是将ngAnimate包含到您的应用程序,动画是由使用CSS转换/动画或JavaScript回调来实现。angular本身各种核心ng指令将提供动画钩子,支持动画的的指令有ngRepeat, ngInclude, ngIf, ngSwitch,ngShow, ngHide, ngView and ngClass,当然自定义命令也是可以通过使用$animate服务来进行动画操作,其各个指令对动画支持情况如下表(忽略,http://t.cn/RUbL4rP):
- ng-enter class 主要用于新添加的元素并渲染到页面中,添加后会添加class ng-enter-active
- ng-move class 主要用于当元素被移动时,移动后会添加class ng-move-active
- ng-leave class主要用于被删除时,删除后会添加class ng-leave-active
- ng-hide,ng-show class用于是否判断执行,对应的还会有几个css,ng-hide-add,ng-hide-add-active,ng-hide-remove,ng-hide-remove-active,会在使用ng-show或是ng-hide指令操作dom时动态添加的class
- 对于表单,在之前的学习笔记上也有通过不同验证的属性,而得到的class(如input无效则会加上class="ng-invalid"),从而来定义其显示样式
必须要明白:(1)父元素动画没执行完,子元素动画不执行,但是可以将此行为屏蔽掉,加上ng-animate-children
(2)在使用$http获取远程数据时,会自动延长动画时间,应用加载,动画不马上执行!
通过审查phonecat上面(http://angular.github.io/angular-phonecat/step-12/app/#/phones)的元素,观察其变化,不难看出,AngularJs可以通过ngAnimate模块在不同时间点给上不同的class,然后通过定义这些class的css,来实现动画操作!觉得还是需要举例子来学习,比较容易懂!主要分两部分来举例,CSS-defined Animations和JavaScript-defined Animations。
CSS-defined Animations
还记得之前的学习笔记-AngularJs(三)使用了filter对ng-repeat进行过滤吗?我们现在修改一下之前的代码,把它改成过滤检索歌曲,代码如下:
<!doctype html>
<html ng-app='animate-css'>
    <head>
        <meta charset="utf8"/>
        <script src="angular.min.js"></script>
        <script src="angular-animate.js"></script> //使用ngAnimate模块需要引入angular-animate.js
        <script>
            angular.module('animate-css', ['ngAnimate'])//注入ngAnimate,这样animate动画效果便自动应用在了项目中,于是就需要定义css改变样式
            .controller('songController', ['$scope', function($scope) {
                $scope.songs=['爱你一万年','开心的马骝','北京欢迎你','笑傲江湖' ,'练习','爱情买卖','七里香' ,'死了都要爱','北京爱情故事','星星点灯','星空','豆浆和油条','神话'];
            }]);
       </script>

        <style>
       /*上文已有提到,angular不同时间点会有不同的class,正是利用这些class来制作动画,必须了解ng-enter,ng-enter-active,ng-leave,ng-leave-active,ng-move,ng-move-active这些class的先后顺序*/

            li{list-style: none; }
            body{margin: 50px; background-color: #333; color: #ccc; overflow: hidden;}
            h3{color: #fff;}
            .song-list.ng-enter,
            .song-list.ng-leave,
            .song-list.ng-move {
              -webkit-transition: 0.5s linear all;
              -moz-transition: 0.5s linear all;
              -o-transition: 0.5s linear all;
              transition: 0.5s linear all;
            }

            .song-list.ng-enter,
            .song-list.ng-move {
              opacity: 0;
              height: 0;
              overflow: hidden;
            }

            .song-list.ng-move.ng-move-active,
            .song-list.ng-enter.ng-enter-active {
              opacity: 1;
              height: 120px;
            }

            .song-list.ng-leave {
              opacity: 1;
              overflow: hidden;
            }

            .song-list.ng-leave.ng-leave-active {
              opacity: 0;
              height: 0;
              padding-top: 0;
              padding-bottom: 0;
            }
        </style>
    </head>
    <body>

        <div ng-controller="songController">
            <input type="text" ng-model="search">
            <button type="submit">Filter</button>
            <ul>
            <li class="song-list" ng-repeat="song in songs | filter:search">
            {{song}}
            </li>
            </ul>
        </div>
    </body>
</html>
JavaScript-defined Animations
如果你不想使用CSS3转换或CSS3动画,如果你想提供动画还不支持CSS的浏览器转换/动画,那么你可以使用JavaScript动画定义AngularJS模块内,也就是自定义动画,实现个性化的动画效果,先来看官网是如何去使用javascript动画定义的:
//!annotate="YourApp" Your AngularJS Module|Replace this or ngModule with the module that you used to define your application.
var ngModule = angular.module('YourApp', ['ngAnimate']);
ngModule.animation('.my-crazy-animation', function() {
  return {
    enter: function(element, done) {
      //run the animation here and call done when the animation is complete
      return function(cancelled) {
        //this (optional) function will be called when the animation
        //completes or when the animation is cancelled (the cancelled
        //flag will be set to true if cancelled).
      };
    },
    leave: function(element, done) { },
    move: function(element, done) { },

    //animation that can be triggered before the class is added
    beforeAddClass: function(element, className, done) { },

    //animation that can be triggered after the class is added
    addClass: function(element, className, done) { },

    //animation that can be triggered before the class is removed
    beforeRemoveClass: function(element, className, done) { },

    //animation that can be triggered after the class is removed
    removeClass: function(element, className, done) { }
  };
});
不难看出是可以不仅自己定义enter(添加元素)、move(移动元素)、leave(删除元素)等状态,而且还可以增加addClass、beforeRemoveClass、removeClass等监听事件。那么我们对上面过滤歌名的demo修改一下:
<!doctype html>
<html ng-app='animate-javascript'>
    <head>
        <meta charset="utf8"/>
        <script src="jquery.js"></script>
        <script src="angular.min.js"></script>
        <script src="angular-animate.js"></script>
        <script>
            var jav = angular.module('animate-javascript', ['ngAnimate']);
            jav.controller('songController', ['$scope', function($scope) {
                $scope.songs=['爱你一万年','开心的马骝','北京欢迎你','笑傲江湖' ,'练习','爱情买卖','七里香' ,'死了都要爱','北京爱情故事','星星点灯','星空','豆浆和油条','神话'];
            }]);
            jav.animation(".repeat-animation",function(){  //我们引入angular-animate.js和注入ngAnimate模块后,便可以使用.animation(element,function(){...})来定义动画,这里我们定义了一个class为.repeat-animation的的动画 return {
                    enter : function(element, done) { //对于动画行为的函数格式是function(element,done){...},这里的element指得是一个jquery对象(前提必须引入jquery.js),done是结束的回调函数 var width = element.width();
                      element.css({
                        position: 'relative',
                        left: -20,
                        opacity: 0
                      });
                      element.animate({
                        left: 0,
                        opacity: 1
                      }, done);
                    },
                    leave : function(element, done) {
                      element.css({
                        position: 'relative',
                        left: 0,
                        opacity: 1
                      });
                      element.animate({
                        left: -10,
                        opacity: 0
                      }, done);
                    },
                    move : function(element, done) {
                      element.css({
                        left: "5px",
                        opacity: 0.2
                      });
                      element.animate({
                        left: "0px",
                        opacity: 1
                      }, done);
                    }
                  };
            })
        </script>

        <style>
            li{list-style: none; }
            body{margin: 50px; background-color: #333; color: #ccc; overflow: hidden;}
            h3{color: #fff;}
        </style>
    </head>
    <body>

        <div ng-controller="songController">
            <input type="text" ng-model="search">
            <button type="submit">Filter</button>
            <ul>
            <li class="song-list repeat-animation" ng-repeat="song in songs | filter:search">
            {{song}}
            </li>
            </ul>
        </div>
    </body>
</html>
这是对ng-animate的一个大概的了解,其中还有许多遗漏的点(比如说$animate服务等),随后学到了,会补充上去,其他指令的自定义动画(通过css或是javascript)的代码demo更新到github上(地址:https://github.com/xiaobin5201314/AngularJS-Learning/tree/master/block-example/动画操作-12)!
