企业IT管理员IE11升级指南【13】—— 如何把IEMP迁移到GPP
企业IT管理员IE11升级指南 系列:
【1】—— Internet Explorer 11增强保护模式 (EPM) 介绍
【2】—— Internet Explorer 11 对Adobe Flash的支持
【3】—— IE11 新的GPO设置
【4】—— IE企业模式介绍
【5】—— 不跟踪(DNT)例外
【6】—— Internet Explorer 11面向IT专业人员的常见问题
【7】—— Win7和Win8.1上的IE11功能对比
【8】—— Win7 IE8和Win7 IE11对比
【9】—— IE10与IE11的功能对比
【10】—— 如何阻止IE11的安装
【11】—— 通过SCCM 2012和WSUS部署Internet Explorer 11
【12】—— 兼容视图列表介绍
【13】—— 如何把IEMP迁移到GPP
【14】—— IE11代理服务器配置
【15】—— 代理自动配置脚本
【16】—— 使用Compat Inspector快速定位IE兼容性问题
【17】—— F12 开发者工具
如何把IEMP迁移到GPP
背景
Internet Explorer Maintenance (IEM) 从Internet Explorer 10以后就已取消。安装Internet Explorer 10的客户端不能从域控制器的组策略中取得IEM策略。
详细信息可以参考以下文档:
http://technet.microsoft.com/en-us/library/jj890998.aspx
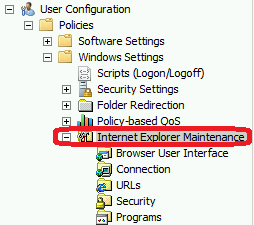
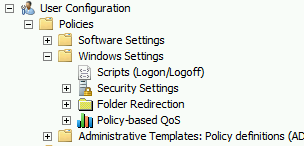
当在Windows 2008 R2域控制上将Internet Explorer 升级到10+以, IEM 从GPO 的编辑窗口消失,见下图
| Windows 2008 R2 DC上升级到IE10以前 |
Windows 2008 R2 DC上升级到IE10后 |
这里主要介绍,如何将Windows 2012 域控制器和windows 2008 R2域控制器上的IEMP迁移到GPP中。
Windows 2012 DC:
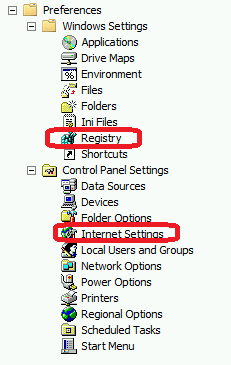
将IEM的设置迁移到“Preferences -> Windows Settings -> Registry” 或 “Preferences -> Control Panel Settings -> Internet Settings”
详细内容可以查看以下官方文档:
How to configure Group Policy Preference settings for Internet Explorer 11 in Windows 8.1 or Windows Server 2012 R2: http://support.microsoft.com/kb/2898604
在本文的结尾,附录了详细的步骤供参考。
Windows 2008 R2 DC:
在Windows 2008 R2 域控制器上,在“Preferences -> Control Panel Settings -> Internet Settings” 中没有 “IE10/IE11” 选项。这是目前的界面设计。
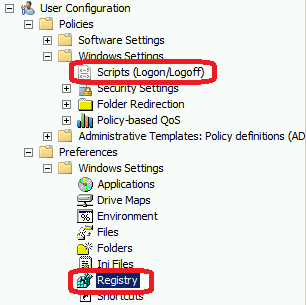
IT管理员可以使用 “Preferences -> Windows Settings -> Registry” 或logon scripts 来发布IE组策略。
详细步骤在本文的详细步骤章节。
| IT管理员可以使用 “Preferences -> Windows Settings -> Registry” 或logon scripts 来发布IE组策略 |
在Windows 2008 R2 域控制器上,在“Preferences -> Control Panel Settings -> Internet Settings” 中没有 “IE10/IE11” 选项 |
详细步骤
已 “Internet Properties -> LAN Settings” 为例,演示如何通过以下三种方式进行设置:
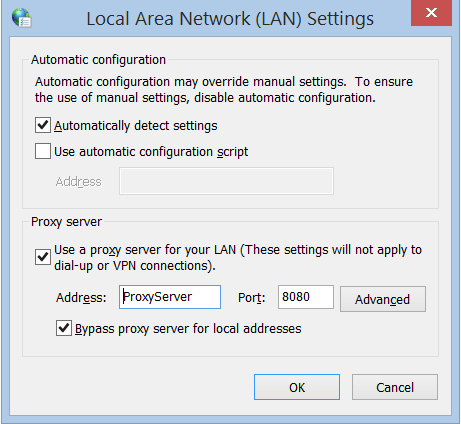
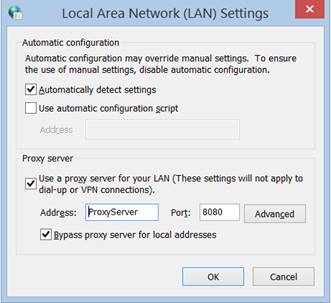
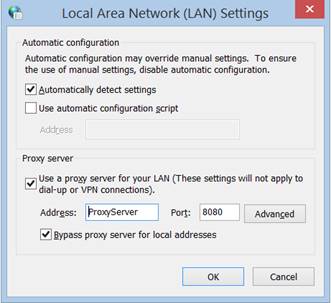
这个演示中, “LAN Settings” 如下图
1) 打勾 “Automatically detect settings”.
2) 启用 “Proxy Server” 并设置为 “ProxyServer:8080”.
3) 选择“Bypass proxy server for local addresses”.
方法 1: 使用 “Preferences -> Windows Settings -> Registry”
条件: 这个方法可用户Windows 2008 R2 DC 和 Windows 2012 DC,可以发布到Windows 7以上操作系统的 IE8, IE9, IE10+。对于Windows XP客户端,GPP可以在安装“Group Policy Preference Client Side Extensions for Windows XP (KB943729)” http://www.microsoft.com/en-us/download/details.aspx?id=3628 后使用。
1) 在DC上的IE中配置“Internet Properties -> LAN Settings”:
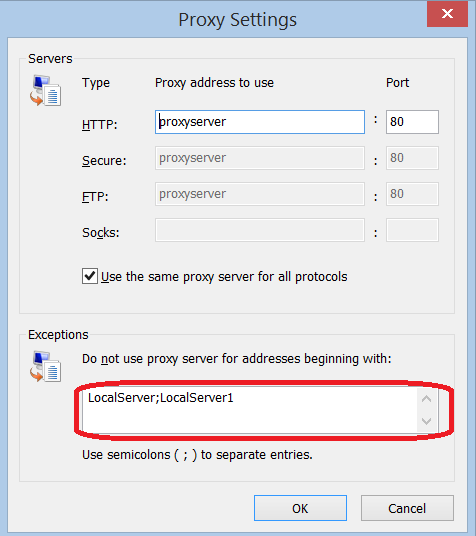
如果需要“Exceptions”,配置如下:
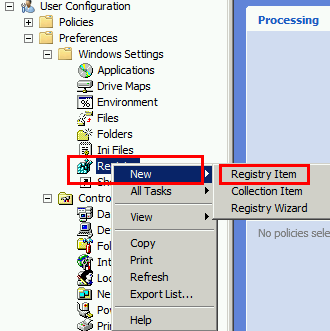
2) 在GPO编辑窗口中选择新建“Registry Item”。
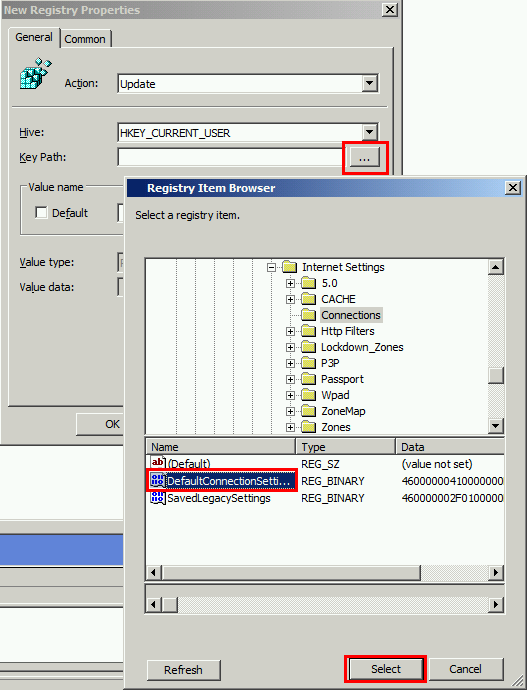
3) 点击下图中的 “…” 按钮,并选择以下路径 “HKEY_CURRENT_USER\Software\Microsoft\Windows\CurrentVersion\Internet Settings\Connections”,选择 “DefaultConnectionSettings” 并点击 “Select”按钮。
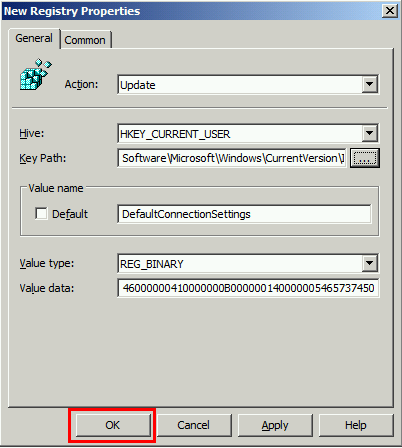
4) 点击“OK” 确认这设置。
5) 使用步骤3~4相同的方式,新建“Registry Item”。
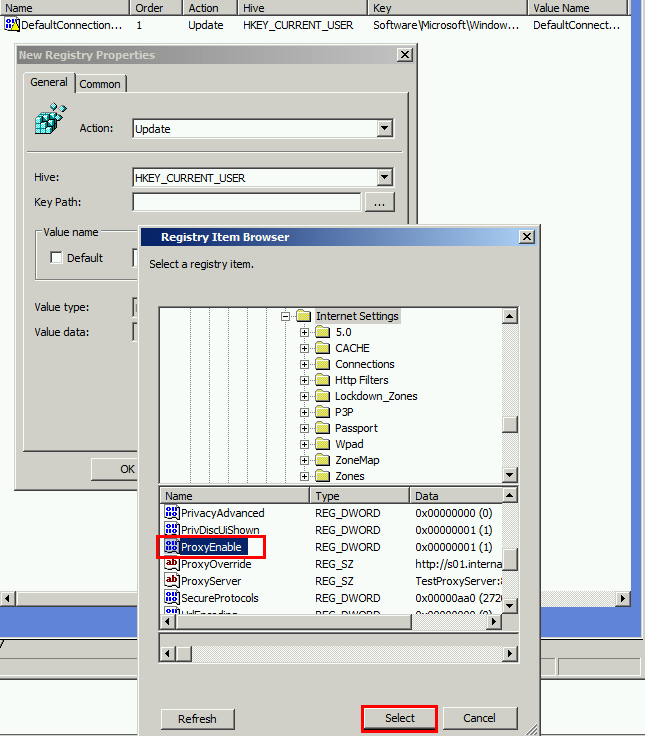
输入 “HKEY_CURRENT_USER\Software\Microsoft\Windows\CurrentVersion\Internet Settings” 并选择 “ProxyEnable” 和点击 “Select” 按钮。
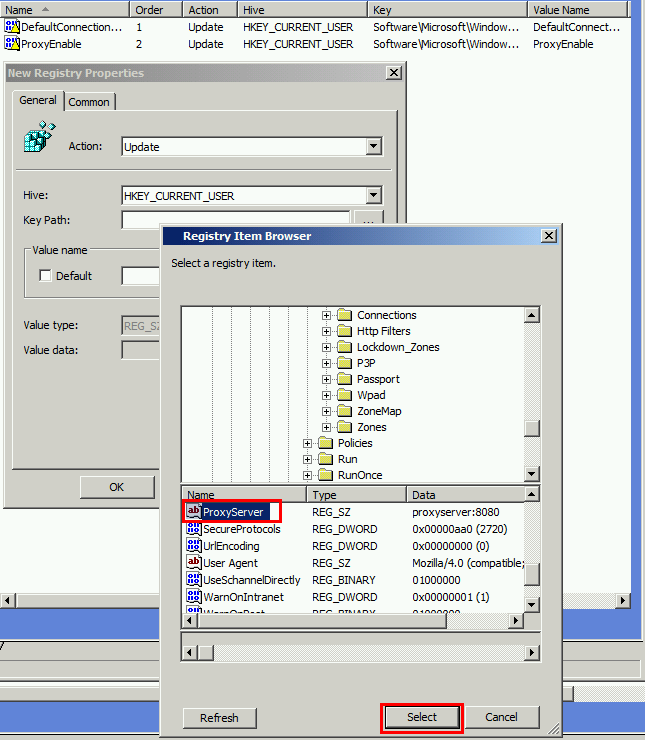
6) 输入“HKEY_CURRENT_USER\Software\Microsoft\Windows\CurrentVersion\Internet Settings” 并选择 “ProxyServer” 和点击“Select”按钮。
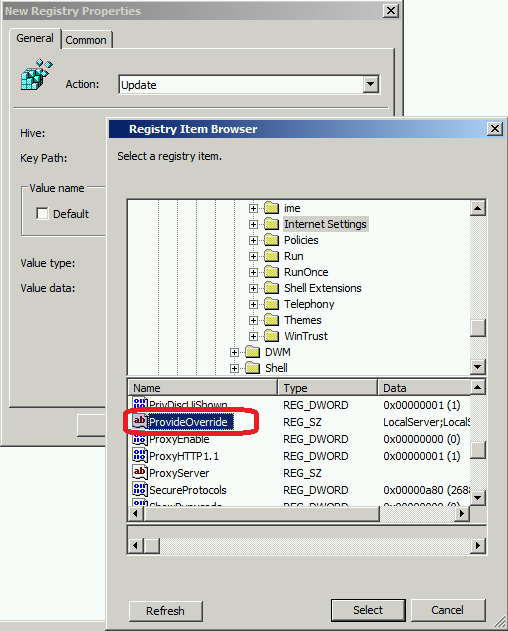
7) 如果选择了 “Bypass proxy server for local addresses” 或设置了 “Exceptions”,需要设置“HKEY_CURRENT_USER\Software\Microsoft\Windows\CurrentVersion\Internet Settings” 并选择 “ProvideOverride” 和点击“Select”按钮。
注意:如果打勾了 “Bypass proxy server for local addresses”, “ProvideOverride” 将在结尾包含 “<local>”,例如 “LocalServer;LocalServer1;<local>”.
8) 整个设置完成后,如下图:
9) 在test OU 中发布这个GPO,这客户端运行“gpupdate /force”,客户将立即获得这些设置。
10) 这个方式适用于IE8, IE9, IE10 和IE11客户端。
方式 2: 使用 “Preferences -> Control Panel Settings -> Internet Settings”
条件: 这个方式可用于Windows 2008 R2 DC 和Windows 2012 DC,Wndows 2008 R2 DC可以发布给IE5-IE9客户端;Windows 2012 DC 可以发布给IE5-IE11 客户端。对于Windows XP客户端,GPP可以在安装“Group Policy Preference Client Side Extensions for Windows XP (KB943729)” http://www.microsoft.com/en-us/download/details.aspx?id=3628 后使用。
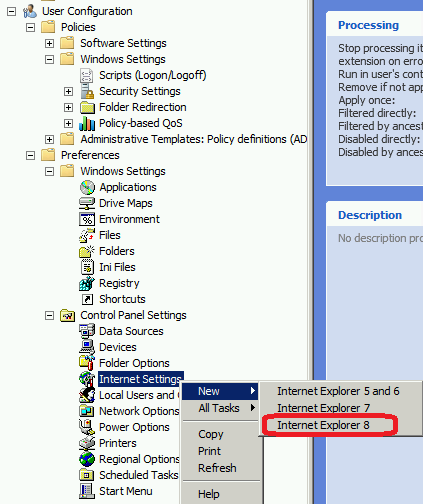
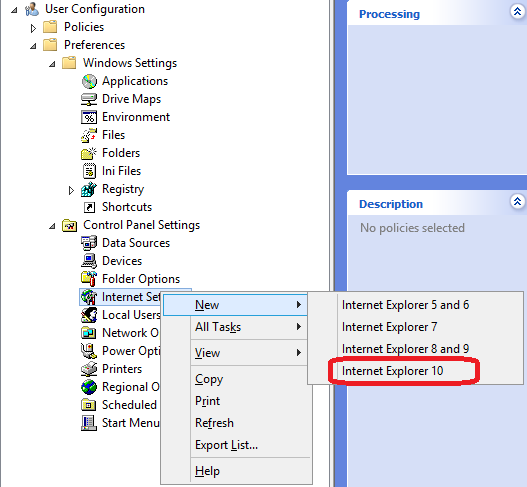
1) 根据DC 版本选择:
| Windows 2008 R2 DC |
Windows 2012 DC |
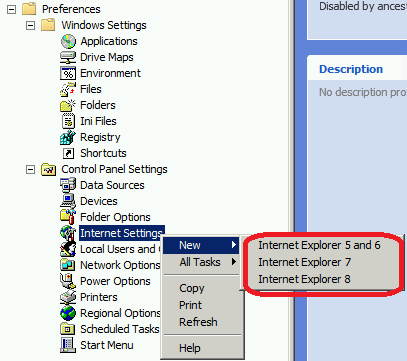
| 在windows 2008 R2 DC 上,安装 http://support.microsoft.com/kb/2530309, 这样下图中的“Internet Explorer 8” 选项将发布给IE8 和 IE9 客户端。 |
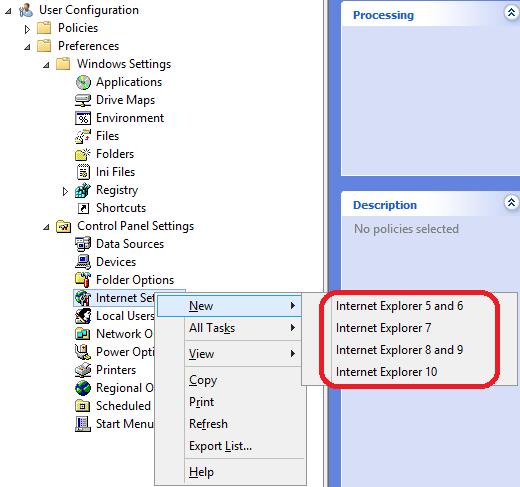
在windows 2012 DC上,安装http://support.microsoft.com/kb/2898604 这样下图中的“Internet Explorer 10” 选项将发布给IE10 和 IE11 客户端 |
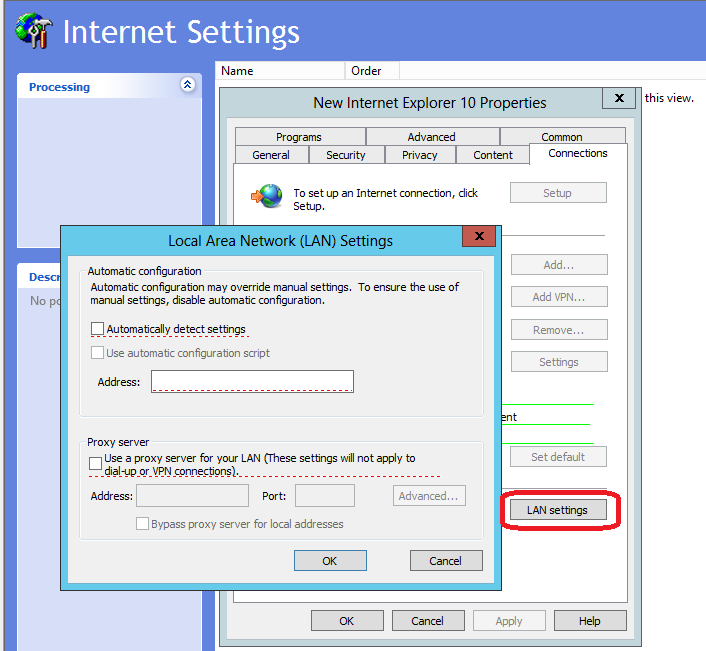
2) 使用Windows 2012 DC上 “Internet Explorer 10” 演示例子: 点击New Internet Explorer 10 Properties 窗口上的“LAN settings“ 按钮,弹出下图 Local Area Network(LAN) setting 窗口。当前相关设置项下有红色虚线。
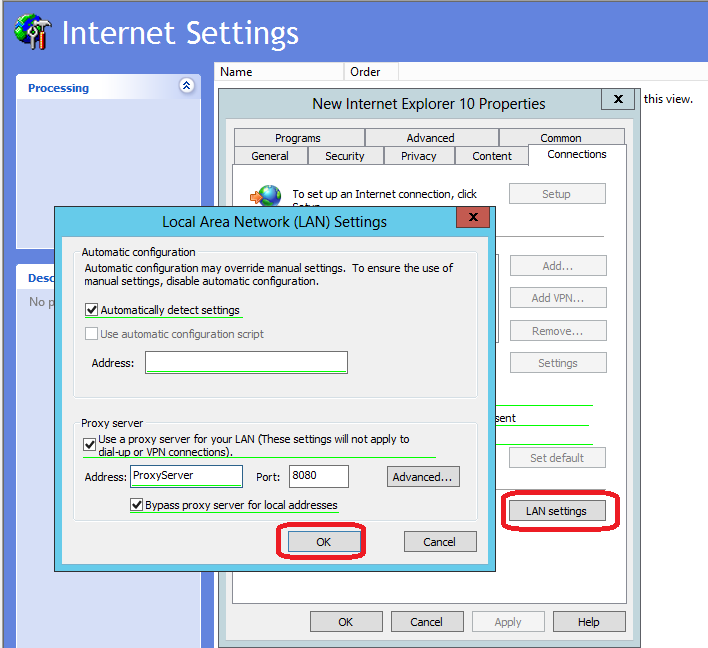
3) 完成设置后,按F5 (或 F6) 确认输入,红色虚线将变为绿色实线,如下图。
注意:红色虚线的内容将被忽略,只有在按F5后,相关设置才会开启,红色虚线将变为绿色实线,设置才会通过GPP发布给用户端。相关功能键开启/禁用设置说明如下:
功能键:
F5 – 开启当前页面上所有设置。
F6 – 开启当前选中的设置。
F7 – 禁用当前选中的设置。
F8 –禁用当前页面上所有设置。
4) 如上图完成配置后,按 “OK” 按钮。
5) 在test OU 中发布这个GPO,这客户端运行“gpupdate /force”,客户将立即获得这些设置。
注意:类似的步骤可以用户Windows 2008 R2 DC向IE8或更低版本IE客户端发布IE配置。
方式3: 使用 “Logon Script”
条件:这个方式可用于Windows 2008 R2 DC 和 windows 2012 DC向IE6+ 客户端发布配置。备注,完成IE8+版本的本地测试。
以下1到4步可以在任何一台IE机器上完成,这里我们简单的已DC为例
1) 在DC 上完成“Internet Properties -> LAN Settings” 配置:
2) 用“regedit”命令在DC上打开注册表编辑器,
3) 导出下面的值到“registry.reg”
Windows Registry Editor Version 5.00
[HKEY_CURRENT_USER\Software\Microsoft\Windows\CurrentVersion\Internet Settings]
"ProxyEnable"=dword:00000001
"ProxyServer"="proxyserver:8080"
[HKEY_CURRENT_USER\Software\Microsoft\Windows\CurrentVersion\Internet Settings\Connections]
"DefaultConnectionSettings"=hex:46,00,00,00,5e,01,00,00,0b,00,00,00,10,00,00,\
00,70,72,6f,78,79,73,65,72,76,65,72,3a,38,30,38,30,13,00,00,00,3c,2d,6c,6f,\
6f,70,62,61,63,6b,3e,3b,3c,6c,6f,63,61,6c,3e,00,00,00,00,01,00,00,00,00,00,\
00,00,00,00,00,00,00,00,00,00,00,00,00,00,00,00,00,00,00,00,00,00,01,00,00,\
00,02,00,00,00,0a,ac,12,24,00,00,00,00,00,00,00,00,00,00,00,00,00,00,00,00,\
00,00,00,00,00,00,00,00,00,00,00,00,00,00,00,00,00,00,00,00,00,00,00,00,00,\
00,00,00,00,00,00,00,00,00,00,00,00,00,00,00,00,00,00,00,00,00,00,00,00,00,\
00,00,00,00,00,00,00,00,00,00,00,00,00,00,00,00,00,00,00,00,00,00,00,00,00,\
00,00,00,00,00,00,00,00,00,00,00,00,00,00,00,00,00,00,00,00,00,00,00,00,00,\
00,00,00,00
4) 创建批处理文件“Test.bat”,内容如下:
reg import registry.reg
5) 复制“registry.reg” 和 “Test.bat” 到DC policy sysvol路径(类似:“sysvol/domain/Policies/GPOUniqueID/User/Scripts/Logon),并设置“Test.bat” 为 logon script.
6) 在test OU 中发布这个GPO,IE客户端重登录系统后将获得这些设置。
参考链接
Red / Green: GP Preferences doesn’t work even though the policy applied and after gpupdate \force
http://blogs.technet.com/b/grouppolicy/archive/2008/10/13/red-green-gp-preferences-doesn-t-work-even-though-the-policy-applied-and-after-gpupdate-force.aspx
How to Add Trust Sites into IE before IE10 through Group Policy
http://blogs.msdn.com/b/asiatech/archive/2013/01/04/how-to-add-trust-sites-into-ie-before-ie10-through-group-policy.aspx
How to configure Internet Explorer security zone sites using group polices
http://blogs.msdn.com/b/askie/archive/2012/06/05/how-to-configure-internet-explorer-security-zone-sites-using-group-polices.aspx
