IOS基础学习-2: UIButton
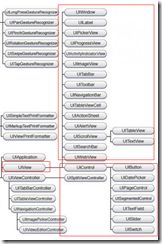
UIButton是一个标准的UIControl控件,UIKit提供了一组控件:UISwitch开关、UIButton按钮、UISegmentedControl分段控件、UISlider滑块、UITextField文本字段控件、UIPageControl分页控件。这些控件的基类均是UIControl,而UIControl派生自UIView类,所以每个控件都有很多视图的特性,包括附着于其他视图的能力。所有控件都拥有一套共同的属性和方法。
具体视图关系如下
1. 创建按钮
1.1 initWithFrame
UIButton *btn1 = [[UIButton alloc]initWithFrame:CGRectMake(10, 10, 80, 44)];
1.2 类方法buttonWithType
通常采用自定义方法,这样的方式比较灵活
[UIButton buttonWithType:UIButtonTypeCustom];
和UIButtonTypeCustom等同的还有以下方式:
typedef enum {
    UIButtonTypeCustom = 0,               // 自定义,常用方式
    UIButtonTypeRoundedRect,              //白色圆角矩形,类似偏好设置表格单元或者地址簿卡片
    UIButtonTypeDetailDisclosure,    //蓝色的披露按钮,可放在任何文字旁
    UIButtonTypeInfoLight,        //小圆圈信息按钮,可以放在任何文字旁
    UIButtonTypeInfoDark,        //白色背景下使用的深色圆圈信息按钮
    UIButtonTypeContactAdd,        //蓝色加号(+)按钮,可以放在任何文字旁
} UIButtonType;
2. 设置按钮属性
2.1 Frame属性
btn.frame = CGRectMake(10.0, 10.0, 60.0, 44.0); //x, y , weight, height;
或者:
[btn setFrame:CGRectMake(20,20,50,50)];
2.2 设置标题
[btn1 setTitle:@"点击" forState:UIControlStateNormal];  //设置标题
[btn1 setTitleColor:[UIColor orangeColor] forState:UIControlStateNormal]; //设置标题颜色[btn1 setTitleShadowColor:[UIColor grayColor] forState:UIControlStateNormal ];//标题阴影颜色
2.3设置背景图片
[btn1 setImage:[UIImageimageNamed:@"btn1Img"] forState:UIControlStateNormal];   //按钮图片
[btn1 setBackgroundImage:[UIImageimageNamed:@"btn1BgImg"] forState:UIControlStateNormal];  //背景图片
2.4 设置按钮图片内部间距
UIEdgeInsets insets;     // 设置按钮内部图片间距
insets.top = insets.bottom = insets.right = insets.left = 10;
btn.contentEdgeInsets = insets;    //内容间距
bt.titleEdgeInsets = insets;         // 标题间距
3. 按钮状态
3.1 常用状态
forState后,可以选择以下状态,常用的包括:常态,高亮,禁用,选中;
enum {
    UIControlStateNormal       = 0,          //常态
    UIControlStateHighlighted  = 1 << 0,                      // 高亮
    UIControlStateDisabled     = 1 << 1,          //禁用
    UIControlStateSelected     = 1 << 2,                      //选中
    UIControlStateApplication  = 0x00FF0000,          //当应用程序标志使用时
    UIControlStateReserved     = 0xFF000000          //为内部框架预留的
};
typedef NSUInteger UIControlState;
3.2高亮或者禁用时,微调属性
高亮时,图像颜色会加深,如果要关闭此属性,请设置adjustsImageWhenHighlighted 为NO
btn1.adjustsImageWhenHighlighted = NO;
禁用时,图像颜色会变浅,如果要关闭此属性,请设置adjustsImageWhenDisabled 为NO
btn1.adjustsImageWhenDisabled = NO;
选中时,可以设置按钮发光,请设置showsTouchWhenHighlighted 为YES
btn1.showsTouchWhenHighlighted = YES;
4. 添加动作
[btn1 addTarget:self action:@selector(btnPressed:) forControlEvents:UIControlEventTouchUpInside];   //为按钮的行为添加属性

-(void)btnPressed:(id)sender{              //处理按钮按下事件
    UIButton* btn = (UIButton*)sender;
    if(btn ==  btn 1){
    NSLog(@"btn1 pressed");
    }
}
5. 实例
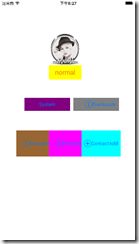
具体见下面的例子。
5.1 btn1:更换图片的按钮
//btn1演示了采用背景图像方式设置按键的基本方法。
    //采用initWithFrame创建按键
    btn1 = [[UIButton alloc]initWithFrame:CGRectMake(150, 100, 100, 100)];
    //采用背景图像时,Title无效
    [btn1 setTitle:@"点击" forState:UIControlStateNormal];
    //setImage可以设置按钮图标
    [btn1 setImage:[UIImage imageNamed:@"0"] forState:UIControlStateNormal];
    [btn1 setImage:[UIImage imageNamed:@"1"] forState:UIControlStateHighlighted];
    //setBackgroundImage可以设置背景图标,这里未使用
    [btn1 setBackgroundImage:[UIImage imageNamed:@"1"] forState:UIControlStateNormal];  //背景图片
    //可以通过UIEdgeInsets设置按钮内部图片间距
    UIEdgeInsets insets;
    insets.top = insets.bottom = insets.right = insets.left = 20;
    //btn1.contentEdgeInsets = insets;        //内容间距
    //btn1.titleEdgeInsets = insets;         // 标题间距
5.2 btn2: 采用不同标题的按钮
//btn2演示了UIButtonTypeRoundedRect设置按钮,并设置按钮边框的方法
    btn2 = [UIButton buttonWithType:UIButtonTypeRoundedRect];//白色圆角矩形,类似偏好设置表格单元或者地址簿卡片
    btn2.frame = CGRectMake(150, 200, 100, 44.0);
    //设置normal下的显示文字
    [btn2 setTitle:@"normal" forState:UIControlStateNormal];
    //设置highlighted状态下文字
    [btn2 setTitle:@"highlighted" forState:UIControlStateHighlighted];
    //设置标题颜色和阴影
    [btn2 setTitleColor:[UIColor orangeColor] forState: UIControlStateNormal]; //设置标题颜色
    [btn2 setTitleShadowColor: [UIColor grayColor] forState:UIControlStateNormal] ;//标题阴影颜色
    //设置标题字体
    btn2.titleLabel.font = [UIFont systemFontOfSize: 20];
    [btn2 setBackgroundColor:[UIColor yellowColor]];
5.3 系统自带的按钮
其中btn4中演示了在系统按钮中,通过Insets设置间距,通过cententHorizontalAlignment设置title左右对齐的方法
//btn3~7演示了系统默认的四种按键
    //btn3:UIButtonTypeSystem
    btn3 = [UIButton buttonWithType:UIButtonTypeSystem];
    btn3.frame = CGRectMake(75, 300, 140, 40);
    [btn3 setBackgroundColor:[UIColor purpleColor]];
    [btn3 setTitle:@"System" forState:UIControlStateNormal];
    //btn4:UIButtonTypeInfoLight
    btn4 = [UIButton buttonWithType:UIButtonTypeDetailDisclosure];
    btn4.frame = CGRectMake(225, 300, 140, 40);
    [btn4 setTitle:@"Disclosure" forState:UIControlStateNormal];
    [btn4 setBackgroundColor:[UIColor grayColor]];
    //设置title靠右边
    btn4.contentHorizontalAlignment = UIControlContentHorizontalAlignmentRight;
    //但是距离右边框10个像素距离
    btn4.contentEdgeInsets = UIEdgeInsetsMake(0,0, 0, 10);

    //btn5:InfoLight
    btn5 = [UIButton buttonWithType:UIButtonTypeInfoLight];
    btn5.frame = CGRectMake(50, 400, 120, 80);
    [btn5 setTitle:@"InfoLight" forState:UIControlStateNormal];
    [btn5 setBackgroundColor:[UIColor brownColor]];
    //btn6:InfoDark
    btn6 = [UIButton buttonWithType:UIButtonTypeInfoDark];
    btn6.frame = CGRectMake(150, 400, 120, 80);
    [btn6 setBackgroundColor:[UIColor magentaColor]];

    [btn6 setTitle:@"InfoDark" forState:UIControlStateNormal];  //设置标题

    //btn7:ContactAdd
    btn7 = [UIButton buttonWithType:UIButtonTypeContactAdd]; //自定义按钮
    btn7.frame = CGRectMake(250, 400, 120, 80);
    [btn7 setTitle:@"ContactAdd" forState:UIControlStateNormal];  //设置标题
    [btn7 setBackgroundColor:[UIColor cyanColor]];
5.4多个按键批量添加视图的方法
当按键数量较多时,可以创建NSArray,遍历批量添加视图
//批量添加视图
        NSArray *btnArray = [[NSArray alloc] initWithObjects:btn1,btn2,btn3,btn4,btn5,btn6,btn7, nil];
    for (NSInteger i=0; i<[btnArray count ]; i++){
        UIButton *tmpButton = btnArray[i];
        [self.view addSubview:tmpButton];
    }
5.5常用按键触发事件
//通常采用TouchUpInside来检测
    [btn1 addTarget:self action:@selector(btn1Process:)forControlEvents:UIControlEventTouchUpInside];
    //其实按下手指时,触发的是TouchDown
    [btn2 addTarget:self action:@selector(btn2TouchDown:)forControlEvents:UIControlEventTouchDown];
    //只有松开手指时,才是TouchUpInside
    [btn2 addTarget:self action:@selector(btn2TouchUpInside:)forControlEvents:UIControlEventTouchUpInside];
5.6对应的检测按键事件的方法
注意,其中sender为对应的按下的按键
-(void) btn1Process:sender {
    NSLog(@"btn1 pressed");
}

-(void) btn2TouchDown:sender {
    NSLog(@"btn2 TouchDown");
}

-(void) btn2TouchUpInside:sender {
    NSLog(@"btn2 TouchUpInside");
}
5.7 判断哪一个按键被按下
屏幕上多个按键时,通过下面方法判读哪个按键被按下。其中sender为按键处理方法的输入参数。
UIButton *btn = (UIButton *) sender;
if(btn == btn2){
    NSLog(@"btn2 triggered");
}


