Mysql 生产库主主复制配置步骤
0.环境介绍
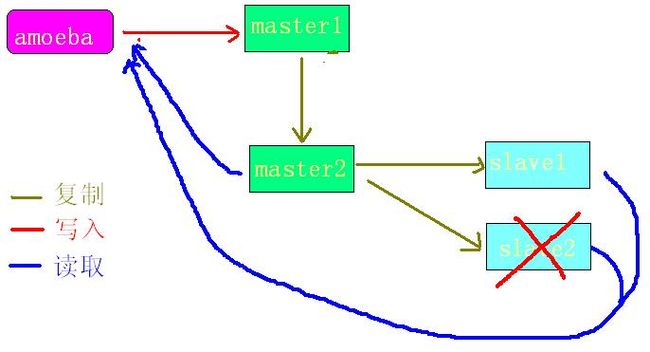
设计的集群节点为master1、master2、slave1。其中master2到slave1的主从复制已经完成。现在需要配置master1和master2之间的相互复制。

1. 修改master2参数文件(/etc/my.cnf)增加/修改如下参数:
log-bin=mysql-bin
log-bin-index=mysql-bin.index
server-id = 114
binlog-do-db=mytest_db
relay-log=relay-bin
relay-log-index=relay-bin-index
replicate-do-db=mytest_db
log_slave_updates=1
auto_increment_increment=2
auto_increment_offset=1
2. 重启master2
# service mysqld restart
3. 修改master1参数
log-bin-index=mysql-bin.index #新增
server-id = 113 #修改
binlog-do-db=mytest_db #新增
relay-log=relay-bin #新增
relay-log-index=relay-bin-index #新增
replicate-do-db=mytest_db #新增
log_slave_updates=1 #新增
auto_increment_increment=2 #新增
auto_increment_offset=2 #新增
#auto-increment-increment= 2 #删除
#auto-increment-offset= 2 #删除
4. 重启master1
# service mysqld restart
5. 在master1添加一个用户 repl 并指定replication权限
create user 'repl'@'master2_IP' identified by 'password';
GRANT REPLICATION SLAVE ON *.* TO 'repl'@'master2_IP';
6. 生成master1备份数据
#锁定表
mysql> FLUSH TABLES WITH READ LOCK;
Query OK, 0 rows affected (0.00 sec)
#查看状态
mysql> show master status;
+------------------+----------+--------------+------------------+
| File | Position | Binlog_Do_DB | Binlog_Ignore_DB |
+------------------+----------+--------------+------------------+
| mysql-bin.000021 | 5337 | mytest_db | |
+------------------+----------+--------------+------------------+
1 row in set (0.00 sec)
#导出数据
[root@localhost ~]# mysqldump -p mytest_db > /usr/software/tianyc/mytest_db_master.dump
Enter password:
[root@localhost ~]#
#解锁表
mysql> unlock tables;
Query OK, 0 rows affected (0.00 sec)
7. 在master2上还原数据
#拷贝文件到master2,执行导入
[root@localhost tianyc]# mysql -p mytest_db < /usr/software/tianyc/mytest_db_master.dump
Enter password:
[root@localhost tianyc]#
8. 在master2上设置它的主库为master1,设置binlog位置,并开启复制。
mysql> change master to master_host='master1_IP',master_port=3306,master_user='repl',master_password='password',master_log_file='mysql-bin.000021',master_log_pos=5337;
Query OK, 0 rows affected (0.05 sec)
mysql> start slave;
Query OK, 0 rows affected (0.00 sec)
mysql> show slave status\G
*************************** 1. row ***************************
Slave_IO_State: Waiting for master to send event
Master_Host: master1_IP
Master_User: repl
Master_Port: 3306
Connect_Retry: 60
Master_Log_File: mysql-bin.000021
Read_Master_Log_Pos: 6036
Relay_Log_File: relay-bin.000002
Relay_Log_Pos: 952
Relay_Master_Log_File: mysql-bin.000021
Slave_IO_Running: Yes
Slave_SQL_Running: Yes
Replicate_Do_DB: mytest_db
Replicate_Ignore_DB:
Replicate_Do_Table:
Replicate_Ignore_Table:
Replicate_Wild_Do_Table:
Replicate_Wild_Ignore_Table:
Last_Errno: 0
Last_Error:
Skip_Counter: 0
Exec_Master_Log_Pos: 6036
Relay_Log_Space: 1102
Until_Condition: None
Until_Log_File:
Until_Log_Pos: 0
Master_SSL_Allowed: No
Master_SSL_CA_File:
Master_SSL_CA_Path:
Master_SSL_Cert:
Master_SSL_Cipher:
Master_SSL_Key:
Seconds_Behind_Master: 0
Master_SSL_Verify_Server_Cert: No
Last_IO_Errno: 0
Last_IO_Error:
Last_SQL_Errno: 0
Last_SQL_Error:
Replicate_Ignore_Server_Ids:
Master_Server_Id: 113
1 row in set (0.00 sec)
9. 此时可验证master1到master2的复制过程。在master1上建表,可以传递给master2,master2又生成binlog传递给slave1
10. 采用同样的方式,创建master2到master1的映射。
#在master2上创建复制用户repl,并授权给master1使用。
create user 'repl'@'master1_IP' identified by 'password';
GRANT REPLICATION SLAVE ON *.* TO 'repl'@'master1_IP';
#查看master2的master状态:
mysql> show master status;
+------------------+----------+--------------+------------------+
| File | Position | Binlog_Do_DB | Binlog_Ignore_DB |
+------------------+----------+--------------+------------------+
| mysql-bin.000006 | 610578 | mytest_db | |
+------------------+----------+--------------+------------------+
1 row in set (0.00 sec)
#此时master1和master2数据库一致,且master2不做更改,所以省去了master2到master1同步数据的过程。
#直接在master1上设置它的主节点:
mysql> change master to master_host='master2_IP',master_port=3306,master_user='repl',master_password='password',master_log_file='mysql-bin.000006',master_log_pos=610578;
Query OK, 0 rows affected (0.02 sec)
mysql> start slave;
Query OK, 0 rows affected (0.00 sec)
mysql> show slave status\G
*************************** 1. row ***************************
Slave_IO_State: Waiting for master to send event
Master_Host: master2_IP
Master_User: repl
Master_Port: 3306
Connect_Retry: 60
Master_Log_File: mysql-bin.000006
Read_Master_Log_Pos: 611282
Relay_Log_File: relay-bin.000002
Relay_Log_Pos: 253
Relay_Master_Log_File: mysql-bin.000006
Slave_IO_Running: Yes
Slave_SQL_Running: Yes
Replicate_Do_DB: mytest_db
Replicate_Ignore_DB:
Replicate_Do_Table:
Replicate_Ignore_Table:
Replicate_Wild_Do_Table:
Replicate_Wild_Ignore_Table:
Last_Errno: 0
Last_Error:
Skip_Counter: 0
Exec_Master_Log_Pos: 611282
Relay_Log_Space: 403
Until_Condition: None
Until_Log_File:
Until_Log_Pos: 0
Master_SSL_Allowed: No
Master_SSL_CA_File:
Master_SSL_CA_Path:
Master_SSL_Cert:
Master_SSL_Cipher:
Master_SSL_Key:
Seconds_Behind_Master: 0
Master_SSL_Verify_Server_Cert: No
Last_IO_Errno: 0
Last_IO_Error:
Last_SQL_Errno: 0
Last_SQL_Error:
Replicate_Ignore_Server_Ids:
Master_Server_Id: 114
1 row in set (0.00 sec)
11. 再将maste1、master2、slave1用amoeba整合成集群,测试集群复制情况。