Cocos2Dx 一些琐碎的API
该随笔用来记录碰到的琐碎的API,以加深印象,以后找起来也方便。
场景:
Director::getInstance()->replaceScene(scene);// 切换场景
Director::getInstance()->replaceScene(TransitionSlideInt::create(3.0f,scene));//带特效切换场景
Director::getInstance()->pushScene(scene)//push 和pop场景不会导致旧场景内存释放
控件:
Label* label = Label::create("hello","Arial",40);//label显示的字符,字体,字号
label->setPosition(Point(300,300));也可使用重载的方法,参数为x和y坐标
MenuItemLabel1* pLabelItem = MenuItemLabel1::create(label);//以label作为菜单项
Menu* pMenu = Menu::create(pLabelItem,NULL);// 把才菜单项加入菜单
pMenu->alignItemsVertivslly();//垂直自动排列
addchild(pMenu);//菜单加入场景即可
controlButton* controlBtn =ControlButton::create(label,sprite); //按钮控件类
controlBtn->setBackgroundSpriteForState(sprite,Control::State::HIGH_LIGHTED);//设置按下图片
controlBtn->setPreferredSize(Size(300,100));//设置固定大小,若图片超过该大小则变大
回调函数://传递一个函数,并且在某时刻调用它
HelloWorld中的关闭按钮回调函数:
 void menuCloseCallback(cocos2d::Ref* pSender); //头文件中的声明
   auto closeItem = MenuItemImage::create(          //cpp文件中的调用
                                          "CloseNormal.png",
                                          "CloseSelected.png",
                            CC_CALLBACK_1(HelloWorld::menuCloseCallback, this));或者
   auto closeItem = MenuItemImage::create(         //create的一另一个重载方法
                                           "CloseNormal.png",
                                           "CloseSelected.png",
                                            this,
                                 menu_selector(Helloworld::menuCloseCallback));
监听器://一直监听,一旦发生某事件就调用
void onClick(cocos2d::Ref *psender,cocos2d::ui::TouchEventType type);//头文件中的申明
rightButton->addTouchEventListener(this,toucheventselector(MyHelloWorld::onClick));//cpp文件中调用
void MyHelloWorld::onClick(Ref* pSender,TouchEventType type){ //cpp文件中的实现
    switch (type) {
        case cocos2d::ui::TOUCH_EVENT_ENDED: //松开触发
            if(picture->isVisible())
               picture->setVisible(false);
            else
                picture->setVisible(true);
            healthBar->setPercent(healthBar->getPercent() - 1);//血条下降
            break;
        case cocos2d::ui::TOUCH_EVENT_BEGAN: //按下后触发
            break;
        case cocos2d::ui::TOUCH_EVENT_MOVED: //按下后移动触发
            break;
        case cocos2d::ui::TOUCH_EVENT_CANCELED: //由于特殊情况中断触发
            break;
        default:
            break;
    }
}
触摸监听器响应触摸事件:
 auto listener =EventListenerTouchOneByOne::create();//单点触摸
    listener->onToucheBegan=[&](Touch* touch,Event* event){
        //Point pos1 = touch->getLocation() //获取基于3D的touch坐标
        Point pos2 = touch->getLocationInView() //获取基于2D的touch坐标
        Point pos3 = Director::getInstance()->convertToGL(pos2) //获取基于cocos2d的touch坐标
        auto target = static_cast<Sprite*>(event->getCurrentTarget());//获取注册监听器时绑定的精灵
        if(target->getBoundingBox().containsPoint(pos3)){//判断出点是否在精灵内
         Log("Touch the Sprite!");
        }
        };
    listener->onTouchMoved=[&](Touch* touch,Event* event){
            Point pos2 = touch->getLocationInView() //获取基于2D的touch坐标
            Log("Position is %f,%f",pos2.x,pos2.y);    //移动时输出坐标
    };
    listener->onTouchEnded=[&](Touch* touch,Event* event);
     Log("onTouchEnd!");
    };
      listener->setSwallowTouches(true);//若两个精灵重叠,则只有上面的响应事件
    _eventDispatcher->addEventListenerWithSceneGraphPriority(listener, sprite);//注册监听事件,绑定精灵,注意为第二个精灵注册监听器时需要listener->clone()来代替listener
 auto listener =EventListenerTouchAllAtOnce::create();//多点触摸
    listener->onTouchesBegan=[&](const std::vector<Touch*>& touches,Event* events){
        auto logtext = (Label*)this->getChildByTag(1);
        int num = touches.size;
        logtext->setString(Value(num).asString+"Touches");
        };
    listener->onTouchesMoved=[&](const std::vector<Touch*>& touches,Event* events){
        auto logtext = (Label*)this->getChildByTag(2);
        std::string text = "";
        for(auto &touch:touches){//遍历每一个触摸
            auto location = touch->getLocation();
            text += "[touchID" + Value(touch->getID()).asString() + "],"
        }
        logtext -> setString(text);
    };
    listener->onTouchesEnded=[&](const std::vector<Touch*>& touches,Event* events){
    };
    _eventDispatcher->addEventListenerWithSceneGraphPriority(listener, this);//注册监听事件,绑定精灵
使用Value进行类型转换:
int a = Value("1234").asInt();
float b = Value("12.45").asFloat();
string s = Value(123.4f).asString();//要是在log输出则要使用%s,并且在asString()后加c_str();
播放声音:
#include “simpleAudioEngine.h”
CocosDenshion::SimpleAudioEngine::getInstance()->playBackGroundMusic("xxxx.mp3",true);//文件名,是否循环.
该方法只适合播放较长的音乐如BGM,若是短促的音效应该使用:
CocosDenshion::SimpleAudioEngine::getInstance()->playBacEffect("xxxx.wav")
Scale9Sprite:可拉伸且不失真的图片
#include "cocos-ext.h"
using namespace cocos2d::extension;
Scale9Sprite* nineGirl1 = Scale9Sprite::create("CloseNormal.png");
nineGirl->setContentSize(Size(200,100));
CocosStudio:
#include "editor-support/cocostudio/CocoStudio.h"
#include "ui/CocosGUI.h"
using namespace cocos2d::ui;
using namespace cocostudio;
使用cocosStudio完成UI并导出为csb文件后(注意资源要一起导出)
auto UI = CSLoader::createNode("MainScene.csb");//加载csb文件
UI->setPosition(Point(0,0));
Button* rightButton = (Button*)UI->getChildByName("Button_1");//根据控件名获取控件
动作:
MoveTo* m_move = MoveTo::create(0.9f,Point(200,100));//绝对移动 MoveBy相对移动
ScaleTo* m_scale = ScaleTo::create(3.0f,2.0f,2.0f);//绝对缩放 ScaleBy相对缩放 参数为 时间,x,y
Blink* blink = Blink::create(3.0f,3);//闪烁 参数为持续时间和次数
JumpTo* m_jump = JumpTp::create(3.0f,Point(50,1),100,1);//绝对跳跃 JumpBy相对跳跃,参数为时间,目的地,高度,次数
ccBezierConfig bezier;//贝塞尔曲线
bezier.controlPoint_1 = Point(100,0);//波谷偏向值
bezier.controlPoint_2 = Point(200,250); //波峰偏向值
bezier.endPosition = Point(300,50); //终点
BezierTo* bezierTo = BezierTo::create(4.0f,bezier);
RepeatForever* repeatAction = RepeatForever::create(m_jump);
Repeat* repeatAction2 = Repeat::create(m_jump,3);//指定重复次数
Action* actions1 = Spawn::create(m_move,m_scale,blink,NULL);//同时播放动作
Action* actions2 = Sequence::create(m_move,m_scale,blink,NULL);//顺序播放动作
sprite->runAction(actions2);
sprite->stopAllActions(); //停止所有动作
auto callbackFunc = [&](){//lambda函数是一个匿名函数[]表示要开始一个lambda函数,
  doSomeThing();             //()内是函数参数
};//[&]表示可以以引用的方式使用外部变量,[=]表示以复制的方式使用外部变量
CallFunc* callFunc = CallFunc::create(callbackFunc);//CallFunc是一个隐形的动作,其作用类似于回调函数,使用lambda函数作为回调函数
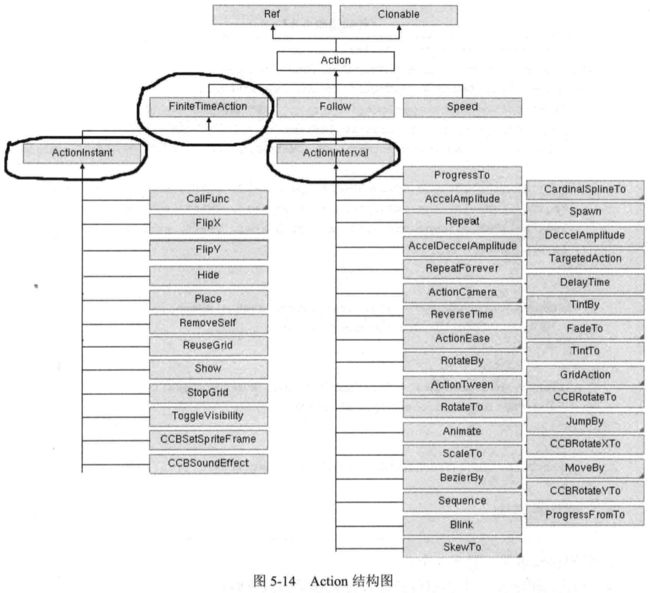
上面是动作分类图,分为立即执行的动作,如show()还有有持续时间的动作,如MoveTo()。
获取随机数:
CCRANDOM_0_1() //获取0到1之间的随机数
定时器:
virtual void update(float dt) //需要重写update方法
this->scheduleUpdate(); //启动定时器,update每帧调用一次
碰撞检测:
Rect entiryRect = Object->getBoundingBox();//若游戏对象没有继承Sprite,而是把Sprite作为一个属性,则需要重新设置
Point pos = getPosition(); //Object的大小,用setContentSize . 然后把绑定在Object上的精灵位置
return entityRect.containsPoint(pos); //移动到Size/2的位置
设置渲染顺序:参数越大越在表面(晚绘制)
sprite->setGlobalZOrder() //可以对于不同层决定绘制顺序
sprite->setLocalZOrder() //对于同一节点的子节点决定绘制顺序
sprite->setOrderOfArrival()// 在LocalZOrder相同时决定绘制先后顺序
绘制大量精灵
Cocos2dx 3.0 使用了auto-batching来解决大量绘制精灵的情况
cocos会自动使用auto-batching,但是需要满足以下条件:
1.绘制的精灵使用哪个同一张纹理,相同的材质和混合功能.
2.绘制是连续的。(是否连续受渲染顺序影响)
3.不把精灵添加到SpriteBatchNode(2.0时代处理大量绘制的方法).
使用TexturePacker打包图片:
设置参数: Dithering: 抖动显示,可以缓解图像失真
Size constrains: 打包图为2的次方,如125*150,150>128,所以会打包成128*256
Allow rotation:允许图片旋转来放更多图片,不影响读取时的显示
Trim: 出去图片的透明部分节省空间,而且不会使对齐失效
把多张图放入TexturePacker打包成一张后,如何读取呢?
SpriteFrameCache* frameCache = SpriteFrameCache::getInstance();
    frameCache->addSpriteFramesWithFile("move.plist","move.png");
    Sprite* sprite1 = Sprite::createWithSpriteFrameName("001.png");//使用单张图片的名字读取即可
    Sprite* sprite2 = Sprite::createWithSpriteFrameName("003.png");
    sprite2->setTextureRect(Rect(0, 0, 150, 100));//截取纹理的部分
    //setPosition.....
创建动画:动画也是action,用runAction播放即可。
使用未打包的图片创建动画:这种方法需要手动指定SpriteFrame大小
cocos2d::Animate* HelloWorld::createAnimation1(){
    int iFrameNum = 8;
    Vector<SpriteFrame*> frames;
    SpriteFrame* frame = NULL;
    for(int i =0; i<iFrameNum ;i++){
        frame = SpriteFrame::create(StringUtils::format("00%d.png",1), Rect(0, 0, 150, 150));
        frames.pushBack(frame);
    }
    Animation *animation = Animation::createWithSpriteFrames(frames);
    animation->setDelayPerUnit(0.01);//每张播放间隙
    animation->setLoops(-1);
    Animate* action = Animate::create(animation);
    return action;
}
使用打包的图片创建动画:
cocos2d::Animate* HelloWorld::createAnimation2(){
    SpriteFrameCache *framecache = SpriteFrameCache::getInstance();
    framecache->addSpriteFramesWithFile("move.plist", "move.png");
    int iFrameNum = 8;
    Vector<SpriteFrame*> frames;
    SpriteFrame* frame = NULL;
    for(int i =1; i<=iFrameNum ;i++){
        log(i);
        //log(StringUtils::format("00%d.png",i));
        frame = framecache->getSpriteFrameByName(StringUtils::format("00%d.png",i));
        frames.pushBack(frame);
    }
    Animation *animation = Animation::createWithSpriteFrames(frames);
    animation->setDelayPerUnit(0.1);
    animation->setLoops(-1);
    Animate* action = Animate::create(animation);
    return action;
}