搭建Spring开发环境并编写第一个Spring小程序
- 搭建Spring开发环境并编写第一个Spring小程序
- 2015-05-27 0 个评论 来源:茕夜
-
收藏
 我要投稿
我要投稿
一.前面,我写了一篇Spring框架的基础知识文章,里面没讲到如何配置Spring开发环境,今天就来讲一下,如果大家不知道怎么下载Spring软件包的话
下面,我将用两种方式来讲述如何搭建Spring环境,其中第一种是利用MyEclipse工具里自带的来自动配置Spring,第二种事由我们自 己手动配置,有什么区别么,没有什么太大的区别,第一种稍微简单,第二种稍微复杂,但是第二种方式能配置较高版本的Spring,大家看个人爱好了!
二.第一种方式:自动配置方式。
(1).首先,新建一个Java项目,项目名为one_spring。
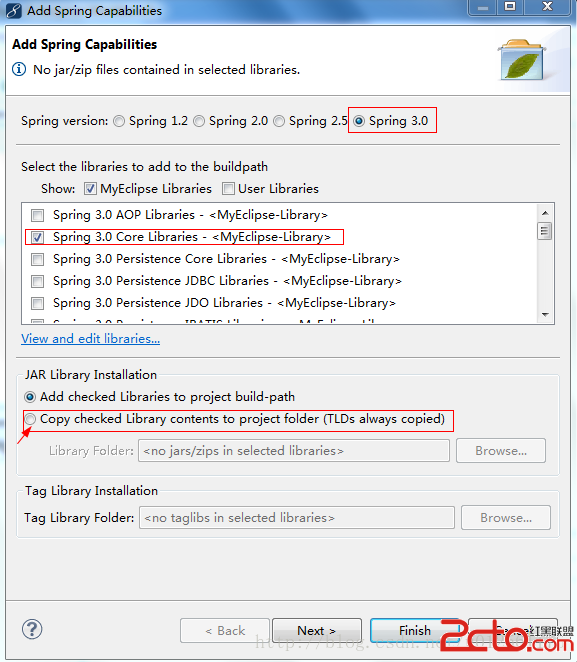
(2).选中这个Java项目,点击鼠标右键,选择MyEclipse下的Add Spring Capabilites...这个选项,也可以从菜单栏里选择,选择之后,如下图所示:
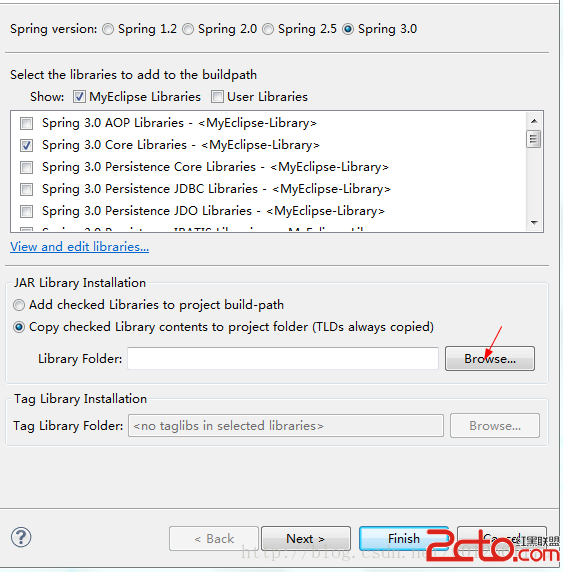
为了使我们创建的这个Java项目可以移植,所以我们可以选择最后一个箭头所指向处,选择之后,如下图所示:
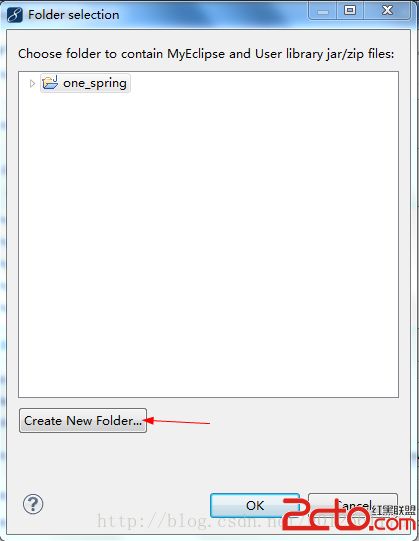
点击Browse按钮,选择放置jar包的文件夹,点击之后,如下图所示:
点击Create New Folder后,新建一个文件夹叫lib,专门放置jar包:
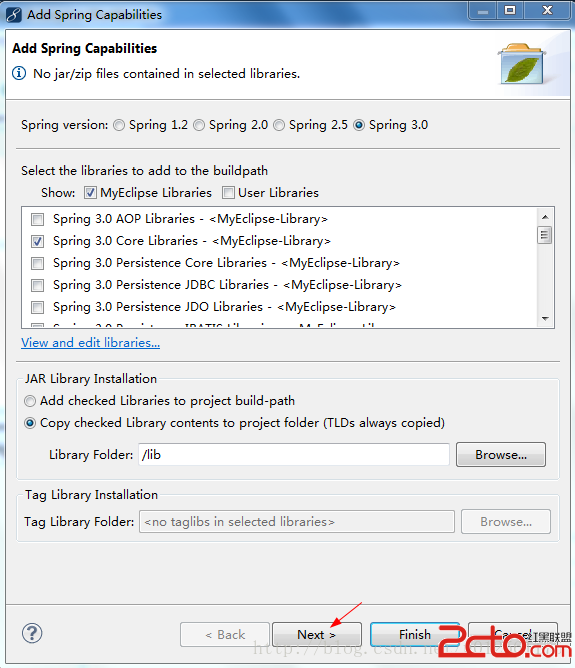
点击OK即可,然后我们再点击下图的Next按钮:
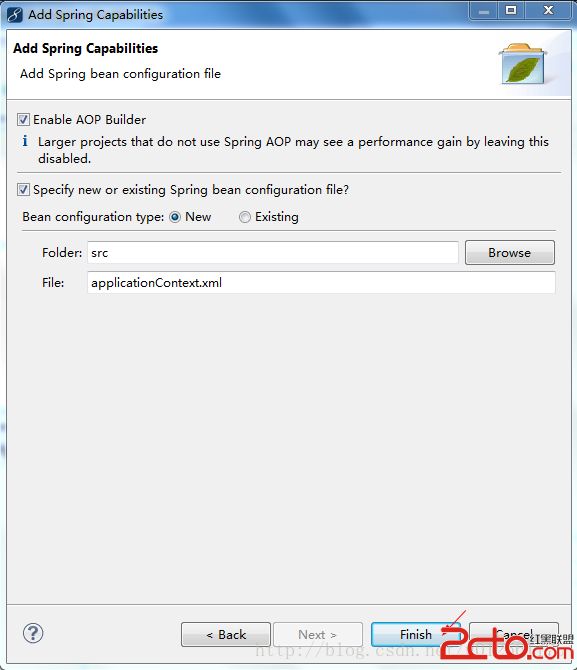
点击Next之后,如下图所示:
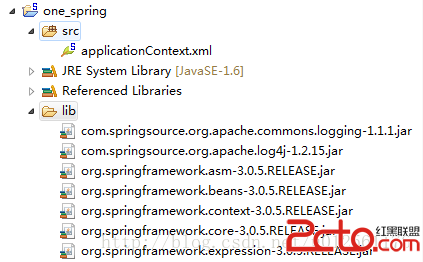
点击Finish按钮即完成了自动配置Spring的开发环境,点击Finish按钮后,项目文件结构如下图所示:
其中applicationContext为Spring的配置文件。
(3).下面我们就可以编写一个比较简单的Spring的小程序了。
首先,新建一个接口Animal,放在com.inter包下,即Animal.java文件,代码如下:
|
1
2
3
4
5
6
|
package
com.inter;
public
interface
Animal {
void
eat();
//定义抽象的吃方法
void
la();
//定义抽象的排泄方法
}
|
再新建一个Dog类,放在com.bean包下,实现了Animal接口,实现了Animal接口的抽象方法,即Dog.java文件,代码如下:
|
1
2
3
4
5
6
7
8
9
10
11
12
13
14
15
16
17
18
19
20
|
package
com.bean;
import
com.inter.Animal;
public
class
Dog
implements
Animal{
@Override
public
void
eat() {
// TODO Auto-generated method stub
System.out.println(狗吃狗粮);
}
@Override
public
void
la() {
// TODO Auto-generated method stub
System.out.println(狗拉狗屎);
}
}
|
再新建一个Cat类,放在com.bean包下,实现了Animal接口,实现了Animal接口的抽象方法,即Cat.java文件,代码如下:
|
1
2
3
4
5
6
7
8
9
10
11
12
13
14
15
16
17
18
19
|
package
com.bean;
import
com.inter.Animal;
public
class
Cat
implements
Animal{
@Override
public
void
eat() {
// TODO Auto-generated method stub
System.out.println(猫吃猫粮);
}
@Override
public
void
la() {
// TODO Auto-generated method stub
System.out.println(猫拉猫屎);
}
}
|
接下来我们就可以在applicationContext.xml文件里配置Dog和Cat这两个beans对象,具体代码如下:
|
1
2
3
4
5
|
<beans beans=
""
http:=
""
schema=
""
spring-beans-
3.0
.xsd=
""
www.springframework.org=
""
xmlns=
"http://www.springframework.org/schema/beans"
xmlns:p=
"http://www.springframework.org/schema/p"
xmlns:xsi=
"http://www.w3.org/2001/XMLSchema-instance"
xsi:schemalocation=
"http://www.springframework.org/schema/beans"
>
<bean
class
=
"com.bean.Dog"
id=
"dog"
></bean>
<bean
class
=
"com.bean.Cat"
id=
"cat"
></bean>
</beans>
|
其中bean标签中的id为这个类的对象取了id,以便后面的标签和代码可用,class是类路径,即包名+类名。
最后,我们新建一个测试类AnimalTest,放在com.test包下,即AnimalTest.java文件,代码如下:
|
1
2
3
4
5
6
7
8
9
10
11
12
13
14
15
16
17
18
19
20
|
package
com.test;
import
org.springframework.context.ApplicationContext;
import
org.springframework.context.support.ClassPathXmlApplicationContext;
import
org.springframework.context.support.FileSystemXmlApplicationContext;
import
com.bean.Cat;
import
com.bean.Dog;
public
class
AnimalTest {
public
static
void
main(String[] args){
ApplicationContext ac=
new
ClassPathXmlApplicationContext(applicationContext.xml);
//查询到配置文件,并赋给ac这个ApplicationContext应用上下文环境对象
Dog d=(Dog) ac.getBean(dog);
//获得配置文件中的id为dog这个bean对象
d.eat();
//调用eat方法
d.la();
//调用排泄方法
Cat c=(Cat)ac.getBean(cat);
//获得配置文件中的id为cat这个bean对象
c.eat();
//调用eat方法
c.la();
//调用排泄方法
}
}
|
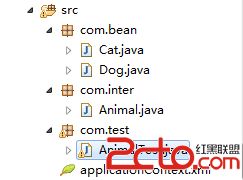
项目文件结构如下图所示:
运行后效果如下:
(4).这样就Spring的环境就配置成功了
三.第二种方式:手动配置Spring环境方式。
(1).首先,先下载所需要的Spring软件包,我下载的为Spring4.1.6这个版本的,下载完后得到几个文件夹,配置Spring所需的jar包就在libs下,如下图所示:
(2).接下来我们就在MyEclipse工具里新建一个Java项目,项目名为one_spring1,如下图所示:
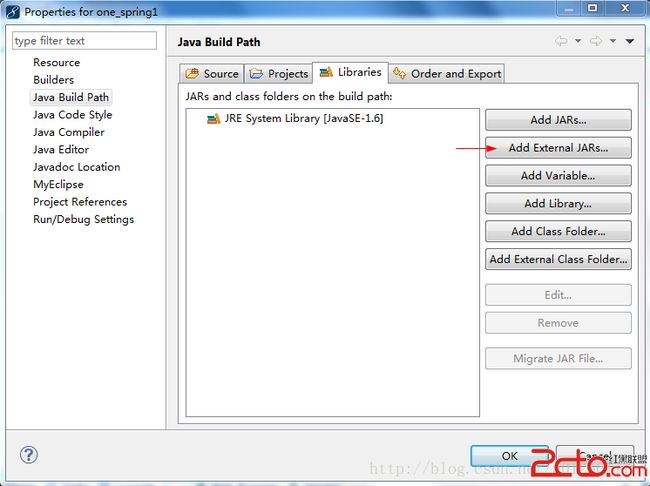
然后选中这个项目,鼠标右键选择Build Path — >configure Build Path...这个选项,点开之后如下图所示:
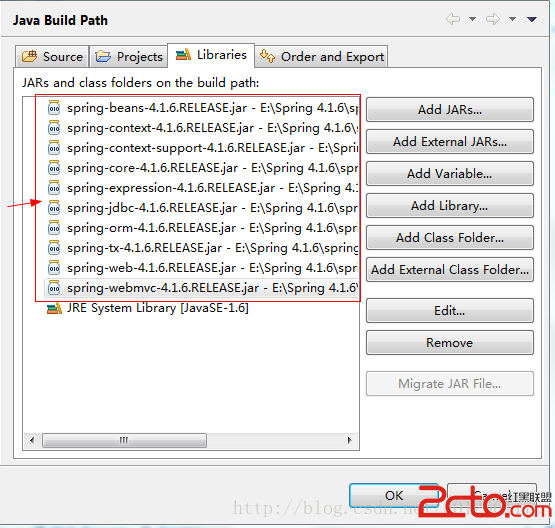
点击右边Add External JARS...按钮,即红色箭头指向处,把我们下载到的软件包下的libs文件夹的jar包添加进去,我们可以把核心的jar包添加进去即可,如下图所示:
其中红色框起来的为Spring的核心jar包,但还缺少一个jar包,这个jar包我下载4.1.6版本的软件包时找不到这个jar包,这个 jar包就是commons-logging-1.1.3.jar,这个jar包我是在Struts2的安装包里拿到的,我们也添加进去,如下图所示:
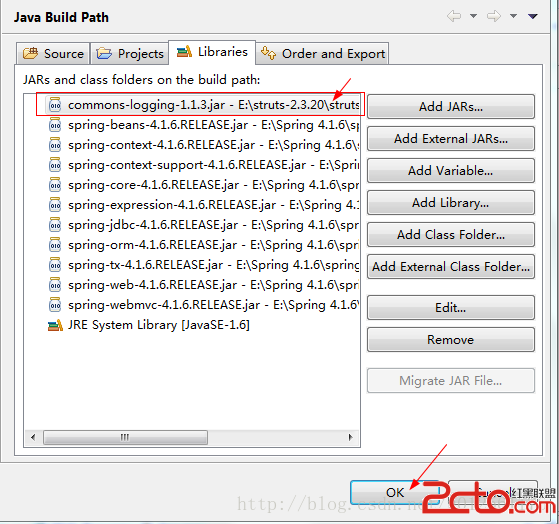
点击OK按钮就可以了,如果是Web项目的话,就把这些核心jar包导入进WEB-INF下的lib文件夹下。
(3).接着我们在项目底下的src目录下新建一个Spring的applicationContext.xml配置文件,其实我们也可以新建成beans.xml,但往往是新建成为第一种,这个文件我们可以从Spring的官网文档里找到,这里我直接附上模板:
|
1
2
3
4
5
|
<!--?xml version=
1.0
encoding=UTF-
8
?-->
<beans beans=
""
http:=
""
schema=
""
spring-beans-
3.0
.xsd=
""
www.springframework.org=
""
xmlns=
"http://www.springframework.org/schema/beans"
xmlns:p=
"http://www.springframework.org/schema/p"
xmlns:xsi=
"http://www.w3.org/2001/XMLSchema-instance"
xsi:schemalocation=
"http://www.springframework.org/schema/beans"
>
</beans>
|
我们可以在beans标签里添加bean标签等等!
(4).这样就配置好了Spring的环境了,接下来就是编写测试类了!
首先,编写一个接口Person,放在com.inter包底下,即Person.java文件,代码如下:
|
1
2
3
4
5
6
|
package
com.inter;
public
interface
Person {
void
eat();
//定义抽象的吃方法
void
drink();
//定义抽象的喝方法
}
|
然后定义两个类,分别为NorthMan类和SouthMan类,都放在com.bean包下,实现了Person接口,也实现了接口里的抽象方法
NorthMan.java文件代码如下:
|
1
2
3
4
5
6
7
8
9
10
11
12
13
14
15
16
17
18
19
|
package
com.bean;
import
com.inter.Person;
public
class
NorthMan
implements
Person{
@Override
public
void
eat() {
// TODO Auto-generated method stub
System.out.println(北方人喜欢吃面食);
}
@Override
public
void
drink() {
// TODO Auto-generated method stub
System.out.println(北方人喜欢喝酒);
}
}
|
SouthMan.java文件代码如下:
|
1
2
3
4
5
6
7
8
9
10
11
12
13
14
15
16
17
18
19
|
package
com.bean;
import
com.inter.Person;
public
class
SouthMan
implements
Person{
@Override
public
void
eat() {
// TODO Auto-generated method stub
System.out.println(南方人喜欢吃饭);
}
@Override
public
void
drink() {
// TODO Auto-generated method stub
System.out.println(南方人喜欢喝茶);
}
}
|
接着在applicationContext.xml配置文件里配置beans,即NorthMan和SouthMan类,applicationContext.xml文件代码如下:
|
1
2
3
4
5
6
7
|
<!--?xml version=
1.0
encoding=UTF-
8
?-->
<beans beans=
""
http:=
""
schema=
""
spring-beans-
3.0
.xsd=
""
www.springframework.org=
""
xmlns=
"http://www.springframework.org/schema/beans"
xmlns:p=
"http://www.springframework.org/schema/p"
xmlns:xsi=
"http://www.w3.org/2001/XMLSchema-instance"
xsi:schemalocation=
"http://www.springframework.org/schema/beans"
>
<bean
class
=
"com.bean.NorthMan"
id=
"northMan"
></bean>
<bean
class
=
"com.bean.SouthMan"
id=
"southMan"
></bean>
</beans>
|
最后编写测试类Test,放在com.test包下,代码如下:
|
1
2
3
4
5
6
7
8
9
10
11
12
13
14
15
16
17
18
19
|
package
com.test;
import
org.springframework.context.ApplicationContext;
import
org.springframework.context.support.FileSystemXmlApplicationContext;
import
com.bean.NorthMan;
import
com.bean.SouthMan;
public
class
Test {
public
static
void
main(String[] args){
ApplicationContext ac=
new
FileSystemXmlApplicationContext(src/applicationContext.xml);
//利用文件系统查询applicationContext.xml配置文件
NorthMan n=(NorthMan) ac.getBean(northMan);
n.eat();
n.drink();
SouthMan s=(SouthMan)ac.getBean(southMan);
s.eat();
s.drink();
}
}
|
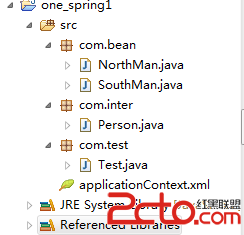
项目结构文件如下图所示:
运行后效果如下:
(5).这样就Spring的环境就配置成功了。
