读取PNG颜色索引数据
在某些应用中,可能需要PNG图片每个像素颜色索引值。如在目标检测中,VOC2012数据库中对每个目标类进行了分割标注,不同类别分别采用不同的颜色索引值。如0 表示背景, 1表示飞机等。opencv中的imread函数可以直接读出png RGB颜色信息,但是不能读出每个像素的颜色索引值。所以,本文给出了一个读取png图片每个像素颜色索引的函数。该函数依赖libpng库,并且和opencv相结合,利用opencv的Mat数据容器保存读出的颜色索引值。libpng库主页网址为http://libmng.com/pub/png/libpng.html。
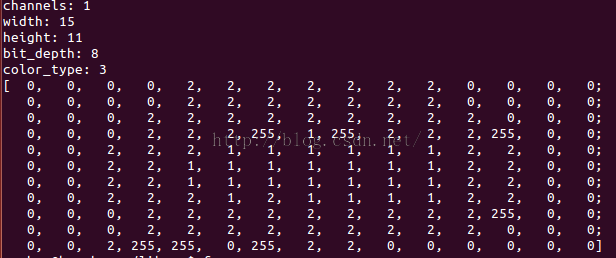
下面是函数源代码,包括两个部分一个是读取png图片每个像素颜色索引的函数indexfromPNG,和测试函数main。测试图片是将原图片缩放到尺寸为11*15, 便于输出结果。该测试实在ubuntu14.04系统下进行。
#include<png.h>
#include<stdio.h>
#include<stdlib.h>
#include<string>
#include<iostream>
#include<opencv2/highgui/highgui.hpp>
#include<opencv2/imgproc/imgproc.hpp>
#include<opencv2/core/core.hpp>
using namespace std;
using namespace cv;

#define PNG_BYTES_TO_CHECK 4

string filepath= "./2007_000063_1.png";
int indexfromPNG(string filepath, Mat& img)
{
    FILE *pic_fp;
    //read png file
    pic_fp = fopen(filepath.c_str(), "rb");
    if(pic_fp == NULL)
    {
        cout<<"file open failed!"<<endl;
        return 0;
    }
    png_structp png_ptr;
    png_infop  info_ptr;
    unsigned char        buf[PNG_BYTES_TO_CHECK];
    int        temp;
    //initialize two important structs of libpng
    png_ptr  = png_create_read_struct(PNG_LIBPNG_VER_STRING, 0, 0, 0);
    info_ptr = png_create_info_struct(png_ptr);
    setjmp(png_jmpbuf(png_ptr));
    //several bytes are read to check whether a file is a legal png
    temp = fread(buf,1,PNG_BYTES_TO_CHECK,pic_fp);
    temp = png_sig_cmp(buf, (png_size_t)0, PNG_BYTES_TO_CHECK);
    if (temp!=0)
    {
        cout<<"file is not png!"<<endl;
        return 0;
    }
    rewind(pic_fp);
    //fill png_struct from png file
    png_init_io(png_ptr, pic_fp);
    //fill png_struct and  png_info according to parameter of PNG_TRANSFORM_IDENTITY, which decide how to
    //transform the data. here, the original data, color index, will be given.
    png_read_png(png_ptr, info_ptr, PNG_TRANSFORM_IDENTITY, 0);
    int color_type, channels, bit_depth, width, height;

     channels      = png_get_channels(png_ptr, info_ptr);
     bit_depth = png_get_bit_depth(png_ptr, info_ptr);
     color_type    = png_get_color_type(png_ptr, info_ptr);
     int i,j;
      int size, pos = 0;
       png_bytep* row_pointers;
        row_pointers = png_get_rows(png_ptr, info_ptr);
        width = png_get_image_width(png_ptr, info_ptr);
        height = png_get_image_height(png_ptr, info_ptr);
        cout<<"channels: "<<channels<<endl;
        cout<<"width: "<<width<<endl;
        cout<<"height: "<<height<<endl;
        cout<<"bit_depth: "<<bit_depth<<endl;
        cout<<"color_type: "<<color_type<<endl;
        img.create(height, width, CV_8U);
        uchar* pdata = (uchar*)img.data;
        for(i = 0; i < height; i++)
        {
            for(j = 0; j < width; j ++)
            {
                pdata[pos] = row_pointers[i][j];
                ++pos;
            }
        }
        cout<<img<<endl;
    /*destroy the png_struct and png_info to free memory*/
    png_destroy_read_struct(&png_ptr, &info_ptr, 0);
    return 1;
}
int main()
{
    Mat colorindex;
    indexfromPNG(filepath, colorindex);
    return 1;
}
测试所用元尺寸图片如下,可以看出包括黑、白、红、绿这四种颜色。
输出结果如下图,可以看出有四种索引值0, 1, 2, 255.
函数中一个关键地方是png_read_png(png_ptr, info_ptr, PNG_TRANSFORM_IDENTITY, 0)。 PNG_TRANSFORM_IDENTITY确定对png解码结果不做任何改变,直接输出像素颜色索引值。而不像opencv直接设置为输出RGB颜色值。其函数其他的设置参数如下:
PNG_TRANSFORM_IDENTITY      No transformation
PNG_TRANSFORM_PACKING       Pack 1, 2 and 4-bit samples
PNG_TRANSFORM_PACKSWAP      Change order of packed pixels to LSB first
PNG_TRANSFORM_INVERT_MONO   Invert monochrome images
PNG_TRANSFORM_SHIFT         Normalize pixels to the sBIT depth
PNG_TRANSFORM_BGR           Flip RGB to BGR, RGBA to BGRA
PNG_TRANSFORM_SWAP_ALPHA    Flip RGBA to ARGB or GA to AG
PNG_TRANSFORM_INVERT_ALPHA  Change alpha from opacity to transparency
PNG_TRANSFORM_SWAP_ENDIAN   Byte-swap 16-bit samples
PNG_TRANSFORM_STRIP_FILLER        Strip out filler bytes (deprecated).
PNG_TRANSFORM_STRIP_FILLER_BEFORE Strip out leading filler bytes
PNG_TRANSFORM_STRIP_FILLER_AFTER  Strip out trailing filler bytes
该信息可以在libpng安装包中的libpng-manual.txt中得到。

