手把手带你画一个动态错误提示 Android自定义view
嗯。。再差1篇就可以获得持之以恒徽章了,今天带大家画一个比较简单的view。
转载请注明出处:http://blog.csdn.net/wingichoy/article/details/50477108
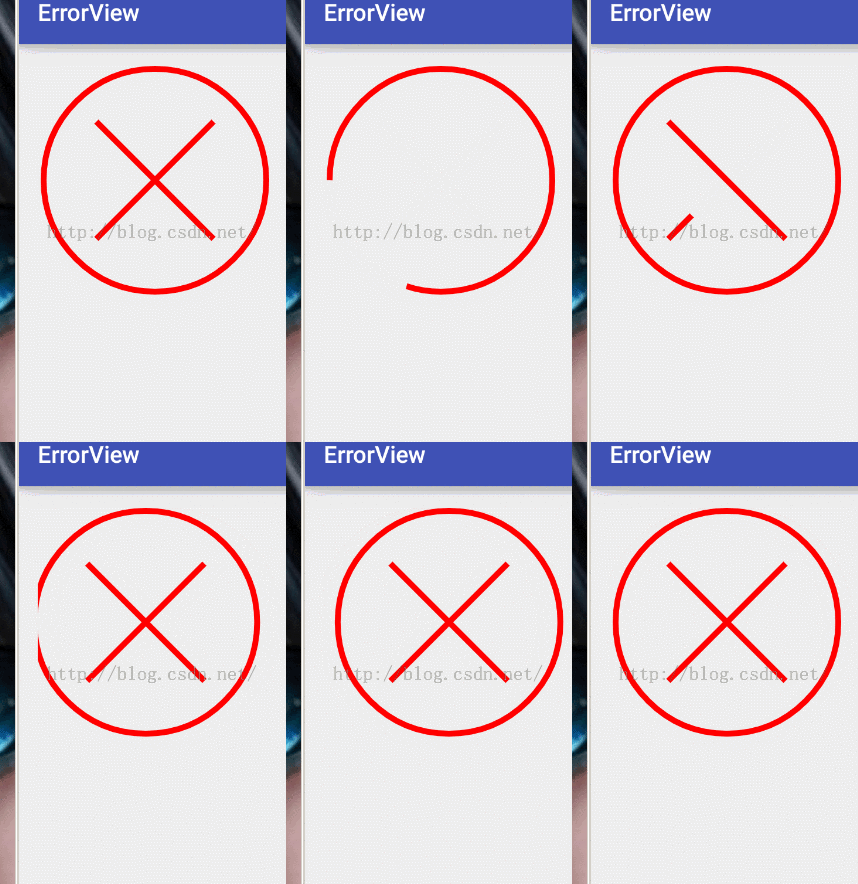
废话不多说,看效果图:
首先 构造函数 测量... 这里就一笔带过了。
 public ErrorView(Context context) {
        this(context, null);
    }

    public ErrorView(Context context, AttributeSet attrs) {
        this(context, attrs, 0);
    }

    public ErrorView(Context context, AttributeSet attrs, int defStyleAttr) {
        super(context, attrs, defStyleAttr);
    }

    @Override
    protected void onMeasure(int widthMeasureSpec, int heightMeasureSpec) {
        int widthSize = MeasureSpec.getSize(widthMeasureSpec);
        int widthMode = MeasureSpec.getMode(widthMeasureSpec);
        int heightSize = MeasureSpec.getSize(heightMeasureSpec);
        int heightMode = MeasureSpec.getMode(heightMeasureSpec);
        if (widthMode == MeasureSpec.EXACTLY) {
            mWidth = widthSize;
        } else {
            mWidth = 200;
        }


        if (heightMode == MeasureSpec.EXACTLY) {
            mHeight = heightSize;
        } else {
            mHeight = 200;
        }
        setMeasuredDimension(mWidth, mHeight);
    }
如果你看不懂上面这些,翻翻我的这一篇博客,有一些补充的知识点。 圆形百分比view
接下来draw,如果让你绘制一个静态的这个突然,你一定闭着眼也能画出来。。那么怎么才能实现动态的效果呢。。
其实就是模仿手绘的过程,我们是一点一点画出来的,一条线的逐渐延迟。 那我们就来模仿这个自然的过程。
首先画一个圆形。
Paint p = new Paint();
        p.setStrokeWidth(10);
        p.setAntiAlias(true);
        p.setColor(Color.RED);
        p.setStyle(Paint.Style.STROKE);
        RectF rectF = new RectF(0 + 10, 0 + 10, mWidth - 10, mHeight - 10);
        canvas.drawArc(rectF, 180, 360 * mProgress / 100, false, p);
        mProgress+=5;
可以看到drawArc的第三个参数 是变化的 , 其中mProgress的初值是零,这里让他自增,也就是说,每次调用onDraw方法,他就会增加。所以每次的弧都会比原来长一点点,直到最后画完。 所以在程序的最后 一定有 postInvalidateDelayed(10); 方法。
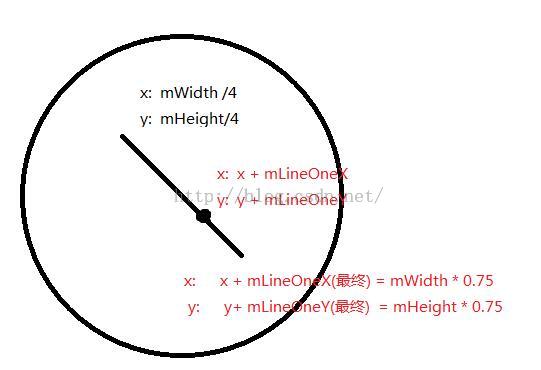
接下来来绘制两条线,这里的坐标我直接取半径的4分之一啦,唯一注意一点就是,只有在progress大于100的时候 我们才绘制两条线,两条线段也是根据一个变量自增的,原理同上。 这里mLineOneX等参数均表示画线的时候两点的坐标。 当mLineOneX = mWidth * 0.5的时候 mWidth /4 + mLineOneX 就等于我们要画线段的最终点。
if (mProgress > 100) {
            //画左边的线
            if (mLineOneX < mWidth * 0.5) {
                mLineOneX+=20;
                mLineOneY+=20;
            }
            canvas.drawLine(mWidth / 4, mHeight / 4, mWidth / 4 + mLineOneX, mHeight / 4 + mLineOneY, p);


            if (mLineOneX == mWidth * 0.5) {
                if (mLineTwoX < mWidth * 0.5) {
                    mLineTwoX+=20;
                    mLineTwoY+=20;
                }else {
                    //判断全部绘制完成
                    isLineDrawDone = true;
                }
                canvas.drawLine(mWidth / 4, (float) (mHeight * 0.75), mWidth / 4 + mLineTwoX, (float) (mHeight * 0.75) - mLineTwoY, p);


            }


        }
之后 添加一个标记位 isLineDrawDone 判断一下 如果没有画完 则 :
 if(isLineDrawDone){
            Log.e("wing","draw done");

        }else{

            postInvalidateDelayed(10);
        }
现在 基本上完成了绘制, 别急 还没加震动,震动效果是怎么实现的呢,大家还记得吗,如果忘了,可以看看我这篇博客: 自定义动画 实现抖一抖效果
所以我们要写一个接口,来回调onStop
public interface OnStopListener{
        void onStop(View v);
    }
把最后的绘制完成完善,继续增加一个标志位,代表全部绘制完成
 if(isLineDrawDone){
            Log.e("wing","draw done");
            if(!isDrawDone) {
                if (mOnStopListener != null) {
                    mOnStopListener.onStop(this);
                }
                isDrawDone = true;
            }

        }else{

            postInvalidateDelayed(10);
        }
提供一个reset()方法 让用户可以手动控制重绘
 public void reset() {
        mProgress = 0;
        mLineOneX = 0;
        mLineOneY = 0;
        mLineTwoX = 0;
        mLineTwoY = 0;
        isLineDrawDone = false;
        isDrawDone = false;
        invalidate();
    }
在提供一个添加监听器的方法
 public void setOnStopListener(OnStopListener onStopListener){
        mOnStopListener = onStopListener;
    }
protected void onCreate(Bundle savedInstanceState) {
        super.onCreate(savedInstanceState);
        setContentView(R.layout.activity_main);
        mErrorView = (ErrorView) findViewById(R.id.errorView);

        mErrorView.setOnStopListener(new ErrorView.OnStopListener() {
            @Override
            public void onStop(View v) {
                ShakeAnimation sa = new ShakeAnimation();
                sa.setDuration(1000);
                v.startAnimation(sa);
            }
        });

        mErrorView.setOnClickListener(new View.OnClickListener() {
            @Override
            public void onClick(View v) {
                mErrorView.reset();
            }
        });
嘿嘿嘿。。。这样就骗到了持之以恒勋章。
源码地址:http://download.csdn.net/detail/wingichoy/9394685

