说说ToolBar以及仿QQ没网络提示的实现
转载请注明出处:王亟亟的大牛之路
昨天停滞了一天的技术更新,写了个感悟,传送门“保持初心不变是多么的艰难--致那些一直在分享,在学习,在努力的开发者们”
今天来说说我们Google推荐的ToolBar,再模仿个别人的View,废话不说,开始!
先看看官方的介绍(大致了解下,不看源码了,你用自定义布局也能做个这样的实现,但是大牛写好了干吗不用?)
5.0.1引入的一个 标准工具栏(ActionBar no.2)
然后下面是一些文字解释,我们来理解下里面比较重要的概念
1.工具栏是传统的不透明的窗口,可以放置任意级别的嵌套.
2.它支持ActionBar的一系列特征,并可能包含以下一些元素(然后列出了一些我们待会要说到的东西)
2.1-navigation button 可能是一个按钮,可能是一个符号,或者是你的ICON,他是垂直对齐的,如果设置的话他是工具栏的最小高度。
2.2-branded logo image 这也就是我们的一个LOGO,大小“顶天立地”,还可以拉宽。
2.3-title and subtitle 你可以理解为一个标题和一个字幕。标题不解释了,字幕的话我的理解更像是副标题,或者就是文字内容,因为标题已经够大了,那么小的就差不多是内容了。
2.4-one and more custom views 一个或多个试图,也就是我们可以再Bar所添加的一些控件了,但是有一点要记住,如果Bar的长度不够了,那么这些控件将会被隐藏。
2.5- action menu 最传统的菜单,用于额外选项选择的操作。
噼里啪啦噼里啪啦 下面就是具体的操作了,我们就不翻译了,用代码来解释(翻译的不准观众老爷们见谅了)
官方的文档:http://developer.android.com/reference/android/widget/Toolbar.html
运行效果GIF太大了,传不上来,地址:https://github.com/ddwhan0123/BlogSample/blob/master/duomeiti/showgif.gif
贴个截图吧
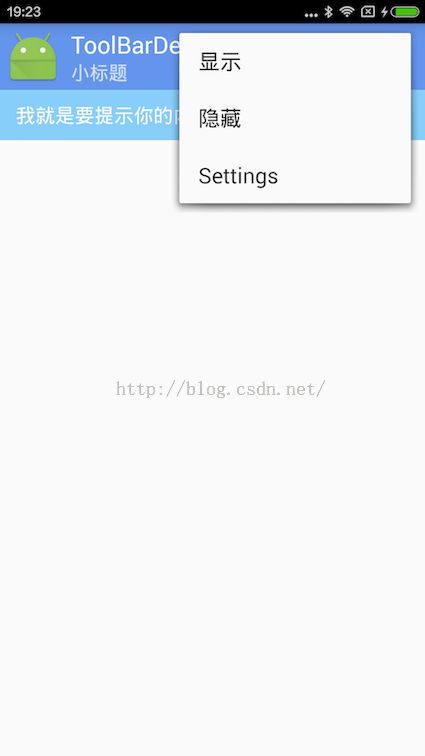
深蓝部分就是我们的ToolBar部分,淡蓝部分是画的那个view
要用ToolBar之前先要把本来默认的Bar给关了
像这样
<span style="font-size:14px;"> <style name="AppTheme.NoActionBar">
        <item name="windowActionBar">false</item>
        <item name="windowNoTitle">true</item>
 </style></span>
还有就是我们的Activyty要继承AppCompatActivity。
ps:反正我们现在新建项目这些其实已经配置好了,默认就是带着ToolBar的,不然会报异常
完全的XML文件是这样的(当然,颜色啊还有些其他属性你自己根据需求来吧)
<span style="font-size:14px;"><resources>

    <!-- Base application theme. -->
    <style name="AppTheme" parent="Theme.AppCompat.Light.DarkActionBar">
        <!-- Customize your theme here. -->
        <item name="colorPrimary">@color/CornflowerBlue</item>
        <item name="colorPrimaryDark">@color/colorPrimaryDark</item>
        <item name="colorAccent">@color/colorAccent</item>
    </style>

    <style name="AppTheme.NoActionBar">
        <item name="windowActionBar">false</item>
        <item name="windowNoTitle">true</item>
    </style>

    <style name="AppTheme.AppBarOverlay" parent="ThemeOverlay.AppCompat.Dark.ActionBar" />

    <style name="AppTheme.PopupOverlay" parent="ThemeOverlay.AppCompat.Light" />

</resources>
</span>
记得values-v21也要配置好哦
<span style="font-size:14px;"><resources>>

    <style name="AppTheme.NoActionBar">
        <item name="windowActionBar">false</item>
        <item name="windowNoTitle">true</item>
        <item name="android:windowDrawsSystemBarBackgrounds">true</item>
        <item name="android:statusBarColor">@android:color/transparent</item>
    </style>
</resources>
</span>
再贴下整个布局文件
<span style="font-size:14px;"><?xml version="1.0" encoding="utf-8"?>
<RelativeLayout xmlns:android="http://schemas.android.com/apk/res/android"
    xmlns:app="http://schemas.android.com/apk/res-auto"
    xmlns:tools="http://schemas.android.com/tools"
    android:layout_width="match_parent"
    android:layout_height="match_parent"
    android:fitsSystemWindows="true"
    tools:context="toolbardemo.wjj.toolbardemo.MainActivity">

    <android.support.design.widget.AppBarLayout
        android:layout_width="match_parent"
        android:layout_height="wrap_content"
        android:theme="@style/AppTheme.AppBarOverlay"
        android:id="@+id/view">

        <android.support.v7.widget.Toolbar
            android:id="@+id/toolbar"
            android:layout_width="match_parent"
            android:layout_height="?attr/actionBarSize"
            android:background="?attr/colorPrimary"
            app:popupTheme="@style/AppTheme.PopupOverlay" />

    </android.support.design.widget.AppBarLayout>

    <ImageView
        android:layout_width="match_parent"
        android:layout_height="wrap_content"
        android:id="@+id/imageView"
        android:layout_below="@+id/view" />


</RelativeLayout>
</span>
如何使用?
再你的 onCreate()方法中
<span style="font-size:14px;"> Toolbar toolbar = (Toolbar) findViewById(R.id.toolbar);
 setSupportActionBar(toolbar);</span>
即可,他会"吃掉"ActionBar的所有行为
在demo的截图里我没有设置logo(实际会是一张很大的图)
其他设置如下:
<span style="font-size:14px;"> toolbar.setTitle("大标题");
 toolbar.setSubtitle("小标题");
 toolbar.setNavigationIcon(R.mipmap.ic_launcher);</span>
然后在这里提一下Navigation的监听事件,他像一个Button一样只咬传一个View.OnClickListener的回调即可,非常的方便。(例子中我操作的时finish)
<span style="font-size:14px;">toolbar.setNavigationOnClickListener(new View.OnClickListener() {
            @Override
            public void onClick(View v) {
                Toast.makeText(MainActivity.this, "退出了", Toast.LENGTH_SHORT).show();
                finish();
            }
        });</span>
然后menu的操作和ActionBar的是一模一样,大家看源码就理解了,这里就不解释了。
再来说下那个View
在上面贴的布局文件也放着了,这是个ImageView,而里面的字啊,背景哪来的?
没错,都是画的(最近很热衷画)
直接上这部分的代码
<span style="font-size:14px;">        //提示框部分
        imageView = (ImageView) findViewById(R.id.imageView);

        //画底板的画笔
        paint = new Paint();
        paint.setColor(resources.getColor(R.color.White));
        paint.setStrokeWidth(5);
        //抗鋸齒
        paint.setAntiAlias(true);
        //抖動處理
        paint.setDither(true);
        //屏幕的长宽
        width = this.getWindowManager().getDefaultDisplay().getWidth();
        height = this.getWindowManager().getDefaultDisplay().getHeight();
        bitmap = Bitmap.createBitmap(width, height / 15
                , Bitmap.Config.ARGB_8888);
        Log.d("--->width height", "  getWidth  " + this.getWindowManager().getDefaultDisplay().getWidth() +
                " getHeight()  " + this.getWindowManager().getDefaultDisplay().getHeight());
        canvas = new Canvas(bitmap);
        canvas.drawColor(resources.getColor(R.color.LightSkyBlue));

        //画字
        paint.setTextSize(50);
        Paint.FontMetricsInt fontMetrics = paint.getFontMetricsInt();
        baseline = (height / 15 - fontMetrics.bottom - fontMetrics.top) / 2;
        canvas.drawText("我就是要提示你的内容", 40, baseline, paint);
        imageView.setImageBitmap(bitmap);</span>
步骤:
1.初始化画笔
2.获取屏幕的参数(onCreate是得不到控件长宽的)
3.创建一个画布,充满imageview,填充颜色背景
4.计算文字的合理(美观)的出现位置
5.把位图送给imageview,收工
然后因为是ImageView所以点击事件也不需要重写,直接set就行(业务逻辑就靠它)
imageView.setOnClickListener(new View.OnClickListener() {
            @Override
            public void onClick(View v) {
                Toast.makeText(MainActivity.this,"自定义被点击了",Toast.LENGTH_SHORT).show();
            }
        });
是不是很方便?
本人最近有个疑问,ListView的item或者ScrollView的控件消失的动画怎么实现,希望各位会的指点一下互相学习(就是默认上移下移控件逐渐消失的过程那个动画别想复杂了)
动画部分就不解释了,我说了2个礼拜的View动画了,之前肯定提到过的,去源码里扣吧
https://github.com/ddwhan0123/BlogSample/blob/master/ToolBarDemo.zip
记得点个赞哦!!