安卓个人学习------ImageView,SeekBar,TableHost,ProgressBar的使用
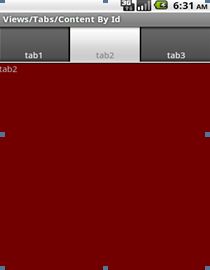
先让大家看一个效果图
怎么样,效果炫吗?
让我们来分析一下,这种效果怎么样才能实现呢?
首先我们注意一下,上方几个横着切换的功能是TabHost
TabHost
提供选项卡(Tab页)的窗口视图容器。此对象包含两个子对象:一组是用户可以选择指定Tab页的标签;另一组是FrameLayout用来显示该Tab页的内容。通常控制使用这个容器对象,而不是设置在子元素本身的值。(译者注:即使使用的是单个元素,也最好把它放到容器对象ViewGroup里)
内部类
interfaceTabHost.OnTabChangeListener
接口定义了当选项卡更改时被调用的回调函数
interface TabHost.TabContentFactory
当某一选项卡被选中时生成选项卡的内容
class TabHost.TabSpec
单独的选项卡,每个选项卡都有一个选项卡指示符,内容和tag标签,以便于记录.
公共方法
public void addTab(TabHost.TabSpec tabSpec)
新增一个选项卡
参数
tabSpec 指定怎样创建指示符和内容.
<?xml version="1.0" encoding="utf-8"?>
<TabHost xmlns:android="http://schemas.android.com/apk/res/android"
    android:layout_width="fill_parent"
    android:layout_height="fill_parent" >

	<LinearLayout android:id="@+id/tab1" android:orientation="vertical"
		android:layout_width="fill_parent" android:layout_height="fill_parent">
		<Button android:id="@+id/button" android:layout_width="fill_parent"
			android:layout_height="wrap_content" android:text="切换到第3个标签" />
		<ImageView  android:layout_width="fill_parent"
			android:layout_height="wrap_content" android:src="@drawable/background" android:layout_marginTop="30dp"/>
	</LinearLayout>
</TabHost>
import android.app.TabActivity;
import android.content.Intent;
import android.os.Bundle;
import android.view.LayoutInflater;
import android.widget.TabHost;

public class TableHostTest extends TabActivity {

	private TabHost tabHost = null;

	@Override
	protected void onCreate(Bundle savedInstanceState) {
		super.onCreate(savedInstanceState);
		tabHost = this.getTabHost();
		LayoutInflater inflater = LayoutInflater.from(this);
		/*注意true的作用*/
		inflater.inflate(R.layout.tablehost, tabHost.getTabContentView(),true);
		tabHost.addTab(tabHost.newTabSpec("tab1").setIndicator("界面1").setContent(R.id.tab1));
		tabHost.addTab(tabHost.newTabSpec("tab2").setIndicator("界面2").setContent(new Intent(this,SeekBarDemo.class)));
		tabHost.addTab(tabHost.newTabSpec("tab3").setIndicator("界面3").setContent(new Intent(this,UITest4Activity.class)));
	}

}
进度条显示:
<?xml version="1.0" encoding="utf-8"?>
<LinearLayout xmlns:android="http://schemas.android.com/apk/res/android"
    android:layout_width="fill_parent"
    android:layout_height="fill_parent"
    android:orientation="vertical" >

    <TextView
        android:layout_width="fill_parent"
        android:layout_height="wrap_content"
        android:text="进度条演示" />

    <ProgressBar
        android:layout_width="wrap_content"
        android:layout_height="wrap_content"
        android:max="1000"
        android:progress="100"
		android:id="@+id/progressbar1"
        />

    <ProgressBar
        style="@android:style/Widget.ProgressBar.Horizontal"
        android:layout_marginTop="30dp"
        android:layout_width="fill_parent"
        android:layout_height="wrap_content"
        android:max="1000"
        android:progress="500"
        android:secondaryProgress="300"
		android:id="@+id/progressbar2"
        />
</LinearLayout>
import android.app.Activity;
import android.os.Bundle;
import android.os.Handler;
import android.util.Log;
import android.widget.ProgressBar;

public class ProgressBarDemo extends Activity{

	ProgressBar progressbar = null;
	static int i = 0;
	int progressbarMax = 0;

	Handler handler = new Handler();

    public void onCreate(Bundle savedInstanceState) {
        super.onCreate(savedInstanceState);
        setContentView(R.layout.progressbar_layout);

        findViews();
    }

	private void findViews() {
		progressbar = (ProgressBar) this.findViewById(R.id.progressbar2);
		progressbar.setMax(1000);
		progressbarMax = progressbar.getMax();

		new Thread(new Runnable(){

			public void run(){
				while(i< progressbarMax){
					i=doWork();

					handler.post(new Runnable(){

						public void run(){
							progressbar.setProgress(i);
						}
					});
					try {
						Thread.sleep(50);
					} catch (InterruptedException e) {
						// TODO Auto-generated catch block
						e.printStackTrace();
					}
				}
			}
		}).start();

	}

	public int doWork(){
		Log.d("TAG", String.valueOf(i));
		return ++i;
	}

/*	//不能用!!!!
	public void run(){
		Log.d("TAG","thread starting...");

		while(i++ < progressbarMax){
			progressbar.setProgress(i);
			try {
				Thread.sleep(50);
			} catch (InterruptedException e) {
				// TODO Auto-generated catch block
				e.printStackTrace();
			}
		}
	}
	*/
}
下面用ImageView实现图片预览功能
import android.app.Activity;
import android.graphics.Bitmap;
import android.graphics.drawable.BitmapDrawable;
import android.os.Bundle;
import android.view.MotionEvent;
import android.view.View;
import android.view.View.OnTouchListener;
import android.widget.ImageView;

public class ImageViewDemo extends Activity implements OnTouchListener {

	ImageView imageView1, imageView2;

	protected void onCreate(Bundle savedInstanceState) {
		// TODO Auto-generated method stub
		super.onCreate(savedInstanceState);
		this.setContentView(R.layout.imageview_layout);

		findViews();
	}

	private void findViews() {
		imageView1 = (ImageView) findViewById(R.id.img1);
		imageView2 = (ImageView) findViewById(R.id.img2);

		imageView1.setOnTouchListener(this);

	}

	public boolean onTouch(View v, MotionEvent event) {
		float scale = 412 / 320;

		int x = (int) (event.getX() * scale);
		int y = (int) (event.getY() * scale);

		//尝试考虑解决边界问题
		int width = (int) (100 * scale);
		int height = (int) (100 * scale);

		BitmapDrawable bitmapDrawable = (BitmapDrawable) imageView1.getDrawable();

		imageView2.setImageBitmap(Bitmap.createBitmap(bitmapDrawable.getBitmap(),
				x,y, width, height));

		return false;
	}

}
<?xml version="1.0" encoding="utf-8"?>
<LinearLayout xmlns:android="http://schemas.android.com/apk/res/android"
    android:layout_width="match_parent"
    android:layout_height="match_parent"
    android:orientation="vertical" >

    <ImageView
        android:id="@+id/img1"
        android:layout_width="fill_parent"
        android:layout_height="300dp"
        android:background="#cccccc"
        android:src="@drawable/pig" />

    <ImageView
        android:id="@+id/img2"
        android:layout_width="100dp"
        android:layout_height="100dp"
        android:background="#cccccc"
        android:scaleType="fitStart"
        android:layout_marginTop="20dp"
        />

</LinearLayout>
调节音量等的控制条:
<?xml version="1.0" encoding="utf-8"?>
<LinearLayout xmlns:android="http://schemas.android.com/apk/res/android"
    android:layout_width="match_parent"
    android:layout_height="match_parent"
    android:orientation="vertical" >

    <SeekBar
        android:layout_width="fill_parent"
        android:layout_height="wrap_content"
        android:max="1000"
        android:id="@+id/seekbar"
        />

</LinearLayout>
import android.app.Activity;
import android.os.Bundle;
import android.util.Log;
import android.widget.SeekBar;
import android.widget.SeekBar.OnSeekBarChangeListener;

public class SeekBarDemo extends Activity implements OnSeekBarChangeListener {

	SeekBar seekbar = null;

	protected void onCreate(Bundle savedInstanceState) {
		// TODO Auto-generated method stub
		super.onCreate(savedInstanceState);
		this.setContentView(R.layout.seekbar_layout);

		findViews();
	}

	private void findViews() {
		seekbar = (SeekBar) this.findViewById(R.id.seekbar);
		seekbar.setOnSeekBarChangeListener(this);
	}

	@Override
	public void onProgressChanged(SeekBar seekBar, int progress,
			boolean fromUser) {
		Log.d("TAG", "changed: "+  String.valueOf(seekBar.getProgress()));

	}

	@Override
	public void onStartTrackingTouch(SeekBar seekBar) {
		Log.d("TAG", "start: "+  String.valueOf(seekBar.getProgress()));

	}

	@Override
	public void onStopTrackingTouch(SeekBar seekBar) {
		Log.d("TAG", "stop: "+  String.valueOf(seekBar.getProgress()));

	}

}


