android系统锁屏详解【android锁屏解析二】
----题记
我的有篇文章说了这个锁屏,但当时写的有点匆忙,没有细说。
AndroidICS4.0---->LockScreen锁屏流程【Android源码解析九】
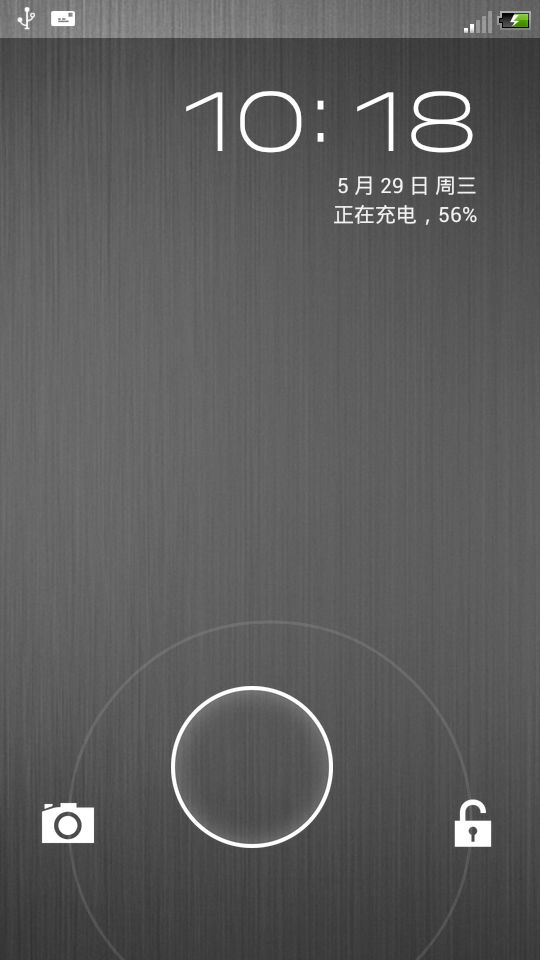
好了,开始正题,系统原声的锁屏界面,先来看一张图片:
这个圆形的解锁界面,左边是照相机,右边是解锁。下面我们来说说这个功能的具体实现,以及怎么修改成为上下左右四个方向的解锁界面。
Step1:先看LockScreen.java这个类加载的布局
inflater.inflate(R.layout.keyguard_screen_tab_unlock, this, true);
然后看对应的布局文件:
<com.android.internal.widget.multiwaveview.MultiWaveView
            android:id="@+id/unlock_widget"
            android:orientation="horizontal"
            android:layout_width="match_parent"
            android:layout_height="match_parent"
            android:layout_alignParentBottom="true"

            android:targetDrawables="@array/lockscreen_targets_with_camera"
            android:targetDescriptions="@array/lockscreen_target_descriptions_with_camera"
            android:directionDescriptions="@array/lockscreen_direction_descriptions"
            android:handleDrawable="@drawable/ic_lockscreen_handle"
            android:waveDrawable="@drawable/ic_lockscreen_outerring"
            android:outerRadius="@dimen/multiwaveview_target_placement_radius"
            android:snapMargin="@dimen/multiwaveview_snap_margin"
            android:hitRadius="@dimen/multiwaveview_hit_radius"
            android:rightChevronDrawable="@drawable/ic_lockscreen_chevron_right"
            android:horizontalOffset="0dip"
            android:verticalOffset="60dip"
            android:feedbackCount="3"
            android:vibrationDuration="20"
            />
下面我们来细细研究这些属性的含义:
空行上面的属性都是android常用的一些属性,相信不用我说了;
(1) android:targetDrawables="@array/lockscreen_targets_with_camera"
这个属性表示目标的图标有几个,android默认是2个,不过我们可以修改这个array的值,我们看看这个值
<array name="lockscreen_targets_with_camera">
        <item>@drawable/ic_lockscreen_unlock</item>
        <item>@null</item>
        <item>@drawable/ic_lockscreen_camera</item>
        <item>@null</item>
    </array>
我相信你这样表示就应该明白该怎么修改了,这四个item分别对应圆圈的位置是右,上,左,下。
想加几个图片,这个完全取决你自己,像小米的锁屏是四个,就是修改的这里。其实也没什么的,so easy!
(2) android:targetDescriptions="@array/lockscreen_target_descriptions_with_camera"
这个属性是对应的描述语言,
<array name="lockscreen_target_descriptions_with_camera">
        <item>@string/description_target_unlock</item>
        <item>@null</item>
        <item>@string/description_target_camera</item>
        <item>@null</item>
    </array>
你要是修改(1)的话,你也就相应的修改这些字符串就可以了。这个没什么可说的了。
(3) android:directionDescriptions="@array/lockscreen_direction_descriptions"
这个属性和(2)差不多,
<array name="lockscreen_direction_descriptions">
        <item>@string/description_direction_right</item>
        <item>@null</item>
        <item>@string/description_direction_left</item>
        <item>@null</item>
    </array>
这个表示的含义就是:对应四个位置,右,上,左,下这四个位置,提示语言:向哪个方向滑的问题。
(4) android:handleDrawable="@drawable/ic_lockscreen_handle"
这个属性对应的就是中间的那个解锁的图标,对应2张图片,一张选中的图片,一张默认没有选中的图片。
<selector xmlns:android="http://schemas.android.com/apk/res/android">

    <item
        android:state_enabled="true"
        android:state_active="false"
        android:state_focused="false"
        android:drawable="@drawable/ic_lockscreen_handle_normal" />

    <item
        android:state_enabled="true"
        android:state_active="true"
        android:state_focused="false"
        android:drawable="@drawable/ic_lockscreen_handle_pressed" />

</selector>
(5) android:waveDrawable="@drawable/ic_lockscreen_outerring"
这个属性对应的就是最外面的圆圈,是用shape属性画出来的。如:
<shape xmlns:android="http://schemas.android.com/apk/res/android"
    android:shape="oval"
    >
    <size android:height="@dimen/keyguard_lockscreen_outerring_diameter" android:width="@dimen/keyguard_lockscreen_outerring_diameter" />
    <solid android:color="#00000000" />
    <stroke android:color="#1affffff" android:width="2dp" />
</shape>
以上的这些值都可以修改的。
(6) android:outerRadius="@dimen/multiwaveview_target_placement_radius"
这个属性表示默认圆的半径的大小;
<!-- Default target placement radius for MultiWaveView -->
    <dimen name="multiwaveview_target_placement_radius">135dip</dimen>
(7) android:snapMargin="@dimen/multiwaveview_snap_margin"
这个属性是默认超越MultiWaveView捕捉到目标半径距离
<!-- Default distance beyond which MultiWaveView snaps to the target radius -->
    <dimen name="multiwaveview_snap_margin">20dip</dimen>
(8) android:hitRadius="@dimen/multiwaveview_hit_radius"
这个属性表示:每个单元目标预设距离,MultiWaveView认为选中
<!-- Default distance from each snap target that MultiWaveView considers a "hit" -->
    <dimen name="multiwaveview_hit_radius">60dip</dimen>
(9)android:rightChevronDrawable="@drawable/ic_lockscreen_chevron_right"
这个属性表示:动态画的波纹的图片,这个属性共有四个,分别为,左,上,右,下四个方位的。
(10) android:horizontalOffset="0dip"
android:verticalOffset="60dip"
这2个属性表示:距离圆圈水平和垂直的距离。你就明白为什么圆的下方少一块的原因了。
(11) android:feedbackCount="3"
表示:反馈数量3个;
(12) android:vibrationDuration="20"
表示:默认震动的时间,20毫秒;
更多属性请参考:core/res/res/values/attrs.xml中
<!-- =============================== -->
    <!-- MultiWaveView class attributes -->
    <!-- =============================== -->
    <eat-comment />
    <declare-styleable name="MultiWaveView">
        <!-- Reference to an array resource that be shown as targets around a circle. -->
        <attr name="targetDrawables" format="reference"/>

        <!-- Reference to an array resource that be used as description for the targets around the circle. -->
        <attr name="targetDescriptions" format="reference"/>

        <!-- Reference to an array resource that be used to announce the directions with targets around the circle. -->
        <attr name="directionDescriptions" format="reference"/>

        <!-- Sets a drawable as the drag center. -->
        <attr name="handleDrawable" format="reference" />

        <!-- Drawable to use for chevron animation on the left. May be null. -->
        <attr name="leftChevronDrawable" format="reference" />

        <!-- Drawable to use for chevron animation on the right. May be null. -->
        <attr name="rightChevronDrawable" format="reference" />

        <!-- Drawable to use for chevron animation on the top. May be null. -->
        <attr name="topChevronDrawable" format="reference" />

        <!-- Drawable to use for chevron animation on the bottom. May be null. -->
        <attr name="bottomChevronDrawable" format="reference" />

        <!-- Drawable to use for wave ripple animation. -->
        <attr name="waveDrawable" format="reference" />

        <!-- Outer radius of target circle. Icons will be drawn on this circle. -->
        <attr name="outerRadius" format="dimension" />

        <!-- Size of target radius. Points within this distance of target center is a "hit". -->
        <attr name="hitRadius" format="dimension" />

        <!-- Tactile feedback duration for actions. Set to '0' for no vibration. -->
        <attr name="vibrationDuration" format="integer"/>

        <!-- How close we need to be before snapping to a target. -->
        <attr name="snapMargin" format="dimension" />

        <!-- Number of waves/chevrons to show in animation. -->
        <attr name="feedbackCount" format="integer" />

        <!-- Used to shift center of pattern vertically. -->
        <attr name="verticalOffset" format="dimension" />

        <!-- Used to shift center of pattern horizontally. -->
        <attr name="horizontalOffset" format="dimension" />
    </declare-styleable>
这些属性能帮助你自定义自己的锁屏,如果不够的话,你也可以自己添加,然后在MultiWaveView.java中添加自己的方法或属性。
step2、介绍MultiWaveView.java这个类的方法,这个类除了锁屏用外,来电界面也用到了这个类,这就是谷歌的代码的高效的利用率,能写一个类,让2个,或多个界面利用。不得不再次佩服下谷歌的设计这个类的人。
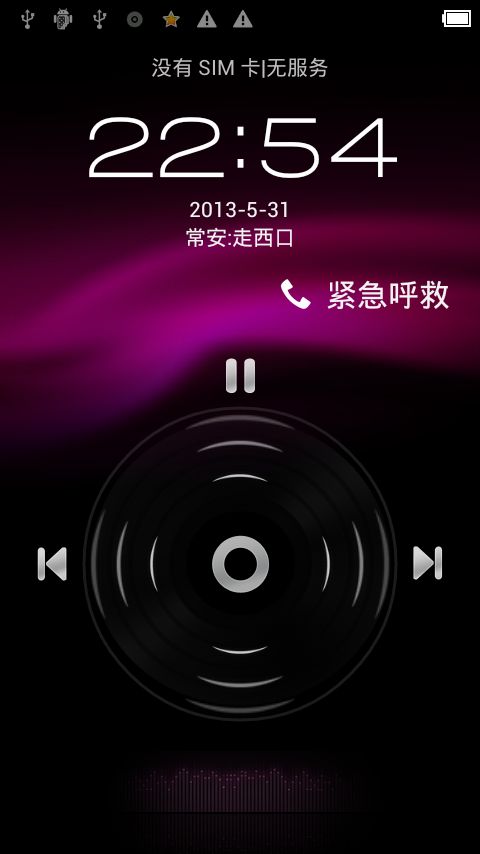
这个类的方法基本看名字就能看明白,先不写了,等有人留言了,再写出来,基本上ste1的属性配置好了,就能定制自己的锁屏界面了,想要更炫的效果,就只能修改MultiWaveView.java这个类了,像小米的锁屏界面就是修改了这个类,把自己的锁屏界面弄了个音乐播放器的view,可以和锁屏界面切换,其实小米就是修改了这个MultiWaveView.java就能达到想要的效果了。
上一张修改后的图片:
step 3 :我看到文章被推荐了,就再写点东西,分析以下MultiWaveView.java这个类,其实看java代码先看类的写法,看类继承了哪些类,实现了哪些接口,这样心理就有个大概了,大概就知道代码会走哪些方法了。
public class MultiWaveView extends View {
其实这个类就是一个view类;
再来看看这个类中有没有内部类,或者内部接口什么的?
大致浏览以下发现这个类中有内部接口:
public interface OnTriggerListener {
        int NO_HANDLE = 0;
        int CENTER_HANDLE = 1;
        public void onGrabbed(View v, int handle);
        public void onReleased(View v, int handle);
        public void onTrigger(View v, int target);
        public void onGrabbedStateChange(View v, int handle);
    }
通过单词的翻译大概就了解这些方法的作用了,
onGrabbed():抓起handler的触发方法; onReleased():释放handler的触发方法;
onTrigger():触发方法,就是最后滑动到哪个app了,就会回调这个方法;
onGrabbedStateChange():这个就是触发状态改变的时候回调这个方法;
接口的方法都是回调方法,回调给实现这个接口的类的实现方法;
其实看到这里还有个重要的没有说到:就是状态,有如下几种状态;比如:空闲的状态,刚开始触发,move追踪,抢占触发,结束,对应的静态的final类型的常量如下:
private static final int STATE_IDLE = 0;
    private static final int STATE_FIRST_TOUCH = 1;
    private static final int STATE_TRACKING = 2;
    private static final int STATE_SNAP = 3;
    private static final int STATE_FINISH = 4;
这几个状态搞明白了,就来看看触摸事件怎么处理的?
Step 4 :view的触摸事件可以通过onTouchEvent()来监听,来看看庐山真面目:
@Override
    public boolean onTouchEvent(MotionEvent event) {
        final int action = event.getAction();

        boolean handled = false;
        switch (action) {
            case MotionEvent.ACTION_DOWN:
                Xlog.i(TAG,"ACTION_DOWN");
                handleDown(event);
                handled = true;
                break;

            case MotionEvent.ACTION_MOVE:
                handleMove(event);
                handled = true;
                break;

            case MotionEvent.ACTION_UP:
                Xlog.i(TAG,"ACTION_UP");
                mActionCancel = false;
                handleMove(event);
                handleUp(event);
                handled = true;
                break;

            case MotionEvent.ACTION_CANCEL:
                Xlog.i(TAG,"ACTION_CANCEL");
                mActionCancel = true;
                handleMove(event);
                handleUp(event);
                handled = true;
                break;
        }
        invalidate();
        return handled ? true : super.onTouchEvent(event);
    }
从谷歌的方法命名上就能大概知道这个方法有什么作用,谷歌的命名很规范,我们要学习这种命名,简单、明了;相应的方法会调用一个方法switchToState(),这个是改变状态做相应处理方法,然后根据传入什么的状态常量,做什么处理就可以了。这个细节大家可以看一眼就明白怎么回事了。
step 5:另外补充几个方法:
private void showTargets(boolean animate) { }显示目标target的方法,传入true:表示有动画,false:无动画;
private void hideTargets(boolean animate) { } 隐藏目标target的方法,出入true:表示有动画,false:无动画;
这个显示和隐藏的实现谷歌的实现是:改变Alpha的值来实现的,setAlpha(0.0f)表示隐藏,setAlpha(1.0f) 显示;
private void updateTargetPositions() { } 这个方法是更新target目标的坐标的方法;
尾声:这些重点方法和流程都说了一下,我相信剩下的细节就没什么了。想做什么修改这个根据客户的需求就可以了。像小米的锁屏,双击出音乐的界面,有播放,上一首,下一首,这个都可以在这个类中做修改;
上传一张图片,看看效果:


