Android笔记 - Android启动之Launcher启动
Android 启动的第三阶段是 Launcher 的启动,也就是最终会看到的 Android 桌面的启动。在之前第二阶段 Android启动之Android Framework启动中, Zygote, ServiceManager, ActivityManagerService 和 PackageManagerService 等系统服务已经启动起来,接下来的 Launcher 启动过程就会看到它们的身影。由于 Launcher 也是应用程序,因此其他应用程序的启动过程基本类似。
ActivityManagerService 在完成服务注册等一系列初始化过程后,其 main 方法中会调用 systemReady 方法,开始以下过程:
ActivityStackSupervisor::resumeTopActivitiesLocked()
ActivityStackSupervisor::resumeTopActivitiesLocked(ActivityStack targetStack, ActivityRecord target, Bundle targetOptions)
ActivityStack::resumeTopActivityLocked(ActivityRecord prev, Bundle options)
ActivityStackSupervisor::resumeHomeActivity(ActivityRecord prev)
ActivityManagerService::startHomeActivityLocked(int userId)
需要注意的是 Launcher 启动过程中, resumeTopActivityLocked 方法会进入两次,第一次由于任务栈中还没有 ActivityRecord,所以会调用 resumeHomeActivity 方法。
经历以上5个方法调用,最后进入 ActivityManagerService 的 startHomeActivityLocked 方法开始 Launcher 启动历程。首先通过 getHomeIntent 方法获得启动 Launcher 的 intent 信息,然后调用 resolveActivityInfo 方法通过 PackageManagerService 获得 Launcher 的 Activity 描述信息 aInfo。如下所示:
代码路径:frameworks/base/services/java/com/android/server/am/ActivityManagerService.java

boolean startHomeActivityLocked(int userId) {
    ......
    Intent intent = getHomeIntent();
    ActivityInfo aInfo =
            resolveActivityInfo(intent, STOCK_PM_FLAGS, userId);
    if (aInfo != null) {
        intent.setComponent(new ComponentName(
                    aInfo.applicationInfo.packageName, aInfo.name));
        // Don't do this if the home app is currently being
        // instrumented.
        aInfo = new ActivityInfo(aInfo);
        aInfo.applicationInfo = getAppInfoForUser(aInfo.applicationInfo, userId);
        ProcessRecord app = getProcessRecordLocked(aInfo.processName,
                    aInfo.applicationInfo.uid, true);
        if (app == null || app.instrumentationClass == null) {
            intent.setFlags(intent.getFlags() | Intent.FLAG_ACTIVITY_NEW_TASK);
            mStackSupervisor.startHomeActivity(intent, aInfo);
        }
    }

    return true;
}

Intent getHomeIntent() {
    Intent intent = new Intent(mTopAction, mTopData != null ? Uri.parse(mTopData) : null);
    intent.setComponent(mTopComponent);
    if (mFactoryTest != SystemServer.FACTORY_TEST_LOW_LEVEL) {
            intent.addCategory(Intent.CATEGORY_HOME);
    }
    return intent;
}
从 getHomeIntent 方法的实现可知,理论上通过在应用程序的 AndroidManifest.xml 文件中添加 Intent.CATEGORY_HOME 的 Category 属性,应用就可以作为 Launcher 来启动。
获得参数 intent 和 aInfo 后,接下来调用 ActivityStackSupervisor 的 startHomeActivity 方法开始以下历程:
ActivityStackSupervisor::startHomeActivity(Intent intent, ActivityInfo aInfo)
ActivityStackSupervisor::startActivityLocked(...)
ActivityStackSupervisor::startActivityUncheckedLocked(...)
ActivityStack::startActivityLocked(...)
ActivityStackSupervisor::resumeTopActivitiesLocked(ActivityStack targetStack, ActivityRecord target, Bundle targetOptions)
ActivityStack::resumeTopActivityLocked(ActivityRecord prev, Bundle options)
ActivityStackSupervisor::startSpecificActivityLocked(ActivityRecord r, boolean andResume, boolean checkConfig)
因为在上述步骤2中将会生成 Launcher 的 ActivityRecord 并添加到任务栈中,所以第二次进入 resumeTopActivityLocked 时,会调用 startSpecificActivityLocked 方法来启动 Launcher 的 Activity。由于 Launcher 是第一次运行,因此还没有创建好 Launcher 进程。在启动 Launcher 之前还需要创建一个新的进程,如下所示:
Process.ProcessStartResult startResult = Process.start("android.app.ActivityThread",
                    app.processName, uid, uid, gids, debugFlags, mountExternal,
                    app.info.targetSdkVersion, app.info.seinfo, null);
通过 Process 的 start 方法请求 Zygote 创建进程后,在新进程中开始执行 ActivityThread 的 main 方法。
代码路径:frameworks/base/core/java/android/app/ActivityThread.java

public static void main(String[] args) {
    ......

    Looper.prepareMainLooper();

    ActivityThread thread = new ActivityThread();
    thread.attach(false);

    if (sMainThreadHandler == null) {
        sMainThreadHandler = thread.getHandler();
    }

    AsyncTask.init();

    if (false) {
        Looper.myLooper().setMessageLogging(new
                LogPrinter(Log.DEBUG, "ActivityThread"));
    }

    Looper.loop();

    throw new RuntimeException("Main thread loop unexpectedly exited");
}
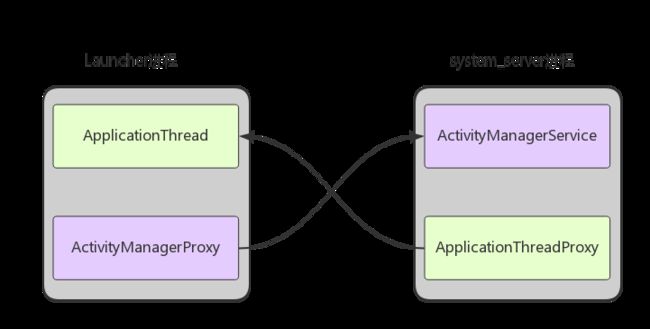
main 方法中有很多值得说的知识点,但和 Launcher 启动有关的是执行 ActivityThread 的 attach 方法,该方法会调用代理类 ActivityManagerProxy 的 attachApplication 方法通知 ActivityManagerService 新进程已经启动成功,可以开始执行应用程序。传入的参数 mAppThread 是一个 ApplicationThread 类的 Binder 对象,用于之后进程间的通信。
Launcher 运行在新创建的进程,而 ActivityManagerService 运行在 system_server 进程,它们之间需要使用 Binder 来进行通信。
通过 Binder 进程间通信机制,ActivityManagerService 收到消息后,其 attachApplication 方法会被调用,接下来执行以下流程:
ActivityManagerService::attachApplicationLocked(IApplicationThread thread, int pid)
ApplicationThreadProxy::bindApplication(...)
通过之前传过来的 mAppThread 对象,调用代理类 ApplicationThreadProxy 的 bindApplication 方法。通过 Binder 通信,在 Launcher 进程中加载 Application 类并执行 onCreate 方法。这也说明,每个虚拟机进程中都会有一个 Application 实例。
接下来继续启动 Activity:
ActivityStackSupervisor::attachApplicationLocked(ProcessRecord app, boolean headless)
ActivityStackSupervisor::realStartActivityLocked(ActivityRecord r, ProcessRecord app, boolean andResume, boolean checkConfig)
ApplicationThreadProxy::scheduleLaunchActivity(...)
通过之前传过来的 mAppThread 对象,调用代理类 ApplicationThreadProxy 的 scheduleLaunchActivity 方法。通过 Binder 通信,最终会执行 ActivityThread 中的 handleLaunchActivity 方法,如下所示:
代码路径:frameworks/base/core/java/android/app/ActivityThread.java

private void handleLaunchActivity(ActivityClientRecord r, Intent customIntent) {
    ......
    Activity a = performLaunchActivity(r, customIntent);

    if (a != null) {
        r.createdConfig = new Configuration(mConfiguration);
        Bundle oldState = r.state;
        handleResumeActivity(r.token, false, r.isForward,
                !r.activity.mFinished && !r.startsNotResumed);

        ......
    }
}
handleLaunchActivity 中会加载 Launcher 应用程序的 class 文件,并调用 Activity 的 onCreate, onStart, onResume 等生命周期回调方法。
Launcher Activity 的 onCreate 方法中会初始化一个 Load 线程,用于加载所有的 workspace 数据以及应用程序图标。过程如下所示:
LauncherModel::startLoader(boolean isLaunching, int synchronousBindPage, int loadFlags)
LoaderTask::run()
LauncherModel::loadAndBindWorkspace()
LauncherModel::loadAndBindAllApps()
loadAndBindWorkspace 主要可分为 load 和 bind 两个阶段,load 阶段由 loadWorkspace 方法完成,主要是遍历数据库,生成 FolderInfo, LauncherAppWidgetInfo, ShortcutInfo 对象。bind 阶段由 bindWorkspace 方法完成,主要将之前得到的对象与 workspace 进行绑定。
loadAndBindAllApps 也分为 load 和 bind 两个阶段,load 阶段主要通过 PackageManagerService 提供的服务查询所有应用程序的 AppInfo 数据,bind 阶段则根据 AppInfo 在桌面显示应用程序。
至此,Android 启动流程梳理完毕。由于篇幅原因,中间有些内容点到为止,后续文章再继续完善。
参考资料:
1. Android系统默认Home应用程序(Launcher)的启动过程源代码分析
2. Launcher3的启动流程(一)
3. Launcher3的启动流程(二)
