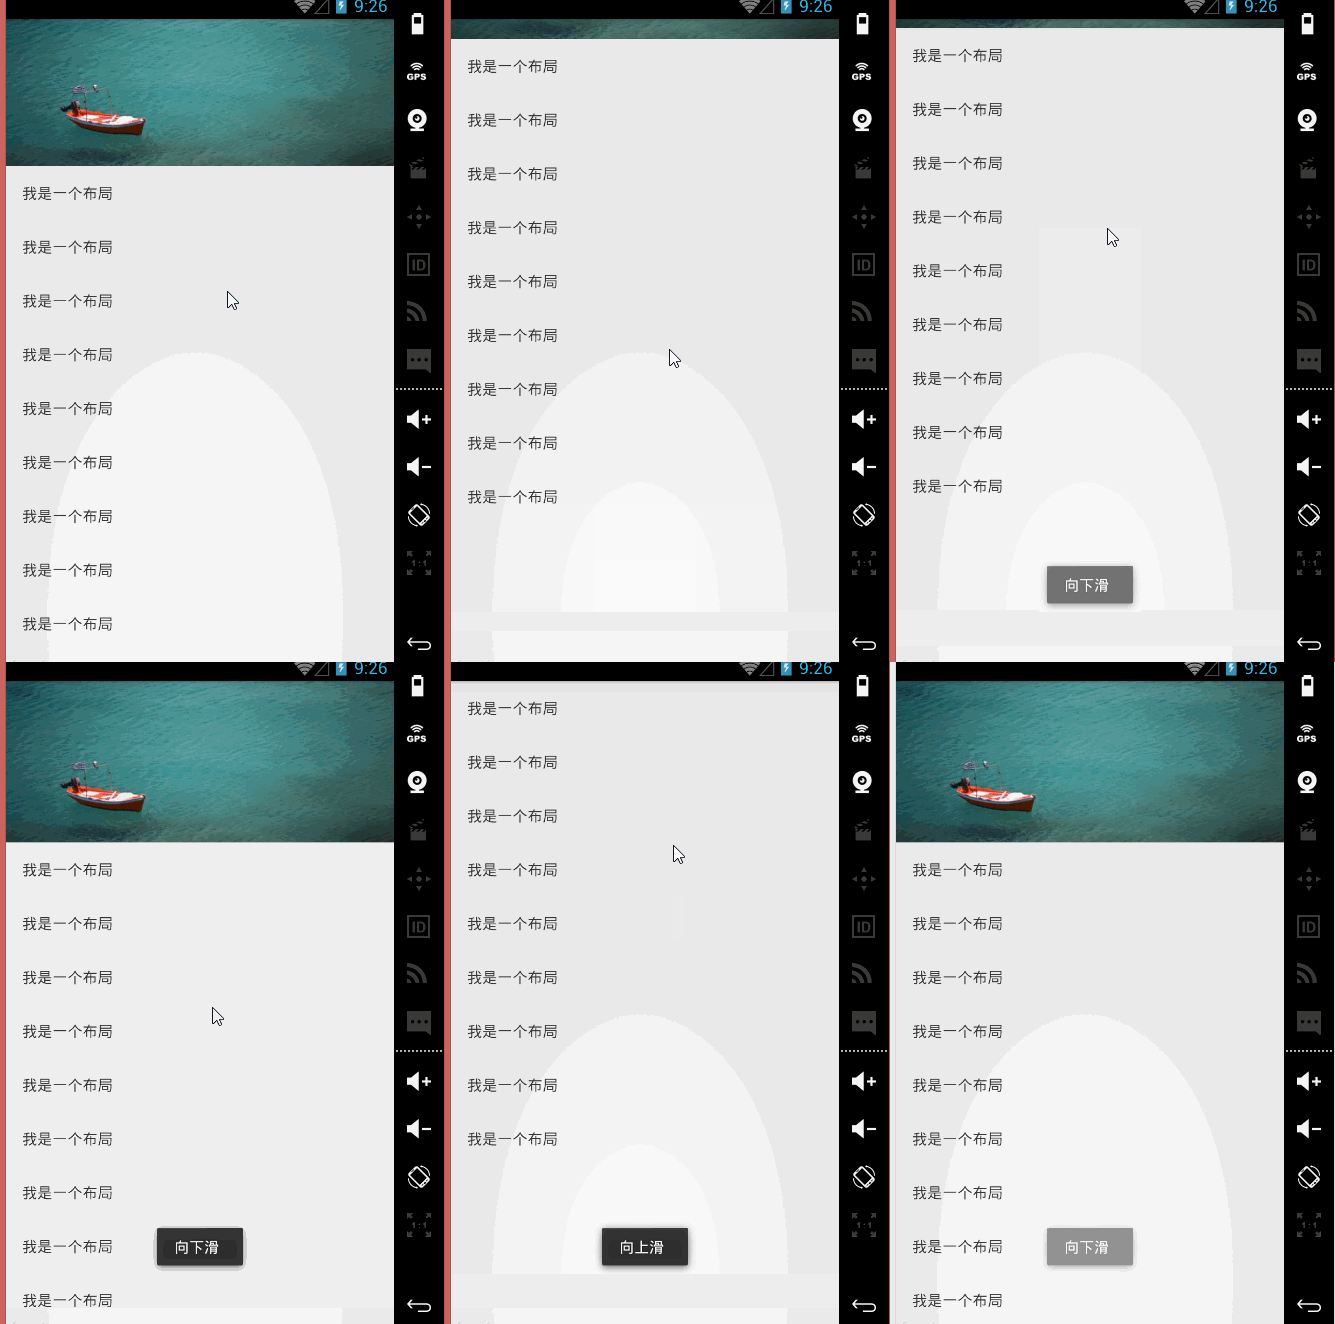
玩转Scroller打造平滑滚动效果
今天给大家带来Scroller的基本用法,Android中看到的很多的平滑的移动效果,基本都是利用Scroller实现的,下面让我们看看Scroller的庐山真面目吧!
构造函数:
public Scroller (Context context)
public Scroller (Context context, Interpolator interpolator)
public Scroller (Context context, Interpolator interpolator, boolean flywheel)
方法
public void abortAnimation ()
停止动画
public boolean computeScrollOffset()
计算当前滑动的距离 如果返回true 表示当前还在滑动过程中 滑动没有结束
public void extendDuration (int extend)
延长滑动时动画的时间
public void fling (int startX, int startY, int velocityX, int velocityY, int minX, int maxX, int minY, int maxY)
在fling(快滑,用户按下触摸屏、快速移动后松开)手势基础上开始滚动。滚动的距离取决于fling的初速度。)
startX 滚动起始点X坐标
startY 滚动起始点Y坐标
velocityX 当滑动屏幕时X方向初速度,以每秒像素数计算
velocityY 当滑动屏幕时Y方向初速度,以每秒像素数计算
minX X方向的最小值,scroller不会滚过此点。
maxX X方向的最大值,scroller不会滚过此点。
minY Y方向的最小值,scroller不会滚过此点。
maxY Y方向的最大值,scroller不会滚过此点。
public final void forceFinished (boolean finished)
finished为true时 强制还原当前进行中的动画到初始位置
public float getCurrVelocity()
获取当前的速度
public final int getCurrX()
获取当前位置距离原点位置的X轴的偏移量
public final int getCurrY()
获取当前位置距离原点位置的Y轴的偏移量
public final int getDuration()
获取滚动事件持续的时间
public final int getFinalX()
获取滚动结束位置距离原点位置的X轴的偏移量(只对fling手势有效)
public final int getFinalY()
获取滚动结束位置距离原点位置的Y轴的偏移量(只对fling手势有效)
public final int getStartX()
获取滚动起始点的X方向的偏移量
public final int getStartY()
获取滚动起始点的Y方向的偏移量
public final boolean isFinished()
判断当前scroller是否完成滚动 返回true 代表当前滚动结束 返回false 代表当前滚动没有结束
public void setFinalX (int newX)
设置scroller的X方向的终止位置
public void setFinalY (int newY)
设置scroller的Y方向的终止位置
public final void setFriction (float friction)
设置摩擦系数
public void startScroll (int startX, int startY, int dx, int dy)
以提供的起始点和将要滑动的距离开始滚动。滚动会使用缺省值250ms作为持续时间。
startX 水平方向滚动的偏移值,以像素为单位。正值表明滚动将向左滚动
startY 垂直方向滚动的偏移值,以像素为单位。正值表明滚动将向上滚动
dx 水平方向滑动的距离,正值会使滚动向左滚动
dy 垂直方向滑动的距离,正值会使滚动向上滚动
public void startScroll (int startX, int startY, int dx, int dy, int duration)
startX 水平方向滚动的偏移值,以像素为单位。正值表明滚动将向左滚动
startY 垂直方向滚动的偏移值,以像素为单位。正值表明滚动将向上滚动
dx 水平方向滑动的距离,正值会使滚动向左滚动
dy 垂直方向滑动的距离,正值会使滚动向上滚动
duration 滚动持续的时间
public int timePassed ()
返回自滚动开始经过的时间
上面就是Scroller的所有的方法。
在进行实例讲解之前,先带大家熟悉一下scrollTo()和scrollBy()的区别
scrollTo:View相对于初始的位置滚动某段距离
scrollBy:View相对于当前位置滚动了某段距离
Scroller基本用法,大致分为以下几步:
1.初始化Scroller
2.调用startScroll()方法开始滚动,刷新界面(invalidate())
3.重写computeScroll()方法,并在其内部完成平滑滚动的逻辑
代码示例:
content_up.xml
<LinearLayout xmlns:android="http://schemas.android.com/apk/res/android"
    android:layout_width="match_parent"
    android:layout_height="match_parent" >
    <ImageView
        android:layout_width="fill_parent"
        android:layout_height="150dp"
        android:background="@drawable/pic_bg"
        />
</LinearLayout>

content_down.xml
<?xml version="1.0" encoding="utf-8"?>
<LinearLayout xmlns:android="http://schemas.android.com/apk/res/android"
    android:layout_width="match_parent"
    android:orientation="vertical"
    android:layout_height="match_parent" >
    <TextView
        android:layout_width="fill_parent"
        android:layout_height="50dp"
        android:layout_marginLeft="15dp"
        android:text="我是一个布局"
        android:gravity="center_vertical"
        />
    <TextView
        android:layout_width="fill_parent"
        android:layout_height="50dp"
        android:text="我是一个布局"
          android:layout_marginLeft="15dp"
        android:gravity="center_vertical"
        />
    <TextView
        android:layout_width="fill_parent"
        android:layout_height="50dp"
        android:text="我是一个布局"
          android:layout_marginLeft="15dp"
        android:gravity="center_vertical"
        />
    <TextView
        android:layout_width="fill_parent"
        android:layout_height="50dp"
        android:text="我是一个布局"
          android:layout_marginLeft="15dp"
        android:gravity="center_vertical"
        />
    <TextView
        android:layout_width="fill_parent"
        android:layout_height="50dp"
        android:text="我是一个布局"
          android:layout_marginLeft="15dp"
        android:gravity="center_vertical"
        />
    <TextView
        android:layout_width="fill_parent"
        android:layout_height="50dp"
        android:text="我是一个布局"
          android:layout_marginLeft="15dp"
        android:gravity="center_vertical"
        />
    <TextView
        android:layout_width="fill_parent"
        android:layout_height="50dp"
        android:text="我是一个布局"
          android:layout_marginLeft="15dp"
        android:gravity="center_vertical"
        />
    <TextView
        android:layout_width="fill_parent"
        android:layout_height="50dp"
        android:text="我是一个布局"
          android:layout_marginLeft="15dp"
        android:gravity="center_vertical"
        />
    <TextView
        android:layout_width="fill_parent"
        android:layout_height="50dp"
        android:text="我是一个布局"
          android:layout_marginLeft="15dp"
        android:gravity="center_vertical"
        />
</LinearLayout>

public class MultiViewGroup extends ViewGroup{
    //屏幕宽度
    private int screenWidth;
    //屏幕高度
    private int screenHeight;
    //屏幕密度
    private int density;

    private boolean flag=false;

    private Scroller scroller;

    //第一个布局的高度
    private int heightone=0;
    //第二个布局的高度
    private int heighttwo=0;


    public MultiViewGroup(Context context) {
        this(context,null);
    }
    public MultiViewGroup(Context context, AttributeSet attrs) {
        this(context, attrs,0);
    }

    public MultiViewGroup(Context context, AttributeSet attrs, int defStyle) {
        super(context, attrs, defStyle);
        screenWidth=context.getResources().getDisplayMetrics().widthPixels;
        screenHeight=context.getResources().getDisplayMetrics().heightPixels;
        density=(int) context.getResources().getDisplayMetrics().density;
        //初始化Scroller
        scroller=new Scroller(context);
        initView(context);
    }

    private void initView(Context context) {
        //创建上方View
        View view_up=LayoutInflater.from(context).inflate(R.layout.content_up, null, true);
        this.addView(view_up);
        //创建下方View
        View view_down=LayoutInflater.from(context).inflate(R.layout.content_down, null, true);
        this.addView(view_down);

    }

    @Override
    protected void onMeasure(int widthMeasureSpec, int heightMeasureSpec) {
        super.onMeasure(widthMeasureSpec, heightMeasureSpec);

        //设置该ViewGroup的大小
        int width=MeasureSpec.getSize(widthMeasureSpec);
        int height=MeasureSpec.getSize(heightMeasureSpec);
        setMeasuredDimension(width, height);
        //测量上方View的大小
        getChildAt(0).measure(screenWidth, 150*density);
        //测量下方View的大小
        getChildAt(1).measure(screenWidth, heighttwo);

    }

    @Override
    protected void onLayout(boolean changed, int l, int t, int r, int b) {

        heightone=getChildAt(0).getMeasuredHeight();
        heighttwo=getChildAt(1).getMeasuredHeight();
        getChildAt(0).layout(0, 0, screenWidth, heightone);
        getChildAt(1).layout(0, heightone, screenWidth, heightone+heighttwo);
    }

    //手指上滑调用的方法
    public void down(){
        if(!flag){
            //开始滑动
            scroller.startScroll(0, getScrollY(), 0, heightone,1000);
            invalidate();
            flag=true;
        }
    }

    //手指下滑调用的方法
    public void up(){
        if(flag){
            scroller.startScroll(0, getScrollY(), 0, -heightone,1000);
            invalidate();
            flag=false;
        }
    }

    @Override
    public void computeScroll() {
        super.computeScroll();
        //如果当前正在滚动
        if (scroller.computeScrollOffset()) {
            //滚动到(x,y)处
            scrollTo(scroller.getCurrX(), scroller.getCurrY());
            invalidate();
        }
    }

public class MainActivity extends ActionBarActivity{
    private MultiViewGroup multiview;
    //手指按下的点为(x1, y1)手指离开屏幕的点为(x2, y2)
    float x1 = 0;
    float x2 = 0;
    float y1 = 0;
    float y2 = 0;
    private int mTouchSlop;

    @Override
    protected void onCreate(Bundle savedInstanceState) {
        super.onCreate(savedInstanceState);
        setContentView(R.layout.activity_main);

        multiview=(MultiViewGroup) findViewById(R.id.multiview);
        ViewConfiguration configuration = ViewConfiguration.get(this);
        // 获取TouchSlop值
        mTouchSlop = ViewConfigurationCompat.getScaledPagingTouchSlop(configuration);
    }

    @Override
    public boolean onTouchEvent(MotionEvent event) {
        if(event.getAction() == MotionEvent.ACTION_DOWN) {
            //当手指按下的时候
            x1 = event.getX();
            y1 = event.getY();
        }
        if(event.getAction() == MotionEvent.ACTION_UP) {
            //当手指离开的时候
            x2 = event.getX();
            y2 = event.getY();
            if(y1 - y2 > mTouchSlop) {
                Toast.makeText(MainActivity.this, "向上滑", Toast.LENGTH_SHORT).show();
                multiview.down();
            } else if(y2 - y1 >mTouchSlop) {
                Toast.makeText(MainActivity.this, "向下滑", Toast.LENGTH_SHORT).show();
                multiview.up();
            }
        }
        return super.onTouchEvent(event);
    }

}
}
代码下载:
ScrollerDemo.Zip
