框架技术--S2SH框架整合(hibernate部分) No 1
hibernate的几个优点:
1、提高生产力。
2、开发更对象化。
3、移植性好(配置方言)。
4、支持透明持久化。
项目集成hibernate进行开发,需要进行以下几点配置。
1、导入JAR包,主要导入几个核心的JAR包:
2、创建hibernate的配置文件,hibernate.cfg.xml,需要在项目的SRC目录下创建。
3、这里我使用的数据库是mysql,所以在hibernate.cfg.xml文件需要这样配置。
<?xml version='1.0' encoding='UTF-8'?>
<!DOCTYPE hibernate-configuration PUBLIC
          "-//Hibernate/Hibernate Configuration DTD 3.0//EN"
       "http://hibernate.sourceforge.net/hibernate-configuration-3.0.dtd">

<hibernate-configuration>
	<session-factory>
		<property name="connection.driver_class">
			com.mysql.jdbc.Driver
		</property>
		<property name="connection.url">
			jdbc:mysql://localhost:3306/Test
		</property>
		<property name="myeclipse.connection.profile">MySQL</property>
		<property name="connection.username">root</property>
		<property name="connection.password">password</property>
		<property name="dialect">
			org.hibernate.dialect.MySQLDialect
		</property>
		<property name="show_sql">true</property>
	</session-factory>
</hibernate-configuration>
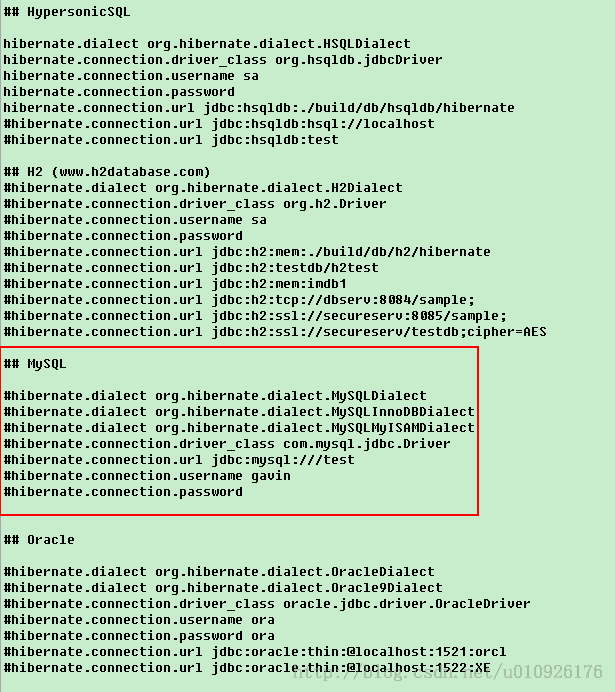
如果在hibernate官网下载过完整的jar包,在压缩包路径hibernate-3.2.0.ga\hibernate-3.2\etc目录下有一个hibernate.properties的文件。打开可看到各种数据库的配置
4、创建实体类,例如创建user对象
package hibernate.test;

public class User {
	private String id;

	private String userName;

	private int age;

	private String address;

	private String phone;

	public String getId() {
		return id;
	}

	public void setId(String id) {
		this.id = id;
	}

	public String getUserName() {
		return userName;
	}

	public void setUserName(String userName) {
		this.userName = userName;
	}

	public int getAge() {
		return age;
	}

	public void setAge(int age) {
		this.age = age;
	}

	public String getAddress() {
		return address;
	}

	public void setAddress(String address) {
		this.address = address;
	}

	public String getPhone() {
		return phone;
	}

	public void setPhone(String phone) {
		this.phone = phone;
	}


}
5、实体类创建完,需要和数据库做一个映射,这里使用User.hbm.xml文件进行映射。
<id name="id">:这个属性意思为主键,<<generator class="uuid" />生成策略为uuid,是一个全局的唯一标示,不会有重复的。
标签中的name代表实体类中的名字,标签另外一个column如果没有则生成的表名与实体字段名字一致。
><?xml version="1.0"?>
<!DOCTYPE hibernate-mapping PUBLIC "-//Hibernate/Hibernate Mapping DTD//EN"
    "http://hibernate.sourceforge.net/hibernate-mapping-3.0.dtd">
<hibernate-mapping>
	<class name="hibernate.test.User">
		<id name="id">
			<generator class="uuid" />
		</id>
		<property name="userName" />
		<property name="age" />
		<property name="address" />
		<property name="phone" />
	</class>
</hibernate-mapping>
6、将User.hbm.xml加入到hibernate的配置文件中,通过mapping标签引入。
<?xml version='1.0' encoding='UTF-8'?>
<!DOCTYPE hibernate-configuration PUBLIC
          "-//Hibernate/Hibernate Configuration DTD 3.0//EN"
       "http://hibernate.sourceforge.net/hibernate-configuration-3.0.dtd">

<hibernate-configuration>
	<session-factory>
		<property name="connection.driver_class">
			com.mysql.jdbc.Driver
		</property>
		<property name="connection.url">
			jdbc:mysql://localhost:3306/Test
		</property>
		<property name="myeclipse.connection.profile">MySQL</property>
		<property name="connection.username">root</property>
		<property name="connection.password">esoft</property>
		<property name="dialect">
			org.hibernate.dialect.MySQLDialect
		</property>
		<property name="show_sql">true</property>

		<mapping resource="hibernate/test/User.hbm.xml" />
	</session-factory>
</hibernate-configuration>
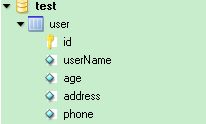
7、现在配置完成,可以写一个工具类,然后通过我们上面写好的实体类,通过hibernate为我们生成数据库的表。执行完main方法,后台数据库中就会增加我们创建user表
需要注意一点,由于我们连接的是mysql数据库,这里需要引入数据库的驱动JAR包:mysqldriver.jar,其他库可到对应官网下载。
package hibernate.util;

import org.hibernate.cfg.Configuration;
import org.hibernate.tool.hbm2ddl.SchemaExport;

public class exportDB {

	/**
	 * @param args
	 */
	public static void main(String[] args) {
		// TODO Auto-generated method stub
		Configuration con = new Configuration().configure();

		SchemaExport export = new SchemaExport(con);

		export.create(true, true);
	}

}
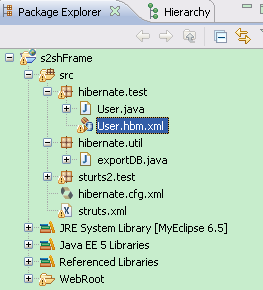
程序目录结构:


