Cocos2d-x源代码剖析-SimpleGame代码剖析
拿到了Andreas Loew TexturePacker和PhysicsEditor的key 和keyfile,可以开始Cocos2d-x源代码剖析了,感谢Cocos2d-x能开源,感谢Andreas Loew能免费给开发者使用他的TexturePacker和PhysicsEditor
Cocos2d-x源代码剖析(SimpleGame代码剖析)
1.SimpleGame目录结构剖析
首先先从SimpleGame目录结构入手,着重以Android平台为例!Cocos2dX Android SimpleGame主要涉及到了java jni,android ndk知识,所以对这方面必须有所了解。

SimpleGame目录如上所示,classes放着基于Cocos2dx的游戏逻辑实现文件,实现的语言为c++

Proj.android 则为cocos2d -x android程序的呈现,里面主要有android的jni和android 的apk代码结构,其中buid_nativie.sh主要是把Resources下的资源往android的asset文件夹复制搬移,且如果有icon图则把icon图复制到drawable下,然后用ndk编译JNI,形成libgame。So文件
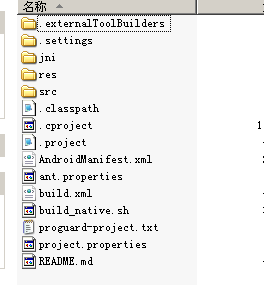
Resources文件夹则放着游戏的资源

2.SimpleGame代码剖析
首先从Android的文件结构(proj.Android)开始
当我们打开eclipse的时候,project.properties文件会告诉我们需要使用什么样的ANDROID SDK,需要哪些第三方库,本工程是否作为库文件形式及混淆等等。我们来看看simpleGame的是怎样的
# Project target.
target=android-8
android.library.reference.1=../../../../cocos2dx/platform/android/java
如图所示,android sdk目标版本ANDROID2.2,而本工程依赖于cocos2d-2.1rc0-x-2.1.3\cocos2dx\platform\android\java
的工程,也就是说导入simplegame的同时,也要导入这个工程,而这个工程主要是实现java通过jni调用加载游戏逻辑,并且让jni下的C程序能调用java层对ANDROID系统的一些API调用,下一章将会对这部分进行分析,现在先略过
接着我们查看Android 的AndroidManifest.xml
<?xml version="1.0" encoding="utf-8"?>
<manifest xmlns:android="http://schemas.android.com/apk/res/android"
      package="org.cocos2dx.simplegame"
      android:versionCode="1"
      android:versionName="1.0">

    <uses-sdk android:minSdkVersion="8"/>
    <uses-feature android:glEsVersion="0x00020000" />

    <application android:label="@string/app_name"
        android:icon="@drawable/icon">

        <activity android:name=".SimpleGame"
                  android:label="@string/app_name"
                  android:screenOrientation="landscape"
                  android:theme="@android:style/Theme.NoTitleBar.Fullscreen"
                  android:configChanges="orientation">
            <intent-filter>
                <action android:name="android.intent.action.MAIN" />
                <category android:name="android.intent.category.LAUNCHER" />
            </intent-filter>
        </activity>
    </application>
    <supports-screens android:largeScreens="true"
                      android:smallScreens="true"
                      android:anyDensity="true"
                      android:normalScreens="true"/>
</manifest>
从里面可以看出,需要gles2.0的支持,
程序的主入口activity为org.cocos2dx.simplegame.SimpleGame
我们顺着这条线继续走,定位到org.cocos2dx.simplegame的SimpleGame.java
package org.cocos2dx.simplegame;

import org.cocos2dx.lib.Cocos2dxActivity;

import android.os.Bundle;

public class SimpleGame extends Cocos2dxActivity{

	protected void onCreate(Bundle savedInstanceState){
		super.onCreate(savedInstanceState);
	}

    static {
        System.loadLibrary("game");
    }
}
从代码可以看出,此Activity继承了cocos2d-2.1rc0-x-2.1.3\cocos2dx\platform\android\java
工程下Cocos2dxActivty,并加载了用native_build.sh编译jni出来的libgame.so
我们先简单介绍下Cocos2dxActivty(后续会在cocos2dx java引用库剖析),Cocos2dxActivty主要做了有如下的工作:
初始化ndk层需要的实例
设置布局,把GLSurfaceView和Render和edittext设置好,加载入程序界面
好了来看看重点,cocos2dx是用C++实现的,所以游戏逻辑也用c++来实现,ANDROID主要就是通过jni形式,来操作android程序界面
我们先来看看jni下的目录结构

主要来看Android.mk,android.mk说明了此jni编译成共享库为libgame.so,所需源文件为hellocpp下的main。Cpp和classes文件夹下的cpp,并使用了cocos2dx的cocos2dx_static cocosdenshion_static cocos_extension_static三个静态库
其他不理先,我们先看我们看得到的main.cpp和classes文件夹下的cpp
void Java_org_cocos2dx_lib_Cocos2dxRenderer_nativeInit(JNIEnv*  env, jobject thiz, jint w, jint h)
{
    if (!CCDirector::sharedDirector()->getOpenGLView())
    {
        CCEGLView *view = CCEGLView::sharedOpenGLView();
        view->setFrameSize(w, h);

        AppDelegate *pAppDelegate = new AppDelegate();
        CCApplication::sharedApplication()->run();
    }
    /*
    else
    {
        ccDrawInit();
        ccGLInvalidateStateCache();

        CCShaderCache::sharedShaderCache()->reloadDefaultShaders();
        CCTextureCache::reloadAllTextures();
        CCNotificationCenter::sharedNotificationCenter()->postNotification(EVNET_COME_TO_FOREGROUND, NULL);
        CCDirector::sharedDirector()->setGLDefaultValues();
    }
    */
}
图为main.cpp。熟悉cocos2dx一看都知道这是函数的主入口,此函数主要给org.cocos2dx.lib.Cocos2dxRenderer类使用,而此类为上面所提到的Cocos2dxActivity初始化的GLSurfaceview的Render,Render会在其可见的时候初始化此函数(也就是说android SimpleGame Activity开启的时候就调用了此函数)。
我们顺着这条线继续剖析下去!

上图截取自Cocos2dx游戏开发一书的图,我们可以大概知道Cocos2dx是设计游戏是一个怎样的模式

同样上图则是cocos2dx的实现模式
void Java_org_cocos2dx_lib_Cocos2dxRenderer_nativeInit(JNIEnv*  env, jobject thiz, jint w, jint h)
{
    if (!CCDirector::sharedDirector()->getOpenGLView())
    {
        CCEGLView *view = CCEGLView::sharedOpenGLView();
        view->setFrameSize(w, h);

        AppDelegate *pAppDelegate = new AppDelegate();
        CCApplication::sharedApplication()->run();
    }
}
再回来看看源码,从图可以看出,先实例化了一个Director(一场戏最主要要有一个导演来主持),再openglview为空的情况下,创建了openGLVIEW,并设置他的高宽,然后新建一个AppDelegate app实例,并运行此实例.
App的运行带动CCApplication调用applicationDidFinishLaunching,所以在AppDelegate内的applicationDidFinishLaunching首先被调用
bool AppDelegate::applicationDidFinishLaunching() {
    // initialize director
    CCDirector *pDirector = CCDirector::sharedDirector();

    pDirector->setOpenGLView(CCEGLView::sharedOpenGLView());

    CCSize screenSize = CCEGLView::sharedOpenGLView()->getFrameSize();
    CCSize designSize = CCSizeMake(480, 320);
    std::vector<std::string> searchPaths;

    if (screenSize.height > 320)
    {
        searchPaths.push_back("hd");
        searchPaths.push_back("sd");
        pDirector->setContentScaleFactor(640.0f/designSize.height);
    }
    else
    {
        searchPaths.push_back("sd");
        pDirector->setContentScaleFactor(320.0f/designSize.height);
    }

    CCFileUtils::sharedFileUtils()->setSearchPaths(searchPaths);

    CCEGLView::sharedOpenGLView()->setDesignResolutionSize(designSize.width, designSize.height, kResolutionNoBorder);

    // turn on display FPS
    pDirector->setDisplayStats(true);

    // set FPS. the default value is 1.0/60 if you don't call this
    pDirector->setAnimationInterval(1.0 / 60);

    // create a scene. it's an autorelease object
    CCScene *pScene = HelloWorld::scene();

    // run
    pDirector->runWithScene(pScene);

    return true;
}
程序的流程如下

从代码看到其场景为HelloWorld::scene(),我们进入这个函数看看,
CCScene* HelloWorld::scene()
{
	CCScene * scene = NULL;
	do
	{
		// 'scene' is an autorelease object
		scene = CCScene::create();
		CC_BREAK_IF(! scene);

		// 'layer' is an autorelease object
		HelloWorld *layer = HelloWorld::create();
		CC_BREAK_IF(! layer);

		// add layer as a child to scene
		scene->addChild(layer);
	} while (0);

	// return the scene
	return scene;
}
从代码可以看出此函数创建了一个scene,并把创建好,并init(create为宏定义,里面会调用到init)好的HelloWorld layer加载入场景中
接着我们来看看Helloworld layer做了什么事
首先Helloworld继承CLayerColor,而CLayerColor继承CCLayerRGBA接口为CCBlendProtocol,CCLayerRGBA继承CCLayer接口为CCRGBAProtocol,可见Helloworld是一个Layer
因为在创建场景的时候,也创建了Helloworld layer(create函数),而create函数会调用init这个函数,所以helloworld layer的初始化都在init这个函数内
bool HelloWorld::init()
{
	bool bRet = false;
	do
	{
		//////////////////////////////////////////////////////////////////////////
		// super init first
		//////////////////////////////////////////////////////////////////////////

		CC_BREAK_IF(! CCLayerColor::initWithColor( ccc4(255,255,255,255) ) );

		//////////////////////////////////////////////////////////////////////////
		// add your codes below...
		//////////////////////////////////////////////////////////////////////////

		// 1. Add a menu item with "X" image, which is clicked to quit the program.

		// Create a "close" menu item with close icon, it's an auto release object.
		CCMenuItemImage *pCloseItem = CCMenuItemImage::create(
			"CloseNormal.png",
			"CloseSelected.png",
			this,
			menu_selector(HelloWorld::menuCloseCallback));
		CC_BREAK_IF(! pCloseItem);

		// Place the menu item bottom-right conner.
        CCSize visibleSize = CCDirector::sharedDirector()->getVisibleSize();
        CCPoint origin = CCDirector::sharedDirector()->getVisibleOrigin();

		pCloseItem->setPosition(ccp(origin.x + visibleSize.width - pCloseItem->getContentSize().width/2,
                                    origin.y + pCloseItem->getContentSize().height/2));

		// Create a menu with the "close" menu item, it's an auto release object.
		CCMenu* pMenu = CCMenu::create(pCloseItem, NULL);
		pMenu->setPosition(CCPointZero);
		CC_BREAK_IF(! pMenu);

		// Add the menu to HelloWorld layer as a child layer.
		this->addChild(pMenu, 1);

		/////////////////////////////
		// 2. add your codes below...
		CCSprite *player = CCSprite::create("Player.png", CCRectMake(0, 0, 27, 40) );

		player->setPosition( ccp(origin.x + player->getContentSize().width/2,
                                 origin.y + visibleSize.height/2) );
		this->addChild(player);

		this->schedule( schedule_selector(HelloWorld::gameLogic), 1.0 );

		this->setTouchEnabled(true);

		_targets = new CCArray;
		_projectiles = new CCArray;

		// use updateGame instead of update, otherwise it will conflit with SelectorProtocol::update
		// see http://www.cocos2d-x.org/boards/6/topics/1478
		this->schedule( schedule_selector(HelloWorld::updateGame) );

		CocosDenshion::SimpleAudioEngine::sharedEngine()->playBackgroundMusic("background-music-aac.wav", true);

		bRet = true;
	} while (0);

	return bRet;
}
首先,创建了一个MenuItem(加载了CloseNormal和CloseSelected两张图片),回调为menucloseCallback,并加载到CCMenu中,作为当点击的时候关闭程序,而CCMenu则添加到Helloworld层中,并设置位置
接着新建player精灵,设置其位置,并加入Helloworld layer中。并开启一个timer调用gamelogic这个函数,gamelogic主要创建一些Target精灵,并给他们设定动画,跑动动画,结束时的动画
再接着,开启另一个Timer用于游戏的刷新(updateGame),刷新了子弹精灵,target精灵,并把被打中的进行删除和打出的子弹进行删除,如果打中大于等于5.就更换到GAMEOVERSCENE
子弹的发射主要在ccTouchesEnded的时候触发,把发出的子弹加入Helloworld layer中,并设置了子弹的动画
在GameOverScene中init只是加了一层显示结果的label,到一定时间就转回HelloWorld 的layer
SimpleGame就解析到此,文采不好,此记录只作为自己记忆所用

