Contents
[ hide]- 1 Preface
- 2 Test plan
- 2.1 Setup
- 2.2 Test Scenario
- 3 Before we start
- 4 Configuring ZK
- 5 Preparing Testing Scripts
- 5.1 Load CSV file as the variable of the user name and password
- 5.2 Set account & password as variables
- 5.3 Generate new desktop ID for redirecting to a new page
- 5.4 Specify parameter
- 5.5 Add the listeners for creating reports
- 6 Running the test
- 7 Trouble-shooting & Tips
- 8 Downloads
- 9 Comments
Preface
Dennis Chen has shared a small talk illustrating how you can execute a loading test with ZK applications using JMeter. Now, in this small talk we will take a real application as an example to demonstrate in detail how you can actually apply the ideas illustrated in Dennis’ article to perform a stress test.
Test plan
We will be using the "shopping cart" example from ZK Essentials as the template application to perform the stress test.
Setup
- ZK 5.0.11
- zk testing demo ( a demo based on the shopping cart sample)
- Jmeter 2.5.1
Test Scenario
- User enters his user name and password for authentication
- Login successfully to the shopping site, redirect to index.zul
- User selects an item and drag to the shopping cart
- User checks out
Since this is a stress test, we can apply 50, 100, 150,... concurrent users to perform the test scenario simultaneously. In our example we have created a max of 300 accounts, which allows you to perform the test with as many as 300 concurrent users.
Before we start
As mentioned above we will be using the "shopping cart" example from ZK Essentials as the template application. However there is only one set of login/password in the current shopping cart implementation which is not sufficient for multiple users. To support multiple users, we have modified the shopping cart example to generate multiple accounts, so that each user will be logged in using a different account. This is done as follows, and it will be triggered as you click "createUserBtn" in login.zul:
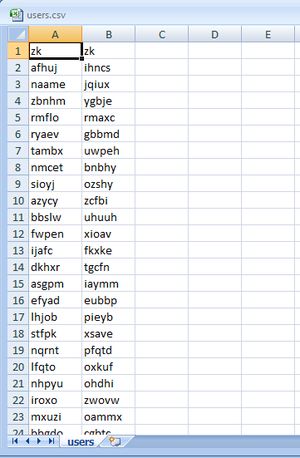
1. prepare a CSV file that includes a list of user names and passwords:
2. Add the following code to LoginViewCtrl.java
|
1
2
3
4
5
6
7
8
9
10
11
12
13
14
15
16
17
18
19
20
21
22
|
public
void
onClick$createUserBtn() {
Map map = userinfo();
Session session = StoreHibernateUtil.openSession();
Transaction t = session.beginTransaction();
Iterator entries = map.entrySet().iterator();
int
i =
0
;
while
(entries.hasNext()) {
i ++;
Map.Entry entry = (Map.Entry) entries.next();
String name = (String)entry.getKey();
String pwd = (String)entry.getValue();
User user =
new
User(i, name, pwd,
"user"
);
session.save(user);
if
(i %
20
==
0
) {
session.flush();
session.clear();
}
}
t.commit();
session.close();
}
|
Configuring ZK
- Set IdGenerator for your ZK app
As illustrated in Dennis’ small talk, you need to define IdGenerator to fix the desktop IDs and component IDs so that we can record and play the testing script. The IdGenerator is implemented as follows:
|
1
2
3
4
5
6
7
8
9
10
11
12
13
14
15
16
17
18
19
20
21
22
23
24
25
26
27
28
|
public
class
MyIdgenerator
implements
IdGenerator {
private
static
ThreadLocal<HttpServletResponse> response =
new
ThreadLocal<HttpServletResponse>();
private
static
AtomicInteger ai =
new
AtomicInteger();
public
String nextComponentUuid(Desktop desktop, Component comp) {
String number;
if
((number = (String) desktop.getAttribute(
"Id_Num"
)) ==
null
) {
number =
"0"
;
desktop.setAttribute(
"Id_Num"
, number);
}
int
i = Integer.parseInt(number);
i++;
// Start from 1
desktop.setAttribute(
"Id_Num"
, String.valueOf(i));
return
"t_"
+ i;
}
public
String nextDesktopId(Desktop desktop) {
HttpServletRequest req = (HttpServletRequest)Executions.getCurrent().getNativeRequest();
String dtid = req.getParameter(
"tdtid"
);
if
(dtid!=
null
){
}
return
dtid==
null
?
null
:dtid;
}
public
String nextPageUuid(Page page) {
return
null
;
}
}
|
- Define your IdGenerator in zk.xml
Then, define your IdGenerator in zk.xml, for example,
|
1
2
3
|
<
system-config
>
<
id-generator-class
>foo.MyIdgenerator</
id-generator-class
>
</
system-config
>
|
Preparing Testing Scripts
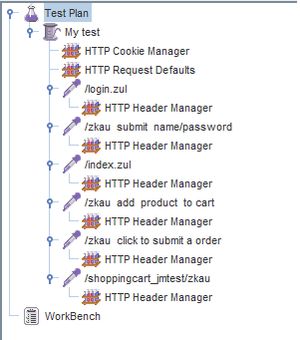
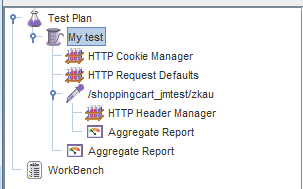
Now we are ready to record the scripts. We will be recording 6 HTTP requests as illustrated in the image below. What we need to do is to configure the parameters of these 6 requests based on the application that we wish to test.
Load CSV file as the variable of the user name and password
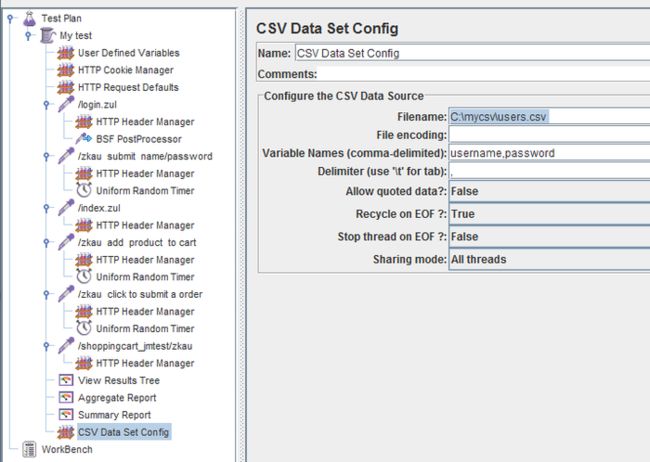
- Add a CSV Data Set Config
First we need to add a CSV Data Set Config here. The element will iterate the csv data set to simulate muti-users login into the application. Please specify a fully qualified name to the Filename field (ex: C:\mycsv\users.csv ), and specify the variable name to the Variable Names field for later use.
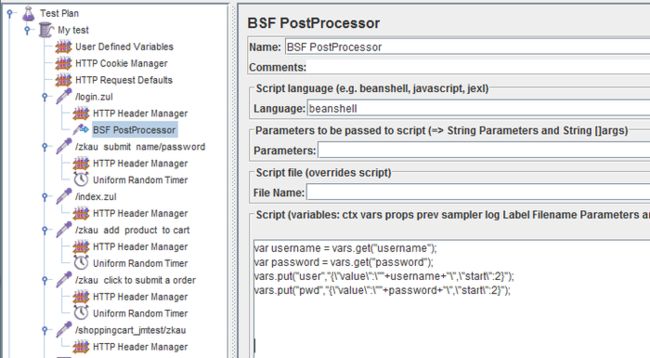
- Add BSF PostProcessor
Then we need to ask jmeter to generate the accounts and passwords automatically based on our CSV file. What we need to do is to add a BSF PostProcessor element, set the language to beanshell, and define:
var username = vars.get("username");
var password = vars.get("password");
vars.put("user","{\"value\":\""+username+"\",\"start\":2}");
vars.put("pwd","{\"value\":\""+password+"\",\"start\":2}");
This script will get the username and password variables generated by CSV Data Set Config element, and combine the result and some text as a parameter which will be used as user names and passwords later.
Set account & password as variables
With these settings ready, we can now set the parameter dtid as ${dtid} and use EL to replace a fixed account and password in the first ajax request (i.e. the login request). For example if we send zk/zk as user name and password, then we will be seeing
data_3: {"value":"zk","start":2} //for username
data_4: {"value":"zk","start":2} //for password
in the recorded jmeter’s request. Then, we use ${user} and ${pwd} to replace {"value":"zk","start":2} for handling the accounts and passwords dynamically.
Generate new desktop ID for redirecting to a new page
After an user logged into the system, he will be redirected to index.zul. Since the URL is changed, the desktop and it’s id will also be changed, we need to retrieve the desktop id again using ${__intSum(${dtid},1,dtid)}.
Specify parameter
The last 3 http requests are for adding products to the shopping cart, check out, and close the browser tab. What we need to do is just to modify their tdtid to ${__intSum(${dtid},1,dtid).
Add the listeners for creating reports
There are many different elements that allows you to generate different kinds of reports, such as Aggregate Report and Graph Results. You can add these listeners to Thread Group or HTTP request depending on the report you wish to generate.
Now we have completed all the settings and have saved these configurations as test.jmx.
Running the test
Now we are ready to start the application and to run the test.
- Generate accounts
- Run the testing script
- Open jmeter’s menu, File > Open , and load test.jmx.
- Specify your IP and port, for example we use localhost/8080 as ip and port number
- In Thread Group ( the root element), set the number of concurrent users to test.
- Perform Run > Start to run the test.
Start your web server, and access login.zul. Click createUserBtn for creating multiple accounts.
You can then observe the average response time, 90% line response time, median response time and other results by accessing the Aggregate Report .
Trouble-shooting & Tips
- Tips: Performing repeating tests
- Trouble-shooting: Erred response
- Trouble-shooting: Timeout error
- Tips: close browser tab for saving memory
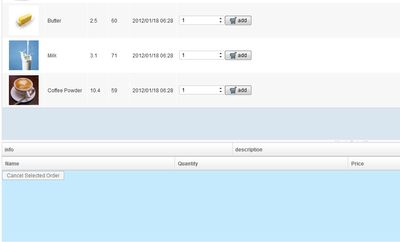
If you have finished a round of test (for example 0~50) you should restart your server before performing another round of test. This is because after you finish a round of test, there will be an extra item listed in each user’s page because they all ordered an item. This extra item is displayed at the bottom of the page (see the image on the right). As there is a DOM change due to this extra item, components’ IDs and orders are also changed thus different from the script you recorded earlier. To solve this problem, just restart your server before performing another round of test.
If you encounter the Response data error shown as the image above, it is most likely that you did not implement IdGenerator correctly. Please refer to Configuring ZK section to implement UUID.
Timeout errors occur when the desktop id in the Ajax request is no longer available at the server side. This normally happens when the URL is changed. If this happens, you need to retrieve desktop ID again. Please refer to Testing Scripts section to implement Desktop ID.
Timeout may also relate to the max allowed desktops. In ZK there is a setting called “max-desktops-per-session” which defines the max concurrent desktops for each session. The more browser tabs an user opens the more desktops will be saved on the session. If the number exceeds the max allowed desktops then some desktops will be dropped with the timeout error.
By default the number is 15 which means an user can open as many as 15 tabs in a same browser at the same time. If you have configured it to a smaller number for saving the memory, and in your use case the users will be opening up multiple tabs then you should double check whether this is the reason causing the timeout error. To change this setting, use:
|
1
2
3
|
<
session-config
>
<
max-desktops-per-session
>1</
max-desktops-per-session
>
</
session-config
>
|
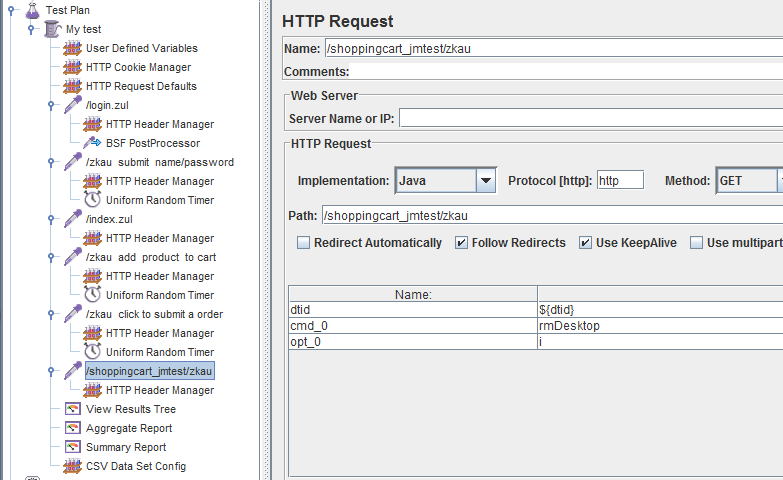
ZK stores desktops in sessions, when user closes the browser tab ZK will send the rmDesktop command to remove the desktop. We can simulate this behavior to save memory when performing a stress test. This is done in the last http request defined in test.jmx. You can refer to the image below:
Downloads
users.csv - users.csv (Please place the csv file under C:/mycsv/)
zk testing demo – the modified shopping cart application used in this small talk
jmeter 2.5.1 – http://jmeter.apache.org/download_jmeter.cgi
test.jmx – test.jmx
