Android 继承DialogFragment弹出dialog对话框二
之前写过一篇关于Android 继承DialogFragment弹出dialog对话框一,这次是在上次的基础上修改了一些东西,就是怎样在DialogFragment中获取getDialog()是获取当前对话框句柄。就可以进行布局可变的灵活操作。就像getactivity();一样使用。下面看代码。
本文demo下载地址:点击
MainActivity
package com.example.fragmentdialogdemo;

import com.example.fragmentdialogdemo.TestDialog.onTestListener;
import android.os.Bundle;
import android.support.v4.app.FragmentActivity;
import android.view.Menu;
import android.view.View;
import android.view.View.OnClickListener;
import android.widget.Button;
import android.widget.TextView;
import android.widget.Toast;

public class MainActivity extends FragmentActivity implements OnClickListener,
		onTestListener {

	private String mstrName = "";
	private String mstrHigh = "";

	@Override
	protected void onCreate(Bundle savedInstanceState) {
		super.onCreate(savedInstanceState);
		setContentView(R.layout.activity_main);

		initUI();
	}

	private void initUI() {
		Button buttonTest = (Button) findViewById(R.id.buttonTest);
		buttonTest.setOnClickListener(this);
	}

	@Override
	public boolean onCreateOptionsMenu(Menu menu) {
		getMenuInflater().inflate(R.menu.main, menu);
		return true;
	}

	// 接口回调的函数
	@Override
	public void onTestListener(int uniqueIdentifier, String strName,
			String strHigh) {
		if (uniqueIdentifier == 1) {
			Toast.makeText(getApplicationContext(),
					"姓名:" + strName + ",身高:" + strHigh, Toast.LENGTH_LONG)
					.show();
			TextView textView1 = (TextView) findViewById(R.id.textView1);
			textView1.setText("姓名:" + strName + ",身高:" + strHigh);
		}

		mstrName = strName;
		mstrHigh = strHigh;
	}

	@Override
	public void onClick(View arg0) {
		switch (arg0.getId()) {
		case R.id.buttonTest:
			// 实例化TestDialog,可以传参数进去,例如标题,或者其他参数,还有一个唯一码.
			TestDialog dialog = new TestDialog().newInstance("请输入", 1,
					mstrName, mstrHigh);
			dialog.show(this.getSupportFragmentManager(), "TestDialog");
			break;
		default:
			break;
		}

	}

}
TestDialog
package com.example.fragmentdialogdemo;

import android.app.Activity;
import android.app.AlertDialog;
import android.app.Dialog;
import android.content.DialogInterface;
import android.os.Bundle;
import android.support.v4.app.DialogFragment;
import android.view.View;
import android.widget.Button;
import android.widget.EditText;
import android.widget.RadioGroup;
import android.widget.RadioGroup.OnCheckedChangeListener;

public class TestDialog extends DialogFragment implements OnCheckedChangeListener{

	// mUniqueFlag作用是唯一码,可以使返回时做判断
	private int mUniqueFlag = -1;
	private onTestListener mOnListener;
	private EditText meditTextName, meditTextHigh;
	protected Button mButtonPositive;

	/**
	 * 新建实例
	 *
	 * @param title
	 * @param unique
	 * @param strName
	 * @param strHigh
	 * @return
	 */
	public static TestDialog newInstance(String title, int unique,
			String strName, String strHigh) {
		TestDialog tDialog = new TestDialog();
		Bundle args = new Bundle();
		args.putString("SelectTemplateTitle", title);
		args.putInt("MultipleTemplate", unique);
		args.putString("TemplateName", strName);
		args.putString("TemplateHigh", strHigh);
		tDialog.setArguments(args);
		return tDialog;

	}

	public interface onTestListener {

		/**
		 *
		 * @param uniqueIdentifier
		 *            唯一标识
		 * @param strName
		 * @param strHigh
		 */
		public abstract void onTestListener(int uniqueIdentifier,
				String strName, String strHigh);
	}

	// 旋转时候保存
	@Override
	public void onSaveInstanceState(Bundle outState) {
		super.onSaveInstanceState(outState);
		outState.putString("InputName", meditTextName.getText().toString());
		outState.putString("InputHigh", meditTextHigh.getText().toString());
	}

	@Override
	public Dialog onCreateDialog(Bundle saveInstanceState) {
		String title = getArguments().getString("SelectTemplateTitle");
		mUniqueFlag = getArguments().getInt("MultipleTemplate");

		AlertDialog.Builder Builder = new AlertDialog.Builder(getActivity())
				.setTitle(title)
				.setPositiveButton("确定", new DialogInterface.OnClickListener() {
					@Override
					public void onClick(DialogInterface dialog, int which) {

						// 触发数据回调
						if (mOnListener != null)
							mOnListener.onTestListener(mUniqueFlag,
									meditTextName.getText().toString(),
									meditTextHigh.getText().toString());
					}
				}).setNegativeButton("取消", null);

		// 添加xml布局
		View view = getActivity().getLayoutInflater().inflate(
				R.layout.test_dialog, null);
		setupUI(view);

		// 旋转后,恢复数据
		if (saveInstanceState != null) {
			String strName = saveInstanceState.getString("InputName");
			if (strName != null)
				meditTextName.setText(strName);

			String strHigh = saveInstanceState.getString("InputHigh");
			if (strHigh != null)
				meditTextHigh.setText(strHigh);
		}
		Builder.setView(view);

		//创建对话框
		AlertDialog dialog = (AlertDialog) Builder.create();
		return dialog;
	}

	private void setupUI(View view) {
		if (view == null)
			return;

		RadioGroup radioGroup1 = (RadioGroup)view.findViewById(R.id.radioGroup1);
		radioGroup1.setOnCheckedChangeListener(this);

		String strName = getArguments().getString("TemplateName");
		String strHigh = getArguments().getString("TemplateHigh");
		meditTextName = (EditText) view.findViewById(R.id.editTextName);
		meditTextHigh = (EditText) view.findViewById(R.id.editTextHigh);

		meditTextName.setText(strName);
		meditTextHigh.setText(strHigh);
	}

	// onAttach是关联activity的,用接口回调
	@Override
	public void onAttach(Activity activity) {
		super.onAttach(activity);
		try {
			mOnListener = (onTestListener) activity;
		} catch (ClassCastException e) {
			dismiss();
		}
	}

	@Override
	public void onCheckedChanged(RadioGroup group, int checkedId) {
		if (group.getId() == R.id.radioGroup1) {
			switch (checkedId) {
			case R.id.radio0:
				//getDialog()是获取当前对话框
				getDialog().findViewById(R.id.LayoutName).setVisibility(View.VISIBLE);
				getDialog().findViewById(R.id.LayoutHigh).setVisibility(View.VISIBLE);
				break;
			case R.id.radio1:
				getDialog().findViewById(R.id.LayoutName).setVisibility(View.GONE);
				getDialog().findViewById(R.id.LayoutHigh).setVisibility(View.VISIBLE);
				break;
			default:
				break;
			}
		}

	}

}
activity_main
<LinearLayout xmlns:android="http://schemas.android.com/apk/res/android"
    xmlns:tools="http://schemas.android.com/tools"
    android:layout_width="match_parent"
    android:layout_height="match_parent"
    android:orientation="vertical"
    tools:context=".MainActivity" >

    <TextView
        android:id="@+id/textView1"
        android:layout_width="match_parent"
        android:layout_height="80dp"
        android:gravity="center"
        android:textSize="18sp"
        android:text="点击button" />

    <Button
        android:id="@+id/buttonTest"
        android:layout_width="wrap_content"
        android:layout_height="wrap_content"
        android:text="Button" />

</LinearLayout>
test_dialog
<LinearLayout xmlns:android="http://schemas.android.com/apk/res/android"
    xmlns:tools="http://schemas.android.com/tools"
    android:layout_width="match_parent"
    android:layout_height="match_parent"
    android:orientation="vertical" >

    <RadioGroup
        android:id="@+id/radioGroup1"
        android:layout_width="wrap_content"
        android:layout_height="wrap_content"
        android:orientation="horizontal">

        <RadioButton
            android:id="@+id/radio0"
            android:layout_width="wrap_content"
            android:layout_height="wrap_content"
            android:checked="true"
            android:text="姓名" />

        <RadioButton
            android:id="@+id/radio1"
            android:layout_width="wrap_content"
            android:layout_height="wrap_content"
            android:text="身高" />

    </RadioGroup>

    <LinearLayout
        android:id="@+id/LayoutName"
        android:layout_width="match_parent"
        android:layout_height="60dp" >

        <TextView
            android:layout_width="wrap_content"
            android:layout_height="match_parent"
            android:gravity="left|center_vertical"
            android:text="姓名:"
            android:textSize="18sp" />

        <EditText
            android:id="@+id/editTextName"
            android:layout_width="wrap_content"
            android:layout_height="wrap_content"
            android:layout_weight="1"
            android:ems="10" >

            <requestFocus />
        </EditText>
    </LinearLayout>

    <LinearLayout
         android:id="@+id/LayoutHigh"
        android:layout_width="match_parent"
        android:layout_height="60dp" >

        <TextView
            android:layout_width="wrap_content"
            android:layout_height="match_parent"
            android:gravity="left|center_vertical"
            android:text="身高:"
            android:textSize="18sp" />

        <EditText
            android:id="@+id/editTextHigh"
            android:layout_width="wrap_content"
            android:layout_height="wrap_content"
            android:layout_weight="1"
            android:ems="10" >

            <requestFocus />
        </EditText>
    </LinearLayout>

</LinearLayout>
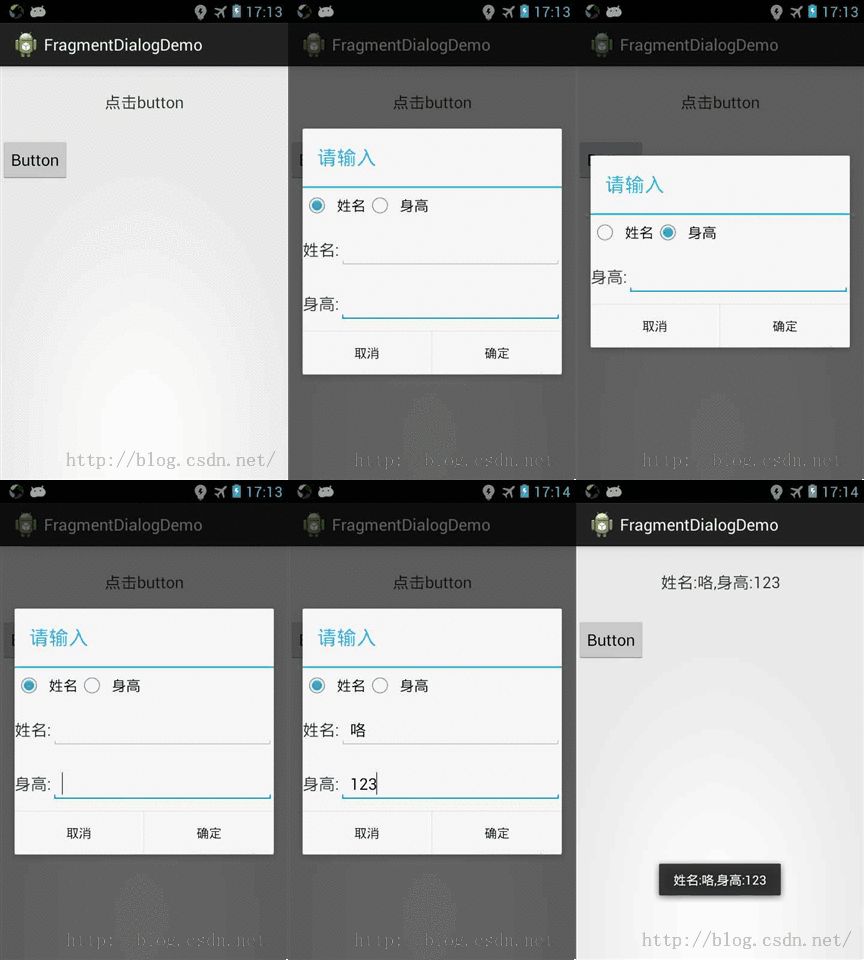
二、效果看下面动态图

三、DialogFragment的部分方法
还是那句话多实践,多总结,多交流!期待你的留言。
