Linux0.11内核--启动引导代码分析bootsect.s
Linux内核中的系统启动引导代码位于/boot目录下

但是,由于。Linus当时是在MINIX系统上开发Linux的,最初MINIX系统上还没有移植gas程序,因此Linus就使用了MINIX系统上的as86。
bootsect需要是16位的实模式程序。目前gas汇编器也支持16位的编译。所以现在也可以直接用as编译器直接编译。
下面是用at&t格式改写的bootsect.s代码
.code16 # rewrite with AT&T syntax by falcon <[email protected]> at 081012 # # SYS_SIZE is the number of clicks (16 bytes) to be loaded. # 0x3000 is 0x30000 bytes = 196kB, more than enough for current # versions of linux # .equ SYSSIZE, 0x3000 # # bootsect.s (C) 1991 Linus Torvalds # # bootsect.s is loaded at 0x7c00 by the bios-startup routines, and moves # iself out of the way to address 0x90000, and jumps there. # # It then loads 'setup' directly after itself (0x90200), and the system # at 0x10000, using BIOS interrupts. # # NOTE! currently system is at most 8*65536 bytes long. This should be no # problem, even in the future. I want to keep it simple. This 512 kB # kernel size should be enough, especially as this doesn't contain the # buffer cache as in minix # # The loader has been made as simple as possible, and continuos # read errors will result in a unbreakable loop. Reboot by hand. It # loads pretty fast by getting whole sectors at a time whenever possible. .global _start, begtext, begdata, begbss, endtext, enddata, endbss .text begtext: .data begdata: .bss begbss: .text .equ SETUPLEN, 4 # nr of setup-sectors .equ BOOTSEG, 0x07c0 # original address of boot-sector .equ INITSEG, 0x9000 # we move boot here - out of the way .equ SETUPSEG, 0x9020 # setup starts here .equ SYSSEG, 0x1000 # system loaded at 0x10000 (65536). .equ ENDSEG, SYSSEG + SYSSIZE # where to stop loading # ROOT_DEV: 0x000 - same type of floppy as boot. # 0x301 - first partition on first drive etc .equ ROOT_DEV, 0x301 ljmp $BOOTSEG, $_start _start: mov $BOOTSEG, %ax mov %ax, %ds mov $INITSEG, %ax mov %ax, %es mov $256, %cx sub %si, %si sub %di, %di rep movsw ljmp $INITSEG, $go go: mov %cs, %ax mov %ax, %ds mov %ax, %es # put stack at 0x9ff00. mov %ax, %ss mov $0xFF00, %sp # arbitrary value >>512 # load the setup-sectors directly after the bootblock. # Note that 'es' is already set up. load_setup: mov $0x0000, %dx # drive 0, head 0 mov $0x0002, %cx # sector 2, track 0 mov $0x0200, %bx # address = 512, in INITSEG .equ AX, 0x0200+SETUPLEN mov $AX, %ax # service 2, nr of sectors int $0x13 # read it jnc ok_load_setup # ok - continue mov $0x0000, %dx mov $0x0000, %ax # reset the diskette int $0x13 jmp load_setup ok_load_setup: # Get disk drive parameters, specifically nr of sectors/track mov $0x00, %dl mov $0x0800, %ax # AH=8 is get drive parameters int $0x13 mov $0x00, %ch #seg cs mov %cx, %cs:sectors+0 # %cs means sectors is in %cs mov $INITSEG, %ax mov %ax, %es # Print some inane message mov $0x03, %ah # read cursor pos xor %bh, %bh int $0x10 mov $38, %cx mov $0x0007, %bx # page 0, attribute 7 (normal) #lea msg1, %bp mov $msg1, %bp mov $0x1301, %ax # write string, move cursor int $0x10 # ok, we've written the message, now # we want to load the system (at 0x10000) mov $SYSSEG, %ax mov %ax, %es # segment of 0x010000 call read_it call kill_motor # After that we check which root-device to use. If the device is # defined (#= 0), nothing is done and the given device is used. # Otherwise, either /dev/PS0 (2,28) or /dev/at0 (2,8), depending # on the number of sectors that the BIOS reports currently. #seg cs mov %cs:root_dev+0, %ax cmp $0, %ax jne root_defined #seg cs mov %cs:sectors+0, %bx mov $0x0208, %ax # /dev/ps0 - 1.2Mb cmp $15, %bx je root_defined mov $0x021c, %ax # /dev/PS0 - 1.44Mb cmp $18, %bx je root_defined undef_root: jmp undef_root root_defined: #seg cs mov %ax, %cs:root_dev+0 # after that (everyting loaded), we jump to # the setup-routine loaded directly after # the bootblock: ljmp $SETUPSEG, $0 #jump to 0x9020:0000(setup.s 程序的开始处) # This routine loads the system at address 0x10000, making sure # no 64kB boundaries are crossed. We try to load it as fast as # possible, loading whole tracks whenever we can. # # in: es - starting address segment (normally 0x1000) # sread: .word 1+ SETUPLEN # sectors read of current track head: .word 0 # current head track: .word 0 # current track read_it: mov %es, %ax test $0x0fff, %ax die: jne die # es must be at 64kB boundary xor %bx, %bx # bx is starting address within segment rp_read: mov %es, %ax cmp $ENDSEG, %ax # have we loaded all yet? jb ok1_read ret ok1_read: #seg cs mov %cs:sectors+0, %ax sub sread, %ax mov %ax, %cx shl $9, %cx add %bx, %cx jnc ok2_read je ok2_read xor %ax, %ax sub %bx, %ax shr $9, %ax ok2_read: call read_track mov %ax, %cx add sread, %ax #seg cs cmp %cs:sectors+0, %ax jne ok3_read mov $1, %ax sub head, %ax jne ok4_read incw track ok4_read: mov %ax, head xor %ax, %ax ok3_read: mov %ax, sread shl $9, %cx add %cx, %bx jnc rp_read mov %es, %ax add $0x1000, %ax mov %ax, %es xor %bx, %bx jmp rp_read read_track: push %ax push %bx push %cx push %dx mov track, %dx mov sread, %cx inc %cx mov %dl, %ch mov head, %dx mov %dl, %dh mov $0, %dl and $0x0100, %dx mov $2, %ah int $0x13 jc bad_rt pop %dx pop %cx pop %bx pop %ax ret bad_rt: mov $0, %ax mov $0, %dx int $0x13 pop %dx pop %cx pop %bx pop %ax jmp read_track #/* # * This procedure turns off the floppy drive motor, so # * that we enter the kernel in a known state, and # * don't have to worry about it later. # */ kill_motor: push %dx mov $0x3f2, %dx mov $0, %al outsb pop %dx ret sectors: .word 0 msg1: .byte 13,10 .ascii "Loading system ... compiled by yan!" .byte 13,10,13,10 .org 508 root_dev: .word ROOT_DEV boot_flag: .word 0xAA55 .text endtext: .data enddata: .bss endbss:
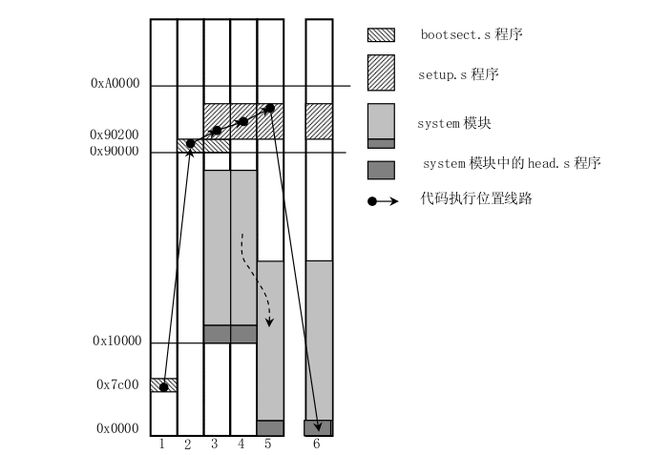
系统加电启动时,首先由BIOS读取bootsect代码到地址0x7c00处,然后首先将自己移动至地址0x9000处,大小是256个字,相当于512
字节。
如何实现内存块的复制,运用ds:si->es:di的方式,将ds所指的段移 到ps所指的段中去,cx中指定移动的次数。gas中的段间跳转指令 ljmp A,B,其中A代表目标段地址,B代表A段中的偏移值。
然后跳转到移动后代码的下一条语句执行,这是由于
ljmp $INITSEG, $go
跳转后,该指令自动修改CS代码段的值。
移动代码后,由于这是会使用pop,push,call等指令,需要使用堆栈段,所以需要重新设置段基址,0x9ff00。
然后通过BIOS的INT 0x13中断来从磁盘加载setup模块。
***************************************
BIOS中断INT 0x13读磁盘功能
读扇区:
ah=0x02 - 读磁盘扇区到内存;a1=需要读出的扇区数量
ch=磁道(柱面)号的低8位; c1=开始扇区(位0-5),磁道号高2 位(位6-7);
dh=磁头号; d1=驱动器号(如果是硬盘则位7要 置位),0为当前A驱动器
es:bx->指向数据缓冲区;如果出错则CF标志置位。