Qt 插件综合编程-基于插件的OpenStreetMap瓦片查看器客户端(3) 插件管理机制
(相关的代码可以从https://github.com/goldenhawking/mercator.qtviewer.git直接克隆)
接下来,我们看看在主框架中,是如何管理插件的。所有图层(在动态链接库中实现的图层称作插件图层)都派生自layer_interface ,主框架类 tilesviewer中,有一个容器用来存储目前所有的图层对象指针:
	class layer_interface;
	class tilesviewer : public QWidget ,public viewer_interface
	{
	protected:
		//layers
		QList < layer_interface * > m_listLayers;
		QSet <  layer_interface * > m_setLayers;
	public:
		//layer Ctrl
		bool addLayer(layer_interface * );
		void removeLayer(layer_interface * );
		bool adjust_layers(layer_interface * target );

		virtual layer_interface * 		layer(const QString &);
		QVector<layer_interface * > 	layers();
		QVector<QString> 				layerNames();
		QVector<bool> 					layerVisibilities();
		QVector<bool> 					layerActivities();
		void 			moveLayerUp(layer_interface *);
		void 			moveLayerDown(layer_interface *);
		void 			moveLayerTop(layer_interface *);
		void 			moveLayerBottom(layer_interface *);
		void 			updateLayerGridView();

	};
容器 m_listLayers 记录了图层的指针,同时记录了顺序。 容器 m_setLayers 是一个集合,用来保证同一个图层不会被插入两次。
一系列的方法用于操作图层,其中, moveLayer系列方法用于挪动相应图层在队列m_listLayers中的顺序;layers, layerNames, layerVisibilities, layerActivities是用来返回图层属性的方法, layer(const QString &) 是用来根据名字返回图层对象指针。上述方法功能简单,且易于理解,这里不再赘述。
在图层管理中,比较重要的方法是 addLayer, removeLayer 和 adjust_layers 三个方法,我们从程序启动时刻,添加图层的过程来逐一介绍这三个方法的作用。
1、进程创建时期
一旦进程创建,外围框架类 osm_frame_widget 构造函数首先得到执行。
1.1 添加内部图层
在osm_frame_widget构造函数里,首先产生一个 layer_tiles类型的图层对象,用于显示OSM瓦片作为背景,这段代码类似:
	//add an osm layer
	layer_tiles * pOSMTile =  new layer_tiles(ui->widget_mainMap);
	pOSMTile->set_name("OSM");
	pOSMTile->set_active(true);
	pOSMTile->set_visible(true);
	//pOSMTile->connectToTilesServer(true);
	AppendLayer(QCoreApplication::applicationFilePath(),pOSMTile);
在这段代码里,传递给图层构造函数的是 ui->widget_mainMap指针,这个指针指向tilesviewer类型的widget对象。随后,为图层设置名称、可见性。被注释掉的部分为设置是否自动下载本地缓存中不存在的瓦片,对应界面上的checkbox属性复选框:
AppendLayer是一个独立的方法,用来添加图层到队列,我们后面与外部图层一并介绍。
1.2 扫描并添加外部图层
在osm_frame_widget构造函数里,有一个到EnumPlugins();的调用。EnumPlugins() 会扫描当前可执行文件夹内所有以 oTVPlugin开头的动态链接库,并试图加载:
void osm_frame_widget::EnumPlugins()
{
	QTVOSM_DEBUG("The osm_frame_widget is enuming plugins.");
	QString strAppDir = QCoreApplication::applicationDirPath();
	QDir pluginsDir(strAppDir);
	QStringList filters;
	filters << "qtvplugin_*.dll" << "libqtvplugin_*.so";
	pluginsDir.setNameFilters(filters);
	//Enum files
	foreach (QString fileName, pluginsDir.entryList(QDir::Files)) {
		QPluginLoader pluginLoader(pluginsDir.absoluteFilePath(fileName));
		QObject *plugin = pluginLoader.instance();//try to load Plugins
		if (plugin) {
			layer_interface * pPlugin= qobject_cast<layer_interface *>(plugin);
			if (pPlugin)
			{
				if (false==AppendLayer(fileName,pPlugin))
				{

				}
			}
		}
	}
	QTVOSM_DEBUG("The osm_frame_widget loaded all plugins.");
	return ;
}
对windows 系统,扩展名为dll,对Linux,为.so
加载插件的代码来自标准Qt范例,使用 动态类型转换测试是否能够获取 layer_interface 类型的指针。一旦获取了指针,则进入 AppendLayer流程。
1.3 向视图添加图层
AppendLayer方法有两个参数,第一个参数是该图层的物理位置。对于内部图层而言,物理位置就是可执行文件本身, 对于外部图层,显然就是动态链接库路径。第二个参数是即将被添加的图层指针。
bool osm_frame_widget::AppendLayer(QString SLName,layer_interface * interface)
{
	layer_interface * ci = interface->load_initial_plugin(SLName,ui->widget_mainMap);
	if (0==ci)
		return false;
	if (false==ui->widget_mainMap->addLayer(ci))
		return false;
	QWidget * wig = ci->load_prop_window();
	if (wig)
	{
		m_layerPropPages[ci] = wig;
		m_PropPageslayer[wig] = ci;
		ui->tabWidget_main->addTab(wig,ci->get_name());
		wig->installEventFilter(this);
	}
	return true;
}
在上面的函数里,首先会调用图层指针的
interface
->
load_initial_plugin
(
SLName
,
ui
->
widget_mainMap
);方法。图层开发者必须在这个方法中,根据给定的视图产生与该视图对应的唯一对象,并返回指针。该操作的理由在上一篇文章中有涉及,这里重申一下,因为非常重要: Qt 插件系统将功能发布到动态链接库后,可通过QPluginLoader加载。一般,无论调用多少次load,只有一个插件实例被创建。这也非常容易理解,因为无论一个进程调用了多少次 load,DLL在内存里其实只有一份。这样的副作用是当 ActiveX宿主拥有两幅地图控件,他们加载插件时,其实只创建了一个实例。按照我们的功能需求,每幅地图的行为应该是独立的,因此,需要手工的维护一套机制,以保证为每幅地图创建一个新的插件实例。最简单的方法就是自举工厂——一个创建同类型对象的方法。只要安排一个机制,在插件被调入时,立刻调用这个工厂,并返回与主框架视图对应的插件实例即可,而自举工厂的入口就叫
load_initial_plugin。其实现的原理可参见上一篇文章。
当指针 ci 返回后,会调用 tilesviewer::addLayer,把图层插入到队列中。addLayer很简单:
	bool tilesviewer::addLayer(layer_interface * ba)
	{
		if (m_setLayers.contains(ba)==true)
			return false;
		m_listLayers.push_back(ba);
		m_setLayers.insert(ba);
		return true;
	}
首先判断图层是否已经被添加,而后直接推入队列尾部。
1.4 创建属性页
在 Appendlayer中,执行addLayer之后,会调用插件的另一个方法load_prop_window创建属性窗口。如果图层具有属性窗口,设计者需要返回一个QWidget指针,相应属性页会被插入到页面tableWidget框中。而wig->installEventFilter(this);用于监听closeEvent,在操作者点击选项卡的叉叉关闭页面时,拦截关闭消息,并进入多窗口显示模式;在多窗口模式下,一旦属性窗口关闭,则拦截closeEvent,重新把它插入到 tableWidget中。这种效果类似下图:
上图为单一窗口选项卡显示,下图为多窗口显示。
至此,进程启动阶段的图层操作结束。
2、图层绘制与操作
图层是怎样绘制并操作的呢?我们看看。
2.1 绘制
请看tilesviewer上的绘制消息处理 paintEvent:
	void tilesviewer::paintEvent( QPaintEvent * /*event*/ )
	{
		QPainter painter(this);
		QBrush br_back(QColor(192,192,192),Qt::Dense5Pattern);
		painter.setBackground(br_back);
		painter.eraseRect(this->rect());

		//Call layers to draw images
		foreach (layer_interface * pItem, m_listLayers)
			pItem->cb_paintEvent(&painter);

		//Draw center mark
		QPen pen(Qt::DotLine);
		pen.setColor(QColor(0,0,255,128));
		painter.setPen(pen);
		painter.drawLine(
					width()/2+.5,height()/2+.5-32,
					width()/2+.5,height()/2+.5+32
					);
		painter.drawLine(
					width()/2+.5-32,height()/2+.5,
					width()/2+.5+32,height()/2+.5
					);


	}
在绘制过程中,首先擦除背景,而后顺序调所有图层的 cb_paintEvent方法,最后,在视图中央绘制一个32x32的十字丝。
原来,所谓的插件cb_paintEvent方法,就是具体实现paint逻辑的一堆调用而已。类似的情形出现在鼠标消息上。
2.2 鼠标响应
我们看看其中一个鼠标响应方法:
    void tilesviewer::mousePressEvent ( QMouseEvent * event )
    {
        //Call layers
        int needUpdate = 0;
        foreach (layer_interface * pItem, m_listLayers)
            needUpdate +=  pItem->cb_mousePressEvent(event)==true?1:0;
        if (needUpdate>0)
            this->update();

        ...
        QWidget::mousePressEvent(event);

    }
needUpdate 是一个整形变量。各个图层的 cb_mousePressEvent被顺序呼叫,返回一个布尔类型变量。如果这个变量返回 true,表示图层说“在此之后帮我刷新窗口”。只要有一个图层需要刷新窗口,在鼠标消息之后,update()会调用,从而执行绘图操作。
2.3 图层事件
图层可自定义事件,发送给希望发送的对象。事件是一个 key-value 集合,由一系列的属性名、属性值构成。图层在需要发送时,调用视图的post_event或者 send_event方法完成调用。这两个方法在 viewer_interface接口类中定义。
class viewer_interface{
public:
	/*! post_event posts events to mainPRG and return immediately.
	 * the event system is formed by key-value maps. A message CAB at lease should contain 2
	 * pairs: destin and source
	 * destin means to whom this message is sent to. source means from whom this message is sent.
	 * MAIN_MAP means the main framework, it can be used both in source and destin
	 * OUTER	means the plugins loaded from dynamic libraries and OCX containers. it can only be used in  destin
	 * ALL  	means Every possible listenes. it can only be used in  destin
	 * except these 3 names above, other names is freely used for convenience.
	 *
	 * \param	QMap<QString.QVariant >
	 * \return	bool Succeed = true.
	*/
	virtual bool post_event(const QMap<QString, QVariant> ) = 0;
	/*! send events to mainPRG and return when all progress finished(Blocking).
	 * the event system is formed by key-value maps. A message CAB at lease should contain 2
	 * pairs: destin and source
	 * destin means to whom this message is sent to. source means from whom this message is sent.
	 * MAIN_MAP means the main framework, it can be used both in source and destin
	 * OUTER	means the plugins loaded from dynamic libraries and OCX containers. it can only be used in  destin
	 * ALL  	means Every possible listenes. it can only be used in  destin
	 * except these 3 names above, other names is freely used for convenience.
	 *
	 * \param	QMap<QString.QVariant >
	 * \return	bool Succeed = true.
	*/
	virtual bool send_event(const QMap<QString, QVariant> ) = 0;
};
视图会根据 QMap 容器中的 destin 属性值,决定事件发送给谁。如果这个destin 是 MAIN_MAP,表示发送给视图本身;OUTER表示只发送给外部的ActiveX控件容器;ALL表示发送给视图、外部容器与其他所有图层;除了这三个预定义的值,其他值都被认为是图层名称,即只发送给该图层。
图层通过方法 layer_interface::cb_event响应事件,这个方法定义如下:
	class layer_interface
	{
		//user-def event callback
		virtual bool cb_event(const QMap<QString, QVariant> /*event*/){return false;}
	};
有了这个机制,图层之间可以交换事件消息,图层开发者可以通过接口方便的向其他图层、ActiveX容器泵出事件。下图显示的是图层的自定义事件在容器中的显示,表示一个geomarker1插件中的标记点ID4被双击了:
2.4 图层方法
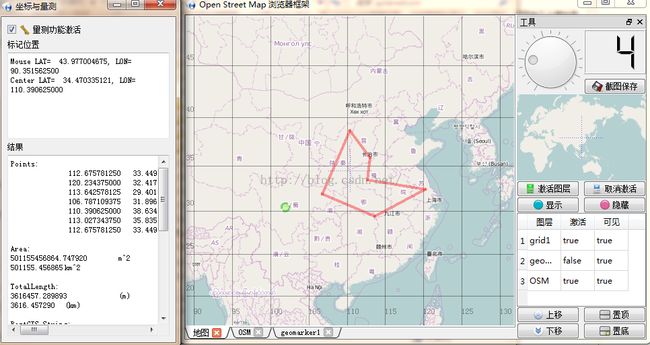
图层不仅有事件,还可以提供方法,使得图层本身可以被外部程序调用。最简单的例子就是从外部获取用户在屏幕上框选的区域坐标,或者让图层添加一个标记位置。
图层方法的实现靠的是接口 call_func:
	class layer_interface
	{
		public:
		//user-def direct function calls
		virtual QMap<QString, QVariant> call_func(const  QMap<QString, QVariant> & /*paras*/){return  std::move( QMap<QString, QVariant>());}

	};
有了这个接口,在 activeX控件中、在其他图层中,就可以调用本图层的功能。我们首先看看在其他图层中如何调用。这里的例子是标绘插件想得到用户使用量测插件在屏幕上框选的区域,作为准备添加的区域:
void qtvplugin_geomarker::on_pushButton_getPolygon_clicked()
{
	if (!m_pVi)	return;
	QString strGridName = QString("grid%1").arg(m_nInstance);
	layer_interface * pif =  m_pVi->layer(strGridName);
	if (pif)
	{
		QMap<QString, QVariant> inPara, outPara;
		inPara["function"] = "get_polygon";
		outPara = pif->call_func(inPara);
		QString strPlainText = "";
		if (outPara.contains("size"))
		{
			int nsz = outPara["size"].toInt();
			for (int i=0;i<nsz;++i)
			{
				QString latkey = QString("lat%1").arg(i);
				QString lonkey = QString("lon%1").arg(i);
				strPlainText += QString("%1,%2;\n").arg(outPara[latkey].toDouble(),0,'f',7).arg(outPara[lonkey].toDouble(),0,'f',7);
			}
		}
		ui->plainTextEdit_corners->setPlainText(strPlainText);
	}
}
当用户单击按钮后,首先查找图层grid,而后,调用方法“”get_polygon ,并获取顶点个数、各个顶点的坐标,显示在界面上。这个方法在插件grid中是这样实现的:
/**
 * function calls avaliable:
 * 	1.function=get_polygon, no other para needed. returns current selected polygon's cornor points, in lat, lon; size=N;lat0=XX;lon0=XX;
 * 	lat1=XX;lon1=XX;lat2=XX;lon2=XX;...;latN-1=XX;lonN-1=XX.
 * 	2.function=get_ruler_status, no other para needed.returns whether ruler tool is active now, status=0 means not active, status=-1 means active.
 * 	3.function=set_ruler_status, with para status, will set ruler status to given value.
 * please notice that the function should be called from the MAIN THREAD ONLY.
 *
 * @param paras	the key-value style paraments.
 * @return QMap<QString, QVariant>	the key-value style return paraments.
 */
QMap<QString, QVariant> qtvplugin_grid::call_func(const  QMap<QString, QVariant> & paras)
{
	QMap<QString, QVariant> res;
	if (paras.contains("function"))
	{
		QString funct = paras["function"].toString();
		if (funct=="get_polygon")
		{
			int Count = m_list_points.size();
			res["size"] = Count;
			for (int i=0;i<Count;++i)
			{
				QString latkey = QString("lat%1").arg(i);
				QString lonkey = QString("lon%1").arg(i);
				res[latkey] = m_list_points[i].x();
				res[lonkey] = m_list_points[i].y();
			}
		}
		else if (funct=="get_ruler_status")
		{
			res["status"] = m_bActive==false?0:-1;
		}
		else if (funct=="set_ruler_status")
		{
			int status = -1;
			if (paras.contains("status"))
				status = paras["status"].toInt();
			set_active(status==0?false:true);
			res["status"] = m_bActive==false?0:-1;
		}
		else
			res["error"] = QString("unknown function \"%1\".").arg(funct);
	}
	else
		res["error"] = "\"function\" keyword not specified, nothing to do.";
	return std::move(res);
}
说白了,就是对基于 QMap 的key-value system的读取、写入。在不改变主框架和现有图层的条件下,新的图层可以方便的发布自己的方法、事件,并使用现有图层的方法、事件。
再看我们在ActiveX控件中如何调用图层的方法。这里以添加一个直线为例:
void testcontainer::on_pushButton_test_line_clicked()
{
	res = ui->axWidget_map1->dynamicCall("osm_layer_call_function(QString,QString)","geomarker1",
												 "function=update_line;name=ID3;type=3;"
												 "lat0=11.3737;lon0=101.30474;"
												 "lat1=40.3737;lon1=111.34347;"
												 "style_pen=4;color_pen=255,0,0,96;"
												 "width_pen=2;").toString();
	if (res.contains("error"))
		QMessageBox::information(this,"geomarker1::update_line",res);
}
只要调用activeX控件的 osm_layer_call_function方法,把插件名 geomarker1、调用字符串传递过去,即可实现划线:
由于 QMap不是win32 COM的标准类型,我们实际上是在控件接口方法中做了转换,和字符串实现了映射。
我们把 key-value 变为字符串,格式为 属性名=属性值;属性名=属性值;属性名=属性值;
可以看到,基于这个思想,插件可以完成很多功能,且不需要改变现有主程序。后续,我们将看看插件功能设计,主要介绍两种思路:
1、基于底层绘图API(Qt Painter API)的2D绘图
2、基于GraphicsView模型-视图架构的高级绘图与事件响应。


