这篇文章还可以在这里找到 英语
这篇文章来自 iOS 教程团队成员 Adam Burkepile, 一个全职软件咨询顾问和独立 iOS 开发者。 看看他最新的 app Pocket No Agenda , 或者在 Twitter 上面关注它。
Block 是对 C/Objective-C 不可思议的一个扩展。 他能让你把一段代码包装成一个单元并且将他们当做对象一样传送。
iOS 中越来越多的 API 必须要用到 Block。 所以你需要了解它来去做几乎所有的事情。 然而, 它的语法以及一些细节之处经常会让初学者感到迷惑。 不要害怕 – 这正是这篇教程要处理的问题! :]
在这个分为两部分的教程中, 你将要创建一个 iOS 小项目,叫做 iOS Diner。 这个应用本身很简单: 用户从菜单中选择一项来创建订单,好像他们马上就要要吃晚餐。 要注意哦, 这个项目可能也会让你感到饥饿!
在这第一部分的教程里, 我们将会创建这个应用的 UI。 这会是 iOS 5 Storyboard 的一个复习, 还包括了一个关于如何创建一个 web service 用来提供 JSON 格式的晚餐菜单数据的简短教程。
注意: 如果你已经对 Storyboard 和 Interface Builder 很熟悉了, 你可以跳过第一部分,直接去第二部分教程, 那里我们开始讨论如何使用 Block。 这部分主要集中于 Storyboard 和 Interface Builder 的讨论。
教程的第二部分将会大量的使用 Block 来实现应用的逻辑。 它将会展示使用 Block 来进行异步处理, 后台任务, 替换标准的API, 以及更多。
如果你迫不及待的话,那么就持续的阅读吧!
开始
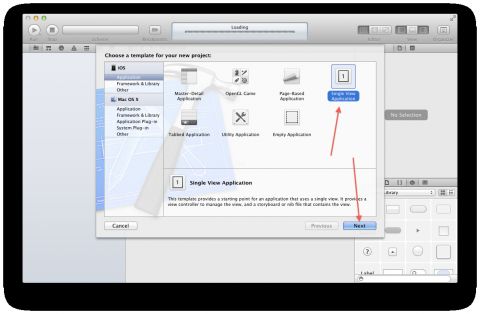
首先,让我们打开 Xcode 并且使用 iOSApplicationSingle View Application 模板来开始一个新项目。
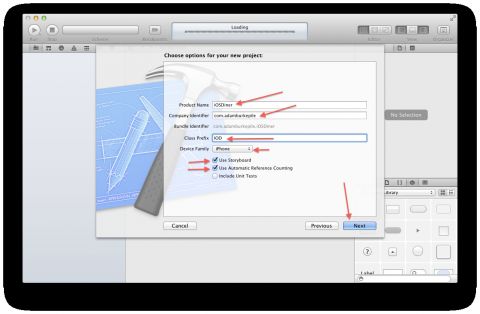
项目名称叫做 “iOSDiner”, 输入用作你创建 App ID 时的 company identifier, 然后输入 “IOD” 作为类名前缀。
设置 device family 为 iPhone。 确保 Use Storyboard 和 Use Automatic Reference Counting 这两个选项是选中的, 但是 Include Unit Tests 和其他的复选框是未选中的。
下一个界面会询问你要把项目存放到哪里。 你可以把它放到任何地方。
运行它一下, 你应该会看到一个空白的屏幕。
在 iPhone/iPod Deployment Info(在 Summary 标签中) 选项中的 Supported Device Orientations 里面, 取消 Portrait 模式, 这样这个应用就只能运行在横屏模式了。
你要做的第一件事就是构建视图界面。 为了完成它,我们需要一些图片。 Ray 的妻子 Vicki 为我们提供了一些漂亮的图片, 你可以到这里下载它。 我们需要将这些图片添加到项目中。
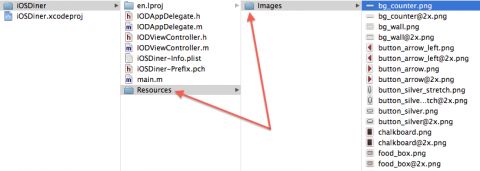
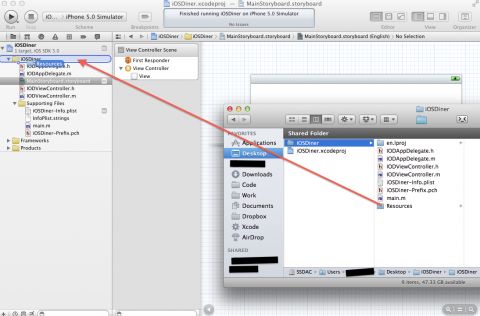
我非常不喜欢 Xcode 在项目和文件系统中匹配文件的方式, 所以大多数时候,我都是手动把资源添加到文件系统中。 我们需要使用 Finder 导航到项目文件夹中。 在项目文件夹中创建一个叫做 “Resources” 的目录。 然后在 Resources 文件夹中创建一个叫做 “Images” 的目录。
把刚下载的 ZIP 文件中的图片复制到 Images 文件夹中, 然后如下图所示,把 Resources 目录拖动到 Xcode 中的 iOSDiner 目录中。
确保下一个对话框中的各项配置和下面的截图是一样的, 然后点击 “Finish” 来添加这些文件。
现在你应该能够看到 Xcode 中的 Resources 目录中有一个 Images子目录, 在它里面包含了你刚刚下载的那些图片 – 完全和文件系统上的结构一样。
添加图片
选中 MainStoryboard.storyboard.
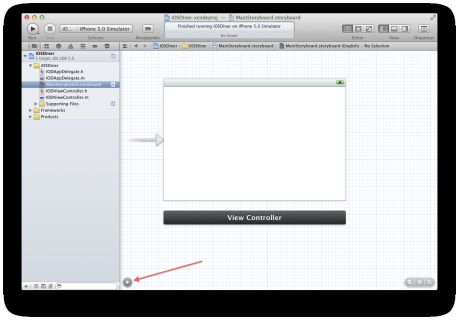
如果你没看到标题为 “View Controller Scene” 的那个界面, 点击最下方的 Expand 按钮 (和下面图片展示的一样)。
你将会为 Storyboard 中的 UIImageView 和 UIButton 添加图片。 为了让一切更简单,展开 Utilities 边栏,并且选择 Media Library。
这里我们看到之前添加到项目中的所有图片。 注意到每张图片都有两个版本。 这是因为每张图片都有默认和视网膜(@2x)版本。
我们仅仅考虑默认版本。 你可以通过选择一张图片并且按下空格键来确定选中的是哪张图片。 名称中不含@2x 的图片就是默认版本。
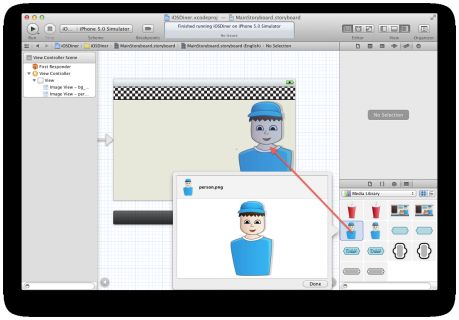
拖动 “bg_wall.png” 到根视图中并且向下面图示中那样放置它。 如果你不确定图片是否放置正确, 你可以切换到 Size Inspector (Utilities 边栏中的第五个标签),指定精确的 X 和 Y 坐标。
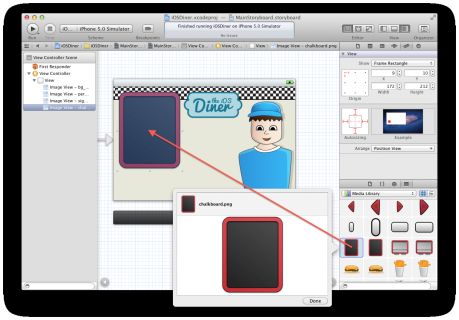
现在对下面这些图片进行同样的操作:
- person.png
- sign_theiOSdiner.png
- chalkboard.png
- bg_counter.png
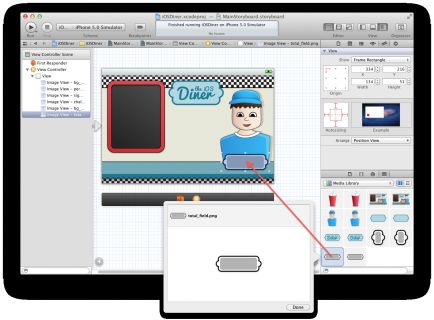
- total_field.png
- food_box.png
注意,你可以通过选择 Image View 然后找到 EditorSize to Fit Conent(或者使用快捷键 Command-Equals) 属性来让它和它里面的图片尺寸一样。
当你拖动和放置好图片后, 会为每一张图片都创建一个 View:
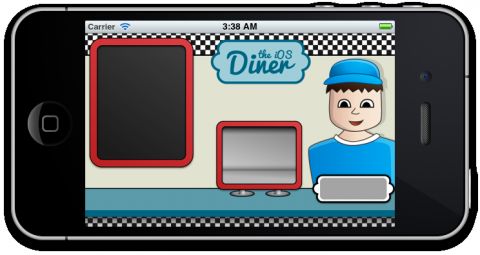
完成之后, 再次运行项目。
嗨!差不多像一个应用了!
下一步,我们将要添加用户界面部分。 在 Xcode 的 Utilities 边栏中, 切换到 Object Library。
拖动一个 “Round Rect Button” 到视图的中间,在屏幕上面。 双击你刚刚放置的按钮,设置 text 为 “-1”。
在 Utilities 边栏中, 选中 Attributes Inspector。 确保你刚刚放置的按钮处于选中状态。 设置 Background 属性为 “button_silver.png”。
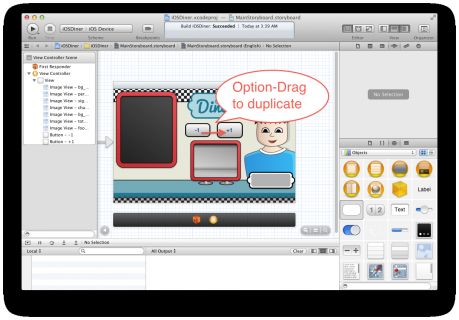
按住 Option/Alt 键并且向右拖动 -1 按钮。 这样会创建一个它的拷贝。 双击这个新的按钮,并且设置它的文本为 “+1″。
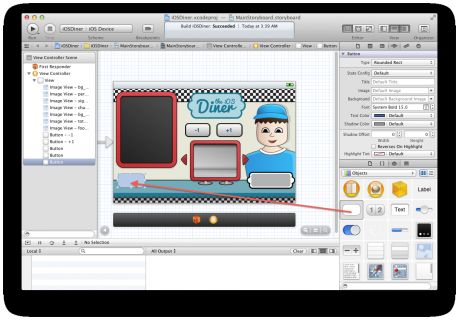
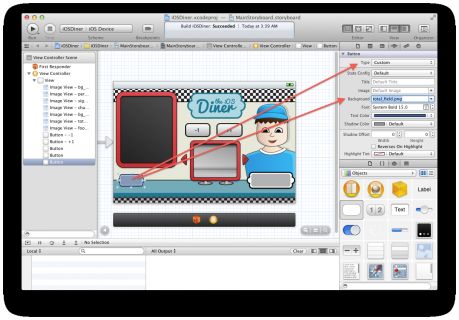
拖动另一个 “Round Rect Button” 到屏幕的左边。 设置 Button Type 属性为 Custom 并且设置这个按钮的 Background 属性为 button_arrow_left.png。
恩,这看起来不太正确。 问题在于, 当你将图片设置为按钮的背景图片时, Xcode 会将图片拉伸到和按钮一样大。
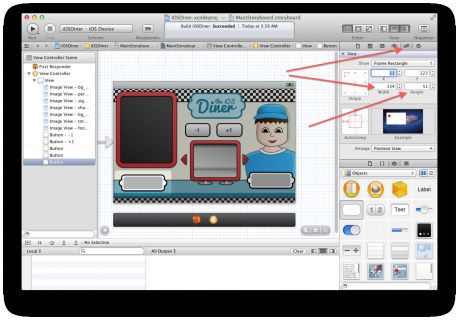
如果你看一下文件本身, 你会看到它的尺寸为 19×33。 所以你要做的是,将按钮的尺寸设置到和图片一样大小。
选中这个按钮。 进入 Size Inspector, 然后分别设置 Width 和 Height 属性为 19 和 33。
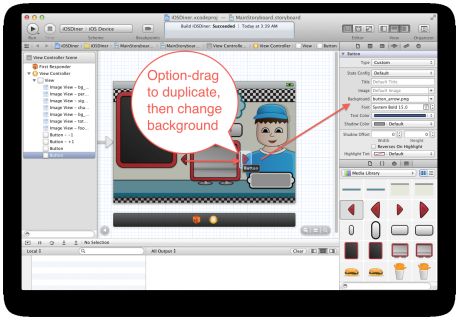
看起来更进一步了! 现在你需要在另一边放一个向右的箭头按钮, 按住 Option/Alt 键,并且将刚才哪个按钮拖动到另一边。 修改这个新按钮的背景图片为 button_arrow.png。
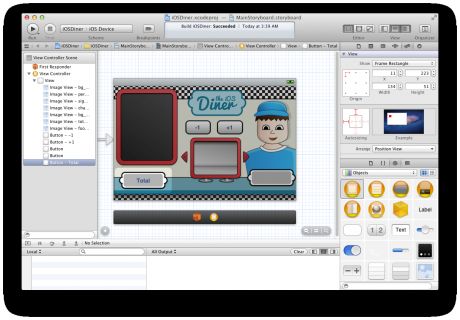
还有最后一个按钮! 拖动另外一个 “Round Rect Button” 到黑板下面。
设置按钮的类型为 Custom 并且设置 Background 属性为 total_field.png。
我们需要再次将它的尺寸设置为和图片一样, 所以,选择 Size Inspector。 分别设置 Width 和 Height 为 134 和 51。 然后双击这个按钮,设置它的文本为 “Total”。
再次运行项目。
看起来很不错! 下面我们需要为 stroyboard 添加一些标签和预览区域。
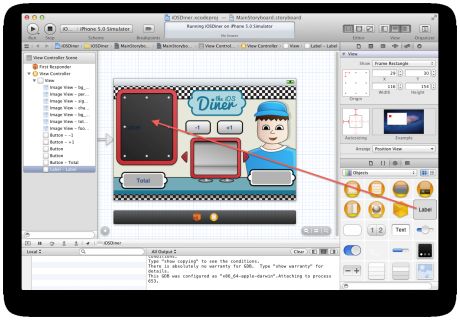
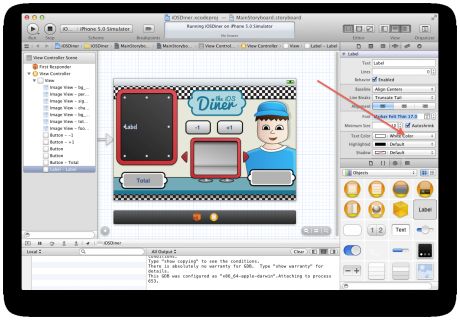
再次选中 Object Library。 拖动一个 UILabel 到黑板那张图片上。 调整它的尺寸和黑板相同。
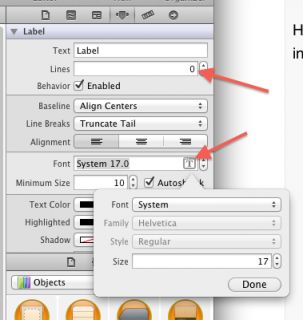
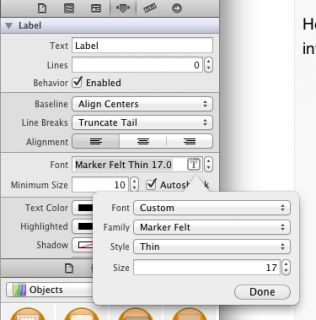
在 Attribute Inspector 中, 设置 Lines 属性为0 (这样会开启多行模式)。 修改 Text Color 的值为 white, 修改 Font 属性为 Marker Felt 17.0 (点击哪个 “T” 符号,选择 Custom,然后再选 Marker Felt)。 通常, 我觉得 Marker Felt 这个字体会是对眼睛的一个损伤,但这次看起来还可以。
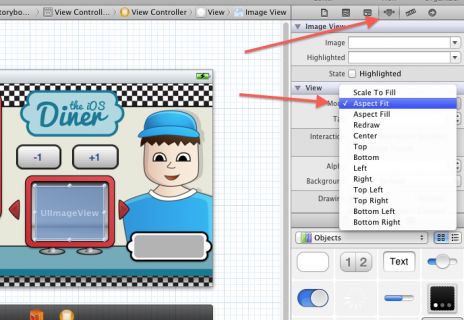
拖动一个 UIImageView 到显示器中间,然后调整它的尺寸和显示器相等大小。
在 Attributes Inspector 中, 修改 Mode 属性为 Aspect Fit。
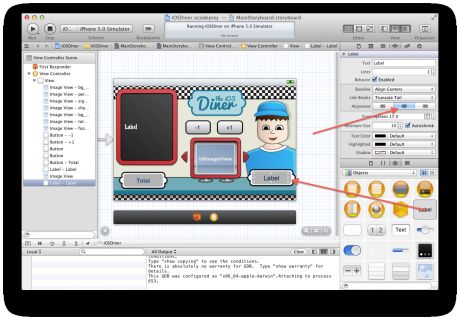
拖动另外一个 UILabel 到右下角的标志牌上面。 同样,调整它的尺寸到和灰色区域相同,并且设置 Alignment 属性为 Centered。
设置 IBOutlets 和 IBActions
现在我们需要在我们刚刚创建的用户界面和我们的代码之间建立连接。 这就是 IBOutlet 和 IBAction 的作用。 IB 指的是 Interface Builder ,用来在 Xcode 中创建用户界面。
- IBOutlet 基本上就是用户界面(例如,一个标签或一个按钮) 和我们代码中对这个元素的引用之间的一个连接。
- IBAction 是我们代码中的一个动作(或者叫方法,如果你喜欢),可以和我们设计的用户界面上的特定事件(例如,点击一个按钮) 绑定起来。
让我们来写一些代码通过 IBOutlet 和 IBAction 绑定 UI 控件吧。
关闭 Utilities 边栏并且打开 Assistant editor。根据你如何设置 Assistant editor 的显示方式, 你的屏幕上可能(或可能不是)看起来像下面的截图那样。 如果你想改变 Assistant editor 如何显示,你可以通过菜单栏中的 View – Assistant Editor 来做这件事。
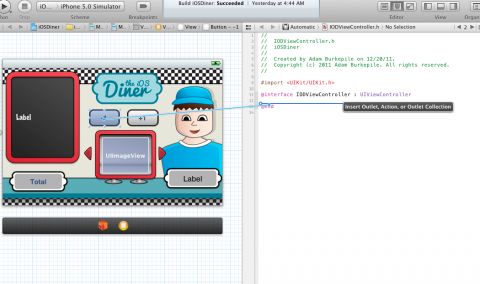
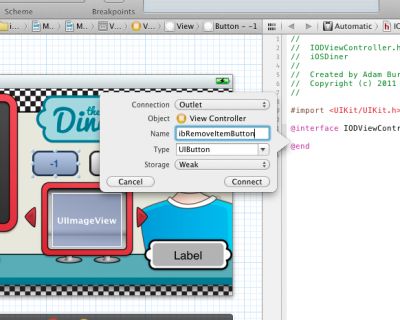
让我们从按钮开始。 选中 “-1″ 按钮, 按住 Control 键并且拖动到编辑视图中的代码中。 这样会自动为这个按钮创建一个 IBOutlet。
对于这个对象,你需要做的所有事情就是给他命名一下, 我比较喜欢为所有的 outlet 都加上一个 “ib” 前缀, 这样能让我通过Xcode 的自动完成功能很容易的找到他们。 给这个对象命名为 “ibRemoveItemButton” 并点击 Connect。
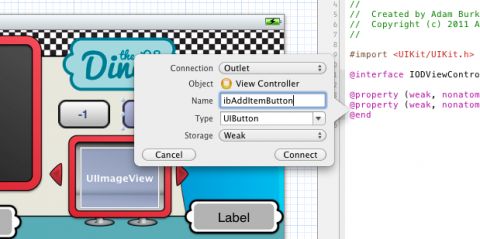
现在,为 “+1″ 这个按钮做同样的事, 并给它命名为 “ibAddItemButton”。
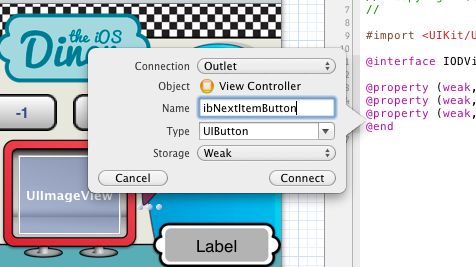
下一步,为红色箭头的按钮设置 Outlet, 给他们命名为 “ibPreviousItemButton” 和 “ibNextItemButton”.
为 total 按钮设置 Outlet,并命名为 “ibTotalOrderButton”。
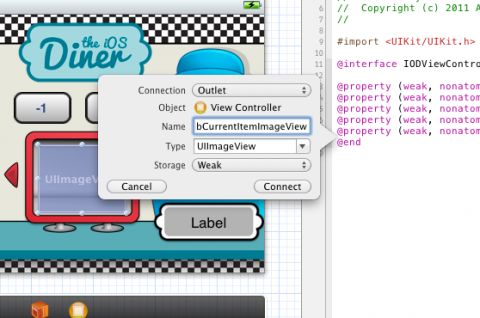
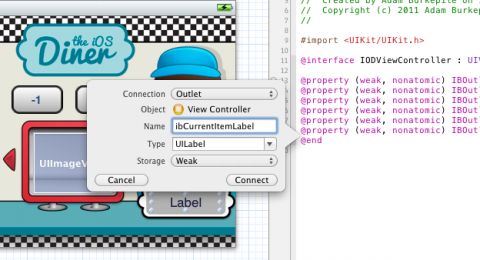
现在为 Label 和 Image View 设置 Outlet, 从左到右, 他们的名字为:
- ibChalkboardLabel
- ibCurrentItemImageView
- ibCurrentItemLabel
你的 IODViewController.h 现在看起来应该是这样:
@interface IODViewController : UIViewController @property (weak, nonatomic) IBOutlet UIButton *ibRemoveItemButton; @property (weak, nonatomic) IBOutlet UIButton *ibAddItemButton; @property (weak, nonatomic) IBOutlet UIButton *ibPreviousItemButton; @property (weak, nonatomic) IBOutlet UIButton *ibNextItemButton; @property (weak, nonatomic) IBOutlet UILabel *ibChalkboardLabel; @property (weak, nonatomic) IBOutlet UIImageView *ibCurrentItemImageView; @property (weak, nonatomic) IBOutlet UILabel *ibCurrentItemLabel; @end |
最后, 我们将要为 UIButton 添加 IBAction。 这里有一些用于响应事件的方法 (Touch Up Inside, Touch Up Outside, Touch Cancel, 等等)。 对于按钮来说,我们用的最多的就是 Touch Up Inside。
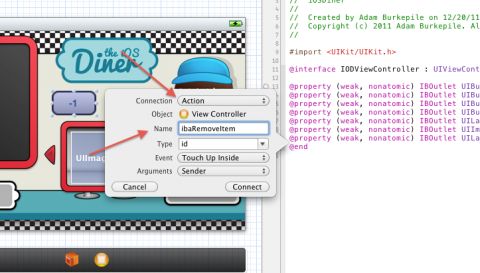
再次选中 “-1″ 按钮。 按住 Control 然后再次拖动到 .h 文件中。
要记得修改 Connection type 为 Action。
这是一个 IBAction, 所以我给他一个前缀 “iba”。 如果你愿意跟随这个习惯, 把 outlet 命名为 “ibaRemoveItem”, 然后点击 Connect。
对 “+1″ 按钮进行同样的操作, 对这个 action 命名为 “ibaAddItem”。
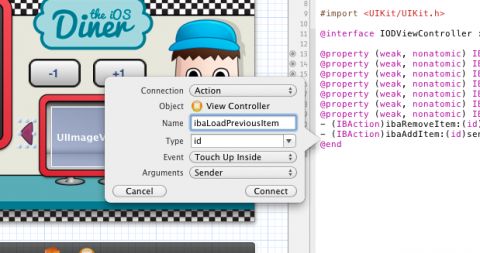
还有,为红色的左三角按钮命名为 “ibaLoadPreviousItem”。
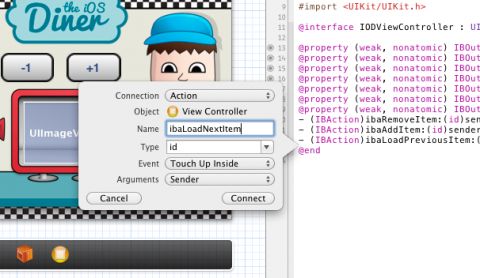
不要忘记红色右三角按钮。 他叫做 “ibaLoadNextItem”。
最后,为左下角的 “Total” 按钮添加一个 IBAction, 并给他命名为 “ibaCalculateTotal”。
设置 Web Service
在你开始编码之前, 是时候设置 web 服务了。 我不会对这个进行过多深入的讲解, 因为这个网站上已经有一些教程很好的讲解了他们 How To Write A Simple PHP/MySQL Web Service for an iOS App 和 How to Write an iOS App That Uses a Web Service
下面的代码展示了用 PHP 作为 web 服务的样子:
<?php function getStatusCodeMessage($status) { $codes = Array( 100 => 'Continue', 101 => 'Switching Protocols', 200 => 'OK', 201 => 'Created', 202 => 'Accepted', 203 => 'Non-Authoritative Information', 204 => 'No Content', 205 => 'Reset Content', 206 => 'Partial Content', 300 => 'Multiple Choices', 301 => 'Moved Permanently', 302 => 'Found', 303 => 'See Other', 304 => 'Not Modified', 305 => 'Use Proxy', 306 => '(Unused)', 307 => 'Temporary Redirect', 400 => 'Bad Request', 401 => 'Unauthorized', 402 => 'Payment Required', 403 => 'Forbidden', 404 => 'Not Found', 405 => 'Method Not Allowed', 406 => 'Not Acceptable', 407 => 'Proxy Authentication Required', 408 => 'Request Timeout', 409 => 'Conflict', 410 => 'Gone', 411 => 'Length Required', 412 => 'Precondition Failed', 413 => 'Request Entity Too Large', 414 => 'Request-URI Too Long', 415 => 'Unsupported Media Type', 416 => 'Requested Range Not Satisfiable', 417 => 'Expectation Failed', 500 => 'Internal Server Error', 501 => 'Not Implemented', 502 => 'Bad Gateway', 503 => 'Service Unavailable', 504 => 'Gateway Timeout', 505 => 'HTTP Version Not Supported' ); return (isset($codes[$status])) ? $codes[$status] : ''; } // Helper method to send a HTTP response code/message function sendResponse($status = 200, $body = '', $content_type = 'text/html') { $status_header = 'HTTP/1.1 ' . $status . ' ' . getStatusCodeMessage($status); header($status_header); header('Content-type: ' . $content_type); echo $body; } class InventoryAPI { function getInventory() { $inventory = array( array("Name"=>"Hamburger","Price"=>0.99,"Image"=>"food_hamburger.png"), array("Name"=>"Cheeseburger","Price"=>1.20,"Image"=>"food_cheeseburger.png"), array("Name"=>"Fries","Price"=>0.69,"Image"=>"food_fries.png"), array("Name"=>"Onion Rings","Price"=>0.69,"Image"=>"food_onion-rings.png"), array("Name"=>"Soda","Price"=>0.75,"Image"=>"food_soda.png"), array("Name"=>"Shake","Price"=>1.20,"Image"=>"food_milkshake.png") ); sendResponse(200, json_encode($inventory)); } } sleep(5); $api = new InventoryAPI; $api->getInventory(); ?> |
我的 web 服务是一个非常简单的 PHP 脚本, 返回一个 JSON 编码的数组。 这个数组里包含了 PHP 中的关联数组(在 Objective-C 中,这个叫做字典), 包含了名称,价格,和这个项目的图片。
唯一一个需要注意的事情,是在上面代码的倒数第三行的 sleep(5)。 我用它来模拟一个比较慢的 web 服务, 用来更好的展示 Block 如何帮助我们执行异步操作。
你可以将上面的代码拷贝到一个 .php 为扩展名的文件中,并且把他们放到某个主机上面或者干脆就用我提供的http://adamburkepile.com/inventory/。
接下来去哪 ?
这个教程的一个实例项目可以在这里下载。
哇,这是一大堆和 Block 无关的东西! 但是现在我们完成了设置视图和 web 服务, 我们可以在下一环节进入有趣的部分了: 写代码!
继续第二部分的教程,这里我们将用 Block 让我们的的晚餐应用完善起来。
到现在,加入我们的论坛来一起讨论你的问题,意见和建议吧。
如何在 iOS 5 中使用 Block (2)
这篇文章还可以在这里找到 英语
这篇文章来自 iOS 教程团队成员 Adam Burkepile, 一个全职软件咨询顾问和独立 iOS 开发者。 看看他最新的 app Pocket No Agenda , 或者在 Twitter 上面关注它。
欢迎回到 在 iOS 5 中使用 Block 系列教程 – 我们已经有了一些 Storyboard/Interface Builder 方面的实践!
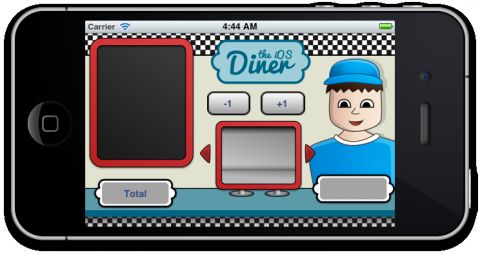
在这个教程的第一部分,我们用 iOS 5 中的 Storyboard 创建视图并且建立了一个很好看的界面, 和你在右边看到的那张截图差不多。
在这第二部分也是这个系列的最后一部分中,我们要使用 Block了! 我们将会讨论 Block 究竟是什么,它们的语法, 如何使用它们, 并且包含了大量的实例。
我们将会向你展示你怎样通过 NSArray, UIView 动画,GCD 来使用 Block, 还有其他更多!
安排好你的时间,并且实践性和快乐的阅读吧。
开始:Block 简介
Block 是 iOS 4.0 和 Mac OSX 10.6 引入的一个新特性。 Block 可以极大的简化代码。 他们可以帮助你减少代码, 减少对代理的依赖, 并且写出更加简洁,可读性强的代码。
即使有这么多好处, 还是有很多开发者没有使用 Block, 因为他们不知道如何使用。 但是 Block 绝对是你作为一个 Objective-C 程序员,一定会想要掌握的技能。
让我们来看看 Block 是谁, 是什么,在哪里用它, 为什么用它, 还有什么时候用它。
Block 是什么东西,它为什么那么重要?
Block 的核心就是一段可以在以后的时间里执行的代码。
Block 是 first-class functions, 也就是说 Block 是一个标准 Objective-C 对象。 因为他们是对象, 他们可以作为参数传递, 作为方法或函数的返回值, 赋值给变量。
在其他语言中,比如 Python,Ruby 和 Lisp, Block 又叫做闭包, 因为他们包含了定义时的状态。 Block 会为所有和它在同一作用范围内的局部变量创建一个常量拷贝。
在没有 Block 之前, 如果我们想在之后的某个时间回调一个方法, 你一般会用代理或者 NSNotificationCenter。 这样也不错, 除了一点,它会让你的代码到处都是 – 你在一个地方开启了一个任务, 然后在另外一个地方处理它的结果。
Block 是非常不错的, 因为它能将和一个任务相关的所有代码都放在一个地方, 你马上就会看到。
Block 为谁准备?
你! Block 是为每一个人准备的! 严格的说, Block 是为每个人和每个将要用到 Block 的人准备的。 Block 是未来的趋势, 所以你最好现在也学一下。 很多内建的方法已经用 Block 重写或者提供了接受 Block 参数的版本。
你怎样用 Block?
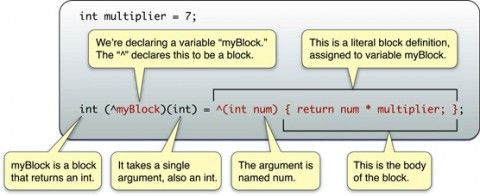
这张 iOS Developer Library 中的图片很好的解释了 Block 的语法:
Block 的声明格式如下:
return_type (^block_name)(param_type, param_type, ...) |
如果你之前使用过其他 C 类型的语言,那这段代码你应该看起来很眼熟, 除了这个 ^ 符号。 ^ 这个符号表示了 “我们定义的这个东西是一个 Block”。
如果你能分析到 ^ 符号的意思 “我是一个 Block” ,那么祝贺你 – 你已经了解了 Block 中最难的部分! :]
注意这里不需要参数的名称, 不过,如果你喜欢的话,你也可以加上它们。
下面是定义 Block 的一个例子:
int (^add)(int,int) |
下面是 Block 的定义格式:
// Block Definition ^return_type(param_type param_name, param_type param_name, ...) { ... return return_type; } |
这就是 Blcok 实际是怎么创建的。 Block 还有另外一种不同的定义方法。 以 ^ 符号起始,后面跟随着参数,这里的参数必须有参数名, 还必须和它要赋值到的 Block 声明中参数列表里面的参数类型和顺序相匹配。下面是实际的代码。
当你定义 Block 时, 返回值类型是可选的,并且可以继承它里面代码的返回值类型。 如果它里面有多条 return 语句,那么这些语句返回的类型必须都是相同的 (或者强制转换到相同的类型)。
这里是 Block 定义的一个例子:
^(int number1, int number2){ return number1+number2 } |
如果我们将 Block 的声明和定义放在一起, 我们会得到这样一个语句:
int (^add)(int,int) = ^(int number1, int number2){ return number1+number2; } |
我们可以这样使用 Block:
int resultFromBlock = add(2,2); |
让我们看一看,使用 Block 和不使用 Block 之间对比的一些例子。
示例: NSArray
让我们看看 Block 如何改变我们操作数组的方式。
首先,让我们看一下一般情况下处理循环的方式:
BOOL stop; for (int i = 0 ; i < [theArray count] ; i++) { NSLog(@"The object at index %d is %@",i,[theArray objectAtIndex:i]); if (stop) break; } |
上面方法中的 “stop” 变量,可能会让你不太明白。 但是如果用 Block 的方式实现它,你就会很清楚的看明白了。 Block 提供了一个 “stop” 变量能让你在任何时候停止循环,我们简单的复制了这个功能来支持和 Block 的方式等同的效果。
现在,让我们看看用快速枚举的方法实现同样的功能:
BOOL stop; int idx = 0; for (id obj in theArray) { NSLog(@"The object at index %d is %@",idx,obj); if (stop) break; idx++; } |
现在,用 Block:
[theArray enumerateObjectsUsingBlock:^(id obj, NSUInteger idx, BOOL *stop){ NSLog(@"The object at index %d is %@",idx,obj); }]; |
在上面这个基于 Block 的代码中,你可能会好奇 “stop” 这个变量到底是什么。 这个变量可以在 block 中赋值为 YES, 这样就后续的任何循环都不会继续了。 这是传递到 enumerateObjectsUsingBlock 方法的 Block 中的其中一个参数。
上面这个例子有些微不足道, 而且也很难明显的体现出 Block 所到来的好处。 但是我想给大家指出 Block 的两点好处:
- 简单性. 使用 Block 我们可以不写任何附加的代码就可以访问对象,对象在数组中的索引,stop 变量。 这意味着少量的代码,减少了发生编码错误的机会(当然,并非我们一定会出现编码错误)。
- 速度. 使用 Block 在执行速度上要比使用快速枚举快。 在我们这个例子中,这点微小的速度提升不值得一提,但是在更复杂的情况下,这个优势就越来越重要。(来源)
示例: UIView Animation
让我们对一个单独的 UIView 执行一个简单的动画。 它将视图的透明度调整为 0,将这个视图向下和向右移动 50 点。 然后将这个 UIView 从它的 superview 中删除掉, 很简单,对吗?
非 Block 的实现方式:
- (void)removeAnimationView:(id)sender { [animatingView removeFromSuperview]; } - (void)viewDidAppear:(BOOL)animated { [super viewDidAppear:animated]; [UIView beginAnimations:@"Example" context:nil]; [UIView setAnimationDuration:5.0]; [UIView setAnimationDidStopSelector:@selector(removeAnimationView)]; [animatingView setAlpha:0]; [animatingView setCenter:CGPointMake(animatingView.center.x+50.0, animatingView.center.y+50.0)]; [UIView commitAnimations]; } |
Block 的实现方式:
- (void)viewDidAppear:(BOOL)animated { [super viewDidAppear:animated]; [UIView animateWithDuration:5.0 animations:^{ [animatingView setAlpha:0]; [animatingView setCenter:CGPointMake(animatingView.center.x+50.0, animatingView.center.y+50.0)]; } completion:^(BOOL finished) { [animatingView removeFromSuperview]; }]; } |
如果我们仔细看一看这两个方法, 就会发现有 3 个优势:
- 更简单的代码 使用 Block, 我们不再需要单独定义一个回调方法, 或者调用 beginAnimations/commitAnimations 。
- 保持代码在一起 使用 Block, 我们不再需要在一个地方开启动画,然后再另外一个地方处理回调。 所有和我们动画相关的代码都在一处, 这样让他的可读性和维护性更强。
- 苹果推荐这样 这里有一个现实的例子, 苹果已经用 Block 重写了之前的一些功能, 现在苹果官方也推荐,如果可能的话,尽量迁移到基于 Block 的方法上面。 (来源)
什么时候用 Blocks
我认为最佳的建议是, 在最合适用 Block 的地方使用它。 这里你可能会出于向后兼容或者更加熟悉以前的方式的原因,从而还要用老的方法。
但是每次你面临这种决策的时候, 想一想 Block 是否能让你更轻松以及你是否能用基于 Block 的方式代替现有代码。 然后选择一个对你最有价值的方法。
当然,你可能会发现,在以后的时间里, 你需要越来越多的使用 Block, 因为大多数框架,无论是第三方的还是苹果自己的,都正在用 Block 重写。所以为了让你未来更加轻松,现在就开始使用 Block 吧。
回到 iOS 晚餐应用: 设置实体类
你将要回顾一下你在第一部分所学到的东西。 如果你没有看过第一部分或者仅仅需要一个全新的开始, 你可以在这里下载当前的项目。
在 Xcode 打开项目,切换到 Project Navigator。 右键点击 iOSDiner 然后选择 New Group。 给他命名为 “Models”。
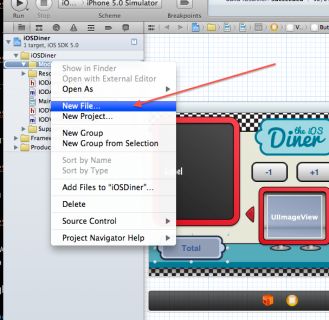
右键点击 Models 目录,然后选择 New File。 选择 Objective-C Class。 给这个类命名为 “IODItem”,让他继承自 NSObject。
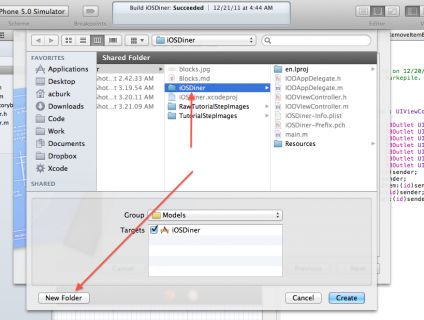
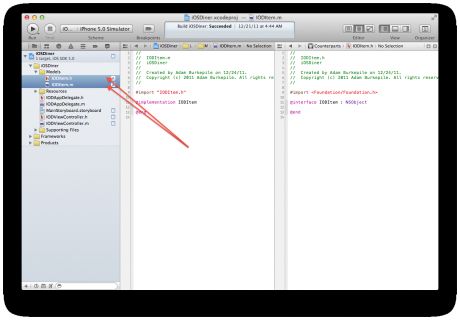
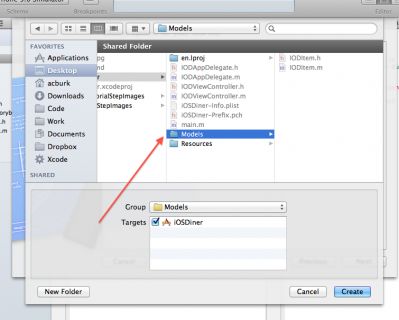
选择 iOSDiner 作为文件的位置, 然后点击 New Folder 在文件系统中创建一个 Models 目录。 确保选中这个新创建的 Models 目录,然后点击 Create 按钮。 这会为 IODItem 创建 .h 和 .m 文件。
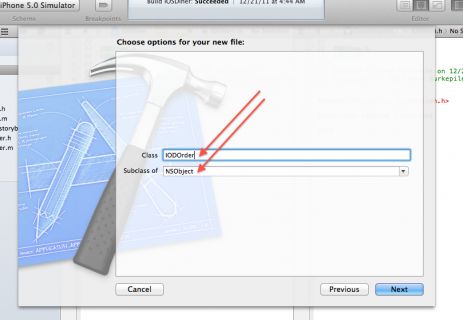
用同样的方式创建 IODOrder 类。 右键点击 Models 目录,然后点击 New File。 选择 Objective-C Class。 类的名称为 “IODOrder” ,继承自 NSObject。
确保 Models 目录处于选中状态, 然后点击 Create 按钮。
现在所有你需要的类都创建好了, 是时候开始写代码了!
设置 IODItem 类的基本属性
打开 IODItem.h。 首先你要做的是为这个类添加 NSCopying 协议。
协议是为一个类指定它要实现什么方法的一种方式。 一般来说,如果一个类实现了一个协议,那么这个类就需要实现这个协议中声明的 required 和 optional 的方法。要实现 NSCopying 协议, 可以这样修改 IODItem.h:
@interface IODItem : NSObject <NSCopying> |
接下来,为 item 添加一些属性。 item 有名称,价格和图片文件这些属性。 把下面这些属性添加到刚才修改的那行代码的下面。 现在,完成后的 .h 文件应该是这样子:
#import <Foundation/Foundation.h> @interface IODItem : NSObject <NSCopying> @property (nonatomic,strong) NSString* name; @property (nonatomic,assign) float price; @property (nonatomic,strong) NSString* pictureFile; @end |
现在,切换到 IODItem.m 在 @implementation IODItem 的下面添加这些属性的 @synthesize 声明。
@synthesize name; @synthesize price; @synthesize pictureFile; |
如果你现在就编译构建项目,你将会看到这样一个警告:
这个警告所指的是你在上面添加的 NSCopying 协议。还记不记得我说的协议可能会定义 required 方法? NSCopying 协议必须实现 -(id)copyWithZone:(NSZone *)zone 方法。 因为你没有实现它,这个类是不完整的 – 因此出现了警告!
将下面的代码添加到 IODItem.m 的结尾(在 @end 之前)。
-(id)copyWithZone:(NSZone *)zone { IODItem* newItem = [IODItem new]; [newItem setName:[self name]]; [newItem setPrice:[self price]]; [newItem setPictureFile:[self pictureFile]]; return newItem; } |
哇,没有任何警告了!
这些代码所做的就是创建一个新的 IODItem 实例, 将它的属性设置成和当前的对象中的一样, 然后返回一个新的实例。
你还需要去设置初始化方法。 这个方法是你在初始化一个新实例时候给对象的属性设置默认值的一个比较快捷的方式。 在IODItem.m 的结尾添加如下代码:
- (id)initWithName:(NSString*)inName andPrice:(float)inPrice andPictureFile:(NSString*)inPictureFile { if (self = [self init]) { [self setName:inName]; [self setPrice:inPrice]; [self setPictureFile:inPictureFile]; } return self; } |
切换回到 IODItem.h 在文件的结尾(@end 前面),添加上面那个方法的原型声明。
- (id)initWithName:(NSString*)inName andPrice:(float)inPrice andPictureFile:(NSString*)inPictureFile; |
设置 IODOrder 的基本属性
下一步,我们将处理另外一个类,IODOrder。 这个类代表了订单和对订单的一些操作: 增加订单项, 删除订单项,计算订单总数和输出订单的摘要。
切换到 IODOrder.h, 在 @interface 之前增加下面的代码,来让 IODOrder 知道有一个名为 IODItem 的类。
@class IODItem; |
在 @interface 里面, 增加如下属性:
@property (nonatomic,strong) NSMutableDictionary* orderItems; |
这是一个字典,用于保存用户提交的订单。 切换到 IODOrder.m 然后在文件顶部导入 IODItem 类的头文件。
#import "IODItem.h" |
然后在 @implementation IODOrder 的下面声明这个属性的 synthesize。
@synthesize orderItems; |
设置 IODViewController 的基本属性
切换到 IODViewController.h 增加一个实例变量和两个属性。 将 “@interface IODViewController : UIViewController” 替换成如下:
@class IODOrder; @interface IODViewController : UIViewController { int currentItemIndex; } @property (strong, nonatomic) NSMutableArray* inventory; @property (strong, nonatomic) IODOrder* order; |
currentItemIndex 变量记录了用户当前浏览的哪个商品。 inventory 这个变量顾名思义, 它是一个包含 IODItem 对象的数组,我们会从 web service 中得到它。 order 是 IODOrder 类的一个实例, 它保存了用户当前的订单。
切换到 IODViewController.m 并且做这些事情:
- 导入 IODItem 和 IODOrder 类
- 为 inventory 和 order 属性添加 @synthesize 声明
- 在 viewDidLoad 方法中初始化 currentItemIndex 为 0
- 设置 order 属性为一个新的 IODOrder 实例
当你都完成时,它看起来应该是这样:
#import "IODViewController.h" #import "IODItem.h" // <---- #1 #import "IODOrder.h" // <---- #1 @implementation IODViewController // ... Other synthesize statements ... @synthesize inventory; // <---- #2 @synthesize order; // <---- #2 // ... didReceiveMemoryWarning - not relevant to discussion ... #pragma mark - View lifecycle - (void)viewDidLoad { [super viewDidLoad]; currentItemIndex = 0; // <---- #3 self.order = [IODOrder new]; // <---- #4 } |
构建一下项目。 一切都平稳的运行起来, 没有任何警告消息。
加载商品清单
你稍后会添加 retrieveInventoryItems 方法, 将会从 web service 中下载和处理商品清单。 这是一个类方法,不是实例方法。
注意: 类方法通过开头的 + 符号来定义。 实例方法通过 – 符号来定义。
在 IODItem.m 文件顶部的 #import 下面,增加如下代码:
#define kInventoryAddress @"http://adamburkepile.com/inventory/" |
注意: 如果你使用自己的 web 服务器,修改上面的 URL,指向你自己的服务器。
将下面的方法添加到 IODItem.m 文件的 @end 前面:
+ (NSArray*)retrieveInventoryItems { // 1 - Create variables NSMutableArray* inventory = [NSMutableArray new]; NSError* err = nil; // 2 - Get inventory data NSArray* jsonInventory = [NSJSONSerialization JSONObjectWithData:[NSData dataWithContentsOfURL:[NSURL URLWithString:kInventoryAddress]] options:kNilOptions error:&err]; // 3 - Enumerate inventory objects [jsonInventory enumerateObjectsUsingBlock:^(id obj, NSUInteger idx, BOOL *stop) { NSDictionary* item = obj; [inventory addObject:[[IODItem alloc] initWithName:[item objectForKey:@"Name"] andPrice:[[item objectForKey:@"Price"] floatValue] andPictureFile:[item objectForKey:@"Image"]]]; }]; // 4 - Return a copy of the inventory data return [inventory copy]; } |
你的第一个 Block! 让我们仔细看看这段代码,看看它都做了什么:
- 首先,你定义了一个用来存放返回的对象的数组,还有一个 error 指针。
- 我们用一个普通的 NSData 对象来从 web service 中下载数据, 然后将这个 NSData 对象传递给 iOS 中新的 JSON 数据服务中。 这样可以将原始数据解析成 Objective-C 中的对象类型((NSArrays, NSDictionaries, NSStrings, NSNumbers, 等等)。
- 接下来,我们用之前讨论过的 enumerateObjectsUsingBlock: 方法,将这些 NSDictionary 中的普通对象转换为 IODItem 类的对象。 我们在 jsonInventory 数组中调用 enumerateObjectsUsingBlock: 方法, 用 Block 遍历它,然后在里面将传递给 Block 的对象强制转换为 NSDictionary 对象。 用这个 NSDictionary 对象来创建新的 IODItem, 最后将这个新的对象添加到要作为返回值的 inventory 数组中,
- 最后,我们返回 inventory 数组。 注意,我们返回了这个数组的一个拷贝,而不是直接返回它, 因为我们不想返回一个可变数组。 copy 方法创建的是一个不可变数组,你可以安全的返回它。
现在,切换回到 IODItem.h 添加这个方法的原型声明:
+ (NSArray*)retrieveInventoryItems; |
Dispatch Queues 和 Grand Central Dispatch
另外一个对我们很有用的概念就是 dispatch queue。 切换到 IODViewController.m 然后在 @implementation 块中的 @synthesize 声明下面,添加如下语句。
dispatch_queue_t queue; |
然后, 在 viewDidLoad 方法中的最后一行,添加这行代码:
queue = dispatch_queue_create("com.adamburkepile.queue",nil); |
dispatch_queue_create 方法的第一个参数是队列的名称。 你可以用任何方式给它命名, 但它必须在整个系统中是唯一的。 这也是苹果为什么推荐使用反向 DNS 风格的名称。
你需要在控制器的 dealloc 方法中释放掉这个队列。 即便你在项目中使用了 ARC, 但是 ARC 不会管理 dispatch queue, 所以你需要手动的释放他。但是记住在开启 ARC 的情况下,你不需要在 dealloc 方法中调用 [super dealloc]。 所以,添加如下代码:
-(void)dealloc { dispatch_release(queue); } |
现在,让这个队列运转起来, 在 viewDidAppear 方法中现有代码的下面增加如下三行代码:
// 1 - Set initial label text ibChalkboardLabel.text = @"Loading Inventory..."; // 2 - Get inventory self.inventory = [[IODItem retrieveInventoryItems] mutableCopy]; // 3 - Set inventory loaded text ibChalkboardLabel.text = @"Inventory LoadednnHow can I help you?"; |
运行应用。
有些地方好像不对,是吧? 你通过定义在 IODItem 中的 retrieveInventoryItems 方法来调用 web service, 返回商品清单,并且把他们赋值给 inventory 数组。
要记住, 我们在第一部分中为这个 PHP web service 设置了5秒的延迟。 但是当我们运行应用时,是不会先显示 “Loading Inventory…” ,然后等待5秒钟,再显示 “Inventory Loaded.” 的。 它实际上是会在应用启动 5 秒后,直接显示 “Inventory Loaded”, 不会显示 “Loading Inventory….” !
这个问题在于: 调用 web service 时, 阻塞和冻结了主线程, 不允许它修改 label 中的文本。 如果有另外一个队列,你能够在它上面处理一下需要时间较长的操作, 这样就不会影响主线程的执行了。
等一下! 我们已经创建了另外一个队列! 这就是 Grand Central Dispatch 和 Block 帮助我们简单的解决这个问题的方式。 使用 Grand Central Dispatch, 我们可以将一个任务(以 Block 的形式)指定到我们另外的队列上, 这样就不会阻塞主线程了。
将 viewDidAppear 的第二行和第三行代码替换成这样:
// 2 - Use queue to fetch inventory and then set label text dispatch_async(queue, ^{ self.inventory = [[IODItem retrieveInventoryItems] mutableCopy]; dispatch_async(dispatch_get_main_queue(), ^{ ibChalkboardLabel.text = @"Inventory LoadednnHow can I help you?"; }); }); |
注意这里有两个不同的 Block, 他们都返回 void 类型,并且不接收参数。
再运行一下应用,一切看起来都很完美。
你是否对我们第二次调用 dispatch_async 来设置 label 的文本感到奇怪? 当你设置 label 的文本时, 你会更新 UI 元素, 任何更新 UI 元素的操作都必须在主线程上面执行。 所以我们再一次调用 dispatch_async, 但这次是在 main queue 上面,并在 main queue 上执行我们的 Block。
在当一个操作需要很长时间,然后还需要后续的更新 UI 的操作时,这种从一个后台队列到主队列的跳转和嵌套, 是很普遍的。
Grand Central Dispatch 是一个很复杂的系统, 在这个简短的教程中,你不能完全的领会和理解它。 如果你感兴趣的话, 我建议你读一读 Multithreading and Grand Central Dispatch on iOS for Beginners 这篇教程。
增加辅助方法
你从 web service 中下载并存储了商品清单。 现在你将要创建三个辅助方法来帮助你将存储的商品信息显示给用户。
第一个方法是 findKeyForOrderItem:, 将要增加到 IODOrder.m。 这个方法不会有直接的作用, 但是它是访问 item 字典的必须的方法。
添加如下代码到 IODOrder.m 类的结尾(在 @end 之前):
- (IODItem*)findKeyForOrderItem:(IODItem*)searchItem { // 1 - Find the matching item index NSIndexSet* indexes = [[self.orderItems allKeys] indexesOfObjectsPassingTest:^BOOL(id obj, NSUInteger idx, BOOL *stop) { IODItem* key = obj; return [searchItem.name isEqualToString:key.name] && searchItem.price == key.price; }]; // 2 - Return first matching item if ([indexes count] >= 1) { IODItem* key = [[self.orderItems allKeys] objectAtIndex:[indexes firstIndex]]; return key; } // 3 - If nothing is found return nil; } |
让我们看看这个函数具体做了什么。 但是在这之前,我还要解释一下为什么这些是必须的。 IODOrder 包含了一个叫做 orderItems 的属性, 它是一个键-值对字典。 键是 IODItem, 而值是一个 NSNumber, 用来表示一个特定的商品被订购了多少次。
在理论上都没问题, 但是有一点比较奇怪的是, 当你给 NSDictionary 设置一些键的时候, 它不是直接将这个对象赋值过去, 而是创建了这个对象的一个拷贝用作键。 这就代表你用作键的对象必须遵循 NSCopying 协议。 (这也是为什么你之前要给 IODItem 实现 NSCopying 协议的原因)。
事实上 orderItems 字典中的键和 inventory 数组中的 IODItem 对象从技术上来说不是同一个对象(即便他们有相同的属性), 这就意味着你不能通过简单的比较来搜索键。 你必须比较每一个对象的 name 和 price 属性来确定他们是否是相同的对象。 这也是上面的函数做的事情: 它通过比较键的所有属性来找到我们要搜索的那个。
按照上面说的,这是这些代码做的事情:
- 这里你遍历了 orderItems 字典中的所有键,并且用 indexesOfObjectsPassingTest: 方法来确定这个键的 name 和 price 是否和我们要查找的相匹配。 这也是 Block 的另一个例子。 注意在 ^ 符号后面的 BOOL。 这是返回类型。 这是数组特有的一个方法,并且通过 Block 来比较两个对象,返回所有符合我们指定的测试条件的对象的索引。
- 然后直接得到返回的这些索引, 并且返回这些索引中的第一个。
- 如果没有找到符合条件的键,则返回 nil。
不要忘记在 IODOrder.h 中增加方法的原型声明:
- (IODItem*)findKeyForOrderItem:(IODItem*)searchItem; |
现在切换到 IODViewController.m 中,在文件的最后添加如下方法:
- (void)updateCurrentInventoryItem { if (currentItemIndex >= 0 && currentItemIndex < [self.inventory count]) { IODItem* currentItem = [self.inventory objectAtIndex:currentItemIndex]; ibCurrentItemLabel.text = currentItem.name; ibCurrentItemImageView.image = [UIImage imageNamed:[currentItem pictureFile]]; } } |
通过 currentItemIndex 和 inventory 数组, 这个方法为当前选中的商品设置了显示的名称和图片。
还是在 IODViewController.m 中添加:
- (void)updateInventoryButtons { if (!self.inventory || [self.inventory count] == 0) { ibAddItemButton.enabled = NO; ibRemoveItemButton.enabled = NO; ibNextItemButton.enabled = NO; ibPreviousItemButton.enabled = NO; ibTotalOrderButton.enabled = NO; } else { if (currentItemIndex <= 0) { ibPreviousItemButton.enabled = NO; } else { ibPreviousItemButton.enabled = YES; } if (currentItemIndex >= [self.inventory count]-1) { ibNextItemButton.enabled = NO; } else { ibNextItemButton.enabled = YES; } IODItem* currentItem = [self.inventory objectAtIndex:currentItemIndex]; if (currentItem) { ibAddItemButton.enabled = YES; } else { ibAddItemButton.enabled = NO; } if (![self.order findKeyForOrderItem:currentItem]) { ibRemoveItemButton.enabled = NO; } else { ibRemoveItemButton.enabled = YES; } if ([order.orderItems count] == 0) { ibTotalOrderButton.enabled = NO; } else { ibTotalOrderButton.enabled = YES; } } } |
这是这三个辅助方法中最长的一个, 但也是非常简单的一个。 这个方法通过查找应用多个可能的状态,来决定这些按钮是否可用或禁用。
例如,如果 currentItemIndex 是 0, 前一项按钮就是禁用的, 因为你不能再往前了。 如果 orderItems 为 0, 那么总订单数这个按钮就是禁用的, 因为没有用来计算总数的东西。
在 IODViewController.h 类中添加这两个方法的原型声明:
- (void)updateCurrentInventoryItem; - (void)updateInventoryButtons; |
好了! 有了这些辅助方法, 就可以看看效果了。 回到 IODViewController.m 中的 viewDidAppear 方法, 在第一行代码前面添加如下语句:
// 0 - Update buttons [self updateInventoryButtons]; |
然后,将第二部分替换成下面这样:
// 2 - Use queue to fetch inventory and then update UI dispatch_async(queue, ^{ self.inventory = [[IODItem retrieveInventoryItems] mutableCopy]; dispatch_async(dispatch_get_main_queue(), ^{ [self updateInventoryButtons]; [self updateCurrentInventoryItem]; ibChalkboardLabel.text = @"Inventory LoadednnHow can I help you?"; }); }); |
构建并且运行项目:
哈哈! 汉堡包。。。 我还希望看到其他食物, 所以让我们让那些按钮也工作起来。
当你在 storyboard 中创建好 action 后, ibaLoadNextItem: 和 ibaLoadPreviousItem: 方法就也跟着建立好了。 接下来,我们将如下代码添加到这些方法中:
- (IBAction)ibaLoadPreviousItem:(id)sender { currentItemIndex--; [self updateCurrentInventoryItem]; [self updateInventoryButtons]; } - (IBAction)ibaLoadNextItem:(id)sender { currentItemIndex++; [self updateCurrentInventoryItem]; [self updateInventoryButtons]; } |
通过你上面创建的辅助方法的帮助, 切换商品仅仅需要改变一下 currentItemIndex 的值,然后刷新一下屏幕显示就可以了。 没有比这更容易的吧? 现在你有了一餐厅的食物供你选择!
编译一下,然后看看在菜单中切换食物是多么的简单。
增加和删除当前商品
很不幸,你有了一个菜单,但是服务员不能下订单。 或者,换一种说法, 添加/删除 按钮不管用。 是时候修改它了。
你需要在 IODOrder 类中定义另外一个辅助方法, 切换到 IODOrder.m 并且增加如下方法:
- (NSMutableDictionary *)orderItems{ if (!orderItems) { orderItems = [NSMutableDictionary new]; } return orderItems; } |
这仅仅是一个 orderItems 的 getter 方法。 如果 orderItems 被赋了值, 它将返回那个对象。 如果它还没被赋值, 它会创建一个新的字典然后将它赋给 orderItems, 并且返回它。
接下来你要修改 orderDescription 方法。 这个方法将会提供你要打印在黑板上面的字符串。 将如下代码添加到IODOrder.m 中:
- (NSString*)orderDescription { // 1 - Create description string NSMutableString* orderDescription = [NSMutableString new]; // 2 - Sort the order items by name NSArray* keys = [[self.orderItems allKeys] sortedArrayUsingComparator:^NSComparisonResult(id obj1, id obj2) { IODItem* item1 = (IODItem*)obj1; IODItem* item2 = (IODItem*)obj2; return [item1.name compare:item2.name]; }]; // 3 - Enumerate items and add item name and quantity to description [keys enumerateObjectsUsingBlock:^(id obj, NSUInteger idx, BOOL *stop) { IODItem* item = (IODItem*)obj; NSNumber* quantity = (NSNumber*)[self.orderItems objectForKey:item]; [orderDescription appendFormat:@"%@ x%@n", item.name, quantity]; }]; // 4 - Return order description return [orderDescription copy]; } |
我将分开来讲解这些:
- 这个字符串是用来描述订单的。 订单中的所有商品都会被添加到这个字符串中。
- 这段代码得到一个由 orderItems 字典中的键所组成的数组,并且用一个 Block 方法 sortedArrayUsingComparator: 来根据这些键的 name 属性进行排序。
- 然后对这个已经排序好的数组调用 enumerateObjectsUsingBlock: 方法。 将每一个键都转换成 IODItem 对象, 得到它对应的值(订单的数量), 然后将这个字符串添加到 orderDescription 上面。
- 最后,返回 orderDescription 字符串, 但是你返回的是它的一个拷贝,一个不可修改的版本。
切换到 IODOrder.h 添加这两个方法的原型声明:
- (NSMutableDictionary *)orderItems; - (NSString*)orderDescription; |
现在你可以从 order 对象中得到当前订单的字符串了, 切回到 IODViewController.m 添加一个方法来调用它。 你可以将这个方法添加到文件的末尾。
- (void)updateOrderBoard { if ([order.orderItems count] == 0) { ibChalkboardLabel.text = @"No Items. Please order something!"; } else { ibChalkboardLabel.text = [order orderDescription]; } } |
这个方法查看订单中的商品数量, 如果数量为 0, 它返回一个静态字符串用来表示订单中没有任何商品。 另一种情况, 这个方法使用定义在 IODOrder 中的 orderDescription 方法返回的一个代表订单中所有商品数量清单的一个字符串。
在 IODViewController.h 中增加方法的原型声明:
- (void)updateOrderBoard; |
现在你可以根据当前的订单来更新黑板显示了, 替换 IODViewController.m 中的 viewDidAppear 方法里面的第二部分:
// 2 - Use queue to fetch inventory and then then update UI dispatch_async(queue, ^{ self.inventory = [[IODItem retrieveInventoryItems] mutableCopy]; dispatch_async(dispatch_get_main_queue(), ^{ [self updateOrderBoard]; // <---- Add [self updateInventoryButtons]; [self updateCurrentInventoryItem]; ibChalkboardLabel.text = @"Inventory LoadednnHow can I help you?"; }); }); } |
我发现这个有点无意义,因为你在后面那行代码中又给这个 label 设置了初始值,但是处于一致性的考虑,这也不是一个坏主意。
下一个你要实现的方法将会把商品添加到订单中去。 切换到 IODOrder.m 并添加这个方法:
- (void)addItemToOrder:(IODItem*)inItem { // 1 - Find item in order list IODItem* key = [self findKeyForOrderItem:inItem]; // 2 - If the item doesn't exist, add it if (!key) { [self.orderItems setObject:[NSNumber numberWithInt:1] forKey:inItem]; } else { // 3 - If item exists, update the quantity NSNumber* quantity = [self.orderItems objectForKey:key]; int intQuantity = [quantity intValue]; intQuantity++; // 4 - Update order items list with new quantity [self.orderItems removeObjectForKey:key]; [self.orderItems setObject:[NSNumber numberWithInt:intQuantity] forKey:key]; } } |
一步一步的讲解:
- 你用之前创建过的方法来找到这个商品在订单中所对应的 key。 记住,如果这个对象没有找到,它会返回一个 nil。
- 如果在订单中没有找到这个对象, 那么将这个商品的键添加到订单中,并将它所对应的值设置为1。
- 如果找到了这个对象, 我们得到数量值,存放到一个变量中,并且加 1。
- 最后,我们删除之前的键值,并且用刚刚更新过的数量值,增加一个新的键值对。
removeItemFromOrder: 方法和 addItemToOrder: 方法非常相似。 在 IODOrder.m 中增加如下代码:
- (void)removeItemFromOrder:(IODItem*)inItem { // 1 - Find the item in order list IODItem* key = [self findKeyForOrderItem:inItem]; // 2 - We remove the item only if it exists if (key) { // 3 - Get the quanity and decrement by one NSNumber* quantity = [[self orderItems] objectForKey:key]; int intQuantity = [quantity intValue]; intQuantity--; // 4 - Remove object from array [[self orderItems] removeObjectForKey:key]; // 5 - Add a new object with updated quantity only if quantity > 0 if (intQuantity > 0) [[self orderItems] setObject:[NSNumber numberWithInt:intQuantity] forKey:key]; } } |
注意一下,我们从订单中删除商品时,只需要在找到这个对象的时候才进行操作。 如果找到这个商品, 我们得到它的数量, 并且减1,如果减1之后数量大于0, 那么就删除键值对, 然后重新用新的数量值插入一个新的键值对。
切换到 IODOrder.h 增加原型声明:
- (void)addItemToOrder:(IODItem*)inItem; - (void)removeItemFromOrder:(IODItem*)inItem; |
现在我们切换到 IODViewController.m 并且在 add 和 remove 两个事件中调用我们刚刚创建的辅助方法:
- (IBAction)ibaRemoveItem:(id)sender { IODItem* currentItem = [self.inventory objectAtIndex:currentItemIndex]; [order removeItemFromOrder:currentItem]; [self updateOrderBoard]; [self updateCurrentInventoryItem]; [self updateInventoryButtons]; } - (IBAction)ibaAddItem:(id)sender { IODItem* currentItem = [self.inventory objectAtIndex:currentItemIndex]; [order addItemToOrder:currentItem]; [self updateOrderBoard]; [self updateCurrentInventoryItem]; [self updateInventoryButtons]; } |
对于所有这两个方法, 我们所做的都是得到 inventory 数组中当前的商品, 将这个对象传递给定义在 IODOrder 中的 addItemToOrder: 或 removeItemFromOrder: 方法,并且通过辅助方法来更新 UI 显示。
再次构建和运行项目, 你应该看到,你现在可以向订单中增加商品,并且黑板上面会更新你的订单内容。
UIAnimation
让我们回顾一下,并且用另外一个 Block 方法来增加一些可视效果。 替换 ibaRemoveItem: 和 ibaAddItemMethod: 方法的代码:
- (IBAction)ibaRemoveItem:(id)sender { IODItem* currentItem = [self.inventory objectAtIndex:currentItemIndex]; [order removeItemFromOrder:currentItem]; [self updateOrderBoard]; [self updateCurrentInventoryItem]; [self updateInventoryButtons]; UILabel* removeItemDisplay = [[UILabel alloc] initWithFrame:ibCurrentItemImageView.frame]; [removeItemDisplay setCenter:ibChalkboardLabel.center]; [removeItemDisplay setText:@"-1"]; [removeItemDisplay setTextAlignment:UITextAlignmentCenter]; [removeItemDisplay setTextColor:[UIColor redColor]]; [removeItemDisplay setBackgroundColor:[UIColor clearColor]]; [removeItemDisplay setFont:[UIFont boldSystemFontOfSize:32.0]]; [[self view] addSubview:removeItemDisplay]; [UIView animateWithDuration:1.0 animations:^{ [removeItemDisplay setCenter:[ibCurrentItemImageView center]]; [removeItemDisplay setAlpha:0.0]; } completion:^(BOOL finished) { [removeItemDisplay removeFromSuperview]; }]; } - (IBAction)ibaAddItem:(id)sender { IODItem* currentItem = [self.inventory objectAtIndex:currentItemIndex]; [order addItemToOrder:currentItem]; [self updateOrderBoard]; [self updateCurrentInventoryItem]; [self updateInventoryButtons]; UILabel* addItemDisplay = [[UILabel alloc] initWithFrame:ibCurrentItemImageView.frame]; [addItemDisplay setText:@"+1"]; [addItemDisplay setTextColor:[UIColor whiteColor]]; [addItemDisplay setBackgroundColor:[UIColor clearColor]]; [addItemDisplay setTextAlignment:UITextAlignmentCenter]; [addItemDisplay setFont:[UIFont boldSystemFontOfSize:32.0]]; [[self view] addSubview:addItemDisplay]; [UIView animateWithDuration:1.0 animations:^{ [addItemDisplay setCenter:ibChalkboardLabel.center]; [addItemDisplay setAlpha:0.0]; } completion:^(BOOL finished) { [addItemDisplay removeFromSuperview]; }]; } |
上面的东西看起来代码量很大,但是它其实是很简单的。 我们添加的新代码的第一部分仅仅是创建了一个 UILabel 并且设置了它的一些属性。 第二部分是一个动画,移动我们刚刚创建的 UILabel。 这是我们在教程的开始描述的 Block 视图动画的一个例子。
编译并且运行,当你在每次点击 “+1″ 或 “-1″ 按钮,增加和删除商品的时候,你将会看到一个漂亮的动画。
得到总数
我们将要给 IODOrder.m 添加的最后一个辅助方法是用来得到订单中商品的总额的:
- (float)totalOrder { // 1 - Define and initialize the total variable __block float total = 0.0; // 2 - Block for calculating total float (^itemTotal)(float,int) = ^float(float price, int quantity) { return price * quantity; }; // 3 - Enumerate order items to get total [self.orderItems enumerateKeysAndObjectsUsingBlock:^(id key, id obj, BOOL *stop) { IODItem* item = (IODItem*)key; NSNumber* quantity = (NSNumber*)obj; int intQuantity = [quantity intValue]; total += itemTotal(item.price, intQuantity); }]; // 4 - Return total return total; } |
Let’s go through the above code step-by-step:
- We define and initialize the variable that will accumulate the total. Note the __block keyword. We will be using this variable inside of a Block. If we do not use the __block keyword, the Block we create below would create a const copy of this variable and use that when referenced inside the Block, meaning we would not be able to change the value inside of the Block. By adding this keyword we are able to be read from AND write to the variable inside of the Block.
- Then, we define a Block variable and assign it a Block that simply takes a price and a quantity and returns the item total based on price and quantity.
- This code segment goes over every object in the orderItems dictionary using a Block method, enumerateKeysAndObjectsUsingBlock: and uses the previous Block variable to find the total for each item for the quantity ordered and then adds that to the grand total (which is why we needed the __block keyword on the total variable since it is being modified inside of a Block).
- Once we are done calculating the total for all the items, we simply return the calculated total.
Go back to IODOrder.h and add the prototypes:
- (float)totalOrder; |
The last thing to do is to add the total calculation functionality to the app. All the heavy work will be done by the totalOrder method and so, all we have to do is show the calculated total to the user when they hit the total button and trigger the ibaCalculateTotal: action. So fill in the ibaCalculateTotal: stub inIODViewController.m with the following:
- (IBAction)ibaCalculateTotal:(id)sender { float total = [order totalOrder]; UIAlertView* totalAlert = [[UIAlertView alloc] initWithTitle:@"Total" message:[NSString stringWithFormat:@"$%0.2f",total] delegate:nil cancelButtonTitle:@"Close" otherButtonTitles:nil]; [totalAlert show]; } |
This just gets the total, creates a simple alert view, and shows it to the user.
That’s it! Give it a final build and run, and maybe even grab a burger to celebrate! :]
Useful Blocks Cheat Sheet
Before you go, I wanted to let you know about a few block methods that you might find useful.
NSArray
- enumerateObjectsUsingBlock – Probably the Block method I use the most, it basically is a simpler, cleaner foreach.
- enumerateObjectsAtIndexes:usingBlock: – Same as enumerateObjectsUsingBlock: except you can enumerate a specific range of items in the array instead of all the items. The range of items to enumerate is passed via the indexSet parameter.
- indexesOfObjectsPassingTest: – The Block returns an indexset of the the objects that pass a test specified by the Block. Useful for looking for a particular group of objects.
NSDictionary
- enumerateKeysAndObjectsUsingBlock: – Enumerates through a dictionary, passing the Block each key and object.
- keysOfEntriesPassingTest: – Returns a set of the keys corresponding to objects that pass a test specified by the Block.
UIView
- animateWithDuration:animations: – UIViewAnimation Block, useful for simple animations.
- animateWithDuration:completion: – Another UIViewAnimation Block, this version adds a second Block parameter for callback code when the animation code has completed.
Grand Central Dispatch
- dispatch_async – This is the main function for async GCD code.
Creating Your Own Blocks
Also, sometimes you might want to create your own methods that take blocks. Here’s some code snippets showing you how you can do that:
// Here's a method that takes a block - (void)doMathWithBlock:(int (^)(int, int))mathBlock { self.label.text = [NSString stringWithFormat:@"%d", mathBlock(3, 5)]; } // Calling that method with a block - (IBAction)buttonTapped:(id)sender { [self doMathWithBlock:^(int a, int b) { return a + b; }]; } |
Since a block is just an Objective-C object, you can store it in a property so you can call it later. This is useful if you want to call the method after some asynchronous task has completed, such as a network task. Here’s an example:
// Declare property @property (strong) int (^mathBlock)(int, int); // Use copy if not using ARC // Synthesize property @synthesize mathBlock = _mathBlock; // Store block so you can call it later - (void)doMathWithBlock:(int (^)(int, int))mathBlock { self.mathBlock = mathBlock; } // Calling that method with a block - (IBAction)buttonTapped:(id)sender { [self doMathWithBlock:^(int a, int b) { return a + b; }]; } // Later on... - (IBAction)button2Tapped:(id)sender { self.label.text = [NSString stringWithFormat:@"%d", self.mathBlock(3, 5)]; } |
Finally, you can simplify your syntax a bit by using typedefs. Here’s the previous example cleaned up a bit with a typedef for the block:
// Create typedef for block typedef int (^MathBlock)(int, int); // Create property using typedef @property (strong) MathBlock mathBlock; // Synthesize property @synthesize mathBlock = _mathBlock; // Method that stores block for use later - (void)doMathWithBlock:(MathBlock) mathBlock { self.mathBlock = mathBlock; } // Calling that method with a block - (IBAction)buttonTapped:(id)sender { [self doMathWithBlock:^(int a, int b) { return a + b; }]; } // Later on... - (IBAction)button2Tapped:(id)sender { self.label.text = [NSString stringWithFormat:@"%d", self.mathBlock(3, 5)]; } |
Blocks and Autocompletion
One final tip. When you’re using a method that takes a block in Xcode, it can autocomplete the block for you, saving yourself time and syntax errors.
For example, type this into Xcode:
NSArray * array; [array enum |
At this point the autocompletion routine will find enumerateObjectsUsingBlock – hit enter to auto-complete that method name. Then hit enter again to auto-complete the block, and it will put in this:
[array enumerateObjectsUsingBlock:^(id obj, NSUInteger idx, BOOL *stop) { code } |
You can fill in your code and close out the method call, and viola – much easier than typing everything in!
[array enumerateObjectsUsingBlock:^(id obj, NSUInteger idx, BOOL *stop) { // Do something }]; |
Where to Go From Here?
The final completed project code can be downloaded here. If you are familiar with git, I also have the project hosted here at github, with commits at each step if you get stuck at a step.
Hopefully in creating this simple app, you’ve been able to see the power and simplicity that Blocks add to your dev toolkit, and gotten some ideas of how you can use them in your own projects.
If this is your first exposure to blocks, you’ve taken a pretty big step. With more and more apps needing asynchronous, networked, and multi-threaded code, blocks will definitely be considered required learning.
There’s still more to learn about blocks – specifically in terms of variable capture and the __block keyword. More information about blocks and Grand Central Dispatch can be found here:
- Apple: Getting Started With Blocks
- Apple: Concurrency Programming
- GCD Tutorial
Thanks for following along with me on my first (of hopefully many) tutorial for this site, and I hope to hear from you in the forums!
