【Cocos2d-X游戏实战开发】捕鱼达人之加载场景的创建(五)
本系列学习教程使用的是cocos2d-x-2.1.4(最新版为cocos2d-x-2.1.5)
博主发现前两个系列的学习教程被严重抄袭,在这里呼吁大家请尊重开发者的劳动成果,
转载的时候请务必注明出处:http://blog.csdn.net/yangyu20121224/article/details/11826893
趁着过节之际,在这里也是祝大家中秋节日快乐!今天我们要开始的内容也是在游戏
中非常常见的一个功能,就是资源的预加载处理,通常都会有一个进度条用来加载资
源,以便进入游戏中的时候不会因为要加载大量的图片而卡死,好的,话不多说,下面
我们就一起来实现这个功能。
一、类的创建
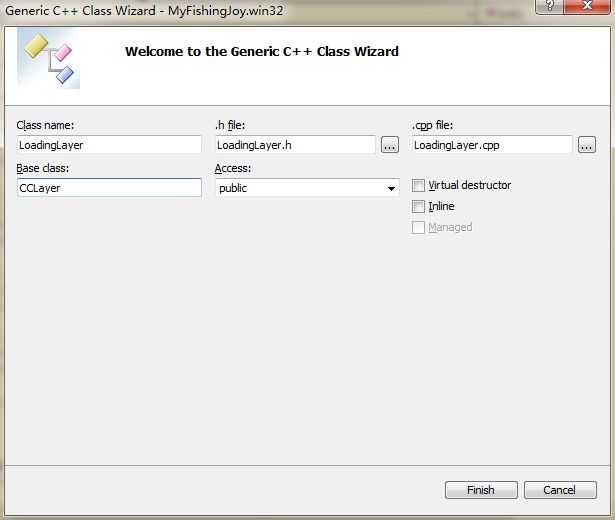
1、首先我们新建一个加载场景类,取名为“LoadingLayer”,并继承自CCLayer类。
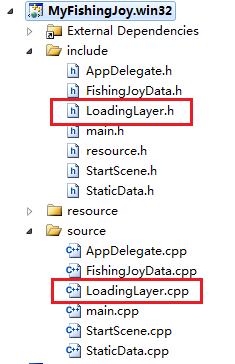
2、添加好了之后,可以在目录中看到“LoadingLayer.h”和“LoadingLayer.cpp”这两个文件。
二、项目编码
1、在刚刚新建的LoadingLayer类中添加代码, LoadingLayer.h头文件。
#ifndef __LOADING_LAYER_H__
#define __LOADING_LAYER_H__

#include "cocos2d.h"

class LoadingLayer:public cocos2d::CCLayer{
public:
	//构造函数
	LoadingLayer();

	//初始化方法
	virtual bool init();

	CREATE_FUNC(LoadingLayer);

	static cocos2d::CCScene* scene();

	void loadCallBack(cocos2d::CCObject* ped);//异步加载图片时的回调函数
private:
	int loadingNum;//用来记录当前的加载图片的数量

	int totalNum;//一共要加载的图片数量

	bool setUpdateView();//用来初始化页面的基本的纹理
};
#endif
2、LoadingLayer.cpp文件,这段代码有很详细的注释,相信有编程基础的同学都能一看就懂。
#include "LoadingLayer.h"
#include "StaticData.h"

USING_NS_CC;

//构造函数
LoadingLayer::LoadingLayer(){
	this->loadingNum = 0;
	this->totalNum = 2;
}

//创建加载场景
CCScene* LoadingLayer::scene(){
	CCScene* scene = CCScene::create();
	LoadingLayer* layer = LoadingLayer::create();
	scene->addChild(layer);
	return scene;
}

//初始化方法
bool LoadingLayer::init(){
	bool isRet = false;
	do
	{
		CC_BREAK_IF(!this->setUpdateView());

		//加入plist文件至缓存
		CCSpriteFrameCache::sharedSpriteFrameCache()->addSpriteFramesWithFile(STATIC_DATA_STRING("cannon_plist"));

		//加入图片至缓存
		CCTextureCache::sharedTextureCache()->addImageAsync(STATIC_DATA_STRING("game_background"),this,callfuncO_selector(LoadingLayer::loadCallBack));

		CCSpriteFrameCache::sharedSpriteFrameCache()->addSpriteFramesWithFile(STATIC_DATA_STRING("GameLayer_plist"));

		CCTextureCache::sharedTextureCache()->addImageAsync(STATIC_DATA_STRING("game_ui_2p"),this,callfuncO_selector(LoadingLayer::loadCallBack));

		isRet = true;
	} while (0);
	return isRet;
}

//加载图片时的回调函数
void LoadingLayer::loadCallBack(CCObject* ped){
	loadingNum++;

	//得到上面进度条对象
	CCProgressTimer* pt1 = (CCProgressTimer*)this->getChildByTag(1);

	//得到下面进度条对象
	CCProgressTimer* pt2 = (CCProgressTimer*)this->getChildByTag(2);

	//得到当前进度条的百分比
	float now = pt1->getPercentage();

	pt1->setPercentage(100 / totalNum + now);
	pt2->setPercentage(100 / totalNum + now);

	if(loadingNum < totalNum){

	}else{
		// 加载完的时候跳转到相应的界面
		CCLOG("loading over");
	}
}

//初始化组件
bool LoadingLayer::setUpdateView(){
	bool isRet = false;
	do
	{
		//获得窗口尺寸大小
		CCSize winSize = CCDirector::sharedDirector()->getWinSize();

		//创建标题图片精灵
		CCSprite* titleBg = CCSprite::create(STATIC_DATA_STRING("loading_title"));
		CC_BREAK_IF(!titleBg);
		titleBg->setPosition(ccp(winSize.width * 0.5,winSize.height * 0.65));
		this->addChild(titleBg);

		//创建上面背景进度条
		CCSprite* load_1_1 = CCSprite::create(STATIC_DATA_STRING("loading_1_1"));
		CC_BREAK_IF(!load_1_1);
		load_1_1->setPosition(ccp(winSize.width * 0.5,winSize.height * 0.25 - 10));
		this->addChild(load_1_1,1);

		//创建下面背景进度条
		CCSprite* load_2_1 = CCSprite::create(STATIC_DATA_STRING("loading_2_1"));
		CC_BREAK_IF(!load_2_1);
		load_2_1->setPosition(ccp(winSize.width * 0.5,winSize.height * 0.1));
		this->addChild(load_2_1,1);

		//创建上面前景进度条
		CCSprite* load_1_2 = CCSprite::create(STATIC_DATA_STRING("loading_1_2"));
		CC_BREAK_IF(!load_1_2);
		//创建上面进度条对象
		CCProgressTimer* pt1 = CCProgressTimer::create(load_1_2);
		// 设置成横向的
		pt1->setType(kCCProgressTimerTypeBar);
		//可以看作是按矩形显示效果的进度条类型
		pt1->setMidpoint(ccp(0,0));
		//用来设定进度条横向前进的方向从左向右或是从右向左
		pt1->setBarChangeRate(ccp(1,0));
		//重新设置坐标
		pt1->setPosition(ccp(winSize.width * 0.5,winSize.height * 0.25 - 10));
		//设置初始进度的百分比
		pt1->setPercentage(0);
		//添加至场景并设置标志位
		this->addChild(pt1,2,1);

		//创建下面前景进度条
		CCSprite* load_2_2 = CCSprite::create(STATIC_DATA_STRING("loading_2_2"));
		CC_BREAK_IF(!load_2_2);
		//创建下面进度条对象
		CCProgressTimer* pt2 = CCProgressTimer::create(load_2_2);
		// 设置成横向的
		pt2->setType(kCCProgressTimerTypeBar);
		//可以看作是按矩形显示效果的进度条类型
		pt2->setMidpoint(ccp(0,0));
		//用来设定进度条横向前进的方向从左向右或是从右向左
		pt2->setBarChangeRate(ccp(1,0));
		//重新设置坐标
		pt2->setPosition(ccp(winSize.width * 0.5,winSize.height * 0.1));
		//设置初始进度的百分比
		pt2->setPercentage(0);
		//添加至场景并设置标志位
		this->addChild(pt2,2,2);

		isRet=true;
	} while (0);
	return isRet;
}
这段代码中,我们就在init函数中添加了几张图片用于演示,但是由于图片比较少所以效果不是很明显,以后在游
戏中需要加载的图片都可以在这里预加载。
3、这个类的代码编写好之后,我们再回到之前的开始场景StartScene.cpp文件中,添加点击“开始游戏”按钮的回
调函数。
//点击“开始游戏”按钮的回调
void StartLayer::start_callback(CCObject* pSender){
    CCLOG( "start game");

	CCDirector::sharedDirector()->replaceScene(CCTransitionFade::create(0.5f, LoadingLayer::scene()));
}
4、最后别忘了在static_data.plist文件中添加图片的路径。
<?xml version="1.0" encoding="UTF-8"?>
<!DOCTYPE plist PUBLIC "-//Apple//DTD PLIST 1.0//EN" "http://www.apple.com/DTDs/PropertyList-1.0.dtd">
<plist version="1.0">
<dict>
	<key>default_gold</key>
	<string>200</string>
	<key>title</key>
	<string>title.png</string>
	<key>background</key>
	<string>background.png</string>
	<key>StartScene_Texture</key>
	<string>StartScene.plist</string>
	<key>start_normal</key>
	<string>ui_button_box02_02.png</string>
	<key>start_selected</key>
	<string>ui_button_box02_01.png</string>
	<key>scene_normal</key>
	<string>ui_button_box01_02.png</string>
	<key>scene_selected</key>
	<string>ui_button_box01_01.png</string>
	<key>Button_Texture</key>
	<string>Button.plist</string>
	<key>start</key>
	<string>ui_2p_010.png</string>
	<key>scene</key>
	<string>button_other_014.png</string>

	<key>loading_title</key>
	<string>loading_title.png</string>
	<key>loading_1_1</key>
	<string>loading_1_1.png</string>
	<key>loading_1_2</key>
	<string>loading_1_2.png</string>
	<key>loading_2_1</key>
	<string>loading_2_1.png</string>
	<key>loading_2_2</key>
	<string>loading_2_2.png</string>

	<key>game_background</key>
	<string>game_background.png</string>
	<key>cannon_plist</key>
	<string>cannon.plist</string>
	<key>cannon</key>
	<string>cannon.png</string>
	<key>cannon10_plist</key>
	<string>cannon10.plist</string>
	<key>cannon10</key>
	<string>cannon10.png</string>
	<key>increase_button</key>
	<string>increase_button.png</string>
	<key>reduce_button</key>
	<string>reduce_button.png</string>
	<key>GameLayer_plist</key>
	<string>GameLayer.plist</string>
	<key>game_ui_2p</key>
	<string>game_ui_2p.png</string>

	</dict>
</plist>
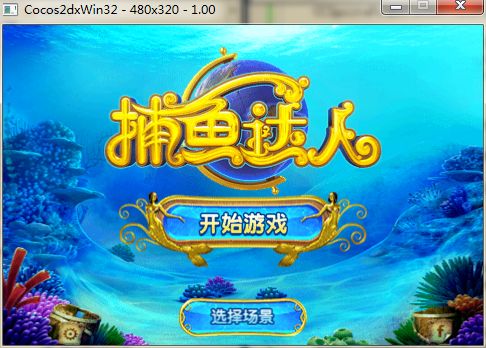
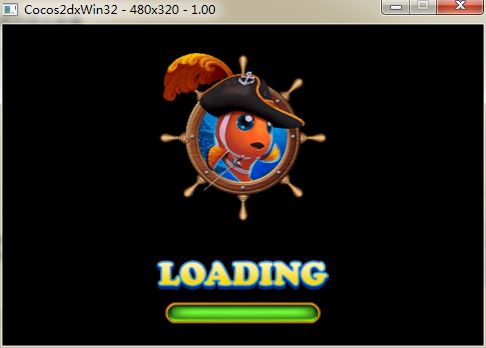
5、运行效果图。
<1> 开始场景界面,点击“开始游戏”按钮,进入加载场景界面。
<2> 预加载资源场景界面,这里有两个进度条,但效果是一样的。
源码下载地址(百度云)


