详细解析WPF中的应用程序模型
创建一个WPF应用程序
使用WPF(Windows Presentation Foundation),您可以创建两种主要类型的应用程序:安装应用程序和 Web 浏览器的应用程序。两者之间的主要区别在于它们的托管方式,以及是否支持页面到页面之间的导航。Microsoft Visual Studio 2008为这两种应用都提供了模板。
在本实验室,我们将一起创建一个安装应用程序,最后将其通过ClickOnce或MSI部署安装到用户的操作系统,并托管在一个独立的窗口之中。这种类型的应用程序对最终用户的系统资源有完全访问权限,在部署之前也必须获得用户的许可。
1.创建基本应用
(1)启动Microsoft Visual Studio 2008
(2)使用C# “WPF Application”模板创建一个新项目。将其命名为’AddressBook’。这一步将搭建应用程序的基本骨架。
(3)地址簿应用程序会帮助您管理您的联系人。在项目中添加一个新的C#类。您可以通过Solution Explorer,在’AddressBook’项目上点击右键,选择Add?New Item,然后在对话框中选择'Class‘。我们将它命名为Contact.cs,并在文件里建立我们的数据模型:
using System.Collections.ObjectModel;
namespace AddressBook
{
/// <summary>
/// Contact value object
/// </summary>
public class Contact
{
/// <summary>
/// First name of contact
/// </summary>
public String FirstName
{
get ;
set ;
}
/// <summary>
/// Last name of contact
/// </summary>
public String LastName
{
get ;
set ;
}
/// <summary>
/// Email address of contact
/// </summary>
public String EmailAddress
{
get ;
set ;
}
/// <summary>
/// Home page
/// </summary>
public Uri HomePage
{
get ;
set ;
}
/// <summary>
/// Home address
/// </summary>
public string HomeAddress
{
get ;
set ;
}
/// <summary>
/// Business address
/// </summary>
public string BusinessAddress
{
get ;
set ;
}
}
/// <summary>
/// This collection will hold all of our contacts in the
/// address book
/// </summary>
public class ContactList : ObservableCollection < Contact >
{
public ContactList()
: base ()
{
}
}
}
您会注意到ContactList这个类继承了ObservableCollection ,因此为数据上下文提供了可绑定的数据集合。DataContext属性用来指定绑定的数据源。使用WPF数据集合特性,您的应用程序可以自动对集合中单一数据项的更新做出反应,也可以自动对整个集合的更新做出反应。数据集合也可以支持在不修改集合中数据的情况下进行排序、过滤和浏览。ObservableCollection 是WPF对数据集合的内置实现。在任务2里我们会集中于数据绑定的实现。
(4)现在让我们定义联系人的集合。您需要在项目中添加一个新的文本文件contacts.txt。您可以通过Solution Explorer,右键点击项目,选择Add?New Item随后在对话框中选择’Text File‘。将以下内容复制到文件里:
Jane;Tester;[email protected];http: // spaces.msn.com;101 Baker St, Bellevue, WA 98055; 202 Smith St, Redmond, WA 98052
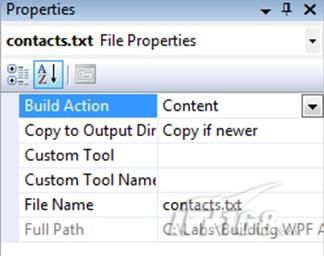
每行都是一个联系人的信息。一旦contacts.txt文件被创建,在Solution Explorer里选中它。文件的属性会出现在下方的Properties窗口。如果这个窗口没有出现,请右键点击这个文件,选择Properties。
·请注意Build Action这个属性的值是’Content’。这个值告诉WPF的MSBuild系统,把这个文件作为伴随应用程序的松散内容。
·Copy to Output Directory这个属性的值是’Do not copy‘,请把它改成’Copy if newer’。这一步确保一旦contacts.txt文件被修改了,新的版本会被复制到版本的输出目录里。
(5)为了控制应用程序启动和退出时的操作,我们下面要处理Application Startup和Exit事件。请在App.xaml.cs中添加下面的代码:
{
}
void AppStartup( object sender, StartupEventArgs args)
{
MainWindow mainWindow = new MainWindow();
mainWindow.WindowStartupLocation = WindowStartupLocation.CenterScreen;
mainWindow.Show();
}
private void AppExit(Object sender, ExitEventArgs e)
{
}
双击MyApp.xaml察看XAML,将以下标记语句添加到MyApp.xaml里,这样Startup事件就与代码绑定了。您需要删除StartupUri属性,以便由Startup事件的代码来处理MainWindow的加载工作。
x:Class ="AddressBook.App"
xmlns:x ="http://schemas.microsoft.com/winfx/2006/xaml"
xmlns ="http://schemas.microsoft.com/winfx/2006/xaml/presentation"
StartupUri ="MainWindow.xaml"
Startup ="AppStartup"
Exit ="AppExit" >
< Application .Resources >
</ Application.Resources >
</ Application >
(6)下面我们创建基本的UI。UI由一个Window组成,Window里有一个Grid并进一步包含一个DockPanel。DockPanel用来显示菜单栏,工具栏,状态栏,和一个罗列所有联系人的左面板。右边的面板则用来显示当前选中的联系人的详细信息。
在MainWindow.xaml文件里,我们从外层的Grid开始。首先将它命名为DocumentRoot:当您双击MainWindow.xaml时,您会同时看到Design选项卡和XAML选项卡。请选择XAML选项卡来编辑xaml:
xmlns ="http://schemas.microsoft.com/winfx/2006/xaml/presentation"
xmlns:x ="http://schemas.microsoft.com/winfx/2006/xaml"
Title ="AddressBook"
Loaded ="WindowLoaded"
SizeToContent ="WidthAndHeight"
MinWidth ="640"
MinHeight ="480" >
< Grid Background ="White" Name ="DocumentRoot" >
< Grid .ColumnDefinitions >
< ColumnDefinition Width ="200" />
< ColumnDefinition Width ="*" />
</ Grid.ColumnDefinitions >
< Grid .RowDefinitions >
< RowDefinition Height ="Auto" />
<!-- Menu -->
< RowDefinition Height ="Auto" />
<!-- Tool Bar -->
< RowDefinition Height ="*" />
<!-- Content Area -->
< RowDefinition Height ="Auto" />
<!-- Status Bar -->
</ Grid.RowDefinitions >
</ Grid >
</ Window >
(7)我们所有的界面和UI元素都会放在DocumentRoot这个Grid里面。下面,我们创建一个DockPanel_Menu放菜单栏。顶层MenuItems有两个:File和Edit,每个菜单项都会包含若干子MenuItems:
< DockPanel
Name ="DockPanel_Menu"
Grid.Column ="0"
Grid.ColumnSpan ="2"
Grid.Row ="0" >
< Menu Background ="White" >
< MenuItem Header ="File" >
< MenuItem Header ="New Contact" Click ="LaunchNewContactWizard" />
< MenuItem Header ="New Group" Click ="NotImplementedMsg" />
< Separator />
< MenuItem Header ="Properties" Click ="NotImplementedMsg" />
< MenuItem Header ="Delete" Click ="NotImplementedMsg" />
< MenuItem Header ="Import" >
< MenuItem Header ="Address book (WAB)..."
Click ="NotImplementedMsg" />
< MenuItem Header ="Business card vCard)..."
Click ="NotImplementedMsg" />
</ MenuItem >
< Separator />
< MenuItem Header ="Exit" InputGestureText ="Alt-F4"
Click ="ExitApplication" >
< MenuItem .ToolTip >
< ToolTip >
Click here to exit
</ ToolTip >
</ MenuItem.ToolTip >
</ MenuItem >
</ MenuItem >
</ Menu >
< Menu Background ="White" >
< MenuItem Header ="Edit" >
< MenuItem Command ="ApplicationCommands.Copy" />
< MenuItem Command ="ApplicationCommands.Paste" />
</ MenuItem >
</ Menu >
</ DockPanel >
(8)下一步是工具栏。ToolBar有两个Buttons,允许您添加和删除联系人。我们稍后会实现添加的功能。至于删除,暂时由我们在上一步定义的NotImplementedMsg事件处理方法来处理。
< DockPanel
Name ="DockPanel_Toolbar"
Grid.Column ="0"
Grid.ColumnSpan ="2"
Grid.Row ="1" >
< ToolBar >
< Button Click ="LaunchNewContactWizard" ToolTip ="Add Contact" >
+
</ Button >
< Button Click ="NotImplementedMsg" ToolTip ="Delete Contact" >
-
</ Button >
</ ToolBar >
</ DockPanel >
(9)左边的面板是这个地址簿应用程序的主要窗口,用来列出所有的联系人。我们使用ListBox,每个联系人的FirstName都是一个ListItem项。暂时让我们关注ListBox和DockPanel,稍后再回来看数据绑定。
既然看到这儿了,我们顺便为联系人列表定义一个上下文菜单。这样就可以添加一个联系人或者添加一个组了:
< DockPanel
Name ="DockPanel_LeftPane"
Grid.Column ="0"
Grid.Row ="2" >
< ListBox Name ="allContacts" SelectionChanged ="ListItemSelected" >
< ListBox .ContextMenu >
< ContextMenu >
< MenuItem Header ="Add a Contact" Click ="LaunchNewContactWizard" />
< MenuItem Header ="Add a Group" Click ="NotImplementedMsg" />
</ ContextMenu >
</ ListBox.ContextMenu >
</ ListBox >
</ DockPanel >
(10)主窗口UI上另一个关键元素是状态栏。让我们在StatusBar元素里放置一个TextBlock:
< DockPanel
Name ="DockPanel_Statusbar"
Grid.Column ="0"
Grid.ColumnSpan ="2"
Grid.Row ="3" >
< StatusBar
BorderBrush ="Black"
BorderThickness ="1" >
< TextBlock Name ="tb" Foreground ="Black" >
Status bar
</ TextBlock >
</ StatusBar >
</ DockPanel >
(11)最后是右手边的窗口框。在左边ListItems显示之后,选择一条联系人,就会在右手边的这个Frame_RightPane里显示这个联系人的详细信息:
< Frame Name ="Frame_RightPane"
Grid.Column ="1"
Grid.Row ="2" />
(12)到此为止,我们已经在XAML里完成了UI元素的添加,是时候看看后面的代码了。在MainWindow.xaml.cs文件里,为MainWindow这个类添加ExitApplication,NotImplementedMsg,WindowLoaded,ListItemSelected和LaunchNewContactWizard方法。您会注意到后三个方法的实现是空的。我们稍后再添加这部分逻辑。
// Triggered on Window load. Sets the ContactList collection
// as the Data Context.
//
private void WindowLoaded( object sender, RoutedEventArgs e)
{
}
//
// Triggers application shutdown
//
void ExitApplication( object sender, RoutedEventArgs e)
{
this .Close();
}
//
// Shows a message box informing user that a feature
// hasn't been implemented.
//
void NotImplementedMsg( object sender, RoutedEventArgs e)
{
MessageBox.Show( " This feature has not been implemented. " ,
" Not Implemented " );
}
//
// Triggered when an item in the Contacts list is selected
//
void ListItemSelected( object sender,
SelectionChangedEventArgs args)
{
}
//
// Triggered when context menu or other toolbar option
// is clicked to launch
// 'Create a new contact' dialog
//
private void LaunchNewContactWizard( object sender,
RoutedEventArgs e)
{
}
(13)生成并运行您的应用程序。地址簿应用程序的基本框架已经搭好了。因为我们尚未初始化或使用联系人的信息,您在程序的左右面板上不会看到任何数据。在这一步,您的应用程序看上去是这样的:

2. 使用Property Bag来存储联系人的集合
(1)在程序启动的时候,应用程序必须从文件中读出联系人的信息,并初始化ContactList对象。打开App.xaml.cs文件并编辑。ReadContactsFromFile方法会从文件中读出数据。在类里添加这个方法,并添加一个辅助方法来把数据转化成联系人对象:
// Reads contact information from file
//
private ContactList ReadContactsFromFile()
{
ContactList contactList = new ContactList();
// Create an instance of StreamReader to read from a file.
// The using statement also closes the StreamReader.
using (StreamReader sr = new StreamReader( " contacts.txt " ))
{
String line;
// Read and display lines from the file until the
// end of the file is reached.
while ((line = sr.ReadLine()) != null )
{
contactList.Add(CreateContactFromLine(line));
}
}
return contactList;
}
//
// De-tokenize one line of contact information and
// hydrate a Contact object
//
private Contact CreateContactFromLine( string line)
{
string [] tokens = line.Split( new char [] { ' ; ' });
if (tokens.Length != 6 )
{
throw new ApplicationException(
String.Format( " Input contact file format. " +
" Expected tokens {0}; Actual tokens {1} " , 6 ,
tokens.Length));
}
Contact contact = new Contact();
contact.FirstName = tokens[ 0 ];
contact.LastName = tokens[ 1 ];
contact.EmailAddress = tokens[ 2 ];
contact.HomePage = (String.IsNullOrEmpty(tokens[ 3 ]) ?
null :
new Uri(tokens[ 3 ], UriKind.Absolute));
contact.HomeAddress = tokens[ 4 ];
contact.BusinessAddress = tokens[ 5 ];
return contact;
}
ReadContactFromFile方法使用System.IO.StreamReader。请确认您在命名空间声明处使用了System.IO:
using System.IO;
(2)下面我们把ReadContactsFromFile方法返回的ContactList数据,添加到应用程序Property Bag里面。如下修改AppStartup方法:
// Triggered on application startup. Positions the window,
// Initializes the contact list model and adds it to the
// Property Bag.
//
void AppStartup( object sender, StartupEventArgs args)
{
// initialize the Contacts collection using data from file
ContactList contactList = ReadContactsFromFile();
// add it to the Property Bag
this .Properties[ " ContactList " ] = contactList;
MainWindow mainWindow = new MainWindow();
// make sure the window appears in the center of the screen
mainWindow.WindowStartupLocation =
WindowStartupLocation.CenterScreen;
mainWindow.Show();
}
(3)让我们顺便在这里创建一个方法,来把联系人数据的更新存回到contacts.txt文件里。因为逻辑非常简单且与本实验关系不大,我们这里就不去实现它了:
// Persists changes from ContactList object in Property Bag
// to file.
//
private void SaveContactsToFile( string fileName)
{
}
(4) 生成并运行应用程序。此时的UI看上去应该和上一个任务结束时没什么不同,看上去我们好像没有什么进展。别着急!
转自:http://tech.sina.com.cn/s/2009-12-04/07281160468.shtml