Android拨号盘列表加载机制(原)
本文档主要介绍Android4.4默认拨号盘界面的列表加载机制。
一、拨号列表界面概述
从DialtactsActivity所加载的布局中可以看出,在拨号界面的显示列表位置,复用了三个Fragment:PhoneFavoriteFragment、SmartDialSearchFragment和RegularSearchFragment,后两个Fragment是在界面处于搜索状态时显示的,而PhoneFavoriteFragment是进入拨号界面默认显示的列表,该Fragment所显示的布局如下:
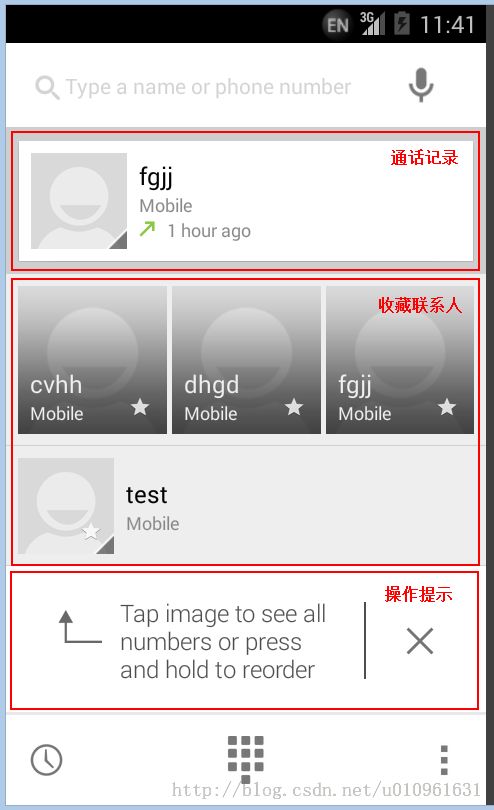
这个Fragment所加载的布局文件(phone_favorites_fragment.xml)中,最重要的部分就是PhoneFavoriteListView,他作为ListView的子类,从上到下分别显示四类内容:
1、通话记录
2、常用联系人记录
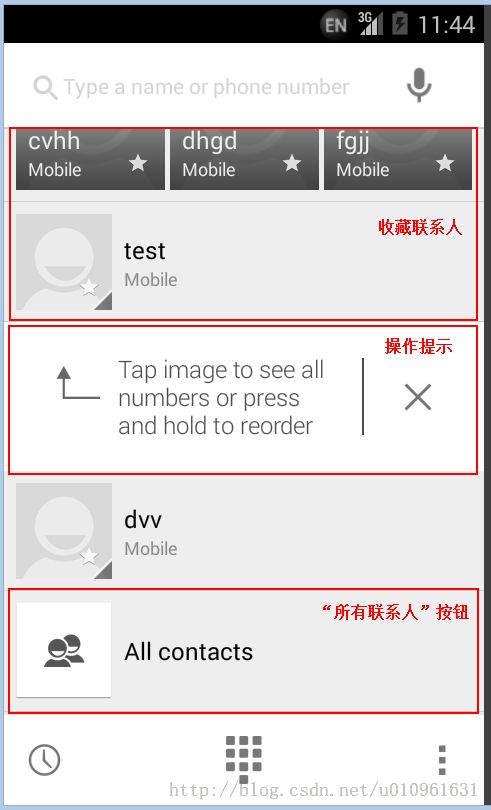
3、操作提示
4、“所有联系人”按钮
从上图可以看出,这四种Item的内容类别不同,显示风格也各异,甚至操作方式都有差别,那么Fragment是如何加载和管理这四种Item呢?
原来,针对这四种不同的类别,PhoneFavoriteFragment分别为每种类别创建Adapter或者View,然后通过PhoneFavoriteMergedAdapter(继承自BaseAdapter)将四种Item合并为一个Adapter,然后传递给ListView以供使用。
下面的分析,我们先来分别查看每个类别的形成过程,然后再分析如何通过PhoneFavoriteMergedAdapter将他们合并一起。
二、通话记录列表
2.1、通话记录Adapter
我们先来看通话记录Adapter的创建过程。
在PhoneFavoriteFragment的onCreate()方法中创建了负责通话记录的Adapter:
mCallLogAdapter = ObjectFactory.newCallLogAdapter(getActivity(), this, new ContactInfoHelper(getActivity(), currentCountryIso), true, false);继续看newCallLogAdapter()内容:
        public static CallLogAdapter newCallLogAdapter(Context context, CallFetcher callFetcher, ContactInfoHelper contactInfoHelper, boolean useCallAsPrimaryAction, boolean isCallLog) {
            return new CallLogAdapter(context, callFetcher, contactInfoHelper, useCallAsPrimaryAction,
                    isCallLog);
        }
原来,我们拿到的mCallLogAdapter是CallLogAdapter对象。
然后我们来看CallLogAdapter中数据的来源。
2.2、通话记录获取过程
在PhoneFavoriteFragment的onCreate()方法中,创建了用于查询通话记录的异步查询Handler:
mCallLogQueryHandler = new CallLogQueryHandler(getActivity().getContentResolver(), this, 1);这里的CallLogQueryHandler是AsyncQueryHandler的子类,用于查询最新的通话记录,并把查询结果传递给mCallLogAdapter。对于其构造方法的参数我们需要了解一下,来看其构造方法:
        public CallLogQueryHandler(ContentResolver contentResolver, Listener listener, int limit) {
            super(contentResolver);
            mListener = new WeakReference<Listener>(listener);
            mLogLimit = limit;
        }
传递的三个参数中,需要注意的是第二个和第三个参数,其中listener的作用是,当CallLogQueryHandler完成查询后,就会调用listener的onCallsFetched()方法,将查询结果传递出来,对当前来说,由于该listener是this参数,所以在查询结束后将会调用到PhoneFavoriteFragment的onCallsFetched()方法。而最后一个limit的作用是,查询的记录的条目限制,此处为1,说明只查询最后一条通话记录。
接下来看查询数据库的操作:
每次PhoneFavoriteFragment进行onResume()的操作,都会触发mCallLogQueryHandler的查询动作:
        @PhoneFavoriteFragment.java
        public void onResume() {
            super.onResume();
            final SharedPreferences prefs = getActivity().getSharedPreferences( DialtactsActivity.SHARED_PREFS_NAME, Context.MODE_PRIVATE);
            mLastCallShortcutDate = prefs.getLong(KEY_LAST_DISMISSED_CALL_SHORTCUT_DATE, 0);

            //查询通话记录
            fetchCalls();
            mCallLogAdapter.setLoading(true);

            //查询搜藏联系人
            getLoaderManager().getLoader(LOADER_ID_CONTACT_TILE).forceLoad();
        }
我们来看fetchCalls()的过程:
        public void fetchCalls() {
            mCallLogQueryHandler.fetchCalls(CallLogQueryHandler.CALL_TYPE_ALL, mLastCallShortcutDate);
        }
这里在触发查询操作时,传递了两个参数:一个用于规定当前查询的通话记录类型,另一个参数是标记上一次查询的时间,这样
每次查询时只需要查询两次时间间隔所更新的通话记录,提高效率。
继续看fetchCalls()操作:
        @CallLogQueryHandler.java
        public void fetchCalls(int callType, long newerThan) {
            //取消正在进行的查询
            cancelFetch();
            int requestId = newCallsRequest();
            //进入查询
            fetchCalls(QUERY_CALLLOG_TOKEN, requestId, callType, false /* newOnly */, newerThan);
        }
再继续:
        private void fetchCalls(int token, int requestId, int callType, boolean newOnly, long newerThan) {
            //构建查询用的sql语句
            StringBuilder where = new StringBuilder();
            List<String> selectionArgs = Lists.newArrayList();

            if (newOnly) {
                //只查询最新的记录
                where.append(Calls.NEW);
                where.append(" = 1");
            }

            if (callType > CALL_TYPE_ALL) {
                //查询某一类通话记录
                if (where.length() > 0) {
                    where.append(" AND ");
                }
                where.append(String.format("(%s = ?)", Calls.TYPE));
                selectionArgs.add(Integer.toString(callType));
            }

            if (newerThan > 0) {
                //时间要晚于上一次的查询时间
                if (where.length() > 0) {
                    where.append(" AND ");
                }
                where.append(String.format("(%s > ?)", Calls.DATE));
                selectionArgs.add(Long.toString(newerThan));
            }

            final int limit = (mLogLimit == -1) ? NUM_LOGS_TO_DISPLAY : mLogLimit;
            final String selection = where.length() > 0 ? where.toString() : null;
            Uri uri = Calls.CONTENT_URI_WITH_VOICEMAIL.buildUpon() .appendQueryParameter(Calls.LIMIT_PARAM_KEY, Integer.toString(limit)) .build();
            //开始异步查询
            startQuery(token, requestId, uri, CallLogQuery._PROJECTION, selection, selectionArgs.toArray(EMPTY_STRING_ARRAY), Calls.DEFAULT_SORT_ORDER);
        }
在这个查询过程中,主要是构建查询的sql语句,先后添加了查询的类型、时间,以及条目限制,对当前环境来说,就是查询晚于上次查询时间的所有类型的通话记录类型中的最后一条记录。查询结束后,将会在父类中调用该对象的onNotNullableQueryComplete()方法,返回当前查询的非空Cursor记录:
        protected void onNotNullableQueryComplete(int token, Object cookie, Cursor cursor) {
            if (token == QUERY_CALLLOG_TOKEN) {
                int requestId = ((Integer) cookie).intValue();
                if (requestId != mCallsRequestId) {
                    return;
                }

                //拿到查询结果
                MoreCloseables.closeQuietly(mCallLogCursor);
                mCallLogCursor = cursor;
            } else if (token == QUERY_VOICEMAIL_STATUS_TOKEN) {
                updateVoicemailStatus(cursor);
                return;
            } else {
                Log.w(TAG, "Unknown query completed: ignoring: " + token);
                return;
            }

            if (mCallLogCursor != null) {
                //更新Adapter
                updateAdapterData(mCallLogCursor);
                mCallLogCursor = null;
            }
        }
然后通过updateAdapterData()更新Adapter:
        private void updateAdapterData(Cursor combinedCursor) {
            final Listener listener = mListener.get();
            if (listener != null) {
                listener.onCallsFetched(combinedCursor);
            }
        }
这里就是调用当初创建CallLogQueryHandler时传递的listener的回调方法,当前来说,就是PhoneFavoriteFragment:
        @PhoneFavoriteFragment.java
        public void onCallsFetched(Cursor cursor) {
            animateListView();
            mCallLogAdapter.setLoading(false);

            //存储当前查询的日期
            if (cursor != null && cursor.moveToFirst()) {
                mCurrentCallShortcutDate = cursor.getLong(CallLogQuery.DATE);
            }

            //更新Adapter的Cursor
            mCallLogAdapter.changeCursor(cursor);
            mAdapter.notifyDataSetChanged();
        }
至此,就将最新的通话记录Cursor传递给了Adapter,也就是CallLogAdapter。下面是更新过程的时序图:

三、常用联系人列表
3.1、常用联系人Adapter
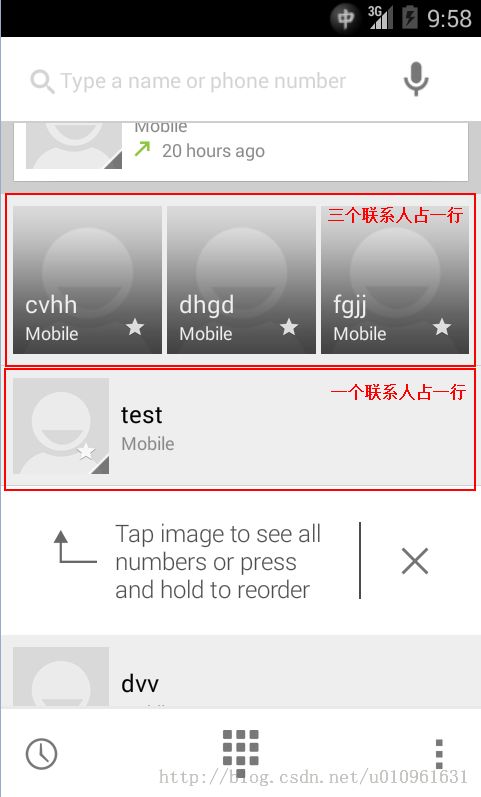
常用联系人列表分为两个部分,首先是一行横向排列的正方形卡片,内部默认包含三个常用联系人,这一组联系人在整个ListView中占用一个Item的位置。其次是超过3个以后的常用联系人项目,他们的排列和通话记录类似,每个联系人占用ListView一个Item的位置。如图所示:
所有常用联系人使用一个Adapter,在Fragment的onAttach()时被创建:
        @PhoneFavoriteFragment.java
        public void onAttach(Activity activity) {
            super.onAttach(activity);
            //常用联系人的Adapter
            mContactTileAdapter = new PhoneFavoritesTileAdapter(activity, mContactTileAdapterListener,
                    this,
                    getResources().getInteger(R.integer.contact_tile_column_count_in_favorites_new),
                    1);
            mContactTileAdapter.setPhotoLoader(ContactPhotoManager.getInstance(activity));
        }
3.2、常用联系人数据获取过程
常用联系人的数据是通过LoaderManager异步查询获取的,获取之后传递给mContactTileAdapter使用。
在PhoneFavoriteFragment的onStart()时,创建了用于获取常用联系人的Loader对象:
        @PhoneFavoriteFragment.java
        public void onStart() {
            super.onStart();

            //初始化常用联系人的Loader
            getLoaderManager().initLoader(LOADER_ID_CONTACT_TILE, null, mContactTileLoaderListener);
        }
上面的初始化过程中,所使用的LoaderCallbacks是mContactTileLoaderListener,那么就会在这个Callbacks内部创建Loader,我们来看这个Loader的定义:
        @PhoneFavoriteFragment.java
        private class ContactTileLoaderListener implements LoaderManager.LoaderCallbacks<Cursor> {
            @Override
            public CursorLoader onCreateLoader(int id, Bundle args) {
                //创建Loader
                return ContactTileLoaderFactory.createStrequentPhoneOnlyLoader(getActivity());
            }

            @Override
            public void onLoadFinished(Loader<Cursor> loader, Cursor data) {
                //将查询数据传回Adapter
                mContactTileAdapter.setContactCursor(data);
                setEmptyViewVisibility(mContactTileAdapter.getCount() == 0);
            }

            @Override
            public void onLoaderReset(Loader<Cursor> loader) {
            }
        }
上面的onCreateLoader()中创建用于查询的Loader,onLoadFinished()中将会返回查询的结果并把结果传递给Adapter,我们先来看创建Loader的过程:
        @ContactTileLoaderFactory.java
        public static CursorLoader createStrequentPhoneOnlyLoader(Context context) {
            Uri uri = Contacts.CONTENT_STREQUENT_URI.buildUpon() .appendQueryParameter(ContactsContract.STREQUENT_PHONE_ONLY, "true").build();
            return new CursorLoader(context, uri, COLUMNS_PHONE_ONLY, null, null, null);
        }
这里我们看到,查询时所使用的URI为Contacts.CONTENT_STREQUENT_URI,他可以搜索到所有的常用联系人信息,具体来说就是
“经常使用的联系人”和“收藏联系人”集合。当Loader异步查询结束后,就会通过LoaderCallbacks的onLoadFinished()方法将结果传递出来,也就是:
        public void onLoadFinished(Loader<Cursor> loader, Cursor data) {
            //将查询数据传回Adapter
            mContactTileAdapter.setContactCursor(data);
            setEmptyViewVisibility(mContactTileAdapter.getCount() == 0);
        }
我们看到,通过mContactTileAdapter的setContactCursor()方法将结果(data)传递给Adapter。
上面这个过程的时序图如下:
四、操作提示项
常用联系人的卡片是可以拖动的,可以任意调整位置,当加载的常用联系人数目超过4项时,在ListView中第一个常用联系人的Item下方,将会出现一个操作提示框,提示用户可以拖动Item调整 位置,如下图:

从图中我们可以看到,该提示项包含左边的提示文本以及右边的取消按钮。他是在onCreateView()中被创建的:
mTileInteractionTeaserView = (TileInteractionTeaserView) inflater.inflate( R.layout.tile_interactions_teaser_view, mListView, false);从该View的初始化过程中定义了取消按钮的点击操作:
        @TileInteractionTeaserView.java
        protected void onFinishInflate() {
            findViewById(R.id.dismiss_button).setOnClickListener(new OnClickListener() {
                @Override
                public void onClick(View v) {
                    //点击取消按钮的事件
                    startDestroyAnimation();
                }
            });
        }
发生点击动作时,就会通过startDestroyAnimation()方法设置该控件的不可见,并存储当前状态,下载加载ListView时就不再显示该Item了。
五、“所有联系人”按钮
这个按钮的作用就是用户点击后,进入所有联系人的界面。他也是直接添加到ListView上面的:
mShowAllContactsButton = inflater.inflate(R.layout.show_all_contact_button, mListView, false);并且注册了点击事件:
        mShowAllContactsButton.setOnClickListener(new OnClickListener() {
            @Override
            public void onClick(View view) {
                showAllContacts();
            }
        });
        private void showAllContacts() {
            //mShowAllContactsListener就是DialtactsActivity
            mShowAllContactsListener.onShowAllContacts();
        }
上面的mShowAllContactsListener是当前的Activity,也就是DialtactsActivity:
        @DialtactsActivity
        public void onShowAllContacts() {
            //打开所有联系人界面
            final Intent intent = new Intent(this, AllContactsActivity.class);
            startActivity(intent);
        }
也就是说,点击后将会进入AllContactsActivity界面,也就进入了所有联系人的列表界面。
六、如何合并各类别项目
在上面的分析中我们拿到了四个不同类别的Adapter,并且把他们合并为统一的Adapter,也就是PhoneFavoriteMergedAdapter。然后在ListView显示时,就会调用该Adapter的相关接口,我们先来看PhoneFavoriteMergedAdapter构造方法:
        public PhoneFavoriteMergedAdapter(Context context, PhoneFavoriteFragment fragment, PhoneFavoritesTileAdapter contactTileAdapter, CallLogAdapter callLogAdapter, View showAllContactsButton, TileInteractionTeaserView tileInteractionTeaserView) {
            final Resources resources = context.getResources();
            mContext = context;
            mFragment = fragment;
            mCallLogPadding = resources.getDimensionPixelSize(R.dimen.recent_call_log_item_padding);
            mContactTileAdapter = contactTileAdapter;
            mCallLogAdapter = callLogAdapter;
            mObserver = new CustomDataSetObserver();
            mCallLogAdapter.registerDataSetObserver(mObserver);
            mContactTileAdapter.registerDataSetObserver(mObserver);
            mShowAllContactsButton = showAllContactsButton;
            mTileInteractionTeaserView = tileInteractionTeaserView;
            mCallLogQueryHandler = new CallLogQueryHandler(mContext.getContentResolver(), mCallLogQueryHandlerListener);
        }
该构造方法的作用就是保存四个项目的Adapter,以及创建CallLogQueryHandler对象,用于清除通话记录。
接下来我们看具体的加载过程。其实就是分析加载ListView时调用的getCount()、getView()等方法。
6.1、getCount()过程
ListView首先要调用的就是Adapter的getCount()方法,用于获取当前ListView要显示的总条目。下面看具体的getCount()方法:
        @PhoneFavoriteMergedAdapter.java
        public int getCount() {
            if (mContactTileAdapter.getCount() > 0) {
                return mContactTileAdapter.getCount() + mCallLogAdapter.getCount() + 1 + getTeaserViewCount();
            } else {
                return mCallLogAdapter.getCount();
            }
        }
这里要区分两种情况,当有常用联系人时,总的数目为:常用联系人数目+通话记录数目+所有联系人按钮(1)+操作提示的数目(1)。当没有常用联系人时,只显示通话记录,所以此时的总数就是通话记录的数目。
6.2、getView()过程
下面看getview()的操作,在这个方法中,需要根据当前的position来创建不同的View。
        public View getView(int position, View convertView, ViewGroup parent) {
            final int callLogAdapterCount = mCallLogAdapter.getCount();

            if ((position == getCount() - 1) && (mContactTileAdapter.getCount() > 0)) {
                //当前的position是最后一项,说明要获取的Item是“所有联系人”按钮
                return mShowAllContactsButton;
            }

            if (mTileInteractionTeaserView.getShouldDisplayInList())  {
                if (position == TILE_INTERACTION_TEASER_VIEW_POSITION + callLogAdapterCount) {
                    //当前position是通话记录的数目+提示框相对常用联系人的偏移量,说明要获取的是操作提示Item
                    return mTileInteractionTeaserView;
                }
            }

            if (callLogAdapterCount > 0) {
                if (position == 0) {
                    //用SwipeableCallLogRow装在通话记录
                    final SwipeableCallLogRow wrapper;
                    if (convertView == null) {
                        wrapper = new SwipeableCallLogRow(mContext);
                        wrapper.setOnItemSwipeListener(mCallLogOnItemSwipeListener);
                    } else {
                        wrapper = (SwipeableCallLogRow) convertView;
                    }

                    final View view = mCallLogAdapter.getView(position, convertView == null ?  null : wrapper.getChildAt(0), parent);
                    wrapper.removeAllViews();
                    final View callLogItem = view.findViewById(R.id.call_log_list_item);
                    //初始化透明度,拖动时会动态改变透明度
                    callLogItem.setTranslationX(0);
                    callLogItem.setAlpha(1);
                    wrapper.addView(view);
                    return wrapper;
                }
            }

            //转换ListView的position为常用联系人Adapter的position
            position = getAdjustedFavoritePosition(position, callLogAdapterCount);

            //获取当前position的常用联系人View
            final View view = mContactTileAdapter.getView(position, convertView, parent);
            if (position >= mContactTileAdapter.getMaxTiledRows()) {
                final FrameLayout frameLayout = (FrameLayout) view;
                final View child = frameLayout.getChildAt(0);
                FrameLayout.LayoutParams params = new FrameLayout.LayoutParams( FrameLayout.LayoutParams.WRAP_CONTENT, FrameLayout.LayoutParams.WRAP_CONTENT);
                child.setLayoutParams(params);
            }
            return view;
        }
在上面的过程中,根据当前的position加载不同的View。对于提示项和按钮,直接返回相应的View即可,而对于通话记录项,需要将通话记录的Item装入SwipeableCallLogRow容器中显示,以此来支持拖拽和拖拽时的动态透明度功能。
而加载常用联系人信息之前,需要将当前的position转换为相对常用联系人的position,并通过mContactTileAdapter取出需要显示的Item。我们主要分析一下常用联系人的加载过程。
需要注意,传递给PhoneFavoritesTileAdapter的position是针对整体ListView来讲的,也就是说,前三个常用联系人的position都是0。
        @PhoneFavoritesTileAdapter.java
        public View getView(int position, View convertView, ViewGroup parent) {
            //得到当前Item的类别,分为两种,ViewTypes.TOP(顶部多合一的项)和ViewTypes.FREQUENT(每个联系人占用一项)
            int itemViewType = getItemViewType(position);

            ContactTileRow contactTileRowView = null;
            if (convertView instanceof  ContactTileRow) {
                contactTileRowView  = (ContactTileRow) convertView;
            }

            //得到当前要显示的Item,如果是TOP位置,则包含多个联系人信息,否则只包含一个
            ArrayList<ContactEntry> contactList = getItem(position);

            if (contactTileRowView == null) {
                //创建View装载当前的Item
                contactTileRowView = new ContactTileRow(mContext, itemViewType, position);
            }

            //将联系人数据装入View容器中
            contactTileRowView.configureRow(contactList, position, position == getCount() - 1);
            return contactTileRowView;
        }
在上面getView()的过程中,首先要识别当前要加载的View的类型,是TOP位置的多合一Item还是下面常规的Item,然后再获取当前position需要加载的联系人信息(对于TOP位置来说,需要加载多个联系人),然后根据当前的Item类型创建加载Item的容器。
我们先来看选择联系人的过程:
        public ArrayList<ContactEntry> getItem(int position) {
            ArrayList<ContactEntry> resultList = new ArrayList<ContactEntry>(mColumnCount);

            //将ListView中的position转换为常用联系人数组中的index
            final int entryIndex = getFirstContactEntryIndexForPosition(position);
            final int viewType = getItemViewType(position);
            final int columnCount;
            if (viewType == ViewTypes.TOP) {
                columnCount = mColumnCount;
            } else {
                columnCount = 1;
            }

            for (int i = 0; i < columnCount; i++) {
                //从常用联系人数组中获取当前需要加载的联系人数据
                final ContactEntry entry = getContactEntryFromCache(entryIndex + i);
                if (entry == null) break;
                resultList.add(entry);
            }

            return resultList;
        }
在上面加载数据过程中,最重要的就是要将ListView中的position转换为常用联系人数组中的索引,在getFirstContactEntryIndexForPosition()需要识别当前要加载的行处于TOP瓦片式行中还是处于瓦片下面的正常Item位置,并根据两种情况计算相应的索引值。拿到索引之后就需要通过getContactEntryFromCache()加载当前需要的联系人数据。
等getItem()返回出来,就需要拿得到的联系人数据构建当前的Item。具体来说就是将当前要加载的联系人装入ContactTileRow这个容器中,以此支持拖拽的操作。
以上就是拨号界面联系人列表的显示方式。