Canvas API初步学习
1.字体
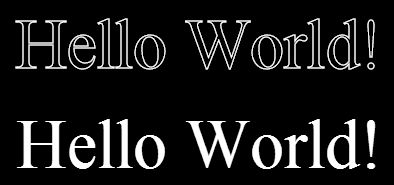
在canvas中最常见的字体表现形式有填充字体和漏空字体。
漏空字体用方法:strokeText(Text,left,top,[maxlength]);
填充字体用方法:fillText(Text,left,top,[maxlength]);
上面的两个方法的最后一个参数是可选的,四个参数的含义分为是:需绘制的字符串,绘制到画布中时左上角在画布中的横坐标及纵坐标,绘制的字符串的最大长度。
<!doctype html>
<html>
    <head></head>
	<body>
	    <canvas id="canvas" width="1350" height="620" style="background:black">
		    你的浏览器不支持canvas标签!
		</canvas>

		<script>
		    var canvas = document.getElementById('canvas');
			var cxt = canvas.getContext('2d');

			cxt.font = "70px Times new Roman";
			cxt.strokeStyle = "white";
			cxt.strokeText("Hello World!",100,100);

			cxt.fillStyle = "white";
			cxt.fillText("Hello World!",100,200);

		</script>
	</body>
</html>
运行结果:
2.路径
Canvas的基本图形都是以路径为基础的。通常使用Context对象的moveTo()、lineTo()、rect()、arc()等方法先在画布中描出图形的路径点,然后使用fill()或者stroke()方法依照路径点来填充图形或者绘制线条。
通常,在开始描绘路径之前需要调用Context对象的beginPath()方法,其作用是清除之前的路径并提醒Context开始绘制一条新路径,否则当调用stroke()方法的时候会绘制之前所有路径,影响绘制效果,同时也因为重复多次而影响网页性能。另外,调用Context对象的closePath()方法可以显式地关闭当前路径,不过不会清除路径。
以下是一些描绘路径的方法的原型:
void moveTo(x, y);
用于显式指定路径的起点。默认状态下,第一条路径的起点是画布的(0, 0)点,之后的起点是上一条路径的终点。
void lineTo(x, y);
用于描绘一条从起点从指定位置的直线路径,描绘完成后绘制的起点会移动到该指定位置。
void rect(left, top,width, height);
用于描绘一个已知左上角顶点位置以及宽和高的矩形,描绘完成后Context的绘制起点会移动到该矩形的左上角顶点。参数表示矩形左上角顶点的x、y坐标以及矩形的宽和高。
void arcTo(x1, y1, x2, y2,radius);
用于描绘一个与两条线段相切的圆弧,两条线段分别以当前Context绘制起点和(x2, y2)点为起点,都以(x1, y1)点为终点,圆弧的半径为radius。描绘完成后绘制起点会移动到以(x2, y2)为起点的线段与圆弧的切点。
void arc(x, y, radius,startAngle, endAngle, anticlockwise);
用于描绘一个以(x, y)点为圆心,radius为半径,startAngle为起始弧度,endAngle为终止弧度的圆弧。anticlockwise为布尔型的参数,true表示逆时针,false表示顺时针。参数中的两个弧度以0表示0°,位置在3点钟方向;Math.PI值表示180°,位置在9点钟方向。
void quadraticCurveTo(cpx,cpy, x, y);
用于描绘以当前Context绘制起点为起点,(cpx,cpy)点为控制点,(x, y)点为终点的二次样条曲线路径。
void bezierCurveTo(cpx1,cpy1, cpx2, cpy2, x, y);
用于描绘以当前Context绘制起点为起点,(cpx1,cpy1)点和(cpx2, cpy2)点为两个控制点,(x, y)点为终点的贝塞尔曲线路径。
路径描绘完成后,需要调用Context对象的fill()和stroke()方法来填充路径和绘制路径线条,或者调用clip()方法来剪辑Canvas区域。以上三个方法的原型如下:
void stroke();
用于按照已有的路径绘制线条。
void fill();
用于使用当前的填充风格来填充路径的区域。
void clip();
用于按照已有的路线在画布中设置剪辑区域。调用clip()方法之后,图形绘制代码只对剪辑区域有效而不再影响区域外的画布。如调用之前没有描绘路径(即默认状态下),则得到的剪辑区域为整个Canvas区域。
此外,Context对象还提供了相应的属性来调整线条及填充风格,如下所示:
strokeStyle
线条的颜色,默认为”#000000”,其值可以设置为CSS颜色值、渐变对象或者模式对象。
fillStyle
填充的颜色,默认为”#000000”,与strokeStyle一样,值也可以设置为CSS颜色值、渐变对象或者模式对象。
lineWidth
线条的宽度,单位是像素(px),默认为1.0。
lineCap
线条的端点样式,有butt(无)、round(圆头)、square(方头)三种类型可供选择,默认为butt。
lineJoin
线条的转折处样式,有round(圆角)、bevel(平角)、miter(尖角)三种;类型可供选择,默认为miter。
miterLimit
线条尖角折角的锐利程序,默认为10。
3.矩形
<!doctype html>
<html>
    <head></head>
	<body>
	    <canvas id="canvas" width="1350" height="620" style="background:black">
		    你的浏览器不支持canvas标签!
		</canvas>

		<script>
		    var canvas = document.getElementById('canvas');
			var cxt = canvas.getContext('2d');

			cxt.clearRect(0,0,1350,620);

			cxt.strokeStyle = "blue";
			cxt.lineWidth = 7;
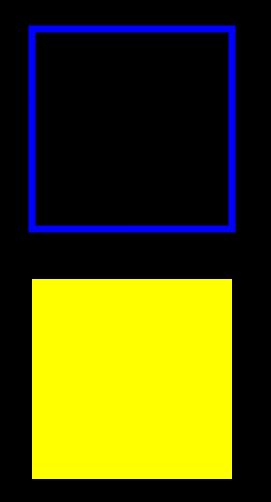
			cxt.strokeRect(100,100,200,200);

			cxt.fillStyle = "yellow";
			cxt.fillRect(100,350,200,200);
		</script>
	</body>
</html>
结果:
4.画布背景图片
有两种方式画背景图:
<!doctype html>
<html>
    <head></head>
	<body>
	    <canvas id="canvas" width="1350" height="620" style="background:black">
		    你的浏览器不支持canvas标签!
		</canvas>

		<script>
		    window.onload = function(){
				var canvas = document.getElementById('canvas');
				var cxt = canvas.getContext('2d');

				var imag = new Image();
				imag.src = "test.jpg";
				imag.onload = function(){
					cxt.drawImage(imag,0,0,700,500);
				}
			}
		</script>
	</body>
</html>
<!doctype html>
<html>
    <head></head>
	<body>
	    <canvas id="canvas" width="1350" height="620" style="background:black">
		    你的浏览器不支持canvas标签!
		</canvas>

		<script>
		    var canvas = document.getElementById('canvas');
	        var cxt = canvas.getContext('2d');

			var imag = new Image();
			imag.src = "test.jpg";
			cxt.drawImage(imag,0,0,700,500);
		</script>
	</body>
</html>
运行结果:
5.颜色填充
<!doctype html>
<html>
    <head></head>
	<body>
	    <canvas id="canvas" width="1350" height="620" style="background:black">
		    你的浏览器不支持canvas标签!
		</canvas>

		<script>
		    var canvas = document.getElementById('canvas');
	        var cxt = canvas.getContext('2d');

			cxt.translate(500,300);
			for(var i=0;i<6;i++){
			    cxt.save();
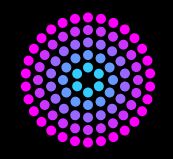
				cxt.fillStyle = 'rgb('+(51*i)+','+(255-51*i)+',255';
				for(var j=0;j<6*i;j++){
				    cxt.rotate(Math.PI*2/(6*i));
					cxt.beginPath();
					cxt.arc(0,12.5*i,5,0,360,false);
					cxt.fill();
					cxt.closePath();
				}
				cxt.restore();
			}
		</script>
	</body>
</html>
运行结果:


