ffmpeg综合应用示例(一)——摄像头直播
本文的示例将实现:读取PC摄像头视频数据并以RTMP协议发送为直播流。示例包含了
1、ffmpeg的libavdevice的使用
2、视频解码、编码、推流的基本流程
具有较强的综合性。
要使用libavdevice的相关函数,首先需要注册相关组件
avdevice_register_all();
接下来我们要列出电脑中可用的dshow设备
AVFormatContext *pFmtCtx = avformat_alloc_context();
	AVDeviceInfoList *device_info = NULL;
	AVDictionary* options = NULL;
	av_dict_set(&options, "list_devices", "true", 0);
	AVInputFormat *iformat = av_find_input_format("dshow");
	printf("Device Info=============\n");
	avformat_open_input(&pFmtCtx, "video=dummy", iformat, &options);
	printf("========================\n");
可以看到这里打开设备的步骤基本与打开文件的步骤相同,上面的代码中设置了AVDictionary,这样与在命令行中输入下列命令有相同的效果
ffmpeg -list_devices true -f dshow -i dummy
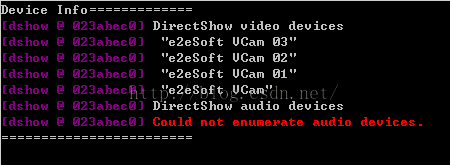
以上语句得到的结果如下
这里我的电脑上只有一个虚拟摄像头软件虚拟出来的几个dshow设备,没有音频设备,所以有如上的结果。
需要说明的是,avdevice有一个avdevice_list_devices函数可以枚举系统的采集设备,包括设备名和设备描述,非常适合用于让用户选择要使用的设备,但是不支持dshow设备,所以这里没有使用它。
下一步就可以像打开普通文件一样将上面的具体设备名作为输入打开,并进行相应的初始化设置,如下
av_register_all();
	//Register Device
	avdevice_register_all();
	avformat_network_init();

	//Show Dshow Device
	show_dshow_device();

	printf("\nChoose capture device: ");
	if (gets(capture_name) == 0)
	{
		printf("Error in gets()\n");
		return -1;
	}
	sprintf(device_name, "video=%s", capture_name);

	ifmt=av_find_input_format("dshow");

	//Set own video device's name
	if (avformat_open_input(&ifmt_ctx, device_name, ifmt, NULL) != 0){
		printf("Couldn't open input stream.(无法打开输入流)\n");
		return -1;
	}
	//input initialize
	if (avformat_find_stream_info(ifmt_ctx, NULL)<0)
	{
		printf("Couldn't find stream information.(无法获取流信息)\n");
		return -1;
	}
	videoindex = -1;
	for (i = 0; i<ifmt_ctx->nb_streams; i++)
		if (ifmt_ctx->streams[i]->codec->codec_type == AVMEDIA_TYPE_VIDEO)
		{
			videoindex = i;
			break;
		}
	if (videoindex == -1)
	{
		printf("Couldn't find a video stream.(没有找到视频流)\n");
		return -1;
	}
	if (avcodec_open2(ifmt_ctx->streams[videoindex]->codec, avcodec_find_decoder(ifmt_ctx->streams[videoindex]->codec->codec_id), NULL)<0)
	{
		printf("Could not open codec.(无法打开解码器)\n");
		return -1;
	}
在选择了输入设备并进行相关初始化之后,需要对输出做相应的初始化。ffmpeg将网络协议和文件同等看待,同时因为使用RTMP协议进行传输,这里我们指定输出为flv格式,编码器使用H.264
//output initialize
avformat_alloc_output_context2(&ofmt_ctx, NULL, "flv", out_path);
//output encoder initialize
pCodec = avcodec_find_encoder(AV_CODEC_ID_H264);
if (!pCodec){
printf("Can not find encoder! (没有找到合适的编码器!)\n");
return -1;
}
pCodecCtx=avcodec_alloc_context3(pCodec);
pCodecCtx->pix_fmt = PIX_FMT_YUV420P;
pCodecCtx->width = ifmt_ctx->streams[videoindex]->codec->width;
pCodecCtx->height = ifmt_ctx->streams[videoindex]->codec->height;
pCodecCtx->time_base.num = 1;
pCodecCtx->time_base.den = 25;
pCodecCtx->bit_rate = 400000;
pCodecCtx->gop_size = 250;
/* Some formats,for example,flv, want stream headers to be separate. */
if (ofmt_ctx->oformat->flags & AVFMT_GLOBALHEADER)
pCodecCtx->flags |= CODEC_FLAG_GLOBAL_HEADER;
//H264 codec param
//pCodecCtx->me_range = 16;
//pCodecCtx->max_qdiff = 4;
//pCodecCtx->qcompress = 0.6;
pCodecCtx->qmin = 10;
pCodecCtx->qmax = 51;
//Optional Param
pCodecCtx->max_b_frames = 3;
// Set H264 preset and tune
AVDictionary *param = 0;
av_dict_set(¶m, "preset", "fast", 0);
av_dict_set(¶m, "tune", "zerolatency", 0);
if (avcodec_open2(pCodecCtx, pCodec,¶m) < 0){
printf("Failed to open encoder! (编码器打开失败!)\n");
return -1;
}
//Add a new stream to output,should be called by the user before avformat_write_header() for muxing
video_st = avformat_new_stream(ofmt_ctx, pCodec);
if (video_st == NULL){
return -1;
}
video_st->time_base.num = 1;
video_st->time_base.den = 25;
video_st->codec = pCodecCtx;
//Open output URL,set before avformat_write_header() for muxing
if (avio_open(&ofmt_ctx->pb,out_path, AVIO_FLAG_READ_WRITE) < 0){
printf("Failed to open output file! (输出文件打开失败!)\n");
return -1;
}
//Show some Information
av_dump_format(ofmt_ctx, 0, out_path, 1);
//Write File Header
avformat_write_header(ofmt_ctx,NULL);
完成输入和输出的初始化之后,就可以正式开始解码和编码并推流的流程了,这里要注意,摄像头数据往往是RGB格式的,需要将其转换为YUV420P格式,所以要先做如下的准备工作
//prepare before decode and encode
	dec_pkt = (AVPacket *)av_malloc(sizeof(AVPacket));
	//enc_pkt = (AVPacket *)av_malloc(sizeof(AVPacket));
	//camera data has a pix fmt of RGB,convert it to YUV420
	img_convert_ctx = sws_getContext(ifmt_ctx->streams[videoindex]->codec->width, ifmt_ctx->streams[videoindex]->codec->height,
		ifmt_ctx->streams[videoindex]->codec->pix_fmt, pCodecCtx->width, pCodecCtx->height, PIX_FMT_YUV420P, SWS_BICUBIC, NULL, NULL, NULL);
	pFrameYUV = avcodec_alloc_frame();
	uint8_t *out_buffer = (uint8_t *)av_malloc(avpicture_get_size(PIX_FMT_YUV420P, pCodecCtx->width, pCodecCtx->height));
	avpicture_fill((AVPicture *)pFrameYUV, out_buffer, PIX_FMT_YUV420P, pCodecCtx->width, pCodecCtx->height);
下面就可以正式开始解码、编码和推流了
//start decode and encode
	int64_t start_time=av_gettime();
	while (av_read_frame(ifmt_ctx, dec_pkt) >= 0){
		if (exit_thread)
			break;
		av_log(NULL, AV_LOG_DEBUG, "Going to reencode the frame\n");
		pframe = av_frame_alloc();
		if (!pframe) {
			ret = AVERROR(ENOMEM);
			return -1;
		}
		//av_packet_rescale_ts(dec_pkt, ifmt_ctx->streams[dec_pkt->stream_index]->time_base,
		//	ifmt_ctx->streams[dec_pkt->stream_index]->codec->time_base);
		ret = avcodec_decode_video2(ifmt_ctx->streams[dec_pkt->stream_index]->codec, pframe,
			&dec_got_frame, dec_pkt);
		if (ret < 0) {
			av_frame_free(&pframe);
			av_log(NULL, AV_LOG_ERROR, "Decoding failed\n");
			break;
		}
		if (dec_got_frame){
			sws_scale(img_convert_ctx, (const uint8_t* const*)pframe->data, pframe->linesize, 0, pCodecCtx->height, pFrameYUV->data, pFrameYUV->linesize);

			enc_pkt.data = NULL;
			enc_pkt.size = 0;
			av_init_packet(&enc_pkt);
			ret = avcodec_encode_video2(pCodecCtx, &enc_pkt, pFrameYUV, &enc_got_frame);
			av_frame_free(&pframe);
			if (enc_got_frame == 1){
				//printf("Succeed to encode frame: %5d\tsize:%5d\n", framecnt, enc_pkt.size);
				framecnt++;
				enc_pkt.stream_index = video_st->index;

				//Write PTS
				AVRational time_base = ofmt_ctx->streams[videoindex]->time_base;//{ 1, 1000 };
				AVRational r_framerate1 = ifmt_ctx->streams[videoindex]->r_frame_rate;// { 50, 2 };
				AVRational time_base_q = { 1, AV_TIME_BASE };
				//Duration between 2 frames (us)
				int64_t calc_duration = (double)(AV_TIME_BASE)*(1 / av_q2d(r_framerate1));	//内部时间戳
				//Parameters
				//enc_pkt.pts = (double)(framecnt*calc_duration)*(double)(av_q2d(time_base_q)) / (double)(av_q2d(time_base));
				enc_pkt.pts = av_rescale_q(framecnt*calc_duration, time_base_q, time_base);
				enc_pkt.dts = enc_pkt.pts;
				enc_pkt.duration = av_rescale_q(calc_duration, time_base_q, time_base); //(double)(calc_duration)*(double)(av_q2d(time_base_q)) / (double)(av_q2d(time_base));
				enc_pkt.pos = -1;

				//Delay
				int64_t pts_time = av_rescale_q(enc_pkt.dts, time_base, time_base_q);
				int64_t now_time = av_gettime() - start_time;
				if (pts_time > now_time)
					av_usleep(pts_time - now_time);

				ret = av_interleaved_write_frame(ofmt_ctx, &enc_pkt);
				av_free_packet(&enc_pkt);
			}
		}
		else {
			av_frame_free(&pframe);
		}
		av_free_packet(dec_pkt);
	}
解码部分比较简单,编码部分需要自己计算PTS、DTS,比较复杂。这里通过帧率计算PTS和DTS
首先通过帧率计算每两帧之间的时间间隔,但是要换算为ffmpeg内部的时间基表示的值。所谓ffmpeg内部的时间基即AV_TIME_BASE,定义为
#define AV_TIME_BASE 1000000
任何以秒为单位的时间值都通过下式转换为ffmpeg内部时间基表示的时间值,其实就是转换为了微秒
timestamp=AV_TIME_BASE*time(s)
所以有
//Duration between 2 frames (us)
int64_t calc_duration = (double)(AV_TIME_BASE)*(1 / av_q2d(r_framerate1));	//内部时间戳
而enc_pkt因为是要写入最后的输出码流的,它的PTS、DTS应该是以ofmt_ctx->streams[videoindex]->time_base为时间基来表示的,时间基之间的转换用下式
enc_pkt.pts = av_rescale_q(framecnt*calc_duration, time_base_q, time_base);其实就是
enc_pkt.pts = (double)(framecnt*calc_duration)*(double)(av_q2d(time_base_q)) / (double)(av_q2d(time_base));非常简单的数学转换。
还有一点,因为转码流程可能比实际的播放快很多,为保持流畅的播放,要判断DTS和当前真实时间,并进行相应的延时操作,如下
//Delay
				int64_t pts_time = av_rescale_q(enc_pkt.dts, time_base, time_base_q);
				int64_t now_time = av_gettime() - start_time;
				if (pts_time > now_time)
					av_usleep(pts_time - now_time);
这里正好与之前相反,要将ofmt_ctx->streams[videoindex]->time_base时间基转换为ffmpeg内部时间基,因为av_gettime获得的就是以微秒为单位的时间
总体流程完毕之后,还剩下最后的flush encoder操作,输出之前存储在缓冲区内的数据
//Flush Encoder
	ret = flush_encoder(ifmt_ctx,ofmt_ctx,0,framecnt);
	if (ret < 0) {
		printf("Flushing encoder failed\n");
		return -1;
	}

	//Write file trailer
	av_write_trailer(ofmt_ctx);

	//Clean
	if (video_st)
		avcodec_close(video_st->codec);
	av_free(out_buffer);
	avio_close(ofmt_ctx->pb);
	avformat_free_context(ifmt_ctx);
	avformat_free_context(ofmt_ctx);
flush_encoder的内容如下
int flush_encoder(AVFormatContext *ifmt_ctx, AVFormatContext *ofmt_ctx, unsigned int stream_index, int framecnt){
	int ret;
	int got_frame;
	AVPacket enc_pkt;
	if (!(ofmt_ctx->streams[stream_index]->codec->codec->capabilities &
		CODEC_CAP_DELAY))
		return 0;
	while (1) {
		enc_pkt.data = NULL;
		enc_pkt.size = 0;
		av_init_packet(&enc_pkt);
		ret = avcodec_encode_video2 (ofmt_ctx->streams[stream_index]->codec, &enc_pkt,
			NULL, &got_frame);
		av_frame_free(NULL);
		if (ret < 0)
			break;
		if (!got_frame){
			ret=0;
			break;
		}
		printf("Flush Encoder: Succeed to encode 1 frame!\tsize:%5d\n",enc_pkt.size);

		//Write PTS
		AVRational time_base = ofmt_ctx->streams[stream_index]->time_base;//{ 1, 1000 };
		AVRational r_framerate1 = ifmt_ctx->streams[stream_index]->r_frame_rate;// { 50, 2 };
		AVRational time_base_q = { 1, AV_TIME_BASE };
		//Duration between 2 frames (us)
		int64_t calc_duration = (double)(AV_TIME_BASE)*(1 / av_q2d(r_framerate1));	//内部时间戳
		//Parameters
		enc_pkt.pts = av_rescale_q(framecnt*calc_duration, time_base_q, time_base);
		enc_pkt.dts = enc_pkt.pts;
		enc_pkt.duration = av_rescale_q(calc_duration, time_base_q, time_base);

		/* copy packet*/
		//转换PTS/DTS(Convert PTS/DTS)
		enc_pkt.pos = -1;
		framecnt++;
		ofmt_ctx->duration=enc_pkt.duration * framecnt;

		/* mux encoded frame */
		ret = av_interleaved_write_frame(ofmt_ctx, &enc_pkt);
		if (ret < 0)
			break;
	}
	return ret;
}
可以看到基本上就是把编码流程重复了一遍
至此,就实现了摄像头数据的直播。
当然还可以使用多线程来实现“按下回车键停止播放”这样的控制功能。
本工程源代码。
