How To Integrate iAd into Your iPhone App
With the iOs SDK 4 now public and the advent of iAds just a few days away, I thought we’d celebrate with a tutorial on how to integrate iAd into your iPhone app!
In this tutorial, not only will we show you how to get started with iAd, but we’ll also show you how to deal with some complex issues you may run into along the way such as:
- Supporting both Portrait and Landscape ads in the same app
- Integrating into a Universal app
- Maintaining backwards compatibility with iOs 3.0
- What to do if you are using a UITableViewController!
We’re actually going to start with where we left off in the How To Port an iPhone Application to the iPad and use the universal app we developed in that tutorial in the starting point.
So grab a copy if you haven’t already, and let’s get to adding some iAds!
Base SDK vs. Deployment Target
The first step to use iAd is to make sure our project has the right Base SDK and iPhone OS Deployment Target selected.
For those of you confused about the difference between the Base SDK and Deployment Target (like I was for quite some time!), here’s what they mean:
- The Base SDK is the version of the SDK you are linking against. Your app can use any classes or functions available in the version of the SDK you choose here – as long as they are available on the actual device the code runs on.
- The Deployment Target is the earliest possible version of the SDK your code can run on. This can be an earlier version than the Base SDK – in fact you often want to set it to be earlier to ensure that as many different versions of the OS can run your code as possible!
The tricky bit is what happens when you want to use a class, function, or framework available in one version of the OS if it’s available, but still work on the old version of the OS if it isn’t. We already did some of this in How To Port an iPhone Application to the iPad, and we’ll do even more in this tutorial!
For this tutorial, we want to set things up so that our code can use stuff available in iOS 4.0 (such as iAd), but still run on as many devices as reasonable (3.0+).
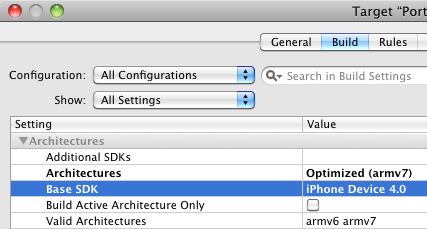
So first let’s set iOs 4.0 as the base SDK. To do this, expand the Targets directory, right click on PortMe, and choose “Get Info”. Click the Build tab, make sure “All Configurations” is selected, navigate to Architectures\Base SDK, and change the value to iPhone Device 4.0.
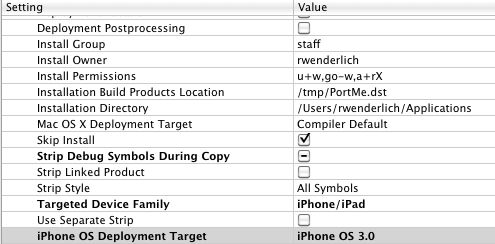
Then, let’s set iPhone OS 3.0 as the iPhone OS Deployment Target. To do this, still in the Target Build tab, navigate to Deployment\iPhone OS Deployment Target, and change the value to iPhone OS 3.0.
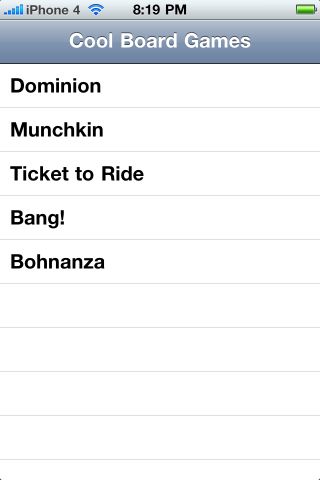
You should now be able to compile and run your app (use the iPhone simulator), and try it out on an iPhone 4 simulator. Once you run your code, in the simulator choose Hardware\Device\iPhone OS 4 and re-run your app. The simulator window will look a little different, and say iPhone 4 in the toolbar, so you’ll know it’s working!
Linking Against the iAd Framework
The next thing we need to do is add the iAd framework to the project. You can do this by right clicking on Frameworks, choosing “Add\Existing Frameworks…”, and choosing “iAd.framework”.
The problem is, if that is all we do our code will break on older devices that don’t have the iAd framework.
You can verify this by trying to run your code in the iPad Simulator 3.2 – boom! The app will crash on startup and you’ll see the following error log:
dyld: Library not loaded: /System/Library/Frameworks/iAd.framework/iAd
Referenced from: /Users/rwenderlich/Library/Application Support/
iPhone Simulator/3.2/Applications/
3ACB1BDA-26F6-43A6-84EA-9FB637B8CDCD/PortMe.app/PortMe
Reason: image not found
To fix this, we need to weak link against the iAd framework. Expand the Targets directory, right click on PortMe, and choose “Get Info”. Click the Build tab, make sure “All Configurations” is selected, and navigate to Linking\Other Linker Flags. Double click on that entry, click the “+” button, and type “-weak_framework iAd”.
Click OK, and then try your app on the iPad simulator again and viola – it should work!
Preparing our XIB
In this tutorial, we’re going to integrate iAd into both the PortMeGameListController and the PortMeGameDetailsController. However, the integration is a bit easier in the PortMeGameDetailsController because it is a subclass of UIViewController, so we’re going to start there first.
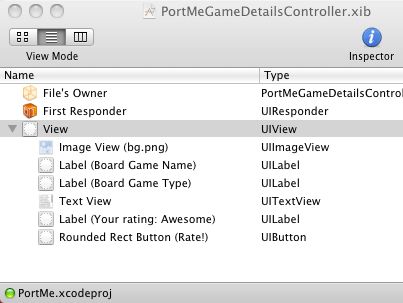
Open up PortMeGameDetailsController.xib. You’ll see that all of the controls are children of a single view:
What we’re going to need to do with iAd is scroll an ad view onto the screen when an ad is available, and shrink the rest of the content to fill the remaining space. As currently designed, this isn’t that easy because all of the controls are direct children of the root view. But there’s an easy way to fix it – we’ll simply move the controls into a subview instead!
The easiest way to do this is to drag another view from the library into the XIB, and change its size to be the same as the existing view’s size (320×416). Then drag the existing view as a subview of the new view. When you’re done, it should look like the following:
Then, control-drag from the File’s Owner to the new view (which is now the root view) to connect it to the view outlet. Save your XIB, and run the project and verify that everything still works OK with the details view (in particularly that orientation resizing works correctly). If all works well, we’re one step closer to integrating iAd!
Simple iAd Integration
Ok, now let’s get to the fun part – integrating iAd!
First, make the following changes to PortMeGameDetailsController:
// In the import section #import "iAd/ADBannerView.h" // Modify the PortMeGameDetailsController interface @interface PortMeGameDetailsController : UIViewController <GameSelectionDelegate, UISplitViewControllerDelegate, ADBannerViewDelegate> { // Inside the PortMeGameDetailsController interface UIView *_contentView; id _adBannerView; BOOL _adBannerViewIsVisible; // After the interface @property (nonatomic, retain) IBOutlet UIView *contentView; @property (nonatomic, retain) id adBannerView; @property (nonatomic) BOOL adBannerViewIsVisible; |
We first include the iAd headers and mark the view controller as implementing the ADBannerViewDelegate. This way, we can receive events as ads become available or not.
We then declare a property to keep track of the content view that contains all of the controls (basically the inner UIView). We also declare a variable to keep track of our iAd banner view, and whether or not it’s currently visible.
Note that we declare the iAd banner view as an id variable rather than as a ADBannerView. This is because we want to ensure backwards compatibility all the way to OS 3.0, and the ADBannerView class is only available on 4.0+, so we need to weak link against it.
Before we forget, let’s hook up our content view to the new outlet we just made. Make sure you save PortMeGameDetailsController.h, go back to PortMeGameDetailsController.xib, control-drag from the File’s Owner to the inner (second) UIView, and connect it to the contentView outlet.
Then switch over to PortMeGameDetailsController.m and make the following changes:
// In the synthesize section @synthesize contentView = _contentView; @synthesize adBannerView = _adBannerView; @synthesize adBannerViewIsVisible = _adBannerViewIsVisible; // In the dealloc section self.contentView = nil; self.adBannerView = nil; |
Next, we’re going to add the meat of the code. But there’s a lot of it – so let’s break it down into 6 steps.
1) Add helper functions to get height of iAd banner
- (int)getBannerHeight:(UIDeviceOrientation)orientation { if (UIInterfaceOrientationIsLandscape(orientation)) { return 32; } else { return 50; } } - (int)getBannerHeight { return [self getBannerHeight:[UIDevice currentDevice].orientation]; } |
There are several places in the rest of the code where we’re going to want to know how large the banner view should be given a particular orientation. Currently iAds have two possible sizes: 320×50 for landscape, or 480×32 for portrait. So we simply retrieve the proper height based on the passed in orientation.
2) Add helper function to create the iAd view
- (void)createAdBannerView { Class classAdBannerView = NSClassFromString(@"ADBannerView"); if (classAdBannerView != nil) { self.adBannerView = [[[classAdBannerView alloc] initWithFrame:CGRectZero] autorelease]; [_adBannerView setRequiredContentSizeIdentifiers:[NSSet setWithObjects: ADBannerContentSizeIdentifier320x50, ADBannerContentSizeIdentifier480x32, nil]]; if (UIInterfaceOrientationIsLandscape([UIDevice currentDevice].orientation)) { [_adBannerView setCurrentContentSizeIdentifier: ADBannerContentSizeIdentifier480x32]; } else { [_adBannerView setCurrentContentSizeIdentifier: ADBannerContentSizeIdentifier320x50]; } [_adBannerView setFrame:CGRectOffset([_adBannerView frame], 0, -[self getBannerHeight])]; [_adBannerView setDelegate:self]; [self.view addSubview:_adBannerView]; } } |
This helper function creates an ADBannerView in a manner that is safe to use across multiple OS versions. It uses weak linking and NSClassFromString to check if the ADBannerView class is available – if it is not, the method will return nil and the function will bail.
However, if it is available it creates an instance of the class. It then uses the setRequiredContentSizeIdentifiers to specify what kind of ads this app needs. For our case, our app supports both portrait and landscape modes so it needs both ad options.
It then calls setCurrentContentSizeIdentifier to tell iAd which ad it should display. We simply choose the correct one by looking at the current orientation.
Next, we need to set the frame for the iAd. Note there’s some funky business here – we actually set the frame of the view to be offscreen! This is because we don’t know if an ad is available yet, and we don’t want to display the view until we know one is.
We set our view controller as the delegate so that we can receive notice about iAds being available or not. Then finally we ad the new iAd banner view as a subview of our view!
Note something subtle about the above – we always use message passing syntax rather than dot notation (i.e. [_adBannerView setRequiredContentSizeIdentifiers:...] instead of _adBannerView.requiredContentSizeIdentifiers = …). This is again to make sure everything runs fine on OS 3.0+.
3) Add function to size views correctly
- (void)fixupAdView:(UIInterfaceOrientation)toInterfaceOrientation { if (_adBannerView != nil) { if (UIInterfaceOrientationIsLandscape(toInterfaceOrientation)) { [_adBannerView setCurrentContentSizeIdentifier: ADBannerContentSizeIdentifier480x32]; } else { [_adBannerView setCurrentContentSizeIdentifier: ADBannerContentSizeIdentifier320x50]; } [UIView beginAnimations:@"fixupViews" context:nil]; if (_adBannerViewIsVisible) { CGRect adBannerViewFrame = [_adBannerView frame]; adBannerViewFrame.origin.x = 0; adBannerViewFrame.origin.y = 0; [_adBannerView setFrame:adBannerViewFrame]; CGRect contentViewFrame = _contentView.frame; contentViewFrame.origin.y = [self getBannerHeight:toInterfaceOrientation]; contentViewFrame.size.height = self.view.frame.size.height - [self getBannerHeight:toInterfaceOrientation]; _contentView.frame = contentViewFrame; } else { CGRect adBannerViewFrame = [_adBannerView frame]; adBannerViewFrame.origin.x = 0; adBannerViewFrame.origin.y = -[self getBannerHeight:toInterfaceOrientation]; [_adBannerView setFrame:adBannerViewFrame]; CGRect contentViewFrame = _contentView.frame; contentViewFrame.origin.y = 0; contentViewFrame.size.height = self.view.frame.size.height; _contentView.frame = contentViewFrame; } [UIView commitAnimations]; } } |
This is a helper function we can call to make sure our views are in the right position. If ads are available, we want the ad banner view to be at the top of the screen and the content view shrunk a bit to fill the rest of the area. If ads are not available, we want the ad banner view offscreen and the content view as large as the entire view here.
And that’s exactly what the above function does. It looks long, but is fairly simple and self-explanatory. Note that we wrap the resizing code in an animation block to make things look awesome.
4) Call createAdView in viewDidLoad
- (void)viewDidLoad { [self createAdBannerView]; } |
We want to create our ad view as soon as our view is loaded, even if we aren’t ready to display it quite yet.
5) Call fixupAdView in viewWillAppear and willRotateToInterfaceOrientation
- (void) viewWillAppear:(BOOL)animated { [self refresh]; [self fixupAdView:[UIDevice currentDevice].orientation]; } - (void)willRotateToInterfaceOrientation:(UIInterfaceOrientation)toInterfaceOrientation duration:(NSTimeInterval)duration { [self fixupAdView:toInterfaceOrientation]; } |
We need to fix up our ad view in viewWillAppear, because the device may have changed orientations in the time between when our view was visible last and now. And we obviously need to change it upon rotation as well!
6) Implement ADBannerViewDelegate
#pragma mark ADBannerViewDelegate - (void)bannerViewDidLoadAd:(ADBannerView *)banner { if (!_adBannerViewIsVisible) { _adBannerViewIsVisible = YES; [self fixupAdView:[UIDevice currentDevice].orientation]; } } - (void)bannerView:(ADBannerView *)banner didFailToReceiveAdWithError:(NSError *)error { if (_adBannerViewIsVisible) { _adBannerViewIsVisible = NO; [self fixupAdView:[UIDevice currentDevice].orientation]; } } |
Now that we have our helper functions, implementing the ADBannerViewDelegate methods are quite simple. We simply toggle whether the ad banner view should be visible or not, and call fixupAdView.
Done!
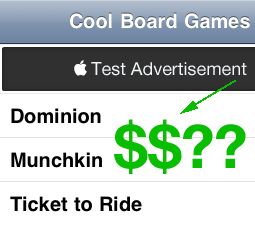
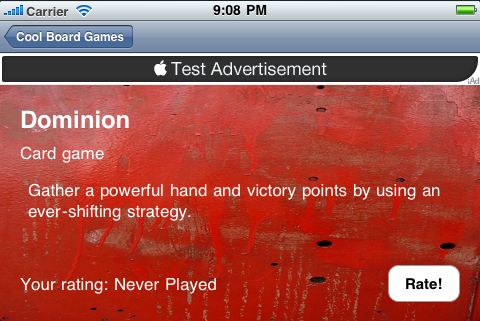
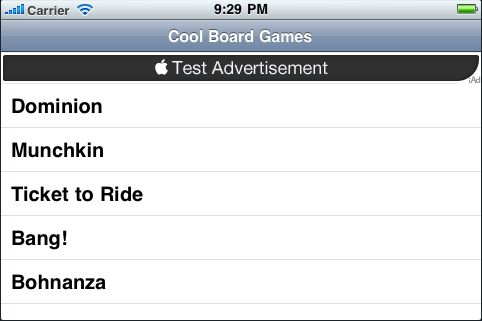
And that’s it! Compile and run your project, and you should see ads appear correctly in both portrait and landscape mode.
And best yet – if you run the code on an iPad or iPhone 3.0 device it will work just fine as well, but without ads!
UITableView integration
Well that worked great for our details controller, but we want it in our list controller too!
The problem is our list controller is a UITableViewController. Unfortunately, it seems like the best way to deal with this situation is to convert your UITableViewController to a normal UIViewController and then proceed similarly to the way we did above. So here are all of the gory steps:
1) Create a XIB for PortMeGameListController
Go to File\New File, choose User Interface and View XIB, make sure Product is iPhone, and click Next. Name the XIB PortMeGameListController.xib and click Finish.
Open up the XIB, click on the File’s Owner, and in the fourth tab of the Attributes Inspector change the class to PortMeGameListController.
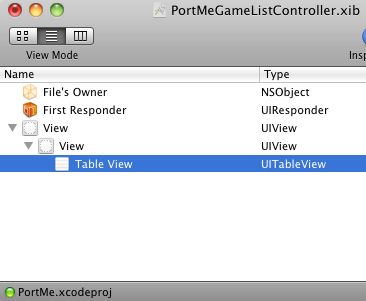
Then drag a UIView into the current UIView (so there are 2, just like we did before), and add a UITableView to the inner view. When you’re done it should look like this:
2) Make some changes to PortMeGameListController
Inside PortMeGameListController.h:
// Change the interface declaration @interface PortMeGameListController : UIViewController <UITableViewDelegate, UITableViewDataSource> { // Add inside class UITableView *_tableView; UIView *_contentView; // Add after class @property (nonatomic, retain) IBOutlet UITableView *tableView; @property (nonatomic, retain) IBOutlet UIView *contentView; |
Inside PortMeGameListController.m:
// In synthesize section @synthesize tableView = _tableView; @synthesize contentView = _contentView; // In dealloc section self.tableView = nil; self.contentView = nil; |
Don’t forget to save the files!
3) Hook up outlets
Now go back to PortMeGameListController.xib and connect the first view to the view outlet, the second to the contentView outlet, and the third to the tableView outlet.
Also control-drag from the tableView back to the File’s Owner and set it as the delegate and datasource.
4) Set the NIB name for PortMeGameListController in MainWindow
Open MainWindow.xib and MainWindow-iPad.xib, expand the Navigation Controller, select “Port Me Game List Controller”, and change the nib name to PortMeGameListController.
5) Compile and test to make sure everything works as usual
At this point, compile and run your code and make sure everything works as it usually does – but now you’re using a UIViewController rather than a TableViewController, and you have a XIB laid out in a nice way to use iAds!
6) Follow the steps from the previous section
Now you’re exactly where we were in the previous section with a view controller – so follow the same steps to integrate in this view!
Done!
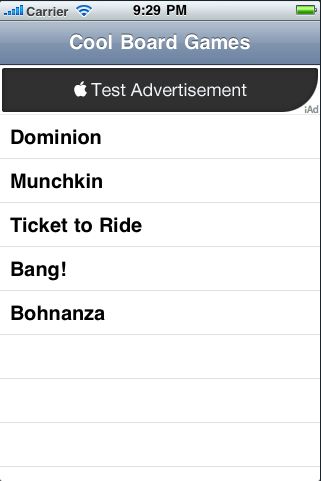
If all goes well, you should be able to compile and run your project and see advertisements at the top of your table view!
Where To Go Now?
Here is a sample project with all of the code we’ve developed in the above tutorial.
Now you should know how to integrate iAds into your projects – no matter what OSs you wish to support for your app! I’d love to hear your experiences with iAds and how well they are working (or not) for your app!
