Android实现Tab切换效果总结
Android的页面切换效果可以通过以下方式实现
1、ActionBar+Fragment实现
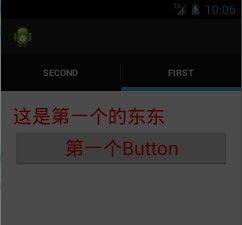
实现效果如:
首先在main.xml中放一个LinearLayout
准备两个xml文件来实现切换
first.xml:
<LinearLayout
    xmlns:android="http://schemas.android.com/apk/res/android"
    android:layout_width="match_parent"
    android:layout_height="match_parent"
    android:orientation="vertical" >
    <TextView
        android:id="@+id/first"
        android:text="@string/first"
        android:layout_width="match_parent"
        android:layout_height="wrap_content"
        android:textColor="#ff0000"
        android:textSize="25sp"
        />
    <Button
        android:id="@+id/firstButton"
        android:text="@string/firstButton"
        android:layout_width="match_parent"
        android:layout_height="match_parent"
        android:textColor="#ff0000"
        android:textSize="25sp"
        />
</LinearLayout>
second.xml
<LinearLayout xmlns:android="http://schemas.android.com/apk/res/android"
    android:layout_width="match_parent"
    android:layout_height="match_parent"
    android:orientation="vertical" >
    <TextView
        android:id="@+id/second"
        android:text="@string/second"
        android:layout_width="match_parent"
        android:layout_height="wrap_content"
        android:textColor="#ff0000"
        android:textSize="25sp"
        />
    <Button
        android:id="@+id/secondButton"
        android:text="@string/second"
        android:layout_width="match_parent"
        android:layout_height="wrap_content"
        />
</LinearLayout>
实现两个Fragment类来实现前面的xml 文件
FirstFragment.java
@SuppressLint("NewApi")
public class FirstFragment extends Fragment {


	@Override
	public void onCreate(Bundle savedInstanceState) {
		// TODO Auto-generated method stub
		Log.e(Constant.MESS_LOG, "FirstFragment OnCreate");
		super.onCreate(savedInstanceState);
	}

	@Override
	public void onStop() {
		// TODO Auto-generated method stub
		Log.e(Constant.MESS_LOG, "FirstFragment onStop!");
		super.onStop();
	}


	@Override
	public View onCreateView(LayoutInflater inflater, ViewGroup container,
			Bundle savedInstanceState) {
		// TODO Auto-generated method stub
		Log.e(Constant.MESS_LOG, "FirstFratment OnCreateView");
		return inflater.inflate(R.layout.first, container,false);
				//super.onCreateView(inflater, container, savedInstanceState);
	}
}
SecondFragment.java
@SuppressLint("NewApi")
public class SecondFragment extends Fragment{

	private Button secondButton;
	@Override
	public void onCreate(Bundle savedInstanceState) {
		// TODO Auto-generated method stub
		super.onCreate(savedInstanceState);
		Log.e(Constant.MESS_LOG, "sECONDfRAGMENT Oncreate");

	}
	private void initialView(){

	}

	@Override
	public View onCreateView(LayoutInflater inflater, ViewGroup container,
			Bundle savedInstanceState) {
		// TODO Auto-generated method stub
		Log.e(Constant.MESS_LOG, "SecondFragment OnCreateView");
		return inflater.inflate(R.layout.second, container, false);
				//super.onCreateView(inflater, container, savedInstanceState);
	}

	@Override
	public void onStop() {
		// TODO Auto-generated method stub
		Log.e(Constant.MESS_LOG, "Secondfragment Onstop!");
		super.onStop();
	}


}
在Activity中得到ActionBar
new 两个Tab 为每个TAB绑定一个监听,将其加到ActionBar当中
@SuppressLint("NewApi")
public class MainActivity extends Activity implements TabListener{

	private Fragment fragment;
	public MainActivity(){
	}
	public MainActivity(Fragment fragment){
		this.fragment = fragment;
	}
	@Override
	protected void onCreate(Bundle savedInstanceState) {
		super.onCreate(savedInstanceState);
		setContentView(R.layout.main);

		ActionBar actionBar = getActionBar();
		actionBar.setNavigationMode(ActionBar.NAVIGATION_MODE_TABS);
		actionBar.setDisplayShowTitleEnabled(false);

		Tab firstTab = actionBar.newTab().setText("First");
		Tab secondTab = actionBar.newTab().setText("second");
		firstTab.setTabListener(new MainActivity((new FirstFragment())));
		secondTab.setTabListener(new MainActivity(new SecondFragment()));

		actionBar.addTab(secondTab);
		actionBar.addTab(firstTab);
	}

	@Override
	public boolean onCreateOptionsMenu(Menu menu) {
		// Inflate the menu; this adds items to the action bar if it is present.
		getMenuInflater().inflate(R.menu.main, menu);
		return true;
	}

	@Override
	public void onTabReselected(Tab tab, FragmentTransaction ft) {
		// TODO Auto-generated method stub

	}

	@Override
	public void onTabSelected(Tab tab, FragmentTransaction ft) {
		// TODO Auto-generated method stub
		ft.add(R.id.layout, fragment,null);
	}

	@Override
	public void onTabUnselected(Tab tab, FragmentTransaction ft) {
		// TODO Auto-generated method stub
		ft.remove(fragment);
	}

}
2、FragemntTabHost+Fragment实现
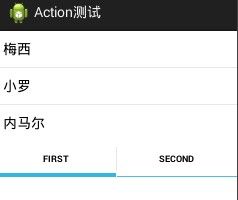
运行效果如下所示:
第一、在主界面添加FragmentTabHost控件以及layout用来显示Fragment
<LinearLayout xmlns:android="http://schemas.android.com/apk/res/android"
    android:layout_width="match_parent"
    android:layout_height="match_parent"
    android:orientation="vertical" >
    <FrameLayout
        android:id="@+id/fragment"
        android:layout_width="match_parent"
        android:layout_height="wrap_content"
        ></FrameLayout>

    <android.support.v4.app.FragmentTabHost
        android:id="@+id/tab_host"
        android:layout_width="match_parent"
        android:layout_height="wrap_content"
        />

</LinearLayout>
第二、添加Fragment
FirstFragment.java
@SuppressLint("NewApi")
public class FirstFragment extends ListFragment {


	@Override
	public void onActivityCreated(Bundle savedInstanceState) {
		// TODO Auto-generated method stub
		super.onActivityCreated(savedInstanceState);

		setListAdapter(new ArrayAdapter<String>(getActivity(), android.R.layout.simple_list_item_1, new String[]{"梅西","小罗","内马尔"}));

	}
}
SecondFragment.java
@SuppressLint("NewApi")
public class SecondFragment extends ListFragment{
@Override
public void onActivityCreated(Bundle savedInstanceState) {
// TODO Auto-generated method stub
super.onActivityCreated(savedInstanceState);
setListAdapter(new ArrayAdapter<String>(getActivity(), android.R.layout.simple_list_item_1, new String[]{"乔丹","科比","勒布朗"}));
}
}
第三、在Activity中实现切换
public class FragmentTabHostActivity extends FragmentActivity {

	private FragmentTabHost mtabhost;
	@Override
	protected void onCreate(Bundle savedInstanceState) {
		// TODO Auto-generated method stub
		super.onCreate(savedInstanceState);
		setContentView(R.layout.tab);

		initView();
	}

	private void initView(){

		mtabhost = (FragmentTabHost) findViewById(R.id.tab_host);
		mtabhost.setup(getApplicationContext(), getSupportFragmentManager(), R.id.fragment);

		TabSpec first =  mtabhost.newTabSpec("first").setIndicator("first");
		mtabhost.addTab(first, FirstFragment.class, null);

		TabSpec second = mtabhost.newTabSpec("second").setIndicator("second");
		mtabhost.addTab(second, SecondFragment.class, null);

	}

}
具体效果如上
当<android.support.v4.app.FragmentTabHost />标签写错或者没有初始化FragmentTabHost 报no tab known for tag null错
具体如下图所示:

如果需要将Tab菜单放在上面可以改成:
<android.support.v4.app.FragmentTabHost
     xmlns:android="http://schemas.android.com/apk/res/android"
    android:id="@android:id/tabhost"
    android:layout_width="fill_parent"
    android:layout_height="fill_parent" >

    <LinearLayout
        android:layout_width="match_parent"
        android:layout_height="match_parent"
        android:orientation="vertical" >

        <TabWidget
            android:id="@android:id/tabs"
            android:layout_width="fill_parent"
            android:layout_height="fill_parent" >
        </TabWidget>

        <FrameLayout
            android:id="@android:id/tabcontent"
            android:layout_width="wrap_content"
            android:layout_height="wrap_content" >
        </FrameLayout>

        <FrameLayout
            android:id="@+id/realtabcontent"
            android:layout_width="wrap_content"
            android:layout_height="wrap_content"
            ></FrameLayout>
    </LinearLayout>

</android.support.v4.app.FragmentTabHost >
同样的道理加上Fragment:
@SuppressLint("NewApi")
public class TabFragment extends Fragment {

	@Override
	public void onCreate(Bundle savedInstanceState) {
		// TODO Auto-generated method stub
		super.onCreate(savedInstanceState);
	}

	@Override
	public View onCreateView(LayoutInflater inflater, ViewGroup container,
			Bundle savedInstanceState) {
		// TODO Auto-generated method stub
		View view = inflater.inflate(R.layout.tab, container,false);
		return view;
	}

}
public class MainActivity extends FragmentActivity {

	private FragmentTabHost mTabHost;

	@Override
	protected void onCreate(Bundle savedInstanceState) {
		super.onCreate(savedInstanceState);
		setContentView(R.layout.main);
		initView();
	}

	private void initView(){
		mTabHost = (FragmentTabHost)findViewById(android.R.id.tabhost);
		mTabHost.setup(getApplicationContext(), getSupportFragmentManager(), R.id.realtabcontent);
		mTabHost.addTab(mTabHost.newTabSpec("tab").setIndicator("tab"),TabFragment.class,null);
		mTabHost.addTab(mTabHost.newTabSpec("web").setIndicator("web"),WebFragment.class,null);

	}

}
具体的运行效果可见:
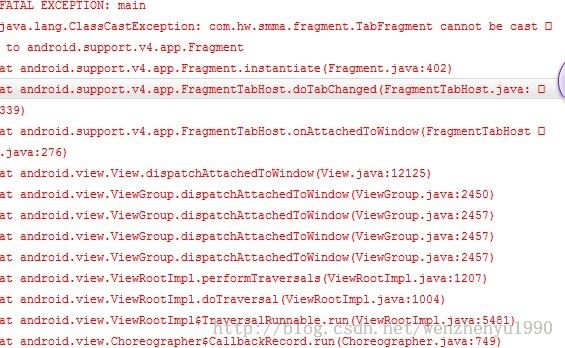
Fragment时需要映入相对应版本的support.v版本.Fragment的包都则出现异常,报错具体如下:
3、Tabhost实现
布局界面包含:
一个TabHost (id为 tabhost)控件里面包括一个TabWidget 其中id号为tabs 还有一个FrameLayout 其中ID号为tabcontent
<?xml version="1.0" encoding="utf-8"?>
<LinearLayout xmlns:android="http://schemas.android.com/apk/res/android"
    android:layout_width="match_parent"
    android:layout_height="match_parent"
    android:orientation="vertical" >


    <TabHost
        android:id="@android:id/tabhost"
        android:layout_width="fill_parent"
        android:layout_height="fill_parent">
        <LinearLayout android:orientation="vertical"
                      android:layout_width="fill_parent"
                      android:layout_height="fill_parent">
            <TabWidget
                android:id="@android:id/tabs"
                android:layout_height="wrap_content"
                android:layout_width="fill_parent"/>
                <FrameLayout
                    android:id="@android:id/tabcontent"
                    android:layout_width="fill_parent"
                    android:layout_height="fill_parent">
                </FrameLayout>
              </LinearLayout>
    </TabHost>
</LinearLayout>
两个xml文件:
<?xml version="1.0" encoding="utf-8"?>
<LinearLayout xmlns:android="http://schemas.android.com/apk/res/android"
    android:layout_width="match_parent"
    android:layout_height="match_parent"
    android:id="@+id/tabhost_tab"
    android:orientation="vertical" >
	<TextView
	    android:id="@+id/tabhost_tabname"
	    android:layout_width="fill_parent"
	    android:layout_height="wrap_content"
	    android:text="@string/tab_name"
	    />
</LinearLayout>
<?xml version="1.0" encoding="utf-8"?>
<LinearLayout xmlns:android="http://schemas.android.com/apk/res/android"
    android:layout_width="match_parent"
    android:layout_height="match_parent"
    android:id="@+id/tabhost_web"
    android:orientation="vertical" >
	<TextView
	    android:id="@+id/tabhost_webname"
	    android:layout_width="fill_parent"
	    android:layout_height="wrap_content"
	    android:text="@string/website"
	    />
</LinearLayout>
继承TabActivity添加tab选项:
public class MainActivity extends TabActivity {

	private TabHost mhost;
	@Override
	protected void onCreate(Bundle savedInstanceState) {
		super.onCreate(savedInstanceState);

		setContentView(R.layout.tabhost_main);
		initTabHostView();
	}

	private void initTabHostView(){

		TabHost tabHost = (TabHost)findViewById(android.R.id.tabhost);
		tabHost.setup();
		 LayoutInflater inflater = LayoutInflater.from(this);
	        inflater.inflate(R.layout.tabhost_tab, tabHost.getTabContentView());
	        inflater.inflate(R.layout.tabhsot_web, tabHost.getTabContentView());

	        TabSpec tab = tabHost.newTabSpec("TAB").setIndicator("TAB");
	        tab.setContent(R.id.tabhost_tabname);
	        tabHost.addTab(tab);

	        TabSpec web = tabHost.newTabSpec("TAB").setIndicator("TAB");
	        web.setContent(R.id.tabhost_webname);
	        tabHost.addTab(web);
	}

}
同样可以通过 tabSpec.setContent(new Intent(MainActivity.this,MoreActivity.class)); 直接将Actvity放到布局文件中,这样就可以实现通过Tab切换Activity的效果了
隔了一个星期终于把这篇博客写完了。以后再遇到tab再来添加。


