pipeline-filter模式变体之尾循环
注:这篇文章的设计存在一些问题,或者说不够优雅。关于原因,请移步本人另一篇文章:《再谈pipeline-filter模式》
pipeline-filter作为一种处理数据的模式(见【POSA】卷4)可以将应用的任务划分为几个自我完备的数据处理步骤,并连接到一个数据管道。本文介绍一种不太常见的pipeline-filter的变体——尾循环的pipeline-filter,当然这也是在特定的需求场景下才会出现的。
首先,我们来看一个常见的pipeline-filter的模式图:
模式的思路比较简单明了,就是对数据的处理步骤进行拆分。然后以统一的编程接口加上递归的方式,将它们串在一起。
最近在写的一个Message broker中处理消息通信的时候也采用了这种模式来切分消息处理步骤。在发送消息的时候这种模式使用得非常的顺畅,因此很自然得在接收消息的时候同样采用了这种模式。我们可以先来简单来看一个发送消息的时候整个pipeline就是像下面这样:
关于名词的说明:本文中谈到的handler可以类比为filter,提到的handler-chain可以类比为pipeline,只是叫法不同。
如果不去多想,接收消息的pipeline也应该跟发送消息类似,只是produce-handler变成了consume-handler。但在代码实现的时候,rabbitmq-java-client的实现方式使得这种模式的运用有些受阻。正常情况下,我们的理解是一个消息的处理或一个消息集合的处理,会穿过一个pipeline,但官方提供的java-client对于接收消息的实现是socket-blocking以等待消息推送到client的(push)方式。因为官方client的这种实现方式,使得外部封装的做法最好是将socket-blocking搬迁到一个独立的EventLoop-Thread上,然后获取到消息之后,解封送并以事件的方式对外提供消息,而客户端在该事件中实现自己的处理逻辑即可,也就是说是一种异步接收的方式,仔细想想也确实应该是这种push的方式。
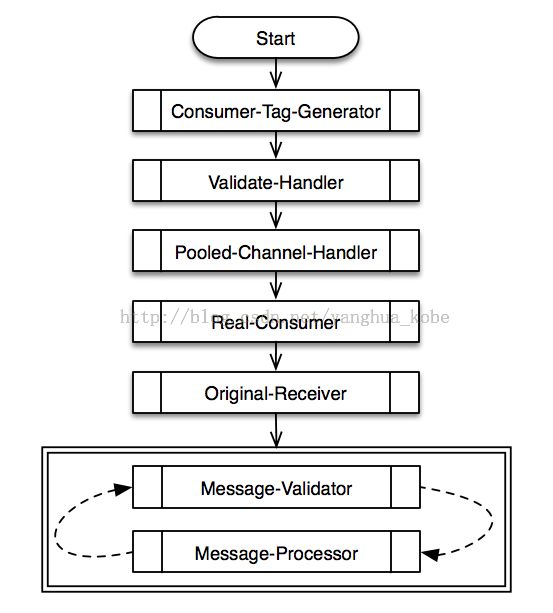
由此可见在接收消息时的pipeline还是很不同于发送消息的。对接收消息而言,filter分成两个部分,第一部分的多个filter只执行一次(主要是在真正开始接收消息之前,处理一些前置任务,比如权限检查,参数验证等);第二部分的多个filter却要不断得在另外一个EventLoop-Thread上循环执行(因为这些filter涉及到对接收到的message进行处理)。所以,在接收消息时的示意图为:
其中,下面框起来的两个handler是在EventLoop-Thread上循环执行的。
显然,上面用于produce的那种pipeline-filter不能应对这种变化(既无法跨线程也无法在就其中的几个进行循环)。而此时不可能独立得为consume单独实现一套新的pipeline-filter(因为在pipeline-filter的基础设施上,我们已经将produce,consume以及request,response、publish,subscribe等都抽象为消息传输(carry))。因此,我们只能在同一套运行机制上,找到一种办法来满足所有的消息传输方式。
我们的做法是,实现一个“过渡handler”(此处的handler即为filter,只是取名不同而已),并实现handle方法。该handler用于将后续的逻辑过渡到一个独立的EventLoop-Thread上并启动EventLoop-Thread(把传递给当前handler的上下文以及chain对象传递到事件处理线程上去),其后的所有handler都在该线程上循环执行。
其实现代码段如下:public void handle(@NotNull MessageContext context,
@NotNull IHandlerChain chain) {
if (!context.isSync()) {
ReceiveEventLoop eventLoop = new ReceiveEventLoop();
eventLoop.setChain(chain);
eventLoop.setContext(context);
eventLoop.setChannelDestroyer(context.getDestroyer());
eventLoop.setCurrentConsumer((QueueingConsumer) context.getOtherParams().get("consumer"));
context.setReceiveEventLoop(eventLoop);
//repeat current handler
((MessageCarryHandlerChain) chain).setEnableRepeatBeforeNextHandler(true);
eventLoop.startEventLoop();
} else {
chain.handle(context);
}
}
如上,ReceiveEventLoop即为一个独立的EventLoop-Thread,启动之后,对于pipeline发起的线程而言,它启动的本次调用链(handle方法的递归调用)已经结束。因此主线程将会从该调用的触发点向下继续执行
而后续的filter在eventloop线程上独立运行:
public void run() {
    try {
        while (true) {
            QueueingConsumer.Delivery delivery = this.currentConsumer.nextDelivery();

            AMQP.BasicProperties properties = delivery.getProperties();
            byte[] msgBody = delivery.getBody();

            context.getChannel().basicAck(delivery.getEnvelope().getDeliveryTag(), false);

            //.....

            this.context.setConsumedMsg(msg);
            this.chain.handle(this.context);
        }
    } catch (InterruptedException e) {
        logger.info("[run] close the consumer's message handler!");
    } catch (IOException e) {
        logger.error("[run] occurs a IOException : " + e.getMessage());
        this.shutdown();
    } catch (ConsumerCancelledException e) {
        logger.info("[run] the consumer has been canceled ");
        this.shutdown();
    } catch (Exception e) {
        logger.error("[run] occurs a Exception : " + e.getMessage());
        this.shutdown();
    }

    logger.info("******** thread id " + this.getThreadID() + " quit from message receiver ********");
}
有一个问题:我们必须拿到对EventLoop-Thread的控制权(外部可以在任意时刻关闭该eventloop),而获取其控制权的关键代码就是上上段代码中的:
context.setReceiveEventLoop(eventLoop);
我们将当前EventLoop的实例包装成一个Thread类型的属性,并为其开放了相应的开、关方法,将其控制权丢给外部:
public void startEventLoop() {
      this.currentThread.start();
}

public void shutdown() {
      this.channelDestroyer.destroy(context.getChannel());
      this.currentThread.interrupt();
}
然后在主线程发起接收消息的方法最后会返回一个IReceiverCloser接口的实例,在其接口方法close中调用shutdown,来对其进行关闭:
//launch pipeline
        carry(ctx);

        return new IReceiverCloser() {
            @Override
            public void close() {
                synchronized (this) {
                    if (ctx.getReceiveEventLoop().isAlive()) {
                        ctx.getReceiveEventLoop().shutdown();
                    }
                }
            }
        };
另一个问题,handler-chain是如何知道从某个handler之后转入eventloop线程会开始循环执行?是如何实现的?它来自于第一段代码中的如下这句代码:
((MessageCarryHandlerChain) chain).setEnableRepeatBeforeNextHandler(true);这句代码会在进入下一个handler之前设置一个“循环执行”的标志。下面看看,我们是如何来改造handlerchain来达到这个目的的,在MessageCarryHandlerChain(它实现了IHandlerChain接口)的实现中,有如下四个变量:
    private List<AbstractHandler> handlerChain;
    private int     pos          = 0;
    private boolean enableRepeat = false;
    private int     repeatPos    = -1;
- handlerChain:解析并顺序存储每个handler
- pos:用来记录当前已经执行到哪个handler
- enableRepeat:用来标识是否启用重复执行handler
- repeatPos:用于记录重复执行的handler的起始位置
public void setEnableRepeatBeforeNextHandler(boolean enableRepeat) {
        this.enableRepeat = enableRepeat;
        if (this.enableRepeat) {
            this.repeatPos = this.pos;
        } else {
            this.repeatPos = Integer.MIN_VALUE;
        }
    }
public void handle(MessageContext context) {
        if (this.repeatPos != Integer.MIN_VALUE) {
            if (this.pos < handlerChain.size()) {
                AbstractHandler currentHandler = handlerChain.get(pos++);
                currentHandler.handle(context, this);
            } else if (this.enableRepeat) {
                this.pos = this.repeatPos;
            }
        }
    }
this.chain.handle(this.context);
if (this.pos < handlerChain.size()) {

}
判断分支,在其中会触发下一个handler的handle方法,并一直执行下去直到判断条件不成立之后会执行else逻辑,将之前保存的起始循环的handler的位置置为新的handler的位置。
currentHandler.handle(context, this);
对于每个被执行的handler都是还原点,当第一轮handler执行完成(调用完这句:this.pos = this.repeatPos;)都会在还原点层层回退(执行还原点之后的该方法内部的剩余代码)。因此,在收到第二个消息时,其实是触发了新一轮的handler-chain执行流程,只是因为pos在之前被置为chain中的循环起始位置,而不是从0开始而已。但对于后面尾循环的handler而言,它们递归调用的本质没有改变,所以其实只是看起来在尾部“循环”而已。


