Android + struts2服务器 Json 通信
由于之前一直都是做客户端,通信方式用的是JSON,而从未自己搭建过服务器,今天趁着中午有点时间就搭建一个简单的服务器
我所用是struts2和JSON搭建的简单服务器
服务器:
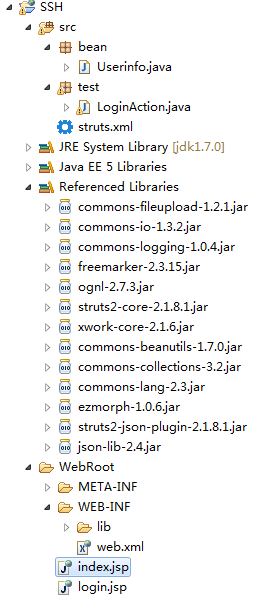
1.New一个新的Web Project
2.导入struts2和JSON所需要的包,
3.编写实体类Userinfo:
package bean;

import java.io.Serializable;

public class Userinfo implements Serializable {

	/**
	 * @author ZJG
	 */
	private static final long serialVersionUID = 1L;

	private int userId;
	private String userName;
	private String password;

	public int getUserId() {
		return userId;
	}

	public void setUserId(int userId) {
		this.userId = userId;
	}

	public String getUserName() {
		return userName;
	}

	public void setUserName(String userName) {
		this.userName = userName;
	}

	public String getPassword() {
		return password;
	}

	public void setPassword(String password) {
		this.password = password;
	}

}
4.编写Action:
package test;

import java.util.ArrayList;
import java.util.List;
import bean.Userinfo;
import com.opensymphony.xwork2.ActionSupport;

public class LoginAction extends ActionSupport {

	/**
	 * @author ZJG
	 */
	private static final long serialVersionUID = 1L;

	private String message;//使用json返回单个值
	private Userinfo userinfo;//使用json返回对象
	private List userInfoList;//使用json返回list对象


	public String getMessage() {
		return message;
	}

	public void setMessage(String message) {
		this.message = message;
	}

	public Userinfo getUserinfo() {
		return userinfo;
	}

	public void setUserinfo(Userinfo userinfo) {
		this.userinfo = userinfo;
	}

	public List getUserInfoList() {
		return userInfoList;
	}

	public void setUserInfoList(List userInfoList) {
		this.userInfoList = userInfoList;
	}

	//返回单个值
	public String returnMag(){
		this.message = "成功返回单个值";
		return SUCCESS;
	}

	//返回对象
	public String returnUser(){
		userinfo = new Userinfo();
		userinfo.setUserId(10000);
		userinfo.setUserName("张三");
		userinfo.setPassword("123456");
		return SUCCESS;
	}

	//返回list对象
	public String returnList(){
		userInfoList = new ArrayList<Userinfo>();
		Userinfo ui = new Userinfo();
		ui.setUserId(10000);
		ui.setUserName("张三1");
		ui.setPassword("111111");
		Userinfo u1 = new Userinfo();
		u1.setUserId(10000);
		u1.setUserName("张三2");
		u1.setPassword("222222");
		userInfoList.add(ui);
		userInfoList.add(u1);
		return SUCCESS;
	}
	public String returnObject(){
		userInfoList = new ArrayList<Userinfo>();
		Userinfo ui = new Userinfo();
		ui.setUserId(10000);
		ui.setUserName("object张三1");
		ui.setPassword("object111111");
		Userinfo u1 = new Userinfo();
		u1.setUserId(10000);
		u1.setUserName("object张三2");
		u1.setPassword("object222222");
		userInfoList.add(ui);
		userInfoList.add(u1);
		userinfo = new Userinfo();
		userinfo.setUserId(3333);
		userinfo.setUserName("object李四");
		userinfo.setPassword("object0000099");
		this.message = "object成功返回单个值";
		return SUCCESS;
	}


}
5.配置struts.xml:
<package name="default"  extends="json-default" >
	<action name="returnMag" class="test.LoginAction" method="returnMag" >
		<result name="success" type="json">
			<param name="includeProperties">message</param>
		</result>
	</action>
	<action name="returnUser" class="test.LoginAction" method="returnUser">
		<result name="success" type="json">
			<param name="includeProperties">
				userinfo\.userId,userinfo\.userName,userinfo\.password
			</param>
		</result>
	</action>
	<action name="returnList" class="test.LoginAction" method="returnList">
		<result name="success" type="json">
			<param name="includeProperties">
				userInfoList\[\d+\]\.userName,userInfoList\[\d+\]\.password,
				userinfo\.userId,userinfo\.userName,userinfo\.password
			</param>
		</result>
	</action>
	<action name="returnObject" class="test.LoginAction" method="returnObject">
		<result name="success" type="json">
			<param name="includeProperties">
				userInfoList\[\d+\]\.userName,userInfoList\[\d+\]\.password,
				userinfo\.userId,userinfo\.userName,userinfo\.password,
				message
			</param>
		</result>
	</action>
</package>
6.配置web.xml
  <filter>
  	<filter-name>struts2</filter-name>
  	<filter-class>
  		org.apache.struts2.dispatcher.FilterDispatcher
  	</filter-class>
  </filter>
  <filter-mapping>
  	<filter-name>struts2</filter-name>
  	<url-pattern>*.action</url-pattern>
  </filter-mapping>
<filter-mapping>
    <filter-name>struts2</filter-name>
    <url-pattern>*.jsp</url-pattern>
</filter-mapping>
7.创建login.jsp
<%@ page language="java" import="java.util.*" pageEncoding="ISO-8859-1"%>
<%@ taglib prefix="s" uri="/struts-tags"  %>
<%
String path = request.getContextPath();
String basePath = request.getScheme()+"://"+request.getServerName()+":"+request.getServerPort()+path+"/";
%>

<!DOCTYPE HTML PUBLIC "-//W3C//DTD HTML 4.01 Transitional//EN">
<html>
  <head>
	<meta http-equiv="pragma" content="no-cache">
	<meta http-equiv="cache-control" content="no-cache">
	<meta http-equiv="expires" content="0">
	<meta http-equiv="keywords" content="keyword1,keyword2,keyword3">
	<meta http-equiv="description" content="This is my page">
	<!--
	<link rel="stylesheet" type="text/css" href="styles.css">
	-->

  </head>

  <body>
     <s:form name="form1" action="returnMag" namespace="/json" >
       <s:submit label="submit"></s:submit>
   </s:form>
  </body>
</html>
其实第7步可以省略.
服务器完成.
android客户端:
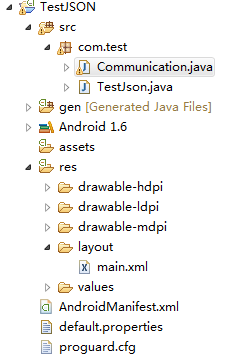
同样还是新建个android项目:
1.修改main.xml
<?xml version="1.0" encoding="utf-8"?>
<LinearLayout xmlns:android="http://schemas.android.com/apk/res/android"
    android:orientation="vertical"
    android:layout_width="fill_parent"
    android:layout_height="fill_parent"
    >
<TextView
    android:layout_width="fill_parent"
    android:layout_height="wrap_content"
    android:text="@string/hello"
    android:id="@+id/tvid"
    />

    <Button
    android:layout_width="fill_parent"
    android:layout_height="wrap_content"
    android:text="String对象"
    android:id="@+id/buttonid"
    />
     <Button
    android:layout_width="fill_parent"
    android:layout_height="wrap_content"
    android:text="bean对象"
    android:id="@+id/buttonid1"
    />
     <Button
    android:layout_width="fill_parent"
    android:layout_height="wrap_content"
    android:text="List对象"
    android:id="@+id/buttonid2"
    />
     <Button
    android:layout_width="fill_parent"
    android:layout_height="wrap_content"
    android:text="Object对象"
    android:id="@+id/buttonid3"
    />

</LinearLayout>
2.修改Activity
public void onCreate(Bundle savedInstanceState) {
        super.onCreate(savedInstanceState);
        setContentView(R.layout.main);
        final TextView tv = (TextView) findViewById(R.id.tvid);
        Button button = (Button) findViewById(R.id.buttonid);
        button.setOnClickListener(new OnClickListener() {

			public void onClick(View v) {
				String result = new Communication().communication("returnMag.action");
				tv.setText(result);
			}
		});
        Button button1 = (Button) findViewById(R.id.buttonid1);
        button1.setOnClickListener(new OnClickListener() {

			public void onClick(View v) {
				String result = new Communication().communication("returnUser.action");
				tv.setText(result);
			}
		});
        Button button2 = (Button) findViewById(R.id.buttonid2);
        button2.setOnClickListener(new OnClickListener() {

			public void onClick(View v) {
				String result = new Communication().communication("returnList.action");
				tv.setText(result);
			}
		});
        Button button3 = (Button) findViewById(R.id.buttonid3);
        button3.setOnClickListener(new OnClickListener() {

			public void onClick(View v) {
				String result = new Communication().communication("returnObject.action");
				tv.setText(result);
			}
		});
3.新建一个与服务器通信的类Communication.java
public class Communication {


	/**
	 * @param 只发送普通数据,调用此方法
	 * @param urlString 对应的 页面
	 * @param params 需要发送的相关数据 包括调用的方法
	 * @return
	 */
	public String communication(String urlString){

		HttpClient client = new DefaultHttpClient();


		client.getConnectionManager().closeIdleConnections(20, TimeUnit.SECONDS);//20秒

		String result="";

		String uploadUrl="http://192.168.1.101:8080/SSH"+"/";///http://192.168.10.9/bingo/Server/code
		String MULTIPART_FORM_DATA = "multipart/form-data";
		String BOUNDARY = "---------7d4a6d158c9"; //数据分隔线

		if (!urlString.equals("")) {
			uploadUrl = uploadUrl+urlString;


		try {
			URL url = new URL(uploadUrl);
	        HttpURLConnection conn = (HttpURLConnection) url.openConnection();
	        conn.setDoInput(true);//允许输入
	        conn.setDoOutput(true);//允许输出
	        conn.setUseCaches(false);//不使用Cache
	        conn.setConnectTimeout(6000);// 6秒钟连接超时
	        conn.setReadTimeout(25000);// 25秒钟读数据超时
	        conn.setRequestMethod("POST");
	        conn.setRequestProperty("Connection", "Keep-Alive");
	        conn.setRequestProperty("Charset", "UTF-8");
	        conn.setRequestProperty("Content-Type", MULTIPART_FORM_DATA + "; boundary=" + BOUNDARY);


	        StringBuilder sb = new StringBuilder();

	        //上传的表单参数部分,格式请参考文章
//	        for (Map.Entry<String, String> entry : params.entrySet()) {//构建表单字段内容
//	            sb.append("--");
//	            sb.append(BOUNDARY);
//	            sb.append("\r\n");
//	            sb.append("Content-Disposition: form-data; name=\""+ entry.getKey() + "\"\r\n\r\n");
//	            sb.append(entry.getValue());
//	            sb.append("\r\n");
//	        }


	        DataOutputStream dos = new DataOutputStream(conn.getOutputStream());
	        dos.write(sb.toString().getBytes());
	        dos.writeBytes("--" + BOUNDARY + "--\r\n");
		      dos.flush();

		      InputStream is = conn.getInputStream();
		      InputStreamReader isr = new InputStreamReader(is, "utf-8");
		      BufferedReader br = new BufferedReader(isr);
		      result = br.readLine();


		}catch (Exception e) {
			result = "{\"ret\":\"898\"}";
		}
	}
		return result;

	}
}
到此客户端搭建完成:
好了现在可以体验哈自己的服务器和android客服端的 json通信了
转载说明:http://blog.csdn.net/z104207/article/details/6672109


