CSS布局快速入门
最近因为项目需要,不得不重新看看CSS/HTML之类的东西,不看不要紧,一看吓一跳
原来不知道真的是太多,以前从未认真对待过,这次总结了一下学习所得,算是对自己
有个交代,也可能让想了解CSS/HTML布局应用的朋友快速入门:
1. CSS 与HTML元素直接关联,以HTML h1元素为例。CSS定义如下:
H1 {
margin: auto;
width:600px;
font-size:18px;
font-weight: bold;
}
2. CSS与HTML元素的id属性关联,以HTML元素img标签为例, CSS定义如下:
#image_style{
margin: auto;
width:450px;
height:450px;
background: #1F1F1F;
border-style: solid;
border-width: 5px;
border-color: #0000FF;
}
#image_style .sub_style{
padding: 25px;
margin:auto;
}
3. CSS与HTML元素的class属性关联,以HTML元素DIV为例,CSS定义如下:
.header {
margin: auto;
width: 600px;
background: #2D2D2F;
}
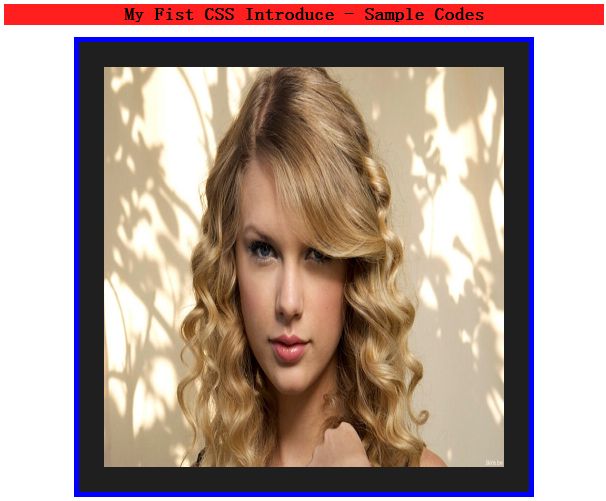
以上三个CSS综合运用结合HTML代码,页面效果如下:

完整的HTML代码如下:
<html>
<head>
    <title>CSS Related to HTML element directly</title>
    <style type="text/css">
	    .header {
			margin: auto;
			width: 600px;
			background: #FF1F1F;
		}

		h1 {
		font-size:18px;
		font-weight: bold;
		text-align: center;
		/*display: inline;*/
		}

		#image_style{
			margin: auto;
			width:450px;
			height:450px;
			background: #1F1F1F;
			border-style: solid;
			border-width: 5px;
			border-color: #0000FF;
		}
		#image_style .sub_style{
			padding: 25px;
			margin:auto;
		}

	</style>
</head>
<body>
	<div class="header">
	<h1>My Fist CSS Introduce - Sample Codes</h1>
	</div>
	<div id="image_style">
		<img class="sub_style" src="images/star_stareu.png">
	</div>
</body>
</html>
4. CSS与DIV元素结合使用实现排版布局
很多常见的博客系统网页布局可以通过CSS + DIV很容易的实现,下面是一个最常用的博
客网页布局CSS+DIV代码解释与介绍, 首先看一下布局效果:
DIV代码如下:
	<div id="container">
		<div id="header">
			<label>头区域</label>
		</div>
		<div id="leftBar">
			<label>左侧导航</label>
		</div>
		<div id="content">
			<label>内容</label>
		</div>
		<div id="rightBar">
			<label>右边框</label>
		</div>
		<div id="footer">
			<label><b>尾区域</b></label>
		</div>
	</div>
CSS的定义代码如下:
		#container {
		  margin:auto; /* IE6 supports them with a full and valid doctype */
		  width: 800px;
		  /* margin-left: 200px;	*/
		  background: #ffffff;
		}

		#header {
		  height: 80;
		  background: #B0C4DE;
		}

		#leftBar {
		  float: left;
		  width: 150px;
		  background: #DFDF12;
		}

		#content {
		  float:left;
		  width:500px;
		  background-color: #cdcde6;
		}

		#rightBar {
		  float:right;
		  width: 150px;
		  background: #EBEBEB;
		}

		#rightBar #zhao_shang {
			/*height:600px; - comment it */
			padding: 20px;
		}

		#footer {
		  clear:both;
		  text-align: center;
		  background:#DDDDDD;
		}
5. CSS注释语法 - CSS注释代码使用如下语法格式/* 代码片段*/
6. 浏览器支持问题
上面的代码在IE6/IE7/IE8中显示时候,HTML页面头必须声明doctype,否则margin: atuo;
不能被IE浏览器识别,doctype声明如下:
<!DOCTYPE html PUBLIC "-//W3C//DTD XHTML 1.0 Transitional//EN" "http://www.w3.org/TR/xhtml1/DTD/xhtml1-transitional.dtd">该布局的完整HTML代码如下,copy之后save为html文件可以直接在chrome运行:
<html>
<head>
    <title>CSS Related to HTML element directly</title>
    <style type="text/css">
		#container {
		  margin:auto; /* IE6 supports them with a full and valid doctype */
		  width: 800px;
		  /* margin-left: 200px;	*/
		  background: #ffffff;
		}

		#header {
		  height: 80;
		  background: #B0C4DE;
		}

		#leftBar {
		  float: left;
		  width: 150px;
		  background: #DFDF12;
		}

		#content {
		  float:left;
		  width:500px;
		  background-color: #cdcde6;
		}

		#rightBar {
		  float:right;
		  width: 150px;
		  background: #EBEBEB;
		}

		#rightBar #zhao_shang {
			/*height:600px; - comment it */
			padding: 20px;
		}

		#footer {
		  clear:both;
		  text-align: center;
		  background:#DDDDDD;
		}
	</style>
</head>
<body>
	<div id="container">
		<div id="header">
			<label>头区域</label>
		</div>
		<div id="leftBar">
			<label>左侧导航</label>
		</div>
		<div id="content">
			<label>内容</label>
		</div>
		<div id="rightBar">
			<label>右边框</label>
		</div>
		<div id="footer">
			<label><b>尾区域</b></label>
		</div>
	</div>
</body>
</html>
