Cloud Foundry中collector组件的源码分析
在Cloud Foundry中有一个叫collector的组件,该组件的功能是通过消息总线发现在Cloud Foundry中注册过的各个组件的信息,然后通过varz和healthz接口来查询它们的信息并发送到指定的存储位置。
本文从collector的功能出发,主要讲述以上两个功能的源码实现。
发现注册组件
在Cloud Foundry中,每个组件在启动的时候后会以一个component的形式向Cloud Foundry注册,同时也会作为一个组件,向NATS发布一些启动信息。
首先以DEA为例,讲述该组件register与向NATS publish信息的实现。首先看以下/dea/lib/dea/agent.rb中register的代码:
        VCAP::Component.register(:type => 'DEA',
                           :host => @local_ip,
                           :index => @config['index'],
                           :config => @config,
                           :port => status_config['port'],
                           :user => status_config['user'],
                           :password => status_config['password'])
这段代码表示,DEA通过VCAP::Component对象中的register方法,实现注册。以下进入vcap-common/lib/vcap/component.rb中的register方法:
      def register(opts)
        uuid = VCAP.secure_uuid
        ……
        auth = [opts[:user] || VCAP.secure_uuid, opts[:password] || VCAP.secure_uuid]
        @discover = {
          :type => type,
          ……
          :credentials => auth,
          :start => Time.now
        }
        ……
        @healthz = "ok\n".freeze
        start_http_server(host, port, auth, logger)
        nats.subscribe('vcap.component.discover') do |msg, reply|
          update_discover_uptime
          nats.publish(reply, @discover.to_json)
        end
        nats.publish('vcap.component.announce', @discover.to_json)
        @discover
      end
可见,在实现register方法的时候,首先通过传递进来的opts参数,构建一个@discover实例变量,订阅了一个vcap.component.discover的消息,又发布了一个vcap.component.announce的消息。关于collector的发现注册组件的功能中,直接关联的register方法中发布的主题,因为collector通过订阅这个主题的消息,将json化的@discover变量取到,然后做相应的处理。
    def send_data(data)
      @adapters.each do |adapter|
        begin
          adapter.send_data(data)
        rescue => e
          Config.logger.warn("collector.historian-adapter.sending-data-error", adapter: adapter.class.name, error: e, backtrace: e.backtrace)
        end
      end
    end
之前已经涉及了collector组件订阅消息的话题,现在进入collector/lib/collector.rb中,实现消息的订阅还有其他的消息请求:
      @nats = NATS.connect(:uri => Config.nats_uri) do
        Config.logger.info("collector.nats.connected")
        # Send initially to discover what's already running
        @nats.subscribe(ANNOUNCE_SUBJECT) { |message| process_component_discovery(message) }
        @inbox = NATS.create_inbox
        @nats.subscribe(@inbox) { |message| process_component_discovery(message) }
        @nats.publish(DISCOVER_SUBJECT, "", @inbox)
        @nats.subscribe(COLLECTOR_PING) { |message| process_nats_ping(message.to_f) }
        setup_timers
      end
当collector接收到由ANNOUNCE_SUBJECT主题发布过来的message(也就是json化的@discover变量)后,将该内容传递后方法process_component_discovery。以下是process_component_discovery方法的代码实现:
    def process_component_discovery(message)
      message = Yajl::Parser.parse(message)
      if message["index"]
        Config.logger.debug1("collector.component.discovered", type: message["type"], index: message["index"], host: message["host"])
        instances = (@components[message["type"]] ||= {})
        instances[message["host"].split(":").first] = {
          :host => message["host"],
          :index => message["index"],
          :credentials => message["credentials"],
          :timestamp => Time.now.to_i
        }
      end
    rescue => e
      Config.logger.warn("collector.component.discovery-failure", error: e.message, backtrace: e.backtrace)
    end
在该方法中,首先对message对象进行解析,若新产生的message对象中index键,则继续往下的操作:在@components对象中,视情况添加一个instance。如贴出的代码,其中两行标注为红色的代码需要理解:首先如果@components[message["type"]]不为空,则将@components[message["type"]]赋值给instances;若为空的话,那就把@components[message["type"]]赋为空,如果之前不存在message["type"]这个键的话,那就先创建一个这样的键,然后再赋为空,最后还是将@components[message["type"]]赋值给instances。在这里需要注意的是,instances与@components[message["type"]]是的首地址是相同的,所以之后给instances添加键值对的时候也是向@components[message["type"]]中添加键值对。需要提一下的是:一个instances代表Cloud Foundry中同一种类型的组件,instances中的每一个instance代表该类型组件的一个实际节点,而且可以发现instance是通过IP来设立键的,因此可见,在Cloud Foundry中相同类型的组件是不能或者不建议共存在同一个节点上或者共享一张网卡的。
一般情况下,当Cloud Foundry的组件启动是发布vcap.component.announce消息后,很快在@components中就会有相应的信息,这样的话,也就是实现了“发现注册组件”的功能。
获取组件varz和healthz并发送
在以上功能中,collector只是实现了发现组件,只包括组件的ip:port信息,index,crdentials等信息,并不带有其他关于组件运行时产生的数据信息。而通过varz和healthz访问那些注册的组件,正好可以做到这些收集varz和healthz信息。
实现的过程中,首先是使用添加周期性定时器:EM.add_periodic_timer(Config.varz_interval) { fetch_varz },在一定的周期内,执行fetch_varz方法,以下进入fetch_varz方法:
    def fetch_varz
      fetch(:varz) do |http, job, index|
        ……
      end
    end
进入fetch_varz方法后,首先是调用fetch方法,参数为:varz,可见通过fetch方法会返回三个值,并作为之后的代码块的参数传入。现在进入fetch方法:
    def fetch(type)
      @components.each do |job, instances|
        instances.each do |index, instance|
          next unless credentials_ok?(job, instance)
          host = instance[:host]
          uri = "http://#{host}/#{type}"
          http = EventMachine::HttpRequest.new(uri).get(
            :head => authorization_headers(instance))
         ……
          http.callback do
            begin
              yield http, job, instance[:index]
            rescue => e
              ……
            end
          end
        end
      end
    end
在发现组件该模块中,以及讲解过@components变量的含义,该方法中首先遍历@components中的每一类组件,再遍历每一类组件中的每一个组件实例,对并该组件实例发起获取varz的请求。实现请求的过程中,首先查阅instance的credentails是否具有,然后组件请求的uri,然后通过EventMachine发送http请求,当请求响应返回的时候,通过yield关键字,将http,job以及instance[:index]返回给fetch_varz方法的代码块,fetch_varz代码块的实现如下:
        varz = Yajl::Parser.parse(http.response)
        now = Time.now.to_i

        handler = Handler.handler(@historian, job)
        Config.logger.debug("collector.job.process", job: job, handler: handler)
        ctx = HandlerContext.new(index, now, varz)
        handler.do_process(ctx)
首先对http.response进行解析,然后通过Handler类的handler方法创建一个handler对象,其中需要注意的是调用了一个@historian对象,在Collector对象的初始化中,有代码:@historian = ::Collector::Historian.build。
@historian对象的功能是创建了网络连接,具体代码实现在/collector/lib/collector/historian.rb中:
class Historian
    def self.build
      historian = new
      if Config.tsdb
        historian.add_adapter(Historian::Tsdb.new(Config.tsdb_host, Config.tsdb_port))
        Config.logger.info("collector.historian-adapter.added-opentsdb", host: Config.tsdb_host)
      end
      if Config.aws_cloud_watch
        historian.add_adapter(Historian::CloudWatch.new(Config.aws_access_key_id, Config.aws_secret_access_key))
        Config.logger.info("collector.historian-adapter.added-cloudwatch")
      end
      if Config.datadog
        historian.add_adapter(Historian::DataDog.new(Config.datadog_api_key, HTTParty))
        Config.logger.info("collector.historian-adapter.added-datadog")
      end
      historian
    end
    ……
end
可以看到@Historian对象的创建是添加了三个网络适配器,或者说是三条连接分别是Tsdb,aws_cloud_watch以及DataDog。当之后需要@historian对象发送数据的时候,也就是通过者三条连接,将数据发送出去,本文马上将涉及这一块。
现在回到fetch_varz中,创建为handler实例对象之后,还创建了一个ctx对象,最后通过handler的do_process方法处理了ctx对象,现在进入collector/lib/collector/handler.rb中,查看do_process方法:
    def do_process(context)
      varz = context.varz
      send_metric("mem_free_bytes", varz["mem_free_bytes"], context) if varz["mem_free_bytes"]
      ……
      varz.fetch("log_counts", {}).each do |level, count|
        next unless %w(fatal error warn).include?(level)
        send_metric("log_count", count, context, {"level" => level})
      end
      process(context)
    end
首先解析出varz对象,并通过send_metric方法将数据发送出去,Handler的子类在执行process方法时,都会调用自己覆写的process方法,以DEA为例,collector/lib/collector/handlers/dea.rb中的process方法为:
      def process(context)
        send_metric("can_stage", context.varz["can_stage"], context)
        ……
        state_counts(context).each do |state, count|
          send_metric("dea_registry_#{state.downcase}", count, context)
        end

        metrics = registry_usage(context)
        send_metric("dea_registry_mem_reserved", metrics[:mem], context)
        send_metric("dea_registry_disk_reserved", metrics[:disk], context)
      end
可以看到其实在process方法也仅仅是将不同组件各自对应的属性值,通过send_metirc方法发送出去。以下进入collector/lib/collector/handler.rb中的send_metric方法中:
    def send_metric(name, value, context, tags = {})
      tags.merge!(additional_tags(context))
      ……
      @historian.send_data({
                               key: name,
                               timestamp: context.now,
                               value: value,
                               tags: tags
                           })
    end
在send_metric代码中,最后通过@historian对象中的send_data实现数据的发送,也就是之前说到的,@historian向@adapter的三条连接中,发送相应的数据,在collector/lib/collector/handler.rb中:
    def send_data(data)
      @adapters.each do |adapter|
        begin
          adapter.send_data(data)
        rescue => e
          Config.logger.warn("collector.historian-adapter.sending-data-error", adapter: adapter.class.name, error: e, backtrace: e.backtrace)
        end
      end
    end
以上讲述从获取varz到发送给TSDB等数据存储模块的流程,关于发送的是什么信息,还没有具体深入。这里以router为例,讲述发送的信息的类型。源码于collector/lib/collector/handlers/router.rb中:
      def process(context)
        varz = context.varz
        send_metric("router.total_requests", varz["requests"], context)
        send_metric("router.total_routes", varz["urls"], context)
        send_metric("router.ms_since_last_registry_update", varz["ms_since_last_registry_update"], context)
        send_metric("router.bad_requests", varz["bad_requests"], context)
        send_metric("router.bad_gateways", varz["bad_gateways"], context)
        return unless varz["tags"]
        varz["tags"].each do |key, values|
          values.each do |value, metrics|
            if key == "component" && value.start_with?("dea-")
              # dea_id looks like "dea-1", "dea-2", etc
              dea_id = value.split("-")[1]
              # These are app requests, not requests to the dea. So we change the component to "app".
              tags = {:component => "app", :dea_index => dea_id }
            else
              tags = {key => value}
            end
            send_metric("router.requests", metrics["requests"], context, tags)
            send_latency_metric("router.latency.1m", metrics["latency"], context, tags)
            ["2xx", "3xx", "4xx", "5xx", "xxx"].each do |status_code|
              send_metric("router.responses", metrics["responses_#{status_code}"], context, tags.merge("status" => status_code))
            end
          end
        end
      end
可见在接收到router的varz信息之后,collector会从中取出过个键值,并进行发送,比如说router的“total_requests”,"total_routes","bad_requests","bad_gateways","router.latency.1m","response_2xxx"等。也正式collector通过分析varz并王TSDB发送这样的信息,所以TSDB中可以存有这些信息,最终DashBoard可以通过获取TSDB中的信息,并显示给用户,当然用户可以看到router组件的请求数,请求延迟,请求的响应时间等,也就不足为怪了。
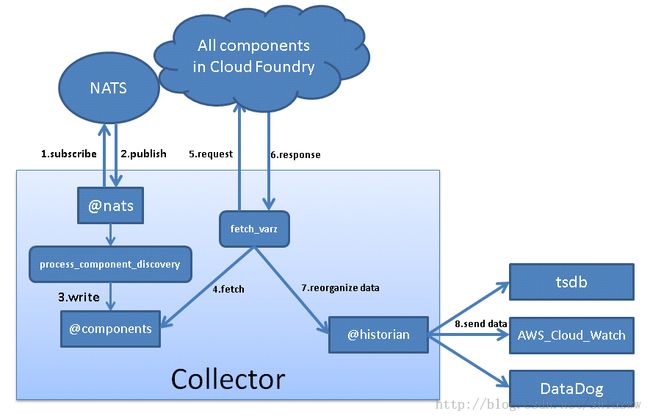
综上代码分析,可以得到框架图如下:
以上便是Cloud Foundry中collector组件的功能分析。
关于作者:
孙宏亮,DAOCLOUD软件工程师。两年来在云计算方面主要研究PaaS领域的相关知识与技术。坚信轻量级虚拟化容器的技术,会给PaaS领域带来深度影响,甚至决定未来PaaS技术的走向。
转载请注明出处。
这篇文档更多出于我本人的理解,肯定在一些地方存在不足和错误。希望本文能够对接触Cloud Foundry中collector组件的人有些帮助,如果你对这方面感兴趣,并有更好的想法和建议,也请联系我。
我的邮箱:[email protected]新浪微博: @莲子弗如清
