腾讯地图自定义重写drawingControl
腾讯地图自定义重写drawingControl
参考api:
http://lbs.qq.com/javascript_v2/case-run.html#control-custom1
http://lbs.qq.com/javascript_v2/case-run.html#overlay-custom
http://lbs.qq.com/javascript_v2/doc/drawingmanager.html
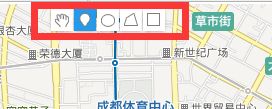
我们使用腾讯地图的绘制功能时,发现它的控件没有提供样式。感觉比较小。
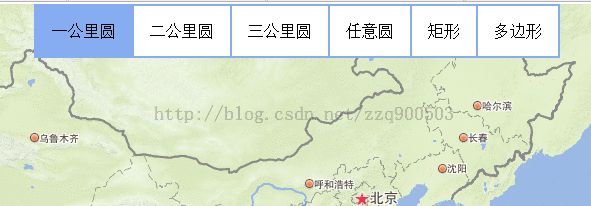
如果想要修改样式只能自己重新写一个控件,听起来很复杂,其实写出来就比较简单了。下面是我自己写的一个,大家可以做自己相应的修改。
控件代码如下,新建为html可用:
<!DOCTYPE html>
<html>

<head>
    <meta http-equiv="Content-Type" content="text/html; charset = utf-8" />
    <meta name="viewport" content="width=device-width, initial-scale=1.0, minimum-scale=1.0, maximum-scale=1.0, user-scalable=no" />
    <title>腾讯地图</title>
    <style>
        html,
        body {
            height: 100%;
            margin: 0px;
            padding: 0px
        }
        #container {
            width: 100%;
            height: 100%
        }
    </style>
    <script src="http://map.qq.com/api/js?v=2.exp"></script>
</head>

<body>
    <div id="container"></div>
    <script>
        var map = new qq.maps.Map(document.getElementById("container"));

        var controlStyleLeft = "padding:16px;border-style: solid; border-width: 2px;border-right-width:1px;border-color:#86acf2;background:#ffffff";
        var controlStyleMid = "padding:16px;border-style: solid; border-width: 2px;border-right-width:1px;border-left-width:1px;border-color:#86acf2;background:#ffffff";
        var controlStyleRight = "padding:16px;border-style: solid; border-width: 2px;border-left-width:1px;border-color:#86acf2;background:#ffffff";

        var circleOneControl = document.createElement("div");
        circleOneControl.style.cssText = controlStyleLeft;
        circleOneControl.innerHTML = "一公里圆";
        circleOneControl.index = 1; //设置在当前布局中的顺序
        circleOneControl.title = "定点画一公里圆";
        circleOneControl.style.cursor="pointer";


        var circleTwoControl = document.createElement("div");
        circleTwoControl.style.cssText = controlStyleMid;
        circleTwoControl.innerHTML = "二公里圆";
        circleTwoControl.index = 2;
        circleTwoControl.title = "定点画二公里圆";
        circleTwoControl.style.cursor="pointer";


        var circleThressControl = document.createElement("div");
        circleThressControl.style.cssText = controlStyleMid;
        circleThressControl.innerHTML = "三公里圆";
        circleThressControl.index = 3;
        circleThressControl.title = "定点画三公里圆";
        circleThressControl.style.cursor="pointer";


     var circleAnyControl = document.createElement("div");
        circleAnyControl.style.cssText = controlStyleMid;;
        circleAnyControl.innerHTML = "任意圆";
        circleAnyControl.index = 4;
        circleAnyControl.title = "画任意大小的圆";
        circleAnyControl.style.cursor="pointer";


    var rectangleControl = document.createElement("div");
        rectangleControl.style.cssText = controlStyleMid;;
        rectangleControl.innerHTML = "矩形";
        rectangleControl.index = 5;
        rectangleControl.title = "画任意大小的矩形";
       rectangleControl.style.cursor="pointer";


  var polygonControl = document.createElement("div");
        polygonControl.style.cssText = controlStyleRight;
        polygonControl.innerHTML = "多边形";
        polygonControl.index = 6;
        polygonControl.title = "画任意形状的多边形";
        polygonControl.style.cursor="pointer";

         //只要设置了index,插入顺序就可以是乱序的了
        map.controls[qq.maps.ControlPosition.TOP_CENTER].push(circleOneControl);
        map.controls[qq.maps.ControlPosition.TOP_CENTER].push(circleTwoControl);
        map.controls[qq.maps.ControlPosition.TOP_CENTER].push(circleThressControl);
      map.controls[qq.maps.ControlPosition.TOP_CENTER].push(circleAnyControl);
     map.controls[qq.maps.ControlPosition.TOP_CENTER].push(rectangleControl);
      map.controls[qq.maps.ControlPosition.TOP_CENTER].push(polygonControl);

 qq.maps.event.addListener(circleOneControl, 'click', function() {
cleanControlcolor();
         setControlcolor(circleOneControl);
    });
 qq.maps.event.addListener(circleTwoControl, 'click', function() {
 cleanControlcolor();
       setControlcolor(circleTwoControl);
    });
 qq.maps.event.addListener(circleThressControl, 'click', function() {
  cleanControlcolor();
        setControlcolor(circleThressControl);
    });
 qq.maps.event.addListener(circleAnyControl, 'click', function() {
   cleanControlcolor();
        setControlcolor(circleAnyControl);
    });
 qq.maps.event.addListener(rectangleControl, 'click', function() {
   cleanControlcolor();
       setControlcolor(rectangleControl);
    });
 qq.maps.event.addListener(polygonControl, 'click', function() {
  cleanControlcolor();
  setControlcolor(polygonControl);
    });

  function cleanControlcolor() {
    var oldColor="#ffffff";
   circleOneControl.style.background=oldColor;
   circleTwoControl.style.background=oldColor;
   circleThressControl.style.background=oldColor;
   circleAnyControl.style.background=oldColor;
   rectangleControl.style.background=oldColor;
   polygonControl.style.background=oldColor;

  }

     function setControlcolor(control) {
    var newColor="#86acf2";
   control.style.background=newColor;
  }


    </script>
</body>

</html>
最后我们把控件和绘图的功能绑定起来
修改引用js
<script src="http://map.qq.com/api/js?v=2.exp"></script>
修改为:
<script charset="utf-8" src="http://map.qq.com/api/js?v=2.exp&libraries=drawing"></script>
添加如下代码:
  var drawingManager = new qq.maps.drawing.DrawingManager({
        drawingMode: null,
        markerOptions:{
        visible:false
        },
        circleOptions: {
            fillColor: new qq.maps.Color(255, 208, 70, 0.3),
            strokeColor: new qq.maps.Color(88, 88, 88, 1),
            strokeWeight: 3,
            clickable: false
        }
    });
    drawingManager.setMap(map);
在相应的控件监听函数里加上相应的 绘制模式set
比如marker添加:
drawingManager.setDrawingMode(qq.maps.drawing.OverlayType.MARKER);变成
 qq.maps.event.addListener(circleOneControl, 'click', function() {
cleanControlcolor();
         setControlcolor(circleOneControl);
   drawingManager.setDrawingMode(qq.maps.drawing.OverlayType.MARKER);
    });
如果要清除绘制模式,则
drawingManager.setDrawingMode(null);

