Android---Gallery
Android 控件之Gallery图片集
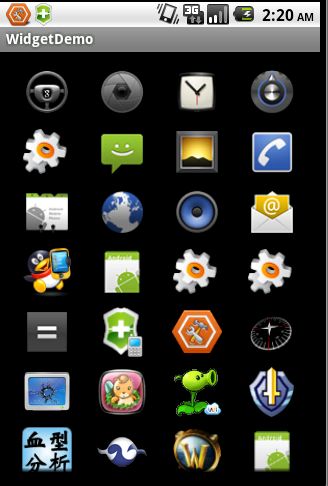
Gallery是Android中的图片库控件。先看效果,爽一番
源码下载
一、简介
在中心锁定,水平显示列表的项。
二、实例
1.布局文件
<?xml version="1.0" encoding="utf-8"?>
<LinearLayout
xmlns:android="http://schemas.android.com/apk/res/android"
android:layout_width="fill_parent"
android:orientation="vertical"
android:layout_height="wrap_content">
<Gallery xmlns:android="http://schemas.android.com/apk/res/android" android:id="@+id/gallery"
android:layout_width="match_parent"
android:layout_height="wrap_content"
/>
<LinearLayout xmlns:android="http://schemas.android.com/apk/res/android"
android:orientation="vertical"
android:layout_width="match_parent"
android:layout_height="wrap_content">
<Gallery android:id="@+id/gallery1"
android:layout_width="match_parent"
android:layout_height="wrap_content"
android:gravity="center_vertical"
android:spacing="16dp"
/>
</LinearLayout>
</LinearLayout>
2.属性文件
<?xml version="1.0" encoding="utf-8"?>
<resources>
<declare-styleable name="TogglePrefAttrs">
<attr name="android:preferenceLayoutChild" />
</declare-styleable>
<!-- These are the attributes that we want to retrieve from the theme
in view/Gallery1.java -->
<declare-styleable name="Gallery1">
<attr name="android:galleryItemBackground" />
</declare-styleable>
<declare-styleable name="LabelView">
<attr name="text" format="string" />
<attr name="textColor" format="color" />
<attr name="textSize" format="dimension" />
</declare-styleable>
</resources>
3.代码
/**
*
*/
package wjq.WidgetDemo;
import android.R.layout;
import android.app.Activity;
import android.content.Context;
import android.content.res.TypedArray;
import android.database.Cursor;
import android.os.Bundle;
import android.provider.Contacts.People;
import android.view.ContextMenu;
import android.view.MenuItem;
import android.view.View;
import android.view.ViewGroup;
import android.view.ContextMenu.ContextMenuInfo;
import android.widget.BaseAdapter;
import android.widget.Gallery;
import android.widget.ImageView;
import android.widget.SimpleCursorAdapter;
import android.widget.SpinnerAdapter;
import android.widget.Toast;
import android.widget.AdapterView.AdapterContextMenuInfo;
/**
* @author 记忆的永恒
*
*/
public class GalleryDemo extends Activity {
private Gallery gallery;
private Gallery gallery1;
/*
* (non-Javadoc)
*
* @see android.app.Activity#onCreate(android.os.Bundle)
*/
@Override
protected void onCreate(Bundle savedInstanceState) {
// TODO Auto-generated method stub
super.onCreate(savedInstanceState);
setContentView(R.layout.gallerypage);
gallery = (Gallery) findViewById(R.id.gallery);
gallery.setAdapter(new ImageAdapter(this));
registerForContextMenu(gallery);
Cursor c = getContentResolver().query(People.CONTENT_URI, null, null, null, null);
startManagingCursor(c);
SpinnerAdapter adapter = new SimpleCursorAdapter(this,
// Use a template that displays a text view
android.R.layout.simple_gallery_item,
// Give the cursor to the list adatper
c,
// Map the NAME column in the people database to...
new String[] {People.NAME},
// The "text1" view defined in the XML template
new int[] { android.R.id.text1 });
gallery1= (Gallery) findViewById(R.id.gallery1);
gallery1.setAdapter(adapter);
}
@Override
public void onCreateContextMenu(ContextMenu menu, View v,
ContextMenuInfo menuInfo) {
menu.add("Action");
}
@Override
public boolean onContextItemSelected(MenuItem item) {
AdapterContextMenuInfo info = (AdapterContextMenuInfo) item
.getMenuInfo();
Toast.makeText(this, "Longpress: " + info.position, Toast.LENGTH_SHORT)
.show();
return true;
}
public class ImageAdapter extends BaseAdapter {
int mGalleryItemBackground;
private Context mContext;
private Integer[] mImageIds = { R.drawable.b, R.drawable.c,
R.drawable.d, R.drawable.f, R.drawable.g };
public ImageAdapter(Context context) {
mContext = context;
TypedArray a = obtainStyledAttributes(R.styleable.Gallery1);
mGalleryItemBackground = a.getResourceId(
R.styleable.Gallery1_android_galleryItemBackground, 0);
a.recycle();
}
@Override
public int getCount() {
return mImageIds.length;
}
@Override
public Object getItem(int position) {
return position;
}
@Override
public long getItemId(int position) {
return position;
}
@Override
public View getView(int position, View convertView, ViewGroup parent) {
ImageView i = new ImageView(mContext);
i.setImageResource(mImageIds[position]);
i.setScaleType(ImageView.ScaleType.FIT_XY);
i.setLayoutParams(new Gallery.LayoutParams(300, 400));
// The preferred Gallery item background
i.setBackgroundResource(mGalleryItemBackground);
return i;
}
}
}
Android Animation学习笔记
标签: 杂谈 |
关于动画的实现,Android提供了Animation,在Android SDK介绍了2种Animation模式:
1. Tween Animation:通过对场景里的对象不断做图像变换(平移、缩放、旋转)产生动画效果,即是一种渐变动画;
2. Frame Animation:顺序播放事先做好的图像,是一种画面转换动画。
动画类型
下面先来看看Android提供的动画类型。Android的animation由四种类型组成
在XML文件中:
- alpha 渐变透明度动画效果
- scale 渐变尺寸伸缩动画效果
- translate 画面转换位置移动动画效果
- rotate 画面转移旋转动画效果
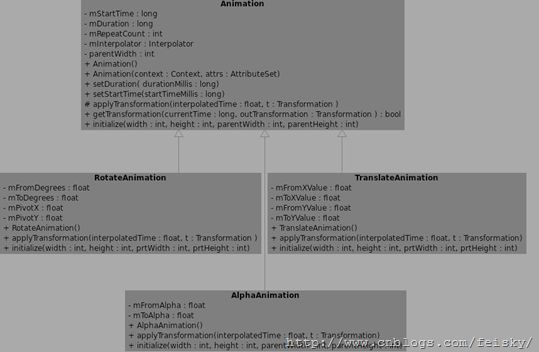
在Java 源码中定义了相应的类,可以使用这些类的方法来获取和操作相应的属性:
- AlphaAnimation渐变透明度动画效果
- ScaleAnimation渐变尺寸伸缩动画效果
- TranslateAnimation画面转换位置移动动画效果
- RotateAnimation画面转移旋转动画效果
Tween Animation
一个tween动画将对视图对象中的内容进行一系列简单的转换(位置,大小,旋转,透明性)。如果你有一个文本视图对象,你可以移动它,旋转它,让它变大或让它变小,如果文字下面还有背景图像,背景图像也会随着文件进行转换。
使用XML来定义Tween Animation
动画的XML文件在工程中res/anim目录,这个文件必须包含一个根元素,可以使<alpha><scale> <translate> <rotate>插值元素或者是把上面的元素都放入<set>元素组中,默认情况下,所以的动画指令都是同时发生的,为了让他们按序列发生,需要设置一个特殊的属性startOffset。动画的指令定义了你想要发生什么样的转换,当他们发生了,应该执行多长时间,转换可以是连续的也可以使同时的。例如,你让文本内容从左边移动到右边,然后旋转180度,或者在移动的过程中同时旋转,没个转换需要设置一些特殊的参数(开始和结束的大小尺寸的大小变化,开始和结束的旋转角度等等,也可以设置些基本的参数(例如,开始时间与周期),如果让几个转换同时发生,可以给它们设置相同的开始时间,如果按序列的话,计算开始时间加上其周期。
Tween Animation共同的节点属性
| 属性[类型] | 功能 | 备注 |
| Duration[long] | 属性为动画持续时间 | 时间以毫秒为单位 |
| fillAfter [boolean] | 当设置为true ,该动画转化在动画结束后被应用 | |
| fillBefore[boolean] | 当设置为true ,该动画转化在动画开始前被应用 | |
| interpolator |
指定一个动画的插入器 | 有一些常见的插入器 accelerate_decelerate_interpolator 加速-减速 动画插入器 accelerate_interpolator 加速-动画插入器 decelerate_interpolator 减速- 动画插入器 其他的属于特定的动画效果 |
| repeatCount[int] | 动画的重复次数 | |
| RepeatMode[int] | 定义重复的行为 | 1:重新开始 2:plays backward |
| startOffset[long] | 动画之间的时间间隔,从上次动画停多少时间开始执行下个动画 | |
| zAdjustment[int] | 定义动画的Z Order的改变 | 0:保持Z Order不变 1:保持在最上层 -1:保持在最下层 |
| 表二 |
||
| XML节点 | 功能说明 | |
| alpha | 渐变透明度动画效果 | |
| <alpha android:fromAlpha=”0.1″ android:toAlpha=”1.0″ android:duration=”3000″ /> |
||
| fromAlpha | 属性为动画起始时透明度 |
0.0表示完全透明 duration为动画持续时间,ms单位 |
|
属性为动画结束时透明度 |
|
| 表三 |
|||
| scale | 渐变尺寸伸缩动画效果 | ||
| <scale android:interpolator= “@android:anim/accelerate_decelerate_interpolator” android:fromXScale=”0.0″ android:toXScale=”1.4″ android:fromYScale=”0.0″ android:toYScale=”1.4″ android:pivotX=”50%” android:pivotY=”50%” android:fillAfter=”false” android:startOffset=“700” android:duration=”700″ android:repeatCount=”10″ /> |
|||
| fromXScale[float] fromYScale[float] | 为动画起始时,X、Y坐标上的伸缩尺寸 | 0.0表示收缩到没有 1.0表示正常无伸缩 值小于1.0表示收缩 值大于1.0表示放大 |
|
| toXScale [float] toYScale[float] |
为动画结束时,X、Y坐标上的伸缩尺寸 | ||
| pivotX[float] pivotY[float] |
为动画相对于物件的X、Y坐标的开始位置 | 属性值说明:从0%-100%中取值,50%为物件的X或Y方向坐标上的中点位置 | |
| 表四 |
|||
| translate | 画面转换位置移动动画效果 | ||
| <translate android:fromXDelta=”30″ android:toXDelta=”-80″ android:fromYDelta=”30″ android:toYDelta=”300″ android:duration=”2000″ /> |
|||
| fromXDelta toXDelta |
为动画、结束起始时 X坐标上的位置 | ||
| fromYDelta toYDelta |
为动画、结束起始时 Y坐标上的位置 | ||
| 表五 |
|||
| rotate | 画面转移旋转动画效果 | ||
| <rotate android:interpolator=”@android:anim/accelerate_decelerate_interpolator” android:fromDegrees=”0″ android:toDegrees=”+350″ android:pivotX=”50%” android:pivotY=”50%” android:duration=”3000″ /> |
|||
| fromDegrees | 为动画起始时物件的角度 | 说明 当角度为负数——表示逆时针旋转 当角度为正数——表示顺时针旋转 (负数from——to正数:顺时针旋转) (负数from——to负数:逆时针旋转) (正数from——to正数:顺时针旋转) (正数from——to负数:逆时针旋转) |
|
| toDegrees | 属性为动画结束时物件旋转的角度 可以大于360度 | ||
| pivotX pivotY |
为动画相对于物件的X、Y坐标的开始位 | 说明:以上两个属性值 从0%-100%中取值 50%为物件的X或Y方向坐标上的中点位置 |
|
下面给出一个完整的XML定义(SDK提供)
<set android:shareInterpolator="false"xmlns:android="http://schemas.android.com/apk/res/android"> <scaleandroid:interpolator="@android:anim/accelerate_decelerate_interpolator"android:fromXScale="1.0" android:toXScale="1.4" android:fromYScale="1.0"android:toYScale="0.6" android:pivotX="50%" android:pivotY="50%"android:fillAfter="false" android:duration="700" /> <setandroid:interpolator="@android:anim/decelerate_interpolator"> <scaleandroid:fromXScale="1.4" android:toXScale="0.0" android:fromYScale="0.6"android:toYScale="0.0" android:pivotX="50%" android:pivotY="50%"android:startOffset="700" android:duration="400" android:fillBefore="false" /> <rotateandroid:fromDegrees="0" android:toDegrees="-45" android:toYScale="0.0"android:pivotX="50%" android:pivotY="50%" android:startOffset="700"android:duration="400" /> </set> </set>
Tween Animation如何使用
使用AnimationUtils类的静态方法loadAnimation()来加载XML中的动画XML文件
//main.xml中的ImageView ImageView spaceshipImage = (ImageView) findViewById(R.id.spaceshipImage); //加载动画 Animation hyperspaceJumpAnimation =AnimationUtils.loadAnimation(this, R.anim.hyperspace_jump); //使用ImageView显示动画spaceshipImage.startAnimation(hyperspaceJumpAnimation);
如何在Java代码中定义动画
//在代码中定义 动画实例对象 private Animation myAnimation_Alpha; private Animation myAnimation_Scale; private Animation myAnimation_Translate; private Animation myAnimation_Rotate; //根据各自的构造方法来初始化一个实例对象 myAnimation_Alpha=newAlphaAnimation(0.1f, 1.0f); myAnimation_Scale =new ScaleAnimation(0.0f, 1.4f, 0.0f, 1.4f, Animation.RELATIVE_TO_SELF, 0.5f, Animation.RELATIVE_TO_SELF, 0.5f); myAnimation_Translate=new TranslateAnimation(30.0f, -80.0f, 30.0f, 300.0f); myAnimation_Rotate=new RotateAnimation(0.0f, +350.0f, Animation.RELATIVE_TO_SELF,0.5f,Animation.RELATIVE_TO_SELF, 0.5f);
interpolator的解释
interpolator定义一个动画的变化率(the rate of change)。这使得基本的动画效果(alpha, scale, translate, rotate)得以加速,减速,重复等。
Interpolator 定义了动画的变化速度,可以实现匀速、正加速、负加速、无规则变加速等。Interpolator 是基类,封装了所有 Interpolator 的共同方法,它只有一个方法,即 getInterpolation (float input),该方法 maps a point on the timeline to a multiplier to be applied to the transformations of an animation。Android 提供了几个 Interpolator 子类,实现了不同的速度曲线,如下:
| AccelerateDecelerateInterpolator | 在动画开始与介绍的地方速率改变比较慢,在中间的时候加速 |
| AccelerateInterpolator | 在动画开始的地方速率改变比较慢,然后开始加速 |
| CycleInterpolator | 动画循环播放特定的次数,速率改变沿着正弦曲线 |
| DecelerateInterpolator | 在动画开始的地方速率改变比较慢,然后开始减速 |
| LinearInterpolator | 在动画的以均匀的速率改变 |
Frame Animation
Frame Animation是顺序播放事先做好的图像,跟电影类似。不同于animation package, Android SDK提供了另外一个类AnimationDrawable来定义、使用Frame Animation。
Frame Animation可以在XML Resource定义(还是存放到res\anim文件夹下),也可以使用AnimationDrawable中的API定义。由于Tween Animation与Frame Animation有着很大的不同,因此XML定义的格式也完全不一样,其格式是:首先是animation-list根节点,animation-list根节点中包含多个item子节点,每个item节点定义一帧动画,当前帧的drawable资源和当前帧持续的时间。下面对节点的元素加以说明:
| XML属性 | 说明 |
| drawable | 当前帧引用的drawable资源 |
| duration | 当前帧显示的时间(毫秒为单位) |
| oneshot | 如果为true,表示动画只播放一次停止在最后一帧上,如果设置为false表示动画循环播放。 |
| variablePadding | If true, allows the drawable’s padding to change based on the current state that is selected. |
| visible | 规定drawable的初始可见性,默认为flase; |
下面就给个具体的XML例子,来定义一帧一帧的动画:
<animation-listxmlns:android="http://schemas.android.com/apk/res/android" android:oneshot="true"> <item android:drawable="@drawable/rocket_thrust1"android:duration="200" /> <item android:drawable="@drawable/rocket_thrust2"android:duration="200" /> <item android:drawable="@drawable/rocket_thrust3"android:duration="200" /> </animation-list>
上面的XML就定义了一个Frame Animation,其包含3帧动画,3帧动画中分别应用了drawable中的3张图片:rocket_thrust1,rocket_thrust2,rocket_thrust3,每帧动画持续200毫秒。
然后我们将以上XML保存在res/anim/文件夹下,命名为rocket_thrust.xml,显示动画的代码:
AnimationDrawable rocketAnimation; public void onCreate(Bundle savedInstanceState) { super.onCreate(savedInstanceState); setContentView(R.layout.main); ImageView rocketImage = (ImageView)findViewById(R.id.rocket_image); rocketImage.setBackgroundResource(R.anim.rocket_thrust); rocketAnimation = (AnimationDrawable) rocketImage.getBackground(); } public boolean onTouchEvent(MotionEvent event) { if (event.getAction() == MotionEvent.ACTION_DOWN) { rocketAnimation.start(); return true; } return super.onTouchEvent(event); }
代码运行的结果:3张图片按照顺序的播放一次.
有一点需要强调的是:启动Frame Animation动画的代码rocketAnimation.start();不能在OnCreate()中,因为在OnCreate()中AnimationDrawable还没有完全的与ImageView绑定,在OnCreate()中启动动画,就只能看到第一张图片。这里实在拖曳事件中实现的。
下面,阅读Android SDK中对AnimationDrawable的介绍,有个简单的了解:
| AnimationDrawable |
|
| 获取、设置动画的属性 | |
| int getDuration() | 获取动画的时长 |
| int getNumberOfFrames() | 获取动画的帧数 |
| boolean isOneShot()
Void setOneShot(boolean oneshot) |
获取oneshot属性 设置oneshot属性 |
| void inflate(Resurce r,XmlPullParser p, AttributeSet attrs) |
|
| 增加、获取帧动画 | |
| Drawable getFrame(int index) | 获取某帧的Drawable资源 |
| void addFrame(Drawable frame,int duration) | 为当前动画增加帧(资源,持续时长) |
| 动画控制 | |
| void start() | 开始动画 |
| void run() | 外界不能直接掉调用,使用start()替代 |
| boolean isRunning() | 当前动画是否在运行 |
| void stop() | 停止当前动画 |
本文参考:Android SDK
moandroid.com
eoeandroid.com
作者:Feisky
出处:http://www.cnblogs.com/feisky/
本文版权归作者和博客园共有,欢迎转载,但未经作者同意必须保留此段声明,且在文章页面明显位置给出原文连接,否则保留追究法律责任的权利。


