Android 自定义View,自定义属性--自定义圆形进度条(整理)
很多的时候,系统自带的View满足不了我们的功能需求,那么我们就需要自定义View来满足我们的需求
自定义View时要先继承View,添加类的构造方法,重写父类View的一些方法,例如onDraw,为了使我们自定义的View在一个项目中能够重用,有时候我们需要自定义其属性,举个很简单的例子,我在项目中的多个界面使用我自定义的View,每个界面该自定义View的颜色都不相同,这时候如果没有自定义属性,那我们是不是需要构建不同颜色的View出来,这样子我们的代码就会显得很冗余,所以这时候我们就需要自定义其属性来满足我们不同的需求。
自定义属性时,我们需要在values下建立attrs.xml文件,在其中定义我们需要定义的属性,然后在自定义View中也要做相对应的修改。
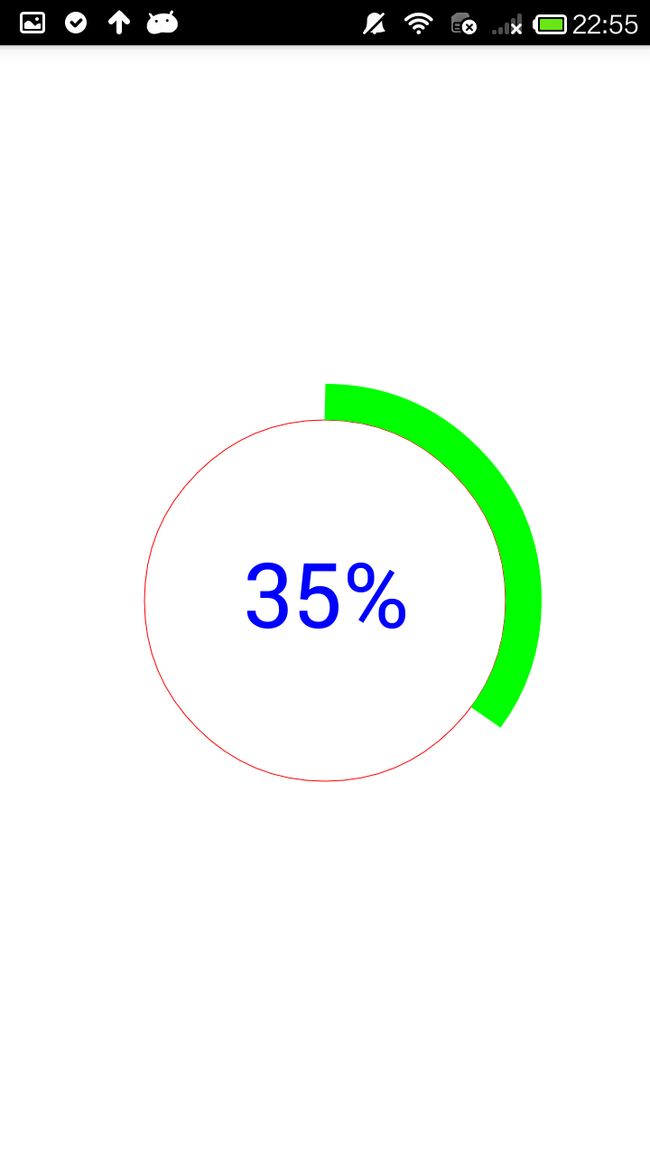
我们还是用一个小例子来看看自定义View和自定义属性的使用--带进度的圆形进度条,我们还是先看一下效果吧
1.在values下面新建一个attrs.xml,在里面定义我们的属性,不同的属性对应不同的format,属性对应的format可以参考http://blog.csdn.net/pgalxx/article/details/6766677,介绍的还是比较详细,接下来我贴上我在自定义这个进度条所用到的属性
<?xml version="1.0" encoding="utf-8"?>
<resources>

    <declare-styleable name="TasksCompletedView">
        <attr name="mRadius" format="dimension"/>
        <attr name="mStrokeWidth" format="dimension"/>
        <attr name="mCircleColor" format="color"/>
        <attr name="mRingColor" format="color"/>
    </declare-styleable>

</resources>
2.自定义View的属性定义之后,接下来就是怎么获取属性和代码的编写了,我们需要在构造方法中获取我们自己定义的相关属性,我们先调用context.obtainStyledAttributes(attrs,R.styleable.RoundProgressBar)来获取TypedArray,然后从TypedArray获取我们定义的属性,例如
private void initAttrs(Context context, AttributeSet attrs) {
		TypedArray typeArray = context.getTheme().obtainStyledAttributes(attrs,
				R.styleable.TasksCompletedView, 0, 0);
		mRadius = typeArray.getDimension(
				R.styleable.TasksCompletedView_mRadius, 80);
		mStrokeWidth = typeArray.getDimension(
				R.styleable.TasksCompletedView_mStrokeWidth, 10);
		mCircleColor = typeArray.getColor(
				R.styleable.TasksCompletedView_mCircleColor, 0xFFFFFFFF);
		mRingColor = typeArray.getColor(
				R.styleable.TasksCompletedView_mRingColor, 0xFFFFFFFF);

		mRingRadius = mRadius + mStrokeWidth / 2;
	}
上面的代码中,如mCircleColor = typeArray.getColor(
R.styleable.TasksCompletedView_mCircleColor, 0xFFFFFFFF);getColor方法的第一个参数是我们在XML文件中定义的颜色,如果我们没有给我们自定义的View定义颜色,他就会使用第二个参数中的默认值,即oxFFFFFFFF.
3.为了方便大家理解,我将自定义View的全部代码贴出来,里面的代码我也有详细的注释
package com.snailws.taskscompleted.activity;

import android.content.Context;
import android.content.res.TypedArray;
import android.graphics.Canvas;
import android.graphics.Paint;
import android.graphics.Paint.FontMetrics;
import android.graphics.RectF;
import android.util.AttributeSet;
import android.view.View;

import com.snailws.taskscompleted.R;

public class TasksCompletedView extends View {

	// 画实心圆的画笔
	private Paint mCirclePaint;
	// 画圆环的画笔
	private Paint mRingPaint;
	// 画字体的画笔
	private Paint mTextPaint;
	// 圆形颜色
	private int mCircleColor;
	// 圆环颜色
	private int mRingColor;
	// 半径
	private float mRadius;
	// 圆环半径
	private float mRingRadius;
	// 圆环宽度
	private float mStrokeWidth;
	// 圆心x坐标
	private int mXCenter;
	// 圆心y坐标
	private int mYCenter;
	// 字的长度
	private float mProgressTxtWidth;
	// 字的高度
	private float mProgressTxtHeight;
	// 总进度
	private int mTotalProgress = 100;
	// 当前进度
	private int mProgress;

	public TasksCompletedView(Context context, AttributeSet attrs) {
		super(context, attrs);
		// 获取自定义的属性
		initAttrs(context, attrs);
		initVariable();
	}

	private void initAttrs(Context context, AttributeSet attrs) {
		TypedArray typeArray = context.getTheme().obtainStyledAttributes(attrs,
				R.styleable.TasksCompletedView, 0, 0);
		mRadius = typeArray.getDimension(
				R.styleable.TasksCompletedView_mRadius, 80);
		mStrokeWidth = typeArray.getDimension(
				R.styleable.TasksCompletedView_mStrokeWidth, 10);
		mCircleColor = typeArray.getColor(
				R.styleable.TasksCompletedView_mCircleColor, 0xFFFFFFFF);
		mRingColor = typeArray.getColor(
				R.styleable.TasksCompletedView_mRingColor, 0xFFFFFFFF);

		mRingRadius = mRadius + mStrokeWidth / 2;
	}

	private void initVariable() {
		mCirclePaint = new Paint();
		mCirclePaint.setAntiAlias(true);
		mCirclePaint.setColor(mCircleColor);
		mCirclePaint.setStyle(Paint.Style.STROKE);

		mRingPaint = new Paint();
		mRingPaint.setAntiAlias(true);
		mRingPaint.setColor(mRingColor);
		mRingPaint.setStyle(Paint.Style.STROKE);
		mRingPaint.setStrokeWidth(mStrokeWidth);

		mTextPaint = new Paint();
		mTextPaint.setAntiAlias(true);
		mTextPaint.setStyle(Paint.Style.FILL);
		//mTextPaint.setColor(color.black);
		mTextPaint.setARGB(255, 0, 0, 255);
		mTextPaint.setTextSize(mRadius / 2);

		FontMetrics fm = mTextPaint.getFontMetrics();
		mProgressTxtHeight = (int) Math.ceil(fm.descent - fm.ascent);

	}

	RectF oval = new RectF();

	@Override
	protected void onDraw(Canvas canvas) {

		mXCenter = getWidth() / 2;
		mYCenter = getHeight() / 2;

		canvas.drawCircle(mXCenter, mYCenter, mRadius, mCirclePaint);

		if (mProgress > 0) {

			oval.left = (mXCenter - mRingRadius);
			oval.top = (mYCenter - mRingRadius);
			oval.right = mRingRadius * 2 + (mXCenter - mRingRadius);
			oval.bottom = mRingRadius * 2 + (mYCenter - mRingRadius);
			canvas.drawArc(oval, -90,
					((float) mProgress / mTotalProgress) * 360, false,
					mRingPaint); //
			String txt = mProgress + "%";
			mProgressTxtWidth = mTextPaint.measureText(txt, 0, txt.length());
			canvas.drawText(txt, mXCenter - mProgressTxtWidth / 2, mYCenter
					+ mProgressTxtHeight / 4, mTextPaint);

		}
	}

	public void setProgress(int progress) {
		mProgress = progress;
		// invalidate();
		postInvalidate();
	}

}
4.如何使用该自定义布局
activity_main.xml
<LinearLayout xmlns:android="http://schemas.android.com/apk/res/android"
    xmlns:tools="http://schemas.android.com/tools"
    xmlns:tc="http://schemas.android.com/apk/res/com.snailws.taskscompleted"
    android:layout_width="match_parent"
    android:layout_height="match_parent"
    android:background="@color/white"
    android:orientation="vertical"
    tools:context=".MainActivity" >

    <!-- 自定义控件:圆形进度条 -->

    <com.snailws.taskscompleted.activity.TasksCompletedView
        android:id="@+id/tasks_view"
        android:layout_width="fill_parent"
        android:layout_height="fill_parent"
        tc:mCircleColor="@color/circle_color"
        tc:mRadius="100dip"
        tc:mRingColor="@color/ring_color"
        tc:mStrokeWidth="20dip" />

</LinearLayout>
注意:
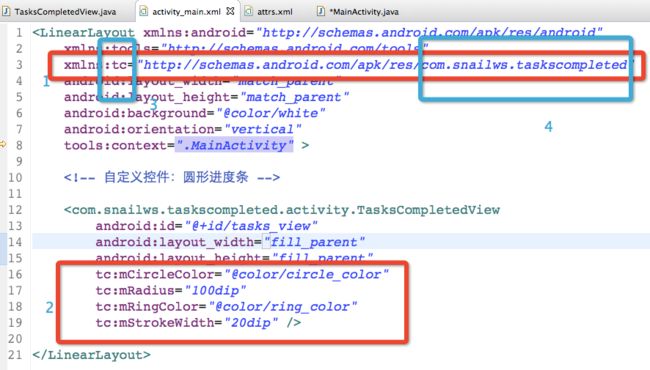
通过上面几步我们就实现了自定义View,和自定义View的属性,当然使用过程中还是有一点变化,我们必须在界面布局的最顶层加上
xmlns:tc="http://schemas.android.com/apk/res/com.snailws.taskscompleted"(如编号1所示)
编号3是自定义属性的前缀,什么意思呢?对于android系统控件我们定义其控件属性是用android:XXX="XXXXXXX",而我们自己定义的就用tc:XXX = "XXXXXX"(如编号2 )
编号4则是我们的包名,它是Manifest.xml中的package属性值,如下图所示
5,在代码中使用该自定义控件
package com.snailws.taskscompleted.activity;

import android.app.Activity;
import android.os.Bundle;
import android.view.Window;

import com.snailws.taskscompleted.R;

public class MainActivity extends Activity {

	private TasksCompletedView mTasksView;

	private int mTotalProgress;
	private int mCurrentProgress;

	@Override
	protected void onCreate(Bundle savedInstanceState) {
		super.onCreate(savedInstanceState);
		requestWindowFeature(Window.FEATURE_NO_TITLE);
		setContentView(R.layout.activity_main);
		initVariable();
		initView();

		// 启动线程
		new Thread(new ProgressRunable()).start();
	}

	private void initVariable() {
		mTotalProgress = 100;
		mCurrentProgress = 0;
	}

	private void initView() {
		mTasksView = (TasksCompletedView) findViewById(R.id.tasks_view);
	}

	class ProgressRunable implements Runnable {

		@Override
		public void run() {
			while (mCurrentProgress < mTotalProgress) {
				mCurrentProgress += 1;
				mTasksView.setProgress(mCurrentProgress);
				try {
					Thread.sleep(100);
				} catch (Exception e) {
					e.printStackTrace();
				}
			}
		}

	}

}
该项目的目标结构如下:
参考1:自定义漂亮的圆形进度条
参考2:Android 高手进阶之自定义View,自定义属性(带进度的圆形进度条)
参考3:error: No resource identifier found for attribute ‘backIcon’ in package


