Android ActionBar的源代码分析(一)
ActionBar是android的一个非常重要开发组件,在很多商业应用中到处可见,也是很多android开发人员必须熟练掌握的开发技术,下面就从源码角度来分析ActionBar的实现过程。
从哪里开始呢?
我们回忆一下在Activity中获取ActionBar的方法为getActionBar(),那就从getActionBar()开始研究吧!
打开getActionBar()的代码实现如下:
    public ActionBar getActionBar() {
        initActionBar();
        return mActionBar;
    }
就简简单单的调用了initActionBar()方法,然后返回mActionBar了。那么mActionBar应该是在initActionBar()中进行实例化的了,我们看一下initActionBar()的代码
    private void initActionBar() {
        Window window = getWindow();

        window.getDecorView();

        if (isChild() || !window.hasFeature(Window.FEATURE_ACTION_BAR) || mActionBar != null) {
            return;
        }

        mActionBar = new ActionBarImpl(this);
        mActionBar.setDefaultDisplayHomeAsUpEnabled(mEnableDefaultActionBarUp);
    }
代码首先是获取窗口类window,然后初始化decorView,接着判断是否嵌套Activity,或者是否使用ActionBar或者mActionBar是否为空,由于是第一次调用,默认情况下这三个条件返回的结果是false;接着就进行mActionBar的实例化操作,可以看到,mActionBar的具体实现交由ActionBarImpl来进行了
抽象类Window的具体实现类是哪个?
这里需要看一下window的具体实现类是哪个呢?我们看到Window这个类是个抽象类,具体实现类是由Activity执行attach()方法的时候才实例化的,我们看一下Activity的attach方法代码
    final void attach(Context context, ActivityThread aThread,
            Instrumentation instr, IBinder token, int ident,
            Application application, Intent intent, ActivityInfo info,
            CharSequence title, Activity parent, String id,
            NonConfigurationInstances lastNonConfigurationInstances,
            Configuration config) {
        attachBaseContext(context);

        mFragments.attachActivity(this, mContainer, null);

        mWindow = PolicyManager.makeNewWindow(this);
        mWindow.setCallback(this);
        mWindow.getLayoutInflater().setPrivateFactory(this);
        if (info.softInputMode != WindowManager.LayoutParams.SOFT_INPUT_STATE_UNSPECIFIED) {
            mWindow.setSoftInputMode(info.softInputMode);
        }
        if (info.uiOptions != 0) {
            mWindow.setUiOptions(info.uiOptions);
        }
        mUiThread = Thread.currentThread();

        mMainThread = aThread;
        mInstrumentation = instr;
        mToken = token;
        mIdent = ident;
        mApplication = application;
        mIntent = intent;
        mComponent = intent.getComponent();
        mActivityInfo = info;
        mTitle = title;
        mParent = parent;
        mEmbeddedID = id;
        mLastNonConfigurationInstances = lastNonConfigurationInstances;

        mWindow.setWindowManager(
                (WindowManager)context.getSystemService(Context.WINDOW_SERVICE),
                mToken, mComponent.flattenToString(),
                (info.flags & ActivityInfo.FLAG_HARDWARE_ACCELERATED) != 0);
        if (mParent != null) {
            mWindow.setContainer(mParent.getWindow());
        }
        mWindowManager = mWindow.getWindowManager();
        mCurrentConfig = config;
    }
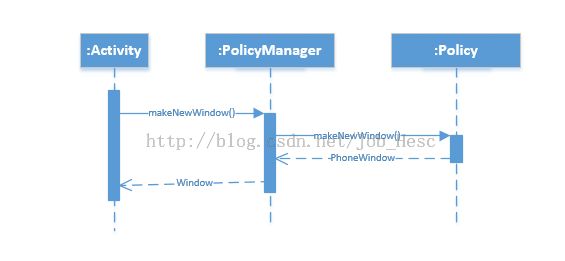
可以看到window是在Activity在执行attach方法的时候创建并初始化的,这里就调用了一个PolicyManager.makeNewWindow(this)方法进行创建window,跟踪到类PolicyManager的方法makeNewWindow中
public final class PolicyManager {
    private static final String POLICY_IMPL_CLASS_NAME =
        "com.android.internal.policy.impl.Policy";

    private static final IPolicy sPolicy;

    static {
        try {
            Class policyClass = Class.forName(POLICY_IMPL_CLASS_NAME);
            sPolicy = (IPolicy)policyClass.newInstance();
        } catch (ClassNotFoundException ex) {
            throw new RuntimeException(
                    POLICY_IMPL_CLASS_NAME + " could not be loaded", ex);
        } catch (InstantiationException ex) {
            throw new RuntimeException(
                    POLICY_IMPL_CLASS_NAME + " could not be instantiated", ex);
        } catch (IllegalAccessException ex) {
            throw new RuntimeException(
                    POLICY_IMPL_CLASS_NAME + " could not be instantiated", ex);
        }
    }

    private PolicyManager() {}

    public static Window makeNewWindow(Context context) {
        return sPolicy.makeNewWindow(context);
    }

    public static LayoutInflater makeNewLayoutInflater(Context context) {
        return sPolicy.makeNewLayoutInflater(context);
    }

    public static WindowManagerPolicy makeNewWindowManager() {
        return sPolicy.makeNewWindowManager();
    }

    public static FallbackEventHandler makeNewFallbackEventHandler(Context context) {
        return sPolicy.makeNewFallbackEventHandler(context);
    }
}
原来策略管理器PolicyManager在static <init>中使用Class.forName()方法动态加载了“com.android.internal.policy.impl.Policy”这个类,并进行实例化,后面的几个静态方法都交由这个类来实现,我们看一下里面的代码:
public class Policy implements IPolicy {
    private static final String TAG = "PhonePolicy";

    private static final String[] preload_classes = {
        "com.android.internal.policy.impl.PhoneLayoutInflater",
        "com.android.internal.policy.impl.PhoneWindow",
        "com.android.internal.policy.impl.PhoneWindow$1",
        "com.android.internal.policy.impl.PhoneWindow$DialogMenuCallback",
        "com.android.internal.policy.impl.PhoneWindow$DecorView",
        "com.android.internal.policy.impl.PhoneWindow$PanelFeatureState",
        "com.android.internal.policy.impl.PhoneWindow$PanelFeatureState$SavedState",
    };

    static {
        for (String s : preload_classes) {
            try {
                Class.forName(s);
            } catch (ClassNotFoundException ex) {
                Log.e(TAG, "Could not preload class for phone policy: " + s);
            }
        }
    }

    public Window makeNewWindow(Context context) {
        return new PhoneWindow(context);
    }

    public LayoutInflater makeNewLayoutInflater(Context context) {
        return new PhoneLayoutInflater(context);
    }

    public WindowManagerPolicy makeNewWindowManager() {
        return new PhoneWindowManager();
    }

    public FallbackEventHandler makeNewFallbackEventHandler(Context context) {
        return new PhoneFallbackEventHandler(context);
    }
}
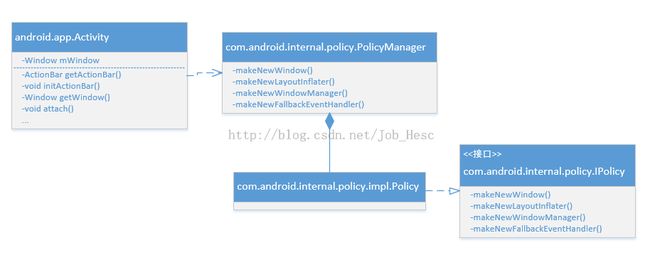
看到这里我们终于有一种恍然大悟的感觉,我们回忆一下,Activity在attach方法调用PolicyManager.makeNewWindow(this)实例化window类,其实PolicyManager是个stub,真正的实现是交由Policy来进行的,最后的结果应该是 Window mWindow = new PhoneWindow(this)
上面类关系如下图:
new ActionBarImpl()到底干了什么?
回到上面,我们在Activity.initActionBar()方法中,调用类ActionBarImpl的构造方法进行了实例化,并把实例化对象赋值给了mActionBar,这里看一下new ActionBarImpl(this)到底做了什么。
public ActionBarImpl(Activity activity) {
        mActivity = activity;
        Window window = activity.getWindow();
        View decor = window.getDecorView();
        init(decor);
        if (!mActivity.getWindow().hasFeature(Window.FEATURE_ACTION_BAR_OVERLAY)) {
            mContentView = decor.findViewById(android.R.id.content);
        }
    }
这里传入Activity参数,并调用activity.getWindow()获取到窗口对象window,从上面可以知道,这个window就是PhoneWindow;接着调用window.getDecorView()获取decorView并调用init()方法进行初始化,我们看一下init()方法做了哪些初始化操作吧
    private void init(View decor) {
        mContext = decor.getContext();
        mOverlayLayout = (ActionBarOverlayLayout) decor.findViewById(
                com.android.internal.R.id.action_bar_overlay_layout);
        if (mOverlayLayout != null) {
            mOverlayLayout.setActionBar(this);
        }
        mActionView = (ActionBarView) decor.findViewById(com.android.internal.R.id.action_bar);
        mContextView = (ActionBarContextView) decor.findViewById(
                com.android.internal.R.id.action_context_bar);
        mContainerView = (ActionBarContainer) decor.findViewById(
                com.android.internal.R.id.action_bar_container);
        mTopVisibilityView = (ViewGroup)decor.findViewById(
                com.android.internal.R.id.top_action_bar);
        if (mTopVisibilityView == null) {
            mTopVisibilityView = mContainerView;
        }
        mSplitView = (ActionBarContainer) decor.findViewById(
                com.android.internal.R.id.split_action_bar);

        if (mActionView == null || mContextView == null || mContainerView == null) {
            throw new IllegalStateException(getClass().getSimpleName() + " can only be used " +
                    "with a compatible window decor layout");
        }

        mActionView.setContextView(mContextView);
        mContextDisplayMode = mActionView.isSplitActionBar() ?
                CONTEXT_DISPLAY_SPLIT : CONTEXT_DISPLAY_NORMAL;

        // This was initially read from the action bar style
        final int current = mActionView.getDisplayOptions();
        final boolean homeAsUp = (current & DISPLAY_HOME_AS_UP) != 0;
        if (homeAsUp) {
            mDisplayHomeAsUpSet = true;
        }

        ActionBarPolicy abp = ActionBarPolicy.get(mContext);
        setHomeButtonEnabled(abp.enableHomeButtonByDefault() || homeAsUp);
        setHasEmbeddedTabs(abp.hasEmbeddedTabs());
    }
这里就是根据布局文件查找相应的控件并赋值给相应的成员变量,这里的关键是:布局文件是哪个呢?
decorView的布局
这就要看一下 Window.getDecorView()里是怎么实现的了,也就是PhoneWindow.getDecorView()的实现代码如下:
    @Override
    public final View getDecorView() {
        if (mDecor == null) {
            installDecor();
        }
        return mDecor;
    }
初始的时候mDecor=null,就是调用installDecor()方法进行初始化。
    private void installDecor() {
        if (mDecor == null) {
            mDecor = generateDecor();
            mDecor.setDescendantFocusability(ViewGroup.FOCUS_AFTER_DESCENDANTS);
            mDecor.setIsRootNamespace(true);
            if (!mInvalidatePanelMenuPosted && mInvalidatePanelMenuFeatures != 0) {
                mDecor.postOnAnimation(mInvalidatePanelMenuRunnable);
            }
        }
        if (mContentParent == null) {
            mContentParent = generateLayout(mDecor);
            mDecor.makeOptionalFitsSystemWindows();
<span style="white-space:pre">	</span>......
这里首先调用generateDecor()方法进行实例化DecorView,其实类DecorView是FrameLayout的派生类,也就是说是一个ViewGroup;然后调用generateLayout()获取布局文件,代码如下:
    protected ViewGroup generateLayout(DecorView decor) {
		......

        int layoutResource;
        int features = getLocalFeatures();
        // System.out.println("Features: 0x" + Integer.toHexString(features));
        if ((features & ((1 << FEATURE_LEFT_ICON) | (1 << FEATURE_RIGHT_ICON))) != 0) {
            if (mIsFloating) {
                TypedValue res = new TypedValue();
                getContext().getTheme().resolveAttribute(
                        com.android.internal.R.attr.dialogTitleIconsDecorLayout, res, true);
                layoutResource = res.resourceId;
            } else {
                layoutResource = com.android.internal.R.layout.screen_title_icons;
            }
            // XXX Remove this once action bar supports these features.
            removeFeature(FEATURE_ACTION_BAR);
            // System.out.println("Title Icons!");
        } else if ((features & ((1 << FEATURE_PROGRESS) | (1 << FEATURE_INDETERMINATE_PROGRESS))) != 0
                && (features & (1 << FEATURE_ACTION_BAR)) == 0) {
            // Special case for a window with only a progress bar (and title).
            // XXX Need to have a no-title version of embedded windows.
            layoutResource = com.android.internal.R.layout.screen_progress;
            // System.out.println("Progress!");
        } else if ((features & (1 << FEATURE_CUSTOM_TITLE)) != 0) {
            // Special case for a window with a custom title.
            // If the window is floating, we need a dialog layout
            if (mIsFloating) {
                TypedValue res = new TypedValue();
                getContext().getTheme().resolveAttribute(
                        com.android.internal.R.attr.dialogCustomTitleDecorLayout, res, true);
                layoutResource = res.resourceId;
            } else {
                layoutResource = com.android.internal.R.layout.screen_custom_title;
            }
            // XXX Remove this once action bar supports these features.
            removeFeature(FEATURE_ACTION_BAR);
        } else if ((features & (1 << FEATURE_NO_TITLE)) == 0) {
            // If no other features and not embedded, only need a title.
            // If the window is floating, we need a dialog layout
            if (mIsFloating) {
                TypedValue res = new TypedValue();
                getContext().getTheme().resolveAttribute(
                        com.android.internal.R.attr.dialogTitleDecorLayout, res, true);
                layoutResource = res.resourceId;
            } else if ((features & (1 << FEATURE_ACTION_BAR)) != 0) {
                if ((features & (1 << FEATURE_ACTION_BAR_OVERLAY)) != 0) {
                    layoutResource = com.android.internal.R.layout.screen_action_bar_overlay;
                } else {
                    layoutResource = com.android.internal.R.layout.screen_action_bar;
                }
            } else {
                layoutResource = com.android.internal.R.layout.screen_title;
            }
            // System.out.println("Title!");
        } else if ((features & (1 << FEATURE_ACTION_MODE_OVERLAY)) != 0) {
            layoutResource = com.android.internal.R.layout.screen_simple_overlay_action_mode;
        } else {
            // Embedded, so no decoration is needed.
            layoutResource = com.android.internal.R.layout.screen_simple;
            // System.out.println("Simple!");
        }

        mDecor.startChanging();

        View in = mLayoutInflater.inflate(layoutResource, null);
        decor.addView(in, new ViewGroup.LayoutParams(MATCH_PARENT, MATCH_PARENT));

        ......
    }
这个方法代码很长,我们只看关键部分的代码;从上面代码可以看出,根据window中不同的features加载不同的布局文件,比如当features=FEATURE_ACTION_BAR时,加载的布局文件com.android.internal.R.layout.screen_action_bar,即screen_action_bar.xml,这个文件在哪呢?其实就在对应的sdk版本下的data\res\layout下,比如我的是在E:\android-dev\sdk\platforms\android-17\data\res\layout目录下,打开该文件:
<?xml version="1.0" encoding="utf-8"?>
<!-- Copyright (C) 2010 The Android Open Source Project

     Licensed under the Apache License, Version 2.0 (the "License");
     you may not use this file except in compliance with the License.
     You may obtain a copy of the License at

          http://www.apache.org/licenses/LICENSE-2.0

     Unless required by applicable law or agreed to in writing, software
     distributed under the License is distributed on an "AS IS" BASIS,
     WITHOUT WARRANTIES OR CONDITIONS OF ANY KIND, either express or implied.
     See the License for the specific language governing permissions and
     limitations under the License.
-->

<!--
This is an optimized layout for a screen with the Action Bar enabled.
-->

<LinearLayout xmlns:android="http://schemas.android.com/apk/res/android"
    android:layout_width="match_parent"
    android:layout_height="match_parent"
    android:orientation="vertical"
    android:fitsSystemWindows="true"
    android:splitMotionEvents="false">
    <com.android.internal.widget.ActionBarContainer android:id="@+id/action_bar_container"
        android:layout_width="match_parent"
        android:layout_height="wrap_content"
        style="?android:attr/actionBarStyle">
        <com.android.internal.widget.ActionBarView
            android:id="@+id/action_bar"
            android:layout_width="match_parent"
            android:layout_height="wrap_content"
            style="?android:attr/actionBarStyle" />
        <com.android.internal.widget.ActionBarContextView
            android:id="@+id/action_context_bar"
            android:layout_width="match_parent"
            android:layout_height="wrap_content"
            android:visibility="gone"
            style="?android:attr/actionModeStyle" />
    </com.android.internal.widget.ActionBarContainer>
    <FrameLayout android:id="@android:id/content"
        android:layout_width="match_parent"
        android:layout_height="0dip"
        android:layout_weight="1"
        android:foregroundGravity="fill_horizontal|top"
        android:foreground="?android:attr/windowContentOverlay" />
    <com.android.internal.widget.ActionBarContainer android:id="@+id/split_action_bar"
                  android:layout_width="match_parent"
                  android:layout_height="wrap_content"
                  style="?android:attr/actionBarSplitStyle"
                  android:visibility="gone"
                  android:gravity="center"/>
</LinearLayout>
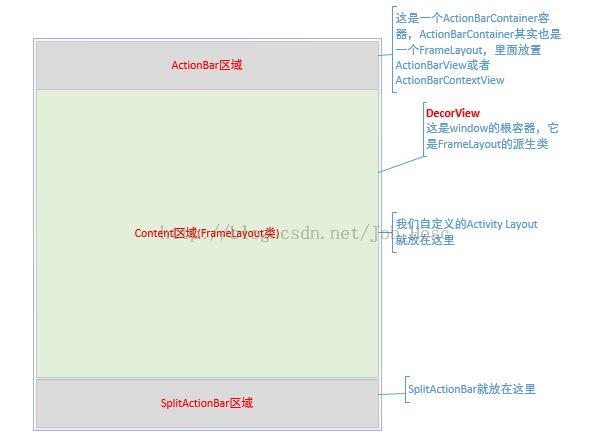
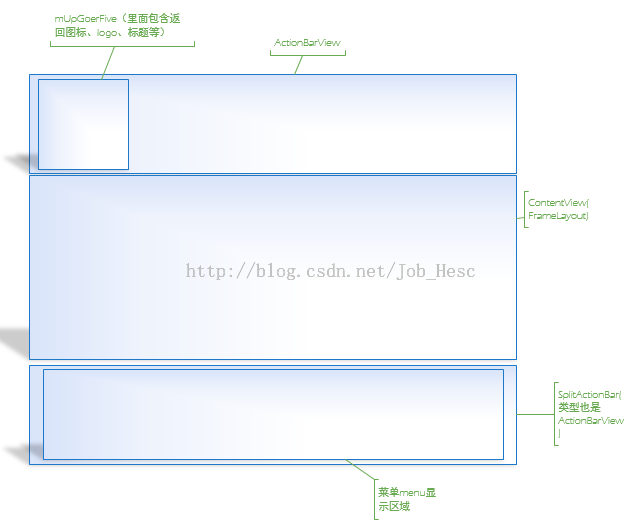
从这个布局文件中可以看到,整个window的根布局为DecorView,然后DecorView里又分为ActionBar区域、Content区域和SplitActionBar区域,其中ActionBar区域放置ActionBarView或者ActionBarContextView,Content区域放置的就是我们使用Activity时自己设计的Layout,SplitActionBar区域放置的是Split形式的ActionBar;整个结构如下图:
到现在为止,我们已经知道了整个Activity的布局,那么ActionBarView的布局又是什么样的呢?
ActionBarView的布局
我们打开ActionBarView的代码来看看。从ActionBarView的代码看出,ActionBarView的布局并不是通过LayoutInflater.inflate xml的方式来创建的,而是通过addView的方式来创建的,通过在代码ActionBarView.java中搜索addView方法,可以看到有以下几个方法调用了addView:
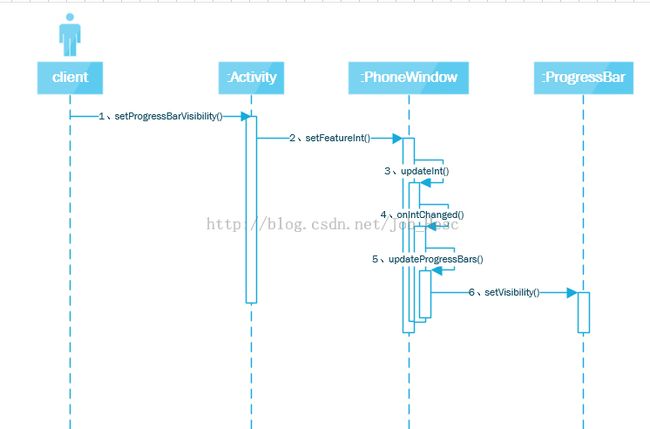
- initProgress(),这是初始化水平进度条的方法,初始状态下ProgressBar的visibility为View.GONE,即不可见,它是在PhoneWindow的installDecor方法中调用的,关于installDecor方法,前面已经提到。有朋友问,那怎么使用ActionBar上的水平ProgressBar呢?很简单,直接调用Activity.setProgressBarVisibility(true)就可以显示ProgressBar,Activity.setProgressBarVisibility(false)就隐藏ProgressBar了,下图是setProgressBarVisibility的调用过程:
- initIndeterminateProgress(),这是初始化圆形进度条的方法,初始状态下ProgressBar的visibility为View.GONE,即不可见。使用ActionBar上圆形的ProgressBar方式就是在Activity.setProgressBarIndeterminateVisibility(true),隐藏进度条的方式为Activity.setProgressBarIndeterminateVisibility(false),该方法的调用过程跟setProgressBarVisibility()一样;
- setMenu(),这是设置ActionBar上菜单的方法。在这个方法中,系统会把menuView放到ActionBar中,这个menuView的类型为ActionMenuView,而ActionMenuView继承于类LinearLayout,也就是说ActionMenuView是一个视图容器,它里面的菜单项menu是由类ActionMenuPresenter来构造的,关于ActionMenuPresenter和ActionMenuView构造菜单的过程,后面章节再进行介绍;这个方法的调用过程如下:

- setSplitActionBar(),这是初始化splitActionBar的方法,它是在PhoneWindow的installDecor方法中调用的;从上面我们知道,这个splitActionBar是放在decorView的最下面。在这个方法中,系统会把menuView放到splitActionBar中,这个menuView就是上面setMenu提到的menuView。当我们在AndroidManifest.xml中设置Activity的属性android:uiOptions="splitActionBarWhenNarrow"时(对于API<14时,需要在activity节点中添加如下节点: <meta-dataandroid:name="android.support.UI_OPTIONS"android:value="splitActionBarWhenNarrow">),menuView就放置到splitActionBar中,否则就会放在ActionBar上;
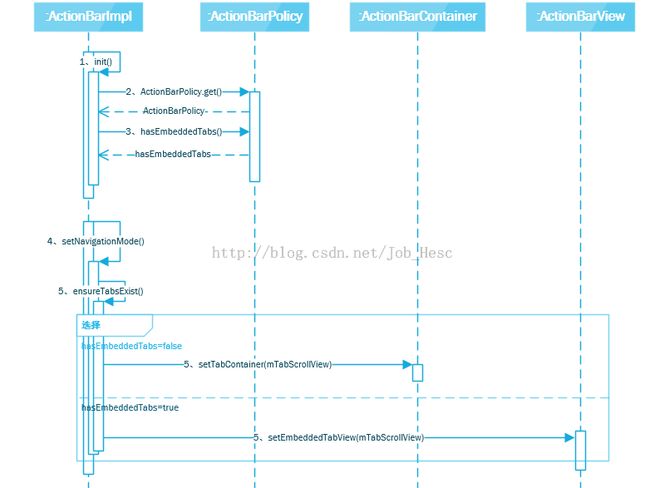
- setEmbeddedTabView(),当NavigationMode=NAVIGATION_MODE_TABS(页签)时,这个方法才有效,它负责把Tab容器添加到ActionBarView中,传入参数tabs是一个ScrollingTabContainerView类型的对象,ScrollingTabContainerView继承于HorizontalScrollView,可以看出它是一个具备水平滚动条的tab容器;当ActionBarPolicy的方法hasEmbeddedTabs返回true时,tab就会embed到ActionBarView上,否则就会放到ActionBarContainer上,这个方法的调用过程如下:
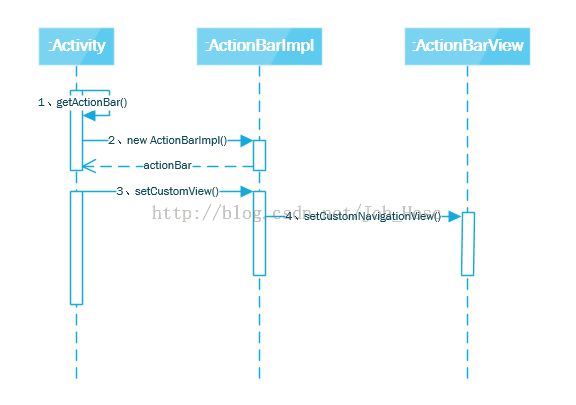
- setCustomNavigationView(),这个方法是把自定义view放置到ActionBarView上,它是由ActionBarImpl.setCustomView()方法调用的;调用过程如下:
- setNavigationMode(),这是设置ActionBar导航模式的方法,对于mode的值,有三个值可选:NAVIGATION_MODE_STANDARD(标准)、NAVIGATION_MODE_LIST(列表)、NAVIGATION_MODE_TABS(页签),当mode=NAVIGATION_MODE_LIST时,就会把spinner控件放置到ActionBarView上;当mode=NAVIGATION_MODE_TABS时,就会把TabScrollView控件放置到ActionBarView上;调用过程如下:

- setDisplayOptions(),这是设置ActionBar显示选项的方法。其中当传入参数options为DISPLAY_SHOW_CUSTOM(即显示自定义视图)时,就会把主题上定义的自定义视图布局放置到ActionBarView上。这里啰嗦一句,主题上怎么定义ActionBarView的自定义视图呢?这里先把结果告诉大家,至于actionbar主题风格的原理,后面章节在做介绍:
    <style name="custom" parent="android:Theme.Holo.Light.DarkActionBar">
        <item name="android:actionBarStyle">@style/MyActionBar</item>
    </style>

    <style name="MyActionBar" parent="<span style="font-family: Arial, Helvetica, sans-serif;">android:</span><span style="font-family: Arial, Helvetica, sans-serif;">Widget.Holo.Light.ActionBar.Solid.Inverse"></span>
        <item name="android:customNavigationLayout">@layout/activity_normal</item>
    </style>
就是设置customNavigationLayout属性为你自定义的布局,然后在AndroidManifest.xml中的Activity添加android:theme="@style/custom"即可
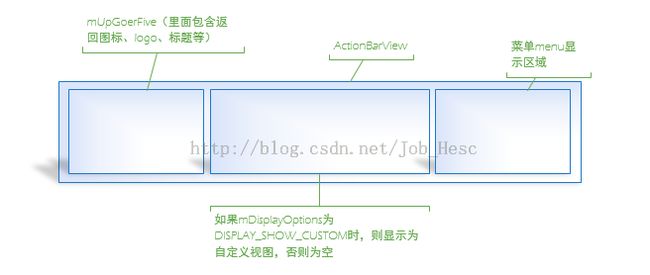
- onFinishInflate(),这是对布局进行inflate后回调的方法,在这个方法中,会把mHomeLayout先添加到mUpGoerFive,然后再把mUpGoerFive放置到ActionBarView中,这个mUpGoerFive是一个ViewGroup,它里面包含两个视图:mHomeLayout和mTitleLayout,其中mHomeLayout包含两个ImageView:mUpView(即返回的指示图标)和mIconView(默认情况下是应用程序图标),这两个View分别可以通过getActionBar().setDisplayHomeAsUpEnabled()和getActionBar().setDisplayShowHomeEnabled()来设置是否显示;而mTitleLayout是一个LinearLayout,它的组成(见文件\sdk\platforms\android-17\data\res\layout\action_bar_title_item.xml)如下:
<?xml version="1.0" encoding="utf-8"?>
<!-- Copyright (C) 2010 The Android Open Source Project

     Licensed under the Apache License, Version 2.0 (the "License");
     you may not use this file except in compliance with the License.
     You may obtain a copy of the License at

          http://www.apache.org/licenses/LICENSE-2.0

     Unless required by applicable law or agreed to in writing, software
     distributed under the License is distributed on an "AS IS" BASIS,
     WITHOUT WARRANTIES OR CONDITIONS OF ANY KIND, either express or implied.
     See the License for the specific language governing permissions and
     limitations under the License.
-->

<LinearLayout xmlns:android="http://schemas.android.com/apk/res/android"
              android:layout_width="wrap_content"
              android:layout_height="match_parent"
              android:orientation="horizontal"
              android:paddingEnd="8dip"
              android:enabled="false">

    <ImageView android:id="@android:id/up"
               android:src="?android:attr/homeAsUpIndicator"
               android:layout_gravity="center_vertical|start"
               android:visibility="gone"
               android:layout_width="wrap_content"
               android:layout_height="wrap_content" />

    <LinearLayout android:layout_width="wrap_content"
                  android:layout_height="wrap_content"
                  android:layout_gravity="center_vertical|start"
                  android:orientation="vertical">
        <TextView android:id="@+id/action_bar_title"
                  android:layout_width="wrap_content"
                  android:layout_height="wrap_content"
                  android:singleLine="true"
                  android:ellipsize="end" />
        <TextView android:id="@+id/action_bar_subtitle"
                  android:layout_width="wrap_content"
                  android:layout_height="wrap_content"
                  android:layout_marginTop="@dimen/action_bar_subtitle_top_margin"
                  android:singleLine="true"
                  android:ellipsize="end"
                  android:visibility="gone" />
    </LinearLayout>
</LinearLayout>
可以看到标题包含一个ImageView和两个TextView,这两个TextView分别为主标题视图和子标题视图,以下就是这个mUpGoerFive的组成: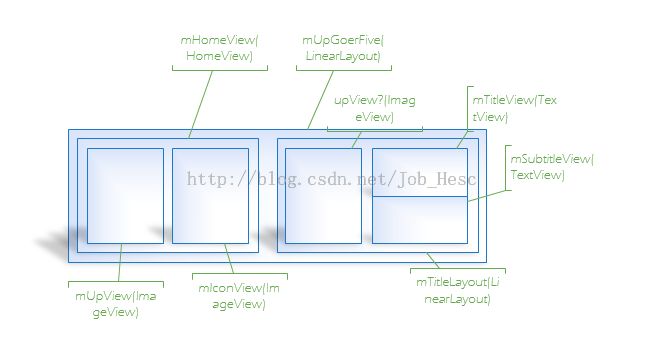
- 内部类ExpandedActionViewMenuPresenter的方法expandItemActionView(),这是当点击MenuItem时调用expandItemActionView()方法,在这个方法中,首先获取到MenuItem的ActionView,然后把ActionView放置到ActionBarView中,通俗一点讲,就是当为菜单项配置ActionView后,在点击该菜单时,就会调用expandItemActionView()方法把这个ActionView显示到ActionBar中;对于菜单装载的详细机制,后面章节会提到。
- 普通情况下的布局:
至此,ActionBar的初始化过程及布局介绍就到处为止,下一篇根据ActionBar涉及的类图来分析ActionBar的运行机制,敬请期待
