D3D中的颜色
颜色表示法
在Direct3D中,颜色是使用RGB三部分来描述的。也就是说,我们要分别指定红、绿和蓝三种颜色的值。混合这三个颜色决定最终的颜色。利用这三种颜色我们能够表现数万种颜色。
我们使用两种不同的结构来存储RGB数据。这第一种是D3DCOLOR,它实际上是一个DWORD类型即32位。在D3DCOLOR类型中的这些位按照8-bit被分为4个部分,每一部分存储的是该色的亮度值。如图4.1所示。
每种颜色占用内存的一个字节,各颜色亮度值的取值范围是0-255。这个值越接近0就越暗,越接近255就越亮。
注意:现在不要管alpha部分;它被用在alpha混合中。
指定其中的每一部分并且把它放到D3DCOLOR中适当的位置需要使用到一些位操作。Direct3D为我们提供了一个完成这个任务的宏D3DCOLOR_ARGB.它使用包含每种颜色以及alpha位一共4个参数。每一个参数的取值必须在0-255之间,如:
| D3DCOLOR brightRed = D3DCOLOR_ARGB(255, 255, 0, 0); D3DCOLOR someColor = D3DCOLOR_ARGB(255, 144, 87, 201); |
另外,我们也能使用D3DCOLOR_XRGB宏,它与刚才的宏类似只不过不必指定alpha部分;不过我们最好还是把alpha指定为0xff(255)。
| #define D3DCOLOR_XRGB(r,g,b) D3DCOLOR_ARGB(0xff,r,g,b) |
在Direct3D中另外一种存储颜色的结构是D3DCOLORVALUE。在这个结构中,我们分别使用一个浮点数来表示每一部分的亮度值。其取值范围是0-1,0表示没有亮度,1表示最大亮度。
| typedef struct _D3DCOLORVALUE { float r; // the red component, range 0.0-1.0 float g; // the green component, range 0.0-1.0 float b; // the blue component, range 0.0-1.0 float a; // the alpha component, range 0.0-1.0 } D3DCOLORVALUE; |
另外,我们能够使用D3DXCOLOR结构,就象D3DCOLORVALUE包含同样的数据成员一样。同时提供有用的构造函数和重载操作符,这将让颜色处理更容易。D3DXCOLOR的定义如下:
| typedef struct D3DXCOLOR { #ifdef __cplusplus public: D3DXCOLOR() {} D3DXCOLOR( DWORD argb ); D3DXCOLOR( CONST FLOAT * ); D3DXCOLOR( CONST D3DXFLOAT16 * ); D3DXCOLOR( CONST D3DCOLORVALUE& ); D3DXCOLOR( FLOAT r, FLOAT g, FLOAT b, FLOAT a );
// casting operator DWORD () const;
operator FLOAT* (); operator CONST FLOAT* () const; operator D3DCOLORVALUE* (); operator CONST D3DCOLORVALUE* () const; operator D3DCOLORVALUE& (); operator CONST D3DCOLORVALUE& () const;
// assignment operators D3DXCOLOR& operator += ( CONST D3DXCOLOR& ); D3DXCOLOR& operator -= ( CONST D3DXCOLOR& ); D3DXCOLOR& operator *= ( FLOAT ); D3DXCOLOR& operator /= ( FLOAT );
// unary operators D3DXCOLOR operator + () const; D3DXCOLOR operator - () const;
// binary operators D3DXCOLOR operator + ( CONST D3DXCOLOR& ) const; D3DXCOLOR operator - ( CONST D3DXCOLOR& ) const; D3DXCOLOR operator * ( FLOAT ) const; D3DXCOLOR operator / ( FLOAT ) const;
friend D3DXCOLOR operator * (FLOAT, CONST D3DXCOLOR& );
BOOL operator == ( CONST D3DXCOLOR& ) const; BOOL operator != ( CONST D3DXCOLOR& ) const; #endif //__cplusplus FLOAT r, g, b, a; } D3DXCOLOR, *LPD3DXCOLOR; |
注意:D3DCOLORVALUE和D3DXCOLOR结构都有4个浮点数成员。这使我们的颜色处理符号能象4D向量一样。颜色向量能被加,减以及缩放。另一方面点积和叉积不能用于颜色向量,但是颜色成员相乘是可以的。因此在D3DXCOLOR类中执行的乘法就是成员相乘。它的定义如下:
现在使用下面全局颜色常量更新我们的d3dUtility.h文件:
const D3DXCOLOR BLACK = D3DCOLOR_XRGB( 0 , 0 , 0 );
const D3DXCOLOR RED = D3DCOLOR_XRGB( 255 , 0 , 0 );
const D3DXCOLOR GREEN = D3DCOLOR_XRGB( 0 , 255 , 0 );
const D3DXCOLOR BLUE = D3DCOLOR_XRGB( 0 , 0 , 255 );
const D3DXCOLOR YELLOW = D3DCOLOR_XRGB( 255 , 255 , 0 );
const D3DXCOLOR CYAN = D3DCOLOR_XRGB( 0 , 255 , 255 );
const D3DXCOLOR MAGENTA = D3DCOLOR_XRGB( 255 , 0 , 255 );
4.2 顶点颜色
图元的颜色是由构成它的顶点的颜色决定的。因此,我们必须把一个颜色成员加入到我们的顶点数据结构中。注意D3DCOLORVALUE类型不能用在这里,因为Direct3D希望用一个32位的值来描述顶点的颜色。(通过使用顶点着色器我们能为顶点颜色使用4D颜色向量,它能提供一个128位的颜色。{
public :
float m_x, m_y, m_z;
D3DCOLOR m_color;
cColorVertex() {}
cColorVertex( float x, float y, float z, D3DCOLOR color)
{
m_x = x;
m_y = y;
m_z = z;
m_color = color;
}
};
const DWORD COLOR_VERTEX_FVF = D3DFVF_XYZ | D3DFVF_DIFFUSE;
4.3 着色处理
着色处理发生在光栅化和指定图元上的顶点颜色怎样被计算成像素颜色之间。目前这里有2种着色处理模式可用:平面着色(flat shading)和高洛德着色(Gouraud shading)。
平面着色,图元像素的颜色是均匀的,且就是指定图元第一个顶点的颜色。因此一旦三角形的第一个顶点被指定成红色,那么它的其他三个顶点也将会是红色。通过使用平面着色来为第二和第三个顶点着色。
| ColorVertex t[3]; t[0]._color = D3DCOLOR_X#ff0000; t[1]._color = D3DCOLOR_X#00ff00; t[2]._color = D3DCOLOR_X#0000ff; |
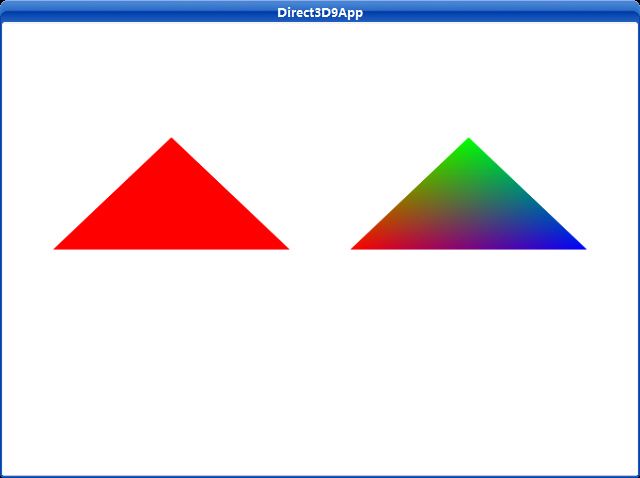
平面着色使物体呈现是斑驳的,因为没有从一个颜色到另一个颜色的平滑过渡。一个更好的着色模式叫做高洛德着色(也被叫做平滑着色)。高洛德着色,图元表面的颜色是由每个顶点通过线性插值来赋予。图4.2显示了分别使用平面着色和高洛德着色处理的红色三角形。
图4.2
就象Direct3D中很多东西一样,着色处理模式是受Direct3D设置状态决定的。
| // set flat shading Device->SetRenderState(D3DRS_SHADEMODE, D3DSHADE_FLAT); // set Gouraud shading Device->SetRenderState(D3DRS_SHADEMODE, D3DSHADE_GOURAUD); |
4.4 实例程序:彩色三角形
这个实例程序展示了分别使用本章中的平面着色和高洛德着色处理的三角形。渲染出的图片如图4.2所示。Renders two colored triangles, one shaded with flat shading and the other shaded
with Gouraud shading. Demontrates vertex colors and the shading render states.
************************************************************************************* */
#include " d3dUtility.h "
#pragma warning(disable : 4100 )
class cColorVertex
{
public :
float m_x, m_y, m_z;
D3DCOLOR m_color;
cColorVertex() {}
cColorVertex( float x, float y, float z, D3DCOLOR color)
{
m_x = x;
m_y = y;
m_z = z;
m_color = color;
}
};
const DWORD COLOR_VERTEX_FVF = D3DFVF_XYZ | D3DFVF_DIFFUSE;
/////////////////////////////////////////////////////////////////////////////////////////////////// /
const int WIDTH = 640 ;
const int HEIGHT = 480 ;
D3DXMATRIX g_world_matrix;
IDirect3DDevice9 * g_d3d_device = NULL;
IDirect3DVertexBuffer9 * g_triangle_vb = NULL;
/////////////////////////////////////////////////////////////////////////////////////////////////// /
bool setup()
{
g_d3d_device -> CreateVertexBuffer( 3 * sizeof (cColorVertex), D3DUSAGE_WRITEONLY, COLOR_VERTEX_FVF,
D3DPOOL_MANAGED, & g_triangle_vb, NULL);
// fill the buffers with the triangle data
cColorVertex * vertices;
g_triangle_vb -> Lock( 0 , 0 , ( void ** ) & vertices, 0 );
vertices[ 0 ] = cColorVertex( - 1.0f , 0.0f , 2.0f , D3DCOLOR_XRGB( 255 , 0 , 0 ));
vertices[ 1 ] = cColorVertex( 0.0f , 1.0f , 2.0f , D3DCOLOR_XRGB( 0 , 255 , 0 ));
vertices[ 2 ] = cColorVertex( 1.0f , 0.0f , 2.0f , D3DCOLOR_XRGB( 0 , 0 , 255 ));
g_triangle_vb -> Unlock();
// set the projection matrix
D3DXMATRIX proj;
D3DXMatrixPerspectiveFovLH( & proj, D3DX_PI * 0.5f , ( float )WIDTH / HEIGHT, 1.0f , 1000.0f );
g_d3d_device -> SetTransform(D3DTS_PROJECTION, & proj);
// turn off lighting
g_d3d_device -> SetRenderState(D3DRS_LIGHTING, false );
return true ;
}
void cleanup()
{
safe_release < IDirect3DVertexBuffer9 *> (g_triangle_vb);
}
bool display( float time_delta)
{
g_d3d_device -> Clear( 0 , NULL, D3DCLEAR_TARGET | D3DCLEAR_ZBUFFER, 0xffffffff , 1.0f , 0 );
g_d3d_device -> BeginScene();
g_d3d_device -> SetStreamSource( 0 , g_triangle_vb, 0 , sizeof (cColorVertex));
g_d3d_device -> SetFVF(COLOR_VERTEX_FVF);
// draw the triangle to the left with flat shading
D3DXMatrixTranslation( & g_world_matrix, - 1.25f , 0.0f , 0.0f );
g_d3d_device -> SetTransform(D3DTS_WORLD, & g_world_matrix);
g_d3d_device -> SetRenderState(D3DRS_SHADEMODE, D3DSHADE_FLAT);
g_d3d_device -> DrawPrimitive(D3DPT_TRIANGLELIST, 0 , 1 );
// draw the triangle to the right with gouraud shading
D3DXMatrixTranslation( & g_world_matrix, 1.25f , 0.0f , 0.0f );
g_d3d_device -> SetTransform(D3DTS_WORLD, & g_world_matrix);
g_d3d_device -> SetRenderState(D3DRS_SHADEMODE, D3DSHADE_GOURAUD);
g_d3d_device -> DrawPrimitive(D3DPT_TRIANGLELIST, 0 , 1 );
g_d3d_device -> EndScene();
g_d3d_device -> Present(NULL, NULL, NULL, NULL);
return true ;
}
LRESULT CALLBACK wnd_proc(HWND hwnd, UINT msg, WPARAM word_param, LPARAM long_param)
{
switch (msg)
{
case WM_DESTROY:
PostQuitMessage( 0 );
break ;
case WM_KEYDOWN:
if (word_param == VK_ESCAPE)
DestroyWindow(hwnd);
break ;
}
return DefWindowProc(hwnd, msg, word_param, long_param);
}
int WINAPI WinMain(HINSTANCE inst, HINSTANCE, PSTR cmd_line, int cmd_show)
{
if ( ! init_d3d(inst, WIDTH, HEIGHT, true , D3DDEVTYPE_HAL, & g_d3d_device))
{
MessageBox(NULL, " init_d3d() - failed. " , 0 , MB_OK);
return 0 ;
}
if ( ! setup())
{
MessageBox(NULL, " Steup() - failed. " , 0 , MB_OK);
return 0 ;
}
enter_msg_loop(display);
cleanup();
g_d3d_device -> Release();
return 0 ;
}
setup方法创建顶点缓存同时填充上带颜色信息的三角形顶点数据。三角形的第一个顶点填充为全亮度红色(255)第二个填充全亮度绿色(255),第三个填充全亮度蓝色(255)。最后,在这个例子中我们屏蔽掉灯光。值得注意的是该例子使用的是一个新的ColorVertex结构,就象在4.2节中说明的一样。
display函数使用不同的着色模式在两个不同的地方分别绘制2个Triangle。每个三角形的位置由世界矩阵g_world_matrix来决定。
下载源程序

